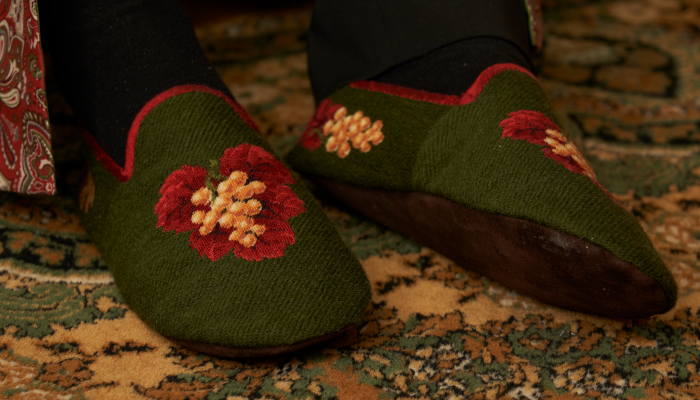
Berlin work
slippers, 2022
Me and needlepoint go back a long time. My mom had made a few and bought me my first printed kit when I was quite young. I finished it, even though it took some time, and my mom still has it framed on the wall. Then I discovered the technique again as a teenager, even though it was something old ladies would do and decidedly uncool. But then I was an odd teen and a bit lonely. I lived in the countryside in the middle of nowhere, when we finally got internet the connection was slower than anything you can imagine today, and even tv signals were so crappy that in bad weather only one of the three or four channels looked clear. Yes, I make it sound totally miserable, but on the positive note, there was a library next to school in the town, I did crafts and some embarrassing juvenile efforts at writing, and we had a dearly beloved dog. Actually, that sounds like some persons cottagecore fantasy nowadays.
So, needlepoint became a sort of comfort object to me, and I still find the sound of a wool thread passing through the canvas incredibly soothing. Later, when I got a boyfriend, moved into a bigger city and life generally got busier I gradually abandoned needlepoint, especially as I didn’t really like framed works on my walls anymore. I had left most at my childhood home anyway. Still later, when I began historical costuming and re-enacting I simply didn’t have time for any modern crafts save occasional knitting. But when I finally got to 19th century, at some point I realized that one of my favorite crafts was period correct again.
Berlin work or Berlin wool work seems to have been a popular pastime for Victorian ladies, and it’s easy to understand why. The technique itself is quite simple, so by following a printed chart you could create beautiful textiles without being exceptionally skilled or artistic. The invention of chemical textile dyes in 1850s made a range of new vivid colours available.
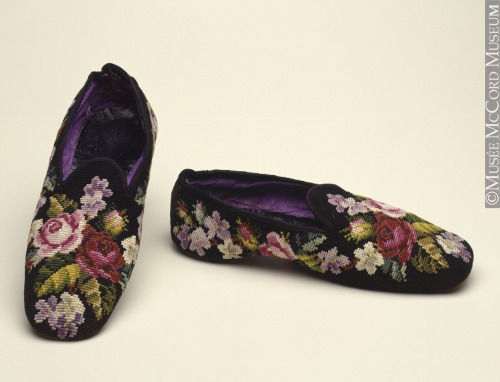
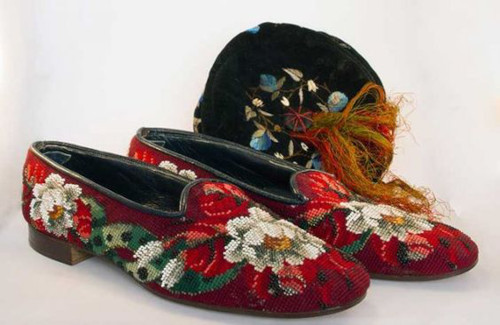
Men's slippers ca 1860, The McCord Museum
Various pieces of home decoration were popular embroidery projects, but so were also slippers, which seem to have been popular gift items. I have been joking that some Christmas yet to come my long-suffering husband will unwrap a pair of slippers with an all-over pattern of roses. (Yes, the patterns for men’s slippers were often just as rainbow colored and floral as women’s - either gentlemen in the period weren’t as restricted in their taste or alternatively the lady making them picked a pattern that appealed to her own taste, much like choosing the color for woollen socks nowadays)
I also got an idea to make him a fancy Victorian smoking jacket / dressing gown - combination, so I decided to start both, because why not?
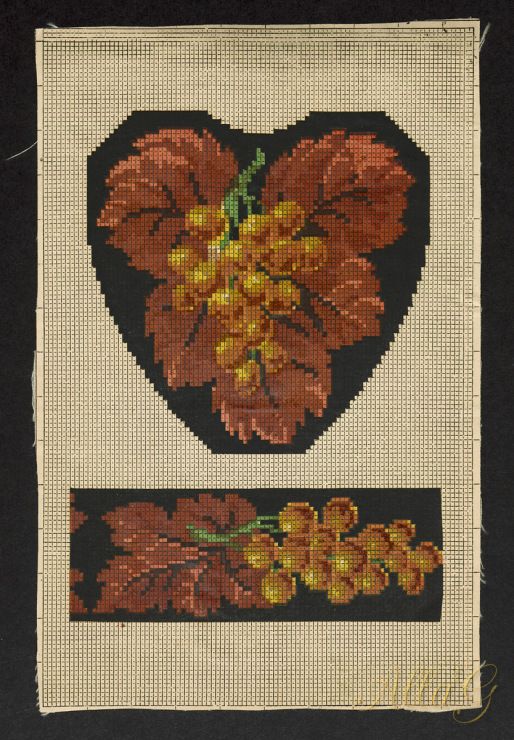
The
embroidery pattern
Many original printed and hand painted charts are available on the internet today, though the quality of the pictures varies, not to mention the possible fading of the original, so some can be hard to decipher. As mentioned above, many designs for men’s slippers are very similar to women’s, and while Jarno likes bright colors, magenta pink roses might be a bit too much for him. I looked at some geometrical designs, but then thought that some nature inspired image would be more interesting to make.
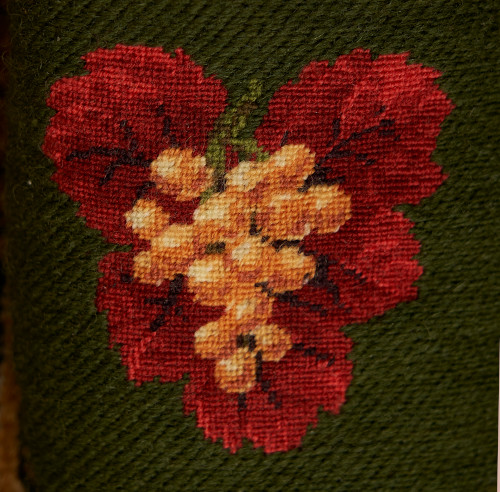
I finally chose this pattern with grapes and leaves, which is both beautiful and can be considered manly for the Bacchus symbolism evocative of relaxing after a good dinner with port and cigars. The scanned image of the original was relatively clear, and I colored some colors a bit stronger with pencils.
Unfortunately I couldn’t find a source or date, but then I had already decided to pick a design that appealed to me even if it was a decade or two off from the tentative period of my own Victorian wardrobe or the smoking jacket / dressing gown - combination I was also making.
The
Materials
Finding the materials was, as ever, a bit of a challenge. I guess there are web shops specialized in embroidery fabrics out there, but I tried local sources first. Aida does not work with thicker wool thread and needlepoint canvas is usually too large in scale for delicate motifs. Or course at this point there was the extra complication that I was already planning to make myself a pair too later and would prefer the same material work for both, especially if I had to order it.
Happily a wonderful craft shop in Helsinki called Hobby Point had a stiff, bucram-type canvas with a thread count of 8,8 threads per centimeter. Normal 4-ply needlepoint wool worked well when stitching over two threads and by splitting it in half I got the right thickness for stitching over every thread. This allowed the same material to be used for projects in a different scale.
I thought that the stiffness of the material might also be an advantage as canvas all too easily twists out of shape and gets softer. Additionally it might even work for millinery if and when I wanted to try proper bucram and wire - construction.
I still had a stash of miscellaneous leftover wools from old projects, so I began choosing colours from there. I liked the original soft, autumnal colour palette, but as I had already found the perfect fabric for the dressing gown / smoking jacket I was perfectionistic enough to try to pick similar colours.
I kept the yellow to golden orange colour range on the grapes, especially as I was lucky enough to find the wools from the stash. The large leaves were changed from brown to red to match the prominent brick red in the dressing gown print. In a Victorian context you can’t go wrong with brighter colours.
The original chart had a dark background, which of course sets off the colours. Black backrounds were popular in the period. But as I really wanted to stick to matching the slippers to the dressing gown I was tempted by the idea of a green background, especially as I had a ball of knitting yarn that matched the velvet I used for collar and cuffs. Red and green always provide a nice contrast. I also thought that knitting yarn for socks would be much more resistant to abrasion on the toe, heel and next to the sole, so it might actually be a sound idea for a backround. And of course it was much cheaper than several skeins of embroidery wool.
Talking about embroidery skeins, the leaves had three shades of red and I found only one suitable from stash, so I had to buy the two darker ones, but I’m pretty pleased about being able to pull most from the stash - a little reward for hoarding them all these years.
Planning
the Construction
Embroidery is nice and easy, making shoes is not! According to “19th Century Embroidery Techniques” (Gail Marsh) ladies used to take the finished canvas to a cobbler who had the tools and expertise to make them into finished slippers. Many of the museum pieces I looked at are actually more like proper shoes with heel and hard sole rather than flat slippers.
Augusta Auctions
If I wanted to go for this look one option might have been to take apart a pair of thrifted shoes and cover them again like I have upcycled shoes for myself, but in the end it would be much easier to make just very basic soft slippers even if the finish would look very amateurish. After all, my motivation was not really creating a perfect replica but rather getting to enjoy the embroidery.
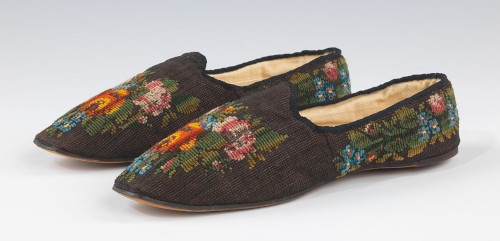
1865–85, The
Metropolitan Museum
There were slippers with seemingly more simple construction on the period, too. Still, they look very neat and beyond my skill level, but more realistic and also comfy.
Jarno didn’t happen to have anything similar for pattern reference, and my first effort based on measuring sneakers ended up way too large and generally pathetic. I had once upon a time begun making a pair of medieval turnshoes for him, never finished because I realized how affordable decent ready made can be, but at least I had some rudimentary experience on soft footwear patterns. So, next I just drew the outline of his sole on cardboard, added a bit of extra length and cut it out on synthetic felt. Then I began to pin a roughly right shaped piece of fabric on it, fitting it on his foot.
On the original slippers the toe is usually square or gently rounded, and the embroidery chart patterns don’t seem to make a difference between the right and left foot - or maybe the cobbler adjusted them a bit while finishing them. The problem was that this nice symmetrical look just doesn’t work on Jarno’s foot shape. It might have worked on sturdier shoes, but soft slippers would either look lopsided or wear out of shape very fast.
Considering this I aimed for a sort of compromise between period shape and good fit. The pattern with separate designs for toe and sides also helpfully allowed for seams on the sides, which would be convenient if I had to fine tune the fit a bit more.
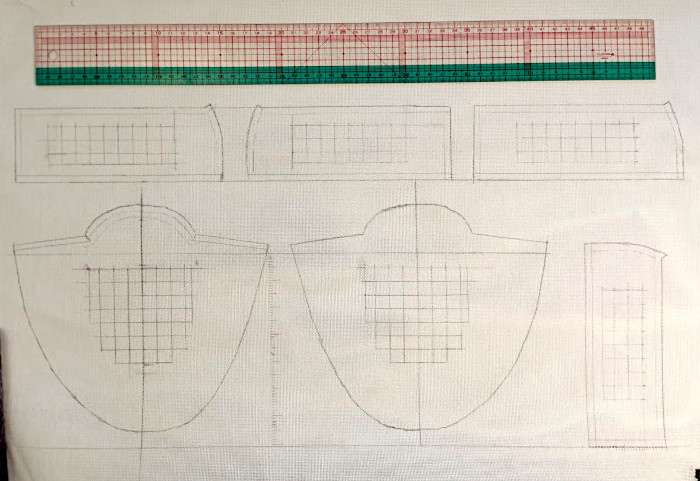
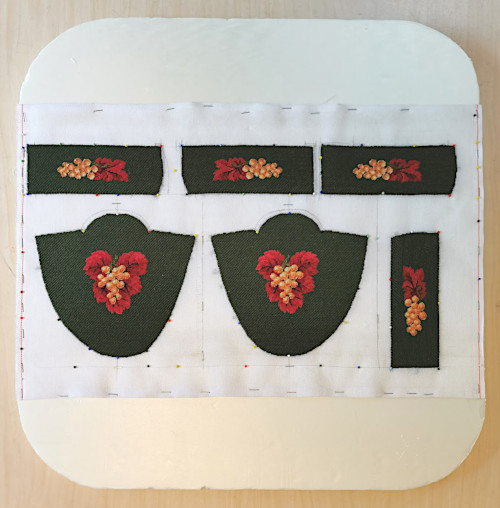
When I had the pattern I could really plan how to place the embroidery designs. And there I ran into a big problem: I had somehow managed to miscalculate the scale and it turned out that worked over two threads, like I had planned, the embroidery pattern wouldn’t fit in at least at the narrow sides. This was incredibly stupid. I didn’t think there was much chance of finding a canvas with exactly right thread count, and besides I was in a hurry to get started, so I just decided to shrink the design even if it meant much more work and looked too tiny.
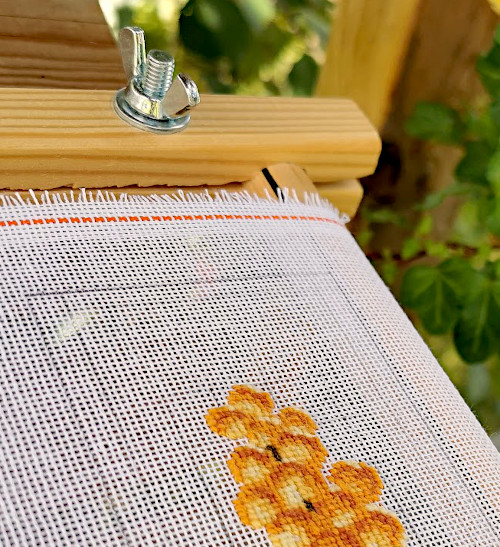
I transferred all the pattern edges with seam allowances on the canvas with a pencil, and also drew a grid of ten thread squares where the embroidery would go to help with counting. As most threads were in strong colours there wouldn’t be much risk of the markings showing through the finished surface, but I still tried to mark them lightly, with the result that I had to darken them occasionally when they wore out.
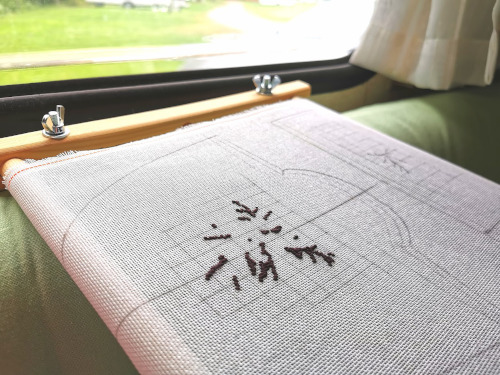
The
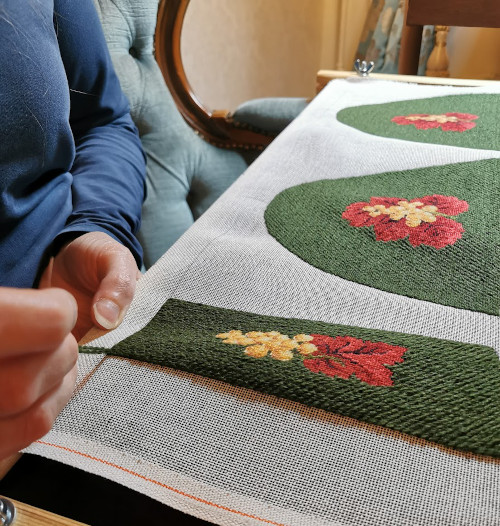
Embroidering
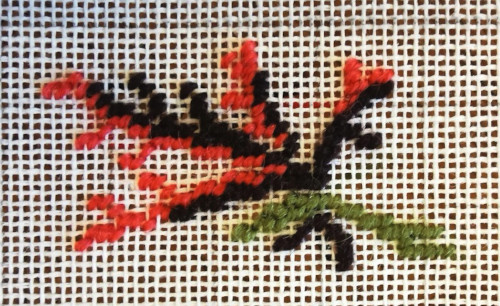
I began with the big designs on the toe.
First I finished the dark leaf veins that provided a good base
for counting other stitches. I had first marked them in pencil,
and continued to mark stitch places with coloured pencils here
and there, especially when jumping farther from earlier
stitching where it was not convenient to count from them. 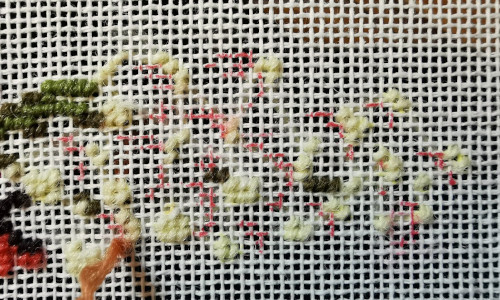
In the small scale it was really easy to count wrong, and this also happened also in the marking stage, so I tried to carefully double check. Still, there are of course small misplaced stitches here and there, but they aren’t really noticeable from any distance. I also made some minor alterations to the original pattern where it looked weird or was not clear enough to be sure.
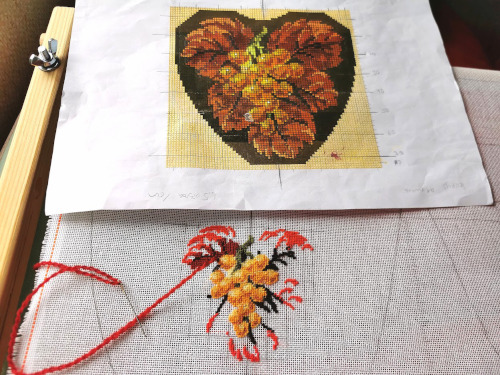
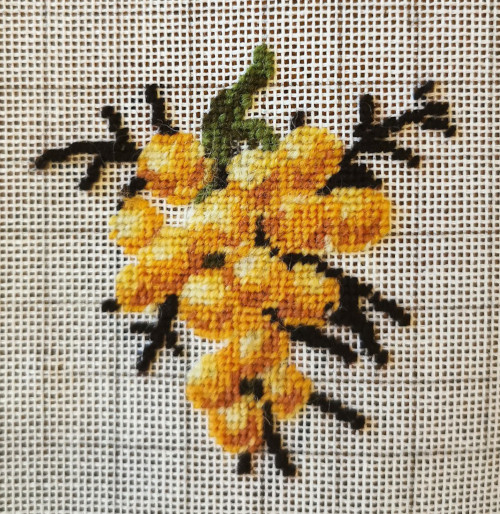
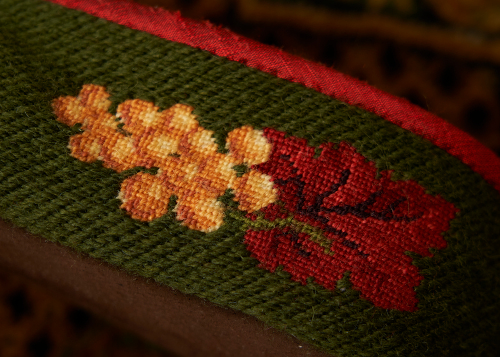
After the veins I began the grapes, mostly beginning with the lightest shade, then adding the darkest and after that filling in the rest. It would have been smart too work on both identical designs at the same time, when you might actually still remember some of the quirks in the pattern, but after the first few colours I became too impatient to see how it would look finished and continued with only one.
After finishing the grapes I moved on to the reds in the leaf, beginning from the lightest shades at the edges. I’m not completely happy with my choice of the two darker ones, however. The golden rule in embroidery is to choose shades that are not too close if you want a three dimensional look, except of course when there is like 5 or more different shades of the color. The two reds are harmonious, but in a certain light they almost blend together and make the very dark veins look too heavy.
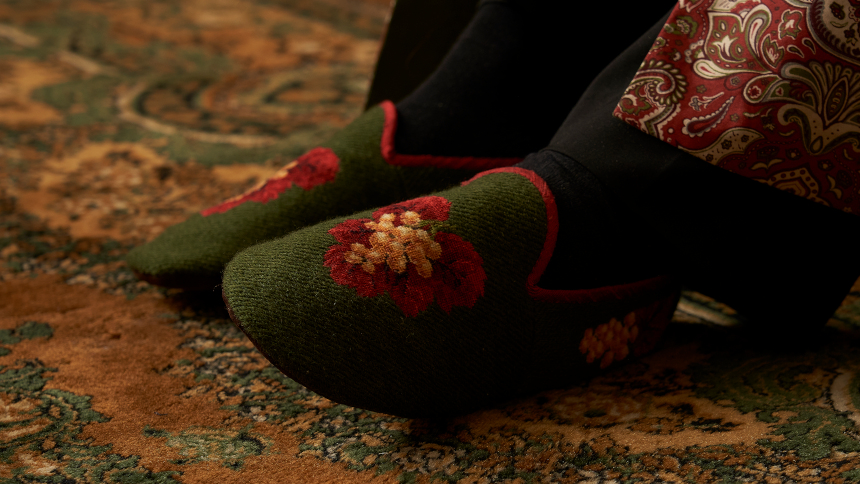
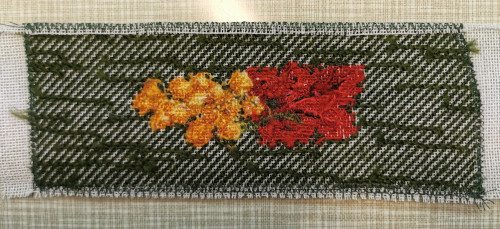
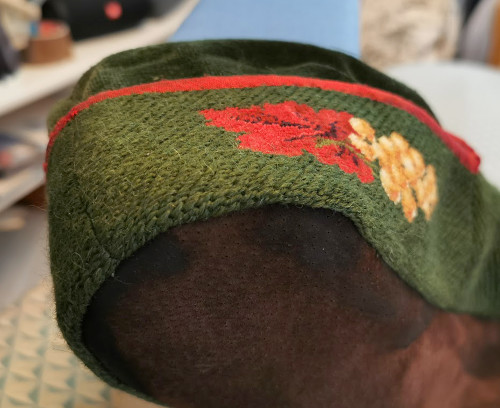
After finishing the toe designs I moved to the sides. Again I began with the leaf veins, then added the lightest red which mostly followed the veins. After the green stems I worked the golden grapes and then finished the leaf.
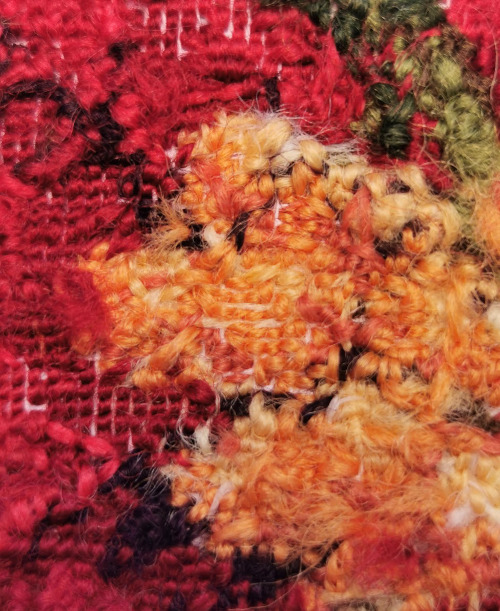
By the way, I have always been strangely fascinated by the underside of a petit point canvas. There the underside of stitches changes directions, threads criss cross over each other, but still you can see the outline of the pattern in the colourful jumble.
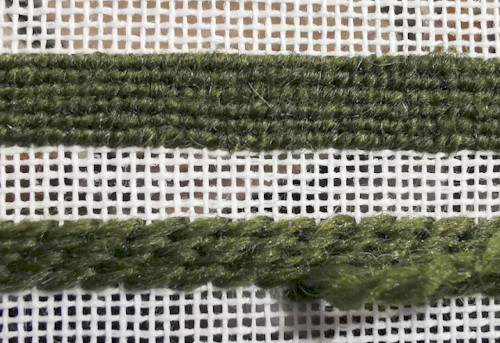
I also began filling the background at this point so I could alternate between it and the side designs, so the former would not get unbearably tedious or the latter tire my eyes too much. And of course, therein waited another complication!
After working a few rows I realized that the knitting yarn was just slightly too thick and twisted the canvas. I guess I could have found something else, but then I began to toy with the idea of changing the backround stitch instead. I tried a tent stitch over three threads for a few rows for comparison, and found that it created a really nice, even surface without pulling the canvas, and also covered it extremely well.
Was this option a period correct one? That’s a good question. There seems to have been berlin work items combining different types of stitches, but I haven’t seen it done in slippers (Though, to be fair, I haven’t looked at that many). There are light colored slippers where the background canvas had been left unworked outside the embroidery, but obviously that was out of the question here.
Then, of course there are many larger pieces like fire screens where the finer details, such as the figure’s faces have been worked in smaller stitch and the rest over two threads, which might be plausible, but the different stitches might not blend in well at the irregular leaf edges. The tent stitch option would at least keep the rows in even height.
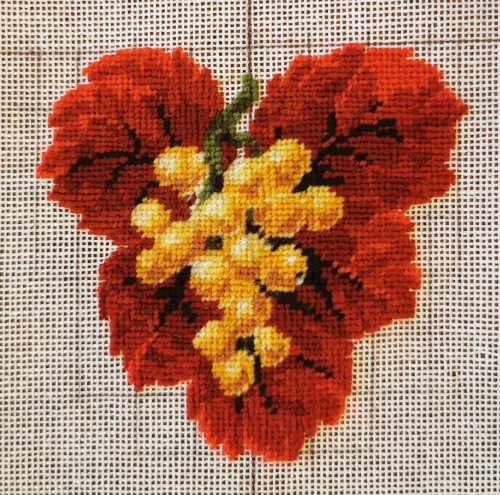
So, in the end I chose to go with the tent stitch, because as stated before, I wasn’t making a replica but rather an Victorian inspired embroidery project. Another strong temptation was the lightning speed of the tent stitch after I got the hang of it after a few rows. The weekend house party where Jarno would actually get to wear these was fast approaching, and the original change of scale had doubled the stitch count and messed up my already optimistic schedule.
I also found that on an aesthetic level I really liked the smooth, soft surface created by tent stitch. It almost looks like a woven textile.
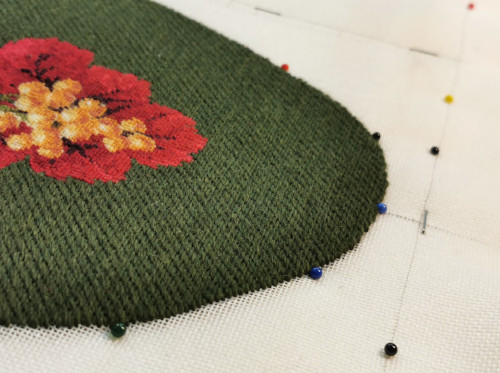
After finally finishing figures and background in all the pattern pieces I removed the canvas from the frame. Despite the frame the stitches had pulled it a bit out of shape. Happily I had marked the center lines of the toe pieces and now I drew several other straight lines on the canvas to help to get it straight again. Then I steamed it thoroughly and pinned it on a styrofoam board.
Sewing the
slippers
While the embroidery had offered some surprises I was most terrified about somehow ruining the slippers in the assembly stage. When drafting and fine-tuning the pattern I had tried to estimate how much extra allowance the seams and lining might take, not to mention the likelihood of the canvas twisting.
Despite pinning the canvas on a board I had not managed to pull it totally straight again, especially as I didn’t have time to leave there for longer than maybe two days. After unpinning it I marked all the pattern edges again. The side seams proved indispensable at this point, as they made it possible to adjust the shape to be a bit straighter.
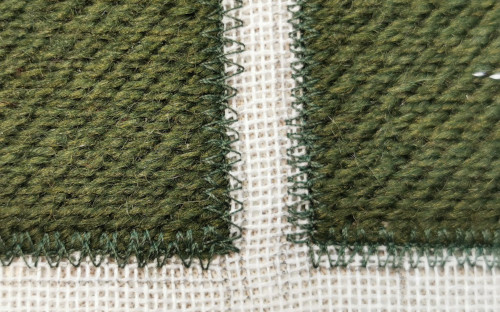
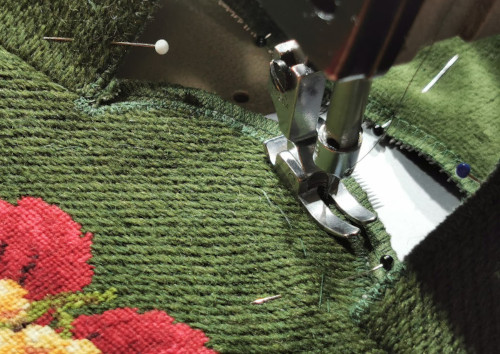
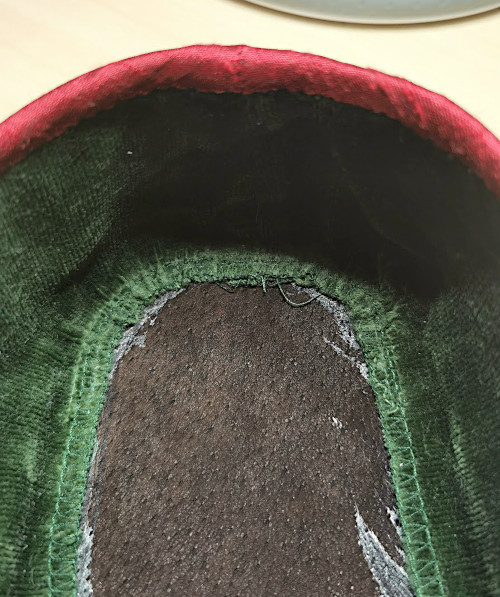
Then I sewed a double zig zag over all the seam allowances to keep the canvas from fraying. At the top edge, which would be finished with a tape, I sewed first one row of zig zag over the embroidery edge, then turned the seam allowance under and added another row of zig zag through both layers.
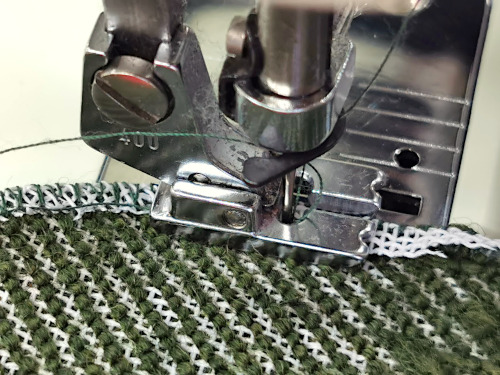
After reinforcing all the edges I trimmed the seam allowances and sewed the back and side seams, and very gently ironed them open through a wet gauze rag.
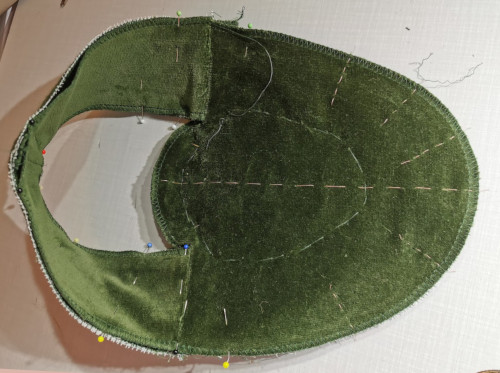
I made the lining from the same green velveteen I had used for the collars and cuffs of the dressing gown. It was soft and comfy and would also hopefully keep the bulky sole seam from chafing too much.
I cut the top edge of the side pieces without seam allowance, but left a wider one on the curved front edge. I run all the edges with overlock before sewing (that’s what you always do with velvet if you are smart)
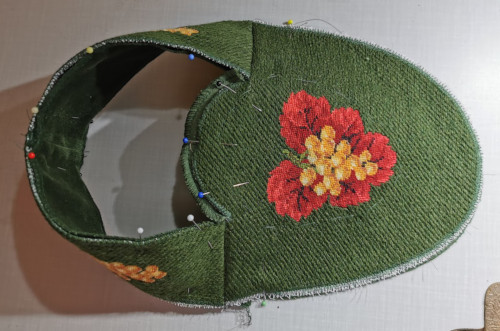
I pinned the lining on inside the embroidered top piece and checked that they matched smoothly. Then I basted them together at the top of the toe part to keep them aligned throughout all the turning inside out and back again to come.
Then I sewed the top edges together. At the curved front edge I used a dense zig zag for this and reinforced the top of side seams as well to keep them from breaking. Then I trimmed the extra seam allowance on the lining.
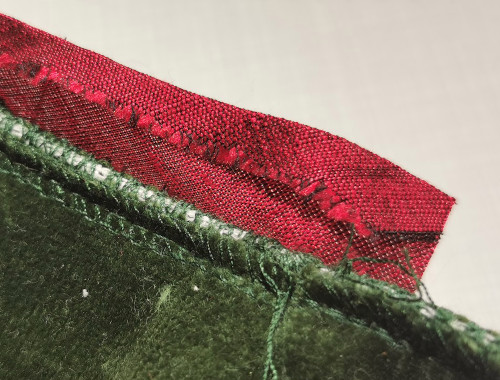
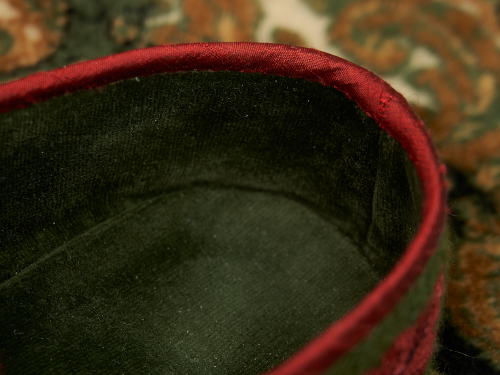
I also thought it would be easiest to sew the edge binding tape at this point before adding the sole. Finding period-accurate looking ribbon can be hard in a world filled with poly cotton satin ribbons and very plain cotton binding tape. Most of the time I cut binding from some suitable material (often ribbons too), especially as binding things with bias tape is so much easier than non-elastic tape, even when it’s not period correct. It was on this period, though.
My final choice of material, however, was not. But when I found leftovers of a ready cut bias tape from my stash in the perfect color, I was quite ready to overlook the fact that it was in very lumpy silk dupioni.
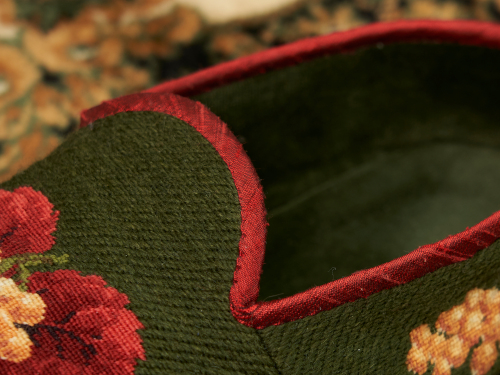
I first sewed the outside edge with machine stitch, save for the curved front edge and the corners, which were much easier to get nice and even by hand. Then I finished the inside edge by hand, going through all layers.
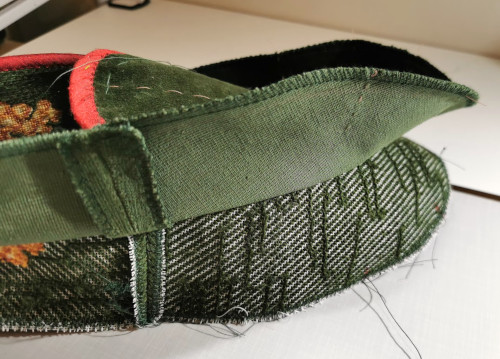
At this point I left the top and lining still separate, as my plan was to join the sole to the upper layer and then finish the lining somehow later.
Amongst other miscellaneous materials I hoard I also had a few plastic bags of leather pieces, among which I found dark brown leather that was stiff but not too thick for my sewing machine.
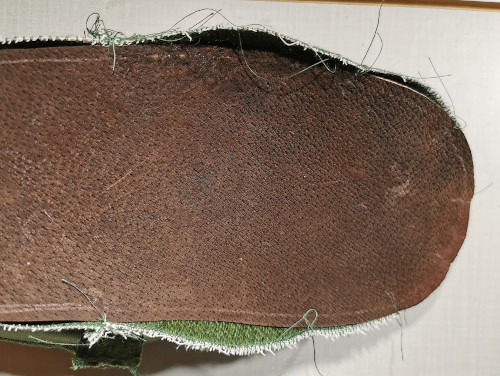
I cut the soles with 0,5cm seam allowance. I basted them at the matched pattern points with a few stitches and then put them under my sewing machine foot, holding my breath. I had mentally prepared to put the soles in by hand if all else failed, but to my happy surprise the machine went over leather and thick embroidery very smoothly and the stitch was very even too. I mean, I had sewed thinner leather on my machine before, and of course tested this beforehand, but I had still been apprehensive about the real thing. Well, sometimes the thing you think is going to be hardest turns out to be really fast and easy instead.

I opened the seams very carefully by ironing gently through a wet gauze, then turned the slippers around and repeated the same on the outside. I also rubbed the steamed materials by hand to further open the seam.
Even though I tried to be very careful I managed to get a few shiny spots on the leather, but otherwise the final result is not bad. At least the sock yarn didn’t show any signs of abrasion or felting.
I was also pleasantly surprised by how well the embroidered canvas molded into the desired shape. Though stiff, the canvas of course has loose weave and soft wool usually shapes beautifully, but I also think that the looser tent stitch helped.
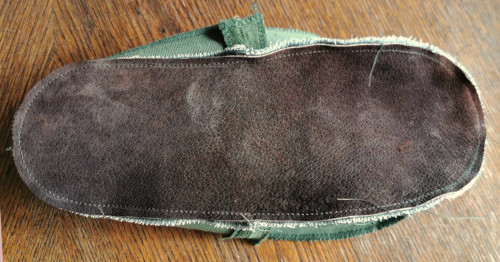
I always use a lot of glue in my shoe upcycling projects (sometimes it’s the biggest cost actually), and the slippers did not entirely escape it either. A nice bonus was working with thick and napped materials, so there was little fear of glue leaking through fabric. I sewed a gathering thread on the lining bottom edge at the toe and heel, and then glued them on the sole over the seam.
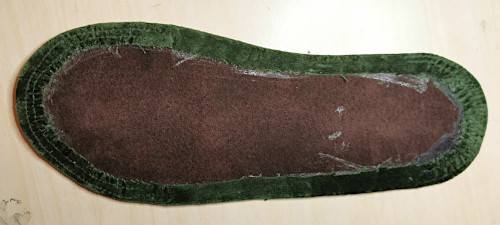
I cut insole pieces of the same leather, then sewed gathering threads around the matching velveteen pieces, glued them on and turned the allowances under, fastening them with a bit more glue. Then I glued the insoles on to cover all the mess underneath. Besides being an easy finish they also stiffened the sole a bit more.
Final
thoughts
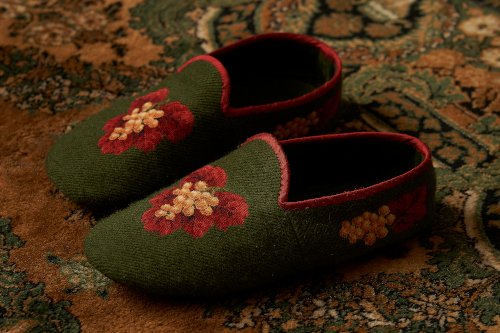
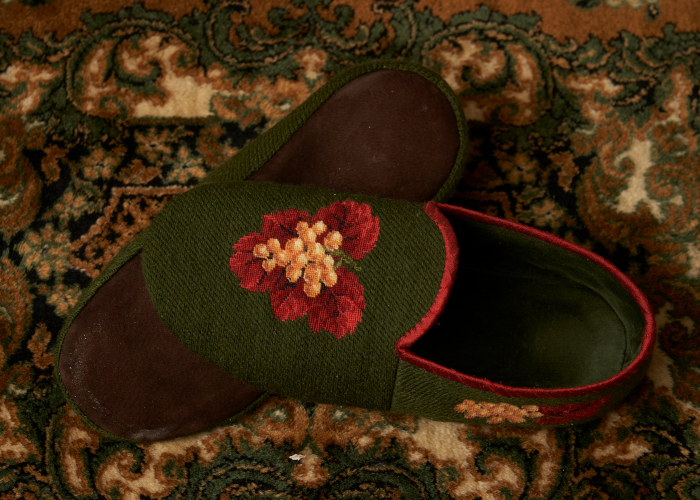
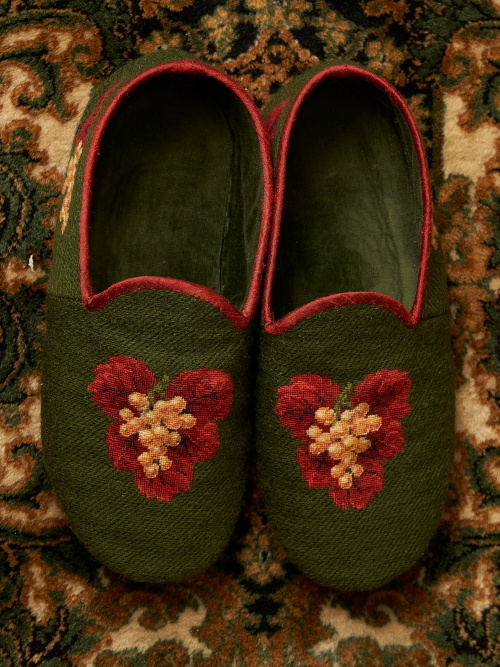
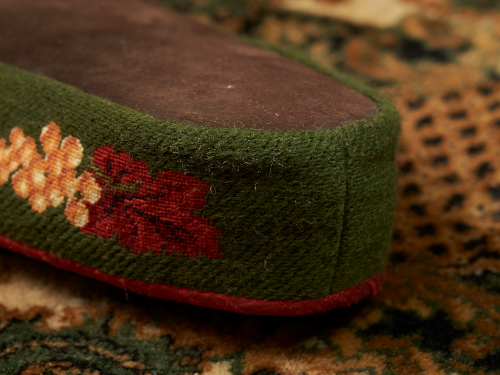
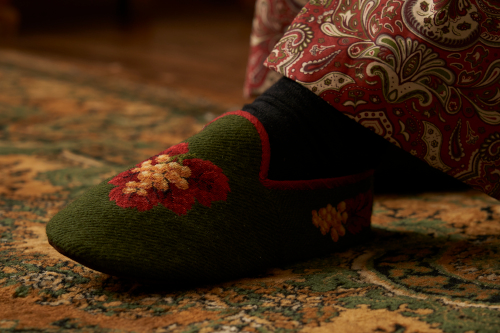
In the end I was rather pleased with the finished slippers, they don’t look like a museum piece but not too bad either. I had been worried that they might still end up too small or large, but happily the size was just right. For some reason I had made the toe part very long and the opening short, so they are a bit tight to put on, but fit when on. I have been told that they are also comfy, but then again after seeing all my work and struggle my husband would hardly dare to tell me otherwise.
The shape is a bit of an issue from a historical point of view, and I wonder if the finished, heavier construction would have kept the toe part shape even with a more square toe and symmetrical shape. The toe is also very flat because I was a bit too afraid of leaving a lot of ease on the upper compared to the sole, while in reality I could probably have easily shaped the embroidered canvas much more.

The main thing, the embroidery was mostly lovely, though towards the end I had to make it in a hurry which kind of spoiled the fun. As stated in the beginning, I have always loved needlepoint, and this project offered both new challenges and rewards.
Following the chart was of course slower than a printed image on canvas. It was familiar from counted cross stitch, which I have also done a bit, but not as much. On the other hand, on most printed canvases the image doesn’t match the stitches and often you have to choose which colour to use for a square where the image has three colours, which can alter the look significantly. Often the result is very pixelated.

Using a stitch chart, however, gives you exactly the same image, though of course in petit point the stitch direction still alters the look. In the tiny scale I ended up with, counting the stitches was sometimes hard for the eyes and I did make some mistakes, but the result was very rewarding. I couldn’t believe I could have so much detail in such a small space! Especially seen from a bit of distance the grape motifs look very alive, quite far from the a bit coarse look that needlepoint works can sometimes have.
Besides the stress of getting them finished in time I really enjoyed making the slippers, and I have also begun another pair for myself. Of course period wardrobe items like these don’t ever get much wear, but whereas many people try to cure themselves from restricting perfectionism my personal goal is to cure myself from restricting practicality. Sometimes you just need to indulge yourself in throwing a huge amount of hours on nice stuff you don’t really need. That being said, I’m still practical enough not to encourage Jarno to wear the slippers at home so that they would get more wear, because, you know, then they would begin to look worn.