Edwardian starter's kit, 2021
In my costuming hobby I generally try to concentrate on a few chosen eras, because once you get into them it becomes easier as you learn more, gather a stash of basic patterns and in time can take on further challenges. Besides, there is the additional work of making all the correct underwear and making or buying the accessories when you jump from era to era.
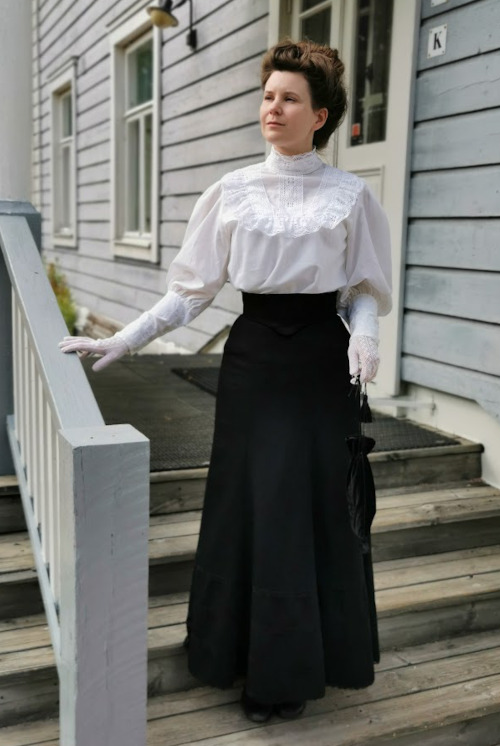
Edwardian costuming and events have become popular in Finland in recent years, and generally I have skipped them for the obvious reason of lacking the right wardrobe but also because the era has never really been that much my thing. But suddenly in the summer of 2020 I was randomly inspired to go to a day event, mainly because due to corona hitting the globe there hadn’t been any events for a while and I wanted to see my costumer friends. I quickly improvised a half-decent outfit of a long black skirt from my gothy days and a white blouse with lace, which actually wasn’t bad at all in cut though all polyester. I only made a quick belt.
The event was really nice and as was only to be expected, while admiring everyone else’s gorgeous creations the era I had previously been a bit lukewarm about suddenly began to look really appealing and my brain automatically went into costume planning mode. This budding dream was soon buried under other pressing matters, though.
Fast forward to the next year when another Edwardian summer event was announced. I didn’t pay much attention at first because I didn’t have proper gear and it was far away in Eastern Finland. But then we decided with my husband that it would actually be nice to take a trip there in our summer holiday and also visit his brother who lives two hours drive from the event place, which is by the way a place worth seeing by itself.
So, at this point I could quite well have chosen to wear my makeshift outfit from previous summer, but the temptation was strong. Before I even knew it I was googling gorgeous lingerie blouses.
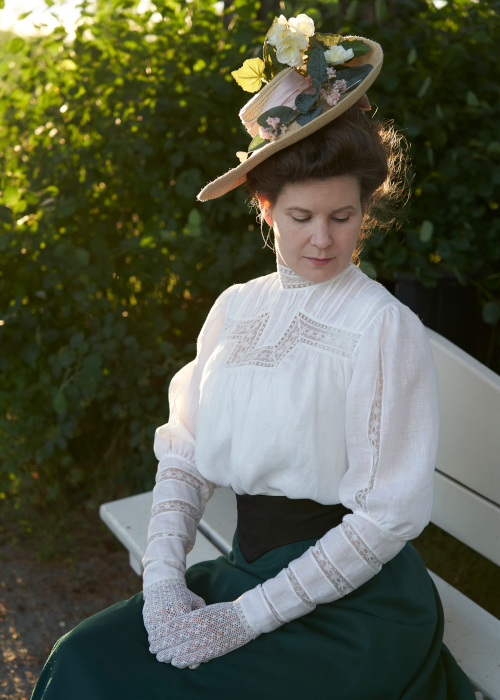
While Edwardian style generally has never quite been my thing I have still always admired the iconic sheer and frothy lingerie dresses. A proper one would of course be totally out of my league, terribly impractical and not even plausible within the time I had before the event, but I thought I could maybe just scramble together a relatively simple blouse with some lace insertions paired with a simple skirt. This combination would function as a sort of basic Edwardian outfit that would enable me to take part in occasional day events in summertime or tea parties indoors.
The obvious extra challenge in embarking on a new era were the undergarments. For the petticoat my 1870s one would do, but corset was the real problem. Edwardian corsetry gives a very distinctive posture which is essential to the style. Studying it, drafting and fitting the patterns and sewing a proper corset was again unrealistic within the timeframe, and to be honest I wasn’t still committed to the era enough to put that much effort into it. Besides, a real deal ultra fashionable Edwardian corset is said to be notoriously uncomfortable (though those who have more experience on wearing them might know better), and due to my stomach problems I just can’t do super tight lacing, even though I know that much of the nipped in waist silhouette was actually achieved by hip padding.
So, I reasoned that not all women would have used the super fashionable tight corsets, and as I get a decent hip curve even on a comfortably laced Natural Form corset I could just go with that. A full cut blouse would create the pigeon breast silhouette on the front anyway.
Choosing the style
At this period fashion changed really fast, so first of all I had to pick a year. The first few years of 20th century have a very low pigeon breast silhouette paired with bishop sleeves, which seemed a bit heavy to me and would probably look more so on me as my hipline is wider than my shoulders. On the other end of the era the style around 1910 is very charming, but then the fashionable silhouette begins to be more long and narrow and I was afraid that this wouldn’t work very well with my curvy hips either. Maybe I’m just being over-critical, but I like to achieve the style ideals if only possible and have become quite spoiled by how great I feel in Natural Form fashions.
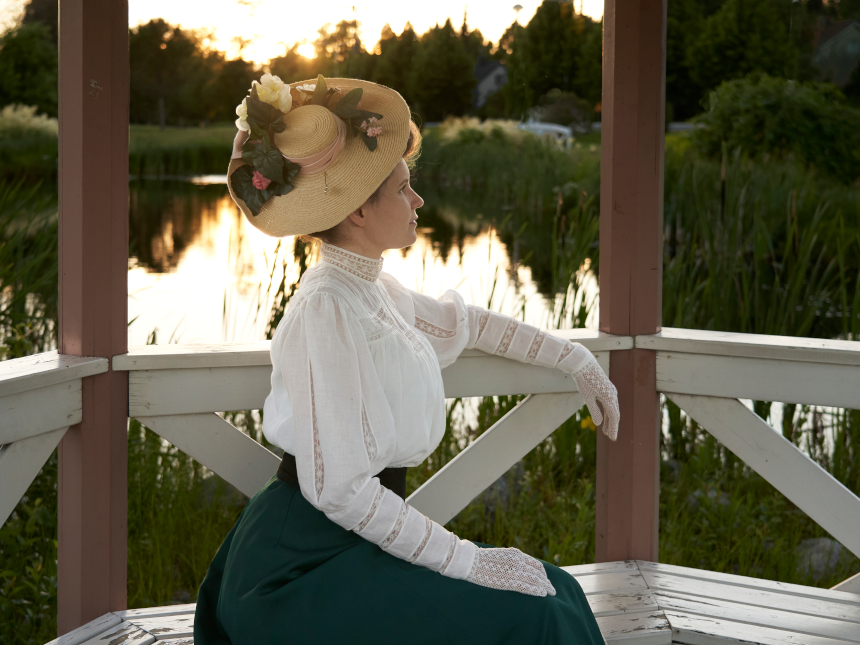
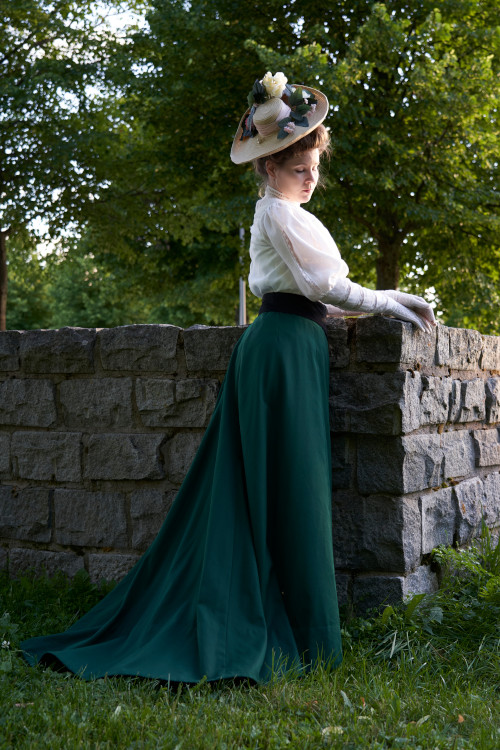
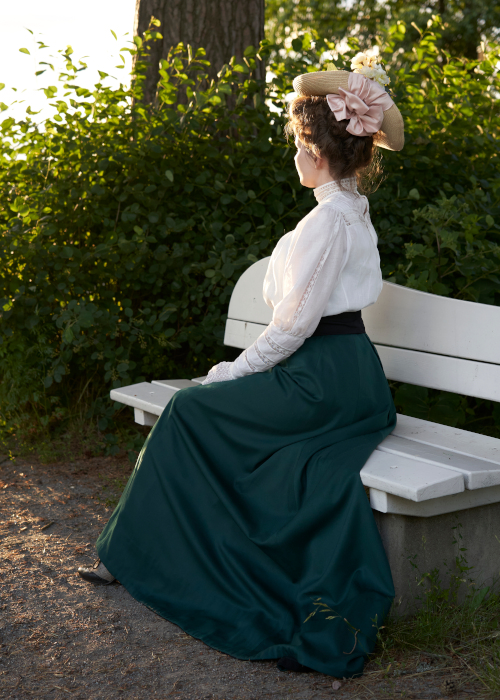
Anyway, in the end I settled in between, around 1905 to 1906. The wide sleeves with the emphasis on shoulder and upper arm were lovely and would add the needed volume on the upper body. The skirt silhouette was also curvy and the cut often simple but elegant.
The
Blouse
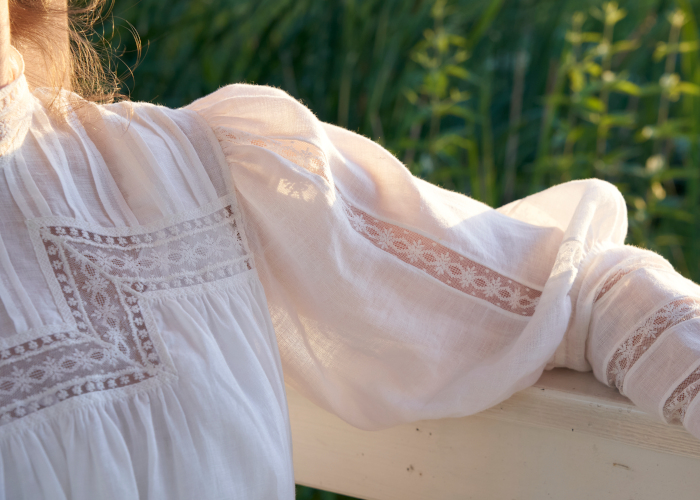
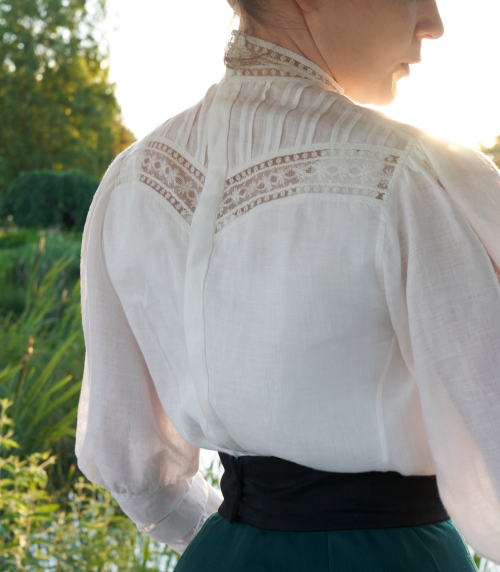
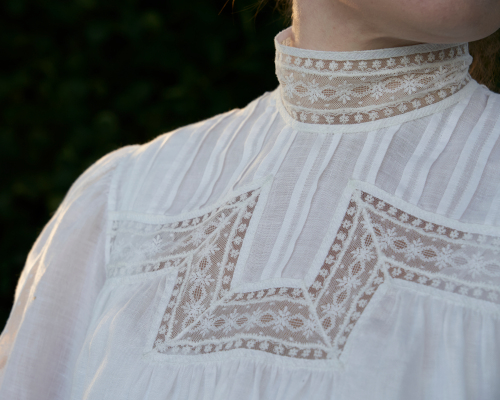
I began to browse pictures more centered on soft blouses. Pretty soon I realized a new complication: Most of them (and even jackets) had elbow length sleeves, pretty in itself but quite impractical as they seemed to be worn with long leather gloves. I was not going to wear those in July and besides I’m trying to save my single pair for evening wear. Finally I found a fashion illustration of a blouse with a puffed upper sleeve and tight lower sleeve. It was pretty in general too, with a nice but not overly complicated lace yoke combining both curved and geometric shapes, and some more lace insertions in the sleeves. The main part of the front piece was gathered into the yoke, which would give the desired ample pouf effect on the bust line. The blouse was pictured only from the front, so I had to guess what the back side of the yoke might be like, but based on some other examples I planned a slightly curved shape.

The problem was that it was not obvious from the picture what the material might be. I thought, however, that with the pintucks and gathered front it would have to be something lightweight so the model might well work for a semi-sheer blouse.
I did make a few alterations, though. The short puffed sleeve would probably need a lining to stay in shape, so I decided to change it to an elbow-length one. I also added some more lace insertions because they are just so charming.
Choosing
the materials
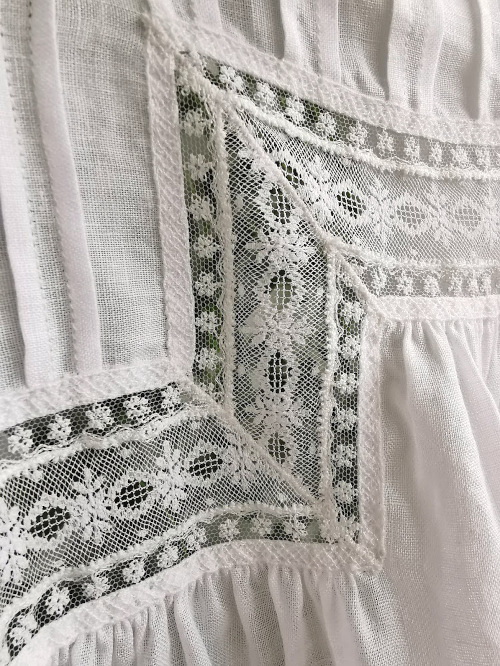
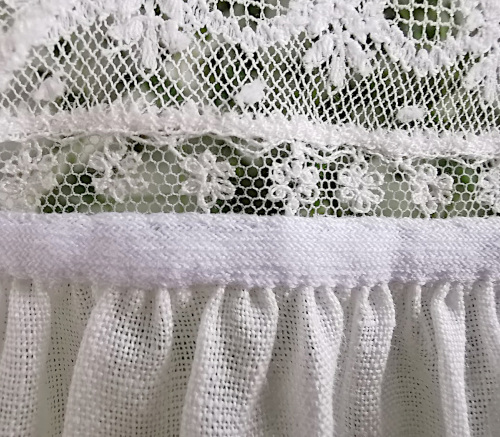
One further excuse for the lingerie blouse project was that I had some perfect insert lace in the stash which I hadn’t had the heart to hide in underwear. I had two options, in fact, but I chose the one that went better with the narrower edging lace that I also had a lot. The narrow lace also conveniently had a wide edge perfect for covering seam allowances.
For the main material I had at first planned to use a very thin and sheer cotton voile, but then I began to have doubts about it. At this point I had planned to use mostly sewing machine, but such a delicate fabric would need really narrow, hand finished seams and with them be really fragile to wear and wash.
I began to dig deeper into my stash for a possible option and found a leftover piece of thin and soft linen. It wasn’t as delicate but probably easier to sew and more durable, and also a totally lovely material to wear.
Drafting
the pattern
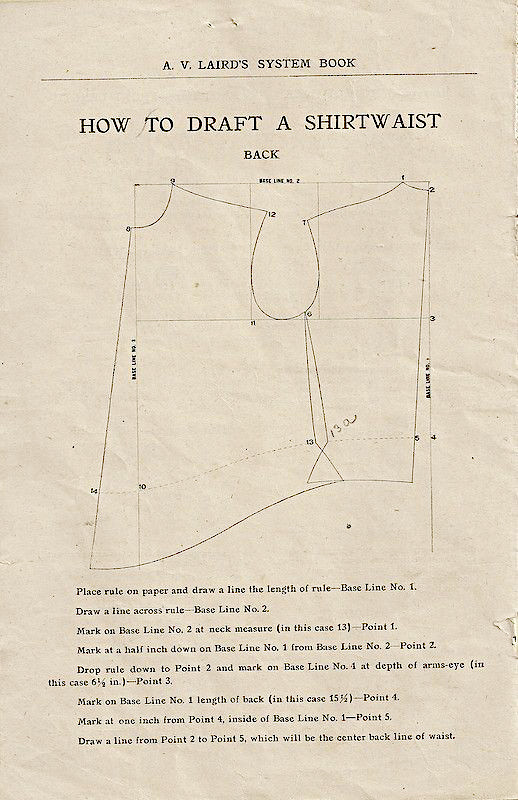
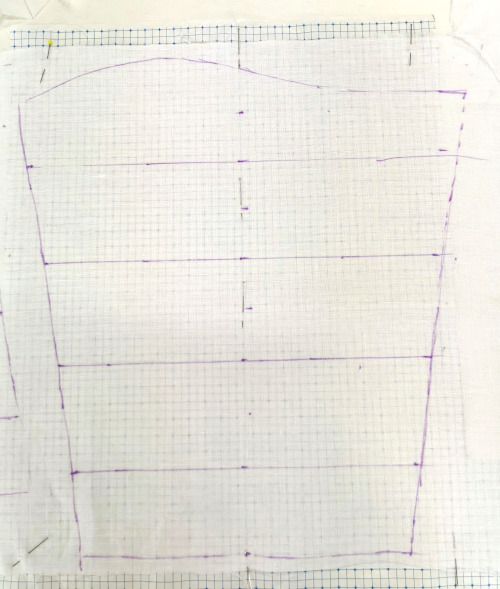
I found several good basic drafting guides for a simple blouse which I used as a starting point. The center front generally widened towards the hem, which was much longer at the center front and curved to the sides. The back piece was more fitted but without darts of shaping seams, only the side seam curved shapely out at the waistline to allow for the hip curve. I decided it would be most simple to use my basic 1870s bodice pattern with some added ease for the back and general armhole shape. I just left out shaping seams at the back. On the front I kept the center front line straight and just cut it wider for the gathering.
For the yoke specifically I used my modern shirt pattern, which already had straight center front, the shoulder seam shape and tight neckline right. I drafted the line for the lace part, which of course was guesswork for the back not visible in my source image. I chose a mildly curved line that I had seen somewhere else and which appealed to my eye.
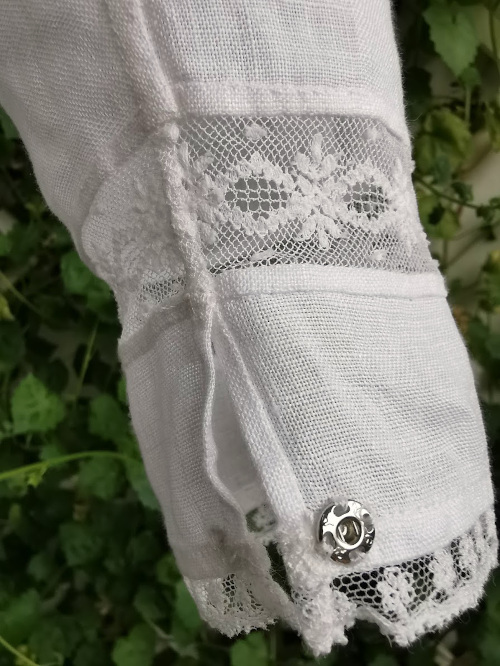
The pattern for the top sleeve is a modern, loose sleeve with a low sleeve cap. On the area joined to the yoke above the lace I added double width for the gathering. The bottom of the sleeve piece is shaped to be longer at the back.
I drafted the lower sleeve as a simple symmetrical piece widening towards the elbow based on rough measurements of elbow and wrist. I checked the final width and shaping of the top edge at the mock up fitting, where I also checked the pattern in general. My mock up material was thicker, so it was a bit challenging to estimate how puffy the front would be in the real thing. I did my best to mark the line for the waist drawstring though.
Sewing
the blouse
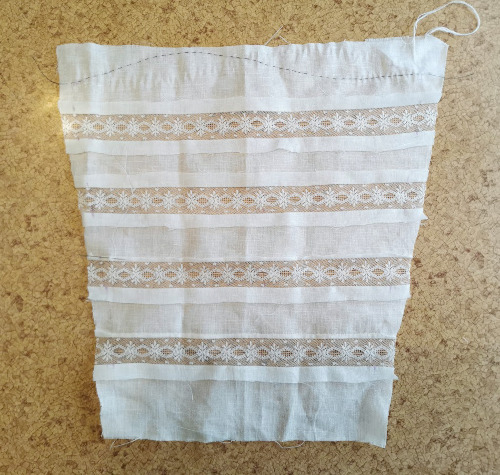
The linen fabric I had chosen was not a large piece, but after a bit of flipping the patterns around and trying several options I managed to fit everything. Happily you can also cut linen in both directions. My emergency option would have been to cut the lower sleeve from scraps and join them with lace, but happily I didn’t have to. From what little I knew of lace insertions beforehand it was that it would be easier to start with a whole piece of fabric if possible. What I had to compromise on was the front piece width, which I had planned to be double the yoke width on the part they were joined but had to cut a little narrower. Which was probably only for the good, since as you can see from the finished thing I ended up with more than enough width anyway.
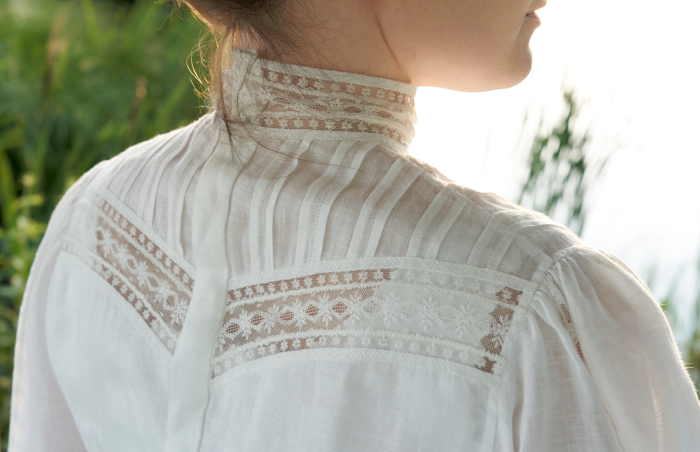
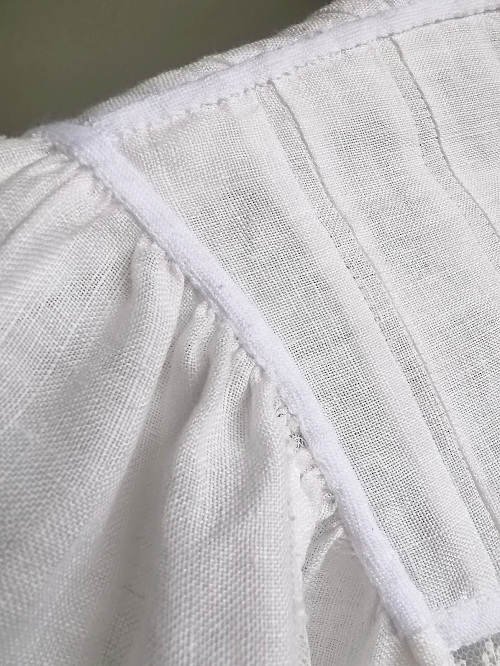
I began with the yoke. I really wanted to make tiny pleats as they should be. But honestly, there was matching in the shoulder seams and the center of the lace part and need for symmetry in general, so the boring 5mm was at least very easy to calculate and mark.Yes, it does look too heavy but at least it matches where it should.
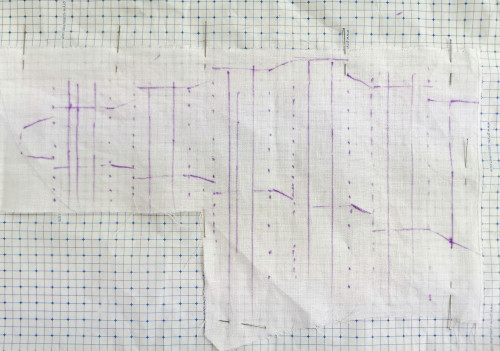
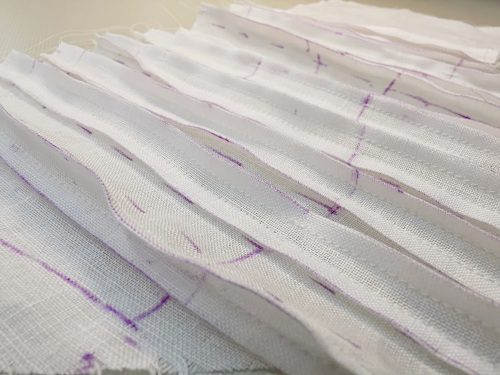
To be sure I was on track of what I was doing I drafted a pattern for all the pleats, then marked them on a larger piece. After sewing the pleats I checked they matched the pattern and marked pattern edges again. The need for extra allowance around some pieces was one reason why I had had to plan cutting so carefully.
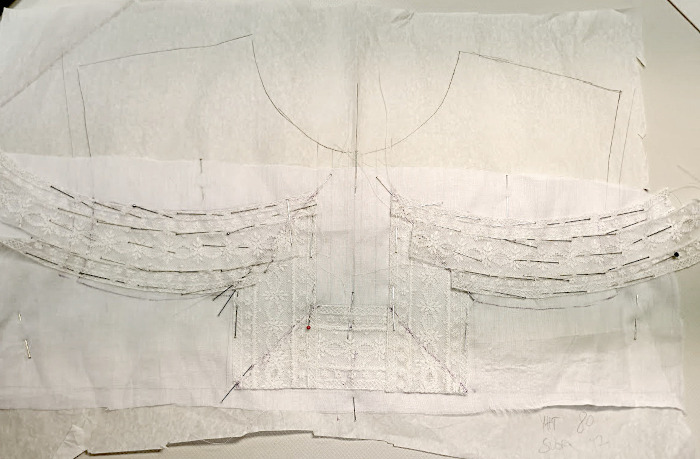
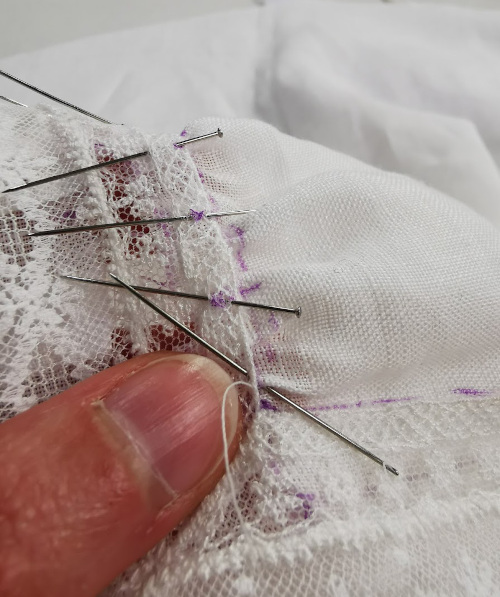
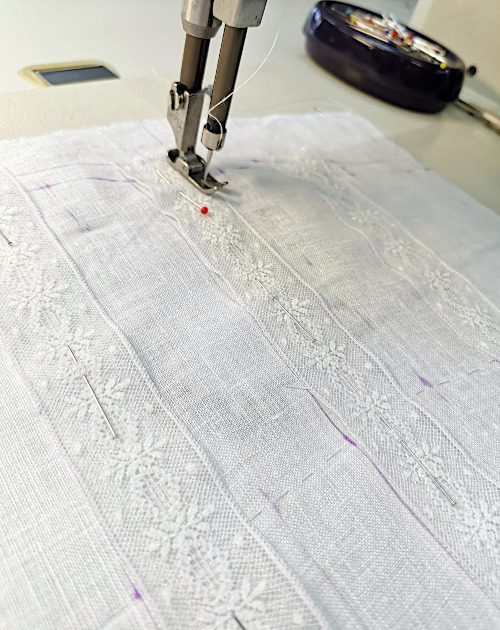
Joining the different widths of lace and sewing them into the desired shape was one of the most interesting parts of the project where I got to try some new stuff. The straight parts in the center part of the front and collar were relatively easy. I overlapped the edges just slightly and joined them with small zig zag. On the curved pieces I first sewed gathering threads on the edges with which I could pull them to match the edge of the next one. Then I pinned a thin muslin over the yoke pattern and pinned the lace rows into it. The width of the joined rows was a bit narrower than I had marked in the pattern as you can see, but it didn’t really make much difference.
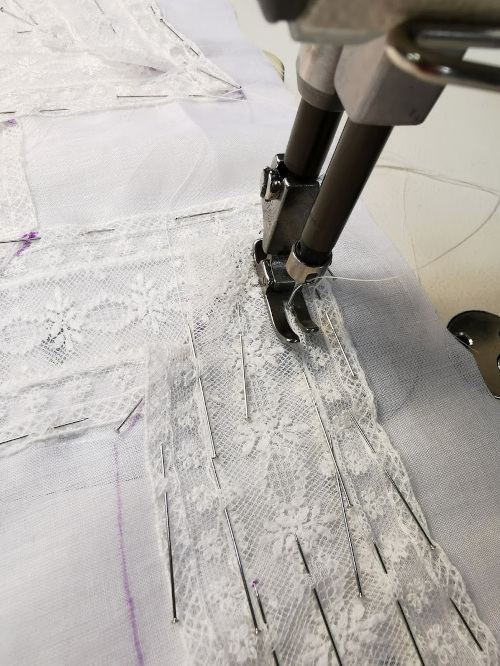
Next I carefully removed the pins from the pattern paper and left them in the lace and fabric only. First I joined the rows on straight stitch, then cut the fabric close to the stitch line and pulled it off from the other side. Some remaining threads caught under the stitch were easy to pick out.
I marked the corners following the pattern and sewed them from the underside on small stitch. Then I trimmed the seam allowances as narrow as I dared and finished the seams with a couple of rows of zig zag over the seam.
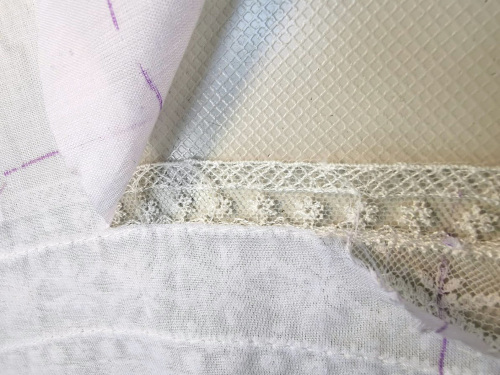
I had left the upper pleated parts of the yoke longer than needed on purpose, and same with the top edge of the back pieces. This meant that I could now pin the finished lace pieces along the marked line and securely on the fabric base rather than just a narrow seam allowance likely to stretch.
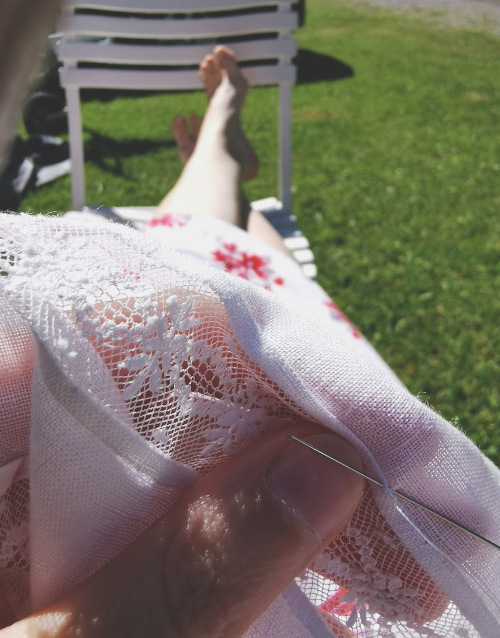
After sewing the top edge I trimmed the seam allowance to ca 4mm width neatly hidden under the lace edge. Instead of hemming them by hand as I maybe should have I tried first to sew a narrow cotton tape to cover the seam allowance by machine. The stitch disguised in the lace edge very well, but the tape kept easily slipping and peaking from under the lace. After a few re-takes I got fed up and I decided I could just as well sew a few short tapes by hand rather than pick out my stitches again and again. This unashamedly cheap trick worked particularly well in the sharp corners of the front lace insertion and over the gathered edge which would have been bulky to turn under. I sewed the gathers of the lace part edge by hand, as hand sewn gathers are just so pretty and this was a highly visible part of the garment.
The real challenge of this project was the tight schedule, which encouraged me to cut corners here and there. I had of course started too late, and while I would have more time for sewing on my summer holiday I would also spend most of it away from home and without access to a sewing machine. This meant that I hurried to get as much of the machine sewing done as I could before the holiday and leave the handsewing for lounging in the camping area between morning and evening swim and barbeque. (Yes, I’m officially middle aged.)
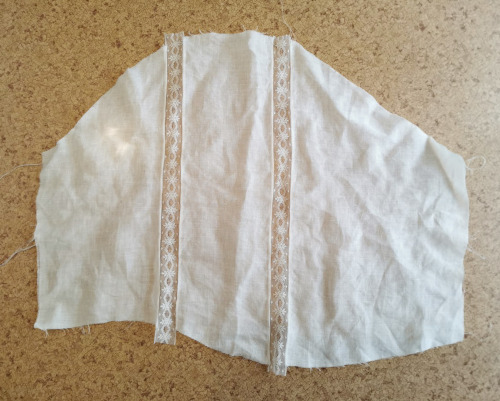
Anyway, once I got the yoke sewn on the lace insertion and that into the back and front pieces I had to figure out how to make the back closure without breaking the symmetry of the yoke. I wouldn’t have time to make proper hand sewn buttonholes nor small and delicate enough buttons in the stash so I opted for hidden buttoning. After fussing a bit with folding pieces and odd lace ends I managed to get all the raw edges tucked somewhere.
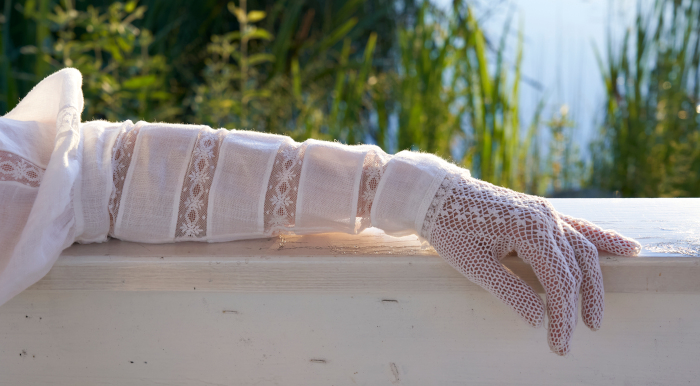
Another thing that needed machine stitch were the lace insertions on the sleeve pieces. I first pinned the lace along the marked lines and then sewed them on near the lace edge. After sewing I cut the fabric under the lace in the middle.
The thin lace tended to stretch while sewing and the finished pieces were seriously twisted. Luckily I had managed to leave some extra fabric outside the pattern edges on the lower sleeves, so after ironing (which helped a bit) I could cut the edges straight again with still some extra seam allowance at this point.
I had originally thought to hem the fabric edges by machine too, but in the end I just couldn’t bring myself to do it. Besides, I would have plenty of time to hem them by hand on the holiday. Of course that took longer than I thought, but I finished them on time anyway. I also gathered the upper sleeve on the lower part by hand and covered the seam allowance again with the trusted cotton tape.
While stopping at home overnight I machine sewed the sleeve seams and side seams and sewed the sleeves into the armhole (minus the gathered top part). I also sewed on the waist drawstring casing and hem by machine because they would be hidden anyway. I also sewed the collar on.
Next we set out towards the eastern Finland. Before heading for the event place we spent a few days at my husband's brother’s house and I managed to do a bit more sewing both there and while sitting in the car.

When I set out to sew the last part of the sleeve on at the shoulder I was worried that the edge of the yoke would stretch out of shape, so I basted a strip of fabric with the woven edge over it on the underside.
After sewing the gathered sleeve cap on the folded edge I trimmed the seam allowances with the supporting extra layer in between and covered them with the handy cotton tape again. I flat felled the rest of the armhole seam by hand along with the side seams and sleeve seams. I also covered the collar seam allowance with the tape, reinforced the top edge with the same, hemmed the back edges and sewed on snap fasteners for the collar and wrist opening and buttons for the rest. I ended up finishing the blouse with still one whole day remaining before the event.
I was not quite sure what one should wear under a blouse. In the material I had switched into it wasn’t really transparent after all unless seen against the light, but of course the lace insertions on the bodice gave a peek on what was underneath. I thought my standard 1870s corset cover would look too heavy. In the end I decided to wear my finer combination underwear which has narrower shoulder straps over the corset and just a modern strap top underneath. Funnily enough, that antique combination suit is the only genuinely Edwardian piece in the outfit. At least it got worn with something in the right style for once, as I usually wear it with 1870s evening wear.
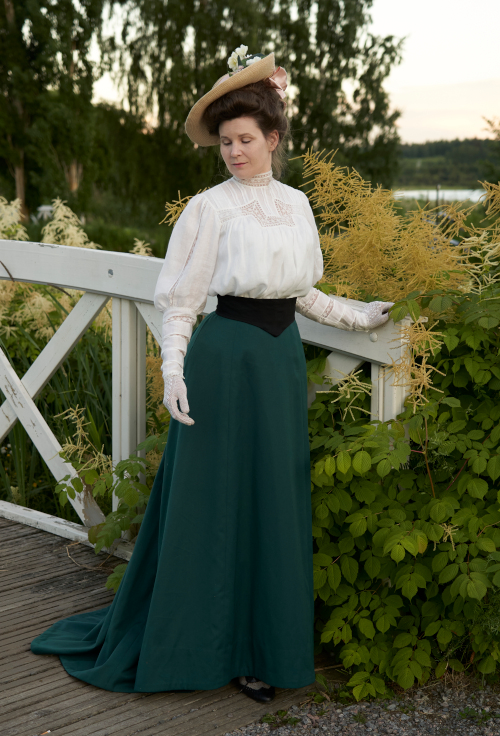
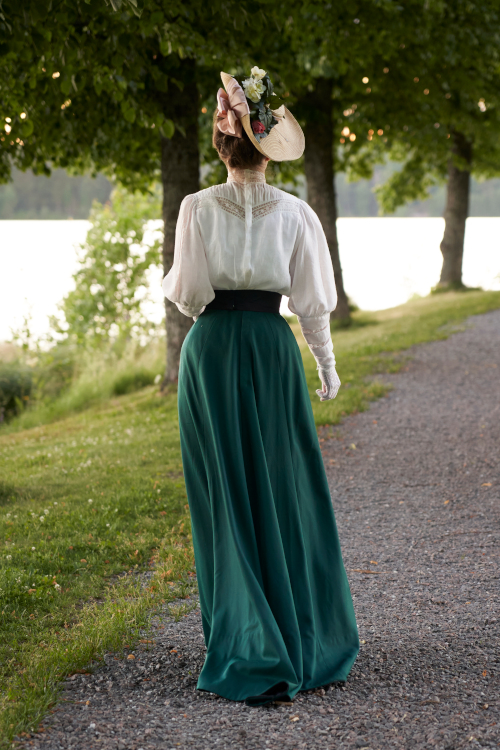
The skirt
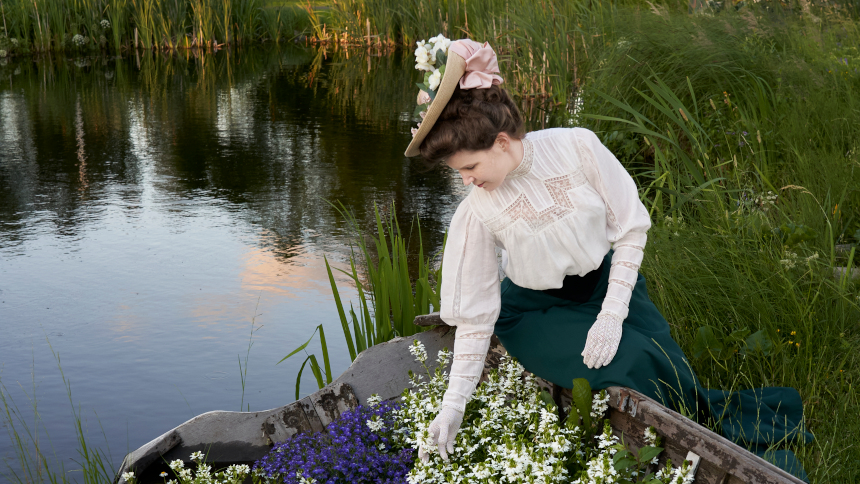
The skirt was a lot more straightforward affair. I had decided on a very basic style with no decoration or interesting details in the cut. It was intended for outdoor wear, but I still couldn’t resist adding a train, as it just gives the style a certain flair.
Unlike with the blouse, I didn’t have anything even remotely suitable for the skirt in stash, so shopping I went. At first I had a vague idea of a light gray or grayish green or blue that would go well with the soft, light mood of the blouse, but then I ran across a bargain bolt of dark green poly-wool blend. The weight and drape were nice and the material would be washable and rather durable. While I had envisioned something light and muted I basically liked the color, and of course since I had wanted that train a darker color would be a lot more practical.
I had very little idea of skirts of this period other than seeing some patterns on books, but I got invaluable help from Maria (@sew_through_time in Instagram and YouTube). I had a vague idea of flat-lined skirts but obviously that was more of a 1890s thing and I was recommended to make a plain underskirt following the skirt cut, which was happy news since it would be so much more simple.
Maria also lent me her skirt pattern. It was a circle skirt with just one pattern piece, but I decided to cut it gored after all to get a more economical cutting plan. As I would be wearing my 1870s corset I could then also use my basic 1870s skirt pattern for the waist-hip part to get it right without extra fitting, and then flare the hem to desired width. Not all of us have the glorious curves of @sew_through_time!
Talking of curves, I had at first tried to make some small hip padding as was often worn in the period I’ve understood, but honestly I thought it looked so ridiculous on me that I decided to ditch it midway and use what I already got. It can be hard to get deep into the aesthetic of a new period at once.
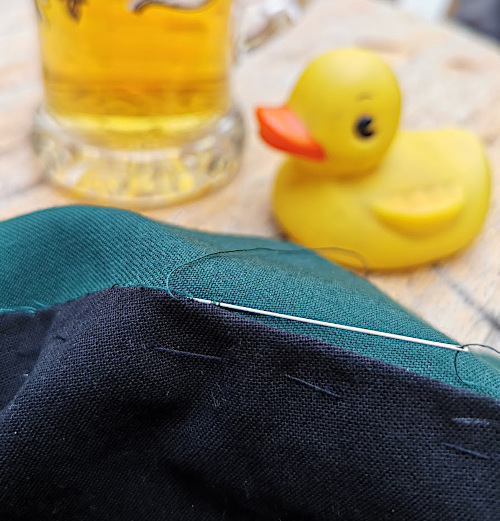
I first made the underskirt of very basic black bedsheet cotton, which also functioned as a pattern mock up. Then I sewed the skirt itself, which was super simple: Just straight seams, overlock for seam allowances, a back opening and a narrow waistband. On the fitting I just checked the final length or the hem. Instead of the full lining I had decided to put a facing on the hem, as it would protect especially the train from wear and tear and give the hemline some shape. I basted it on and then, following Maria’s superior wisdom turned the edge with a 2cm wide band of felted wool blend. Obviously velvet was more common for this but I used wool as it happened to be available and was likely to be very durable. This trick worked very well.
I sewed the skirt along with the blouse on a rather tight schedule, so here I also left all the hand-finishing for the holiday trip. First I hand-stitched the top edge of the previously basted hem facing and the felt band edge. Next I sewed hooks on waistband and back closure, but the stupid hooks wouldn’t keep closed so I had to change them into snap-fasteners minus the few top ones.
The underskirt, however, suffered a sad fate. When I tried on the finished skirt with it I began to feel that I liked the soft way the skirt draped without it even better. I don’t know, I might have been wrong in that, but as the forecast promised high temperatures for the event day I was easily persuaded to skip any extra layers I decently could. Later I kind of forgot the underskirt, but I may yet dig it up or use it with something else, who knows.
Accessorizing
I had originally intended to keep the makeshift belt I had made for last year, but now I couldn’t find it anywhere. Then I thought I could as well make an improved version, and somehow wanted it to be wider. I made the base and began mounting the velvet on it, but in the fitting it didn’t quite work either, maybe it was too massive after all. And then the old belt miraculously re-appeared and I thought I would use it after all, at least this once. Especially towards the end this outfit was very much a “Better finished than perfect”-thing.
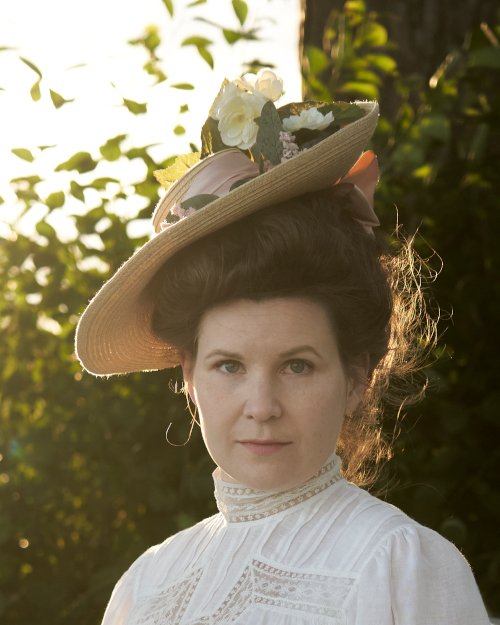
The hat was another story with ups and downs, and you can read more about it here.

Final thoughts
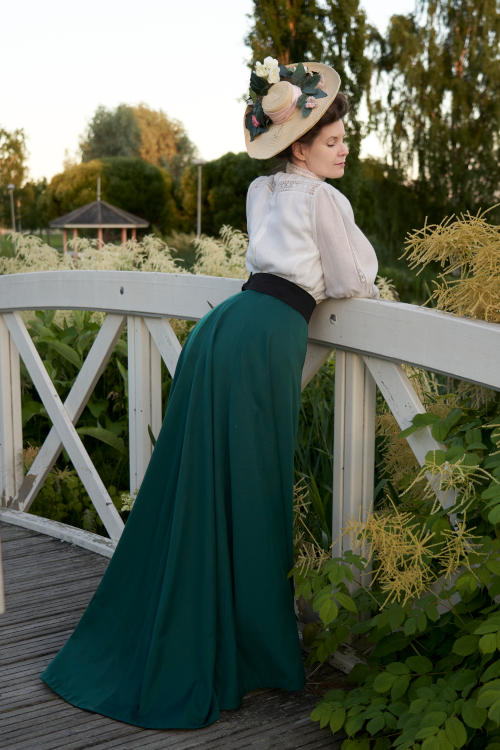
Considering I was venturing into a new fashion era with a relatively tight schedule I think the outcome is pretty solid. If I knew the period better I would probably become aware of many glaring or at least more subtle mistakes, but ignorance is a bliss. I still don’t think the belt is quite right and the blouse might be too baggy at the front after all, but it will do.
I’m rather happy with the basic craftsmanship, though. Sewing the blouse with all that hand-finishing took some time, but the outcome is really nice. Of course it’s far from the ethereal lace-decked lingerie blouses of the high fashion, but the bit heavier and less sheer linen was more realistic for my skill level and doesn’t look in any way inappropriate either. I also like the simple but graceful skirt very much (Huge thanks to @sew_through_time for all the help!). Now that I have a good pattern I may someday make a light colored summer skirt if I get inspired.
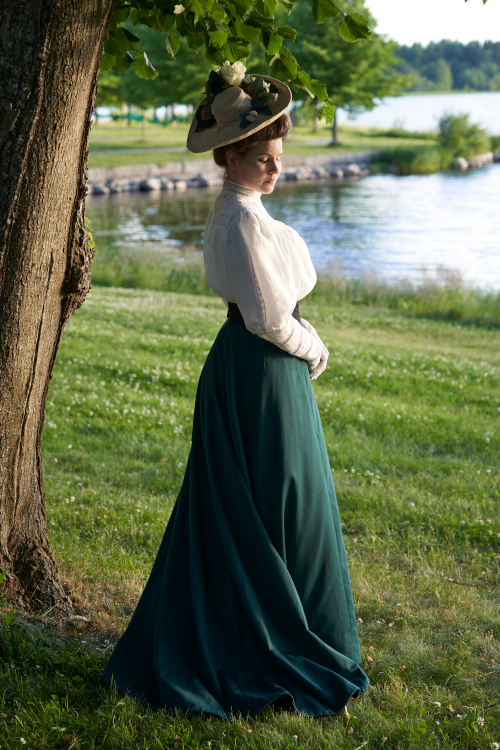
The thing that is clearly not right is the lack of a proper corset, however. The posture created by my 1870s corset is very straight, and I was surprised to notice how hard it actually was even to fake the front-leaning posture, characteristic of the period, for a few minutes for taking pictures. While I broke the first rule of historical costuming, “Always start with the right under layers”, I did it consciously so I guess this was only to be expected.
Of course, if I ever get seriously into Edwardian and can be bothered to make a proper corset, the drawstring-waisted blouse will work just as well and the skirt can be slightly altered. I actually have a lot of the skirt fabric left (It was cheap so I hoarded), so in theory I can also add a jacket later. But to be realistic I have so many plans for my current passion, Natural Form era that it’s not very likely I’ll go full Edwardian any time soon. Anyway, this basic kit will serve me well for day events in warm weather or tea parties indoors.