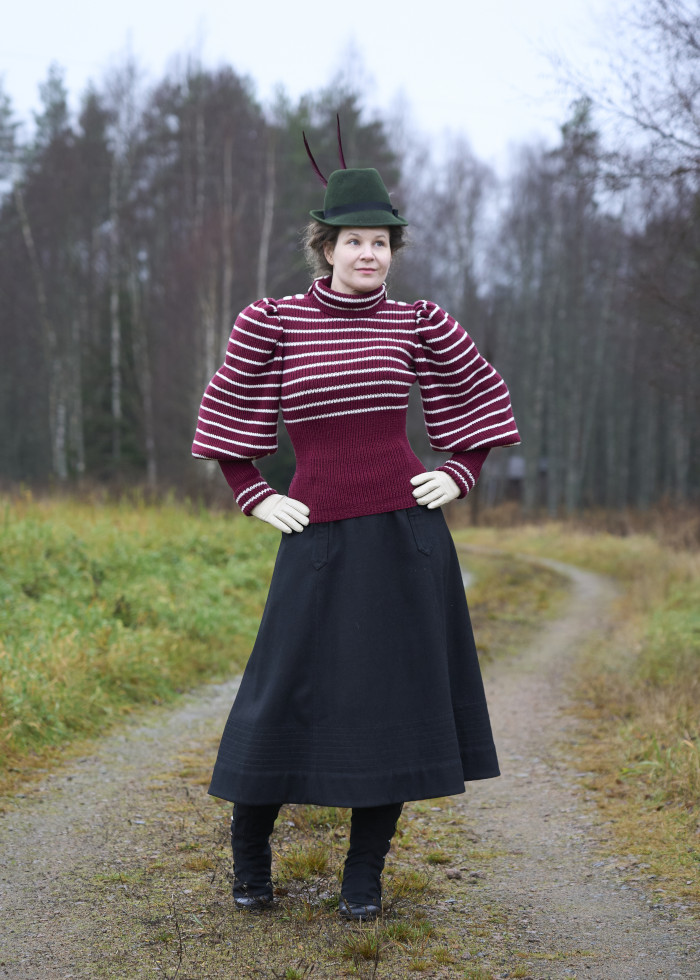
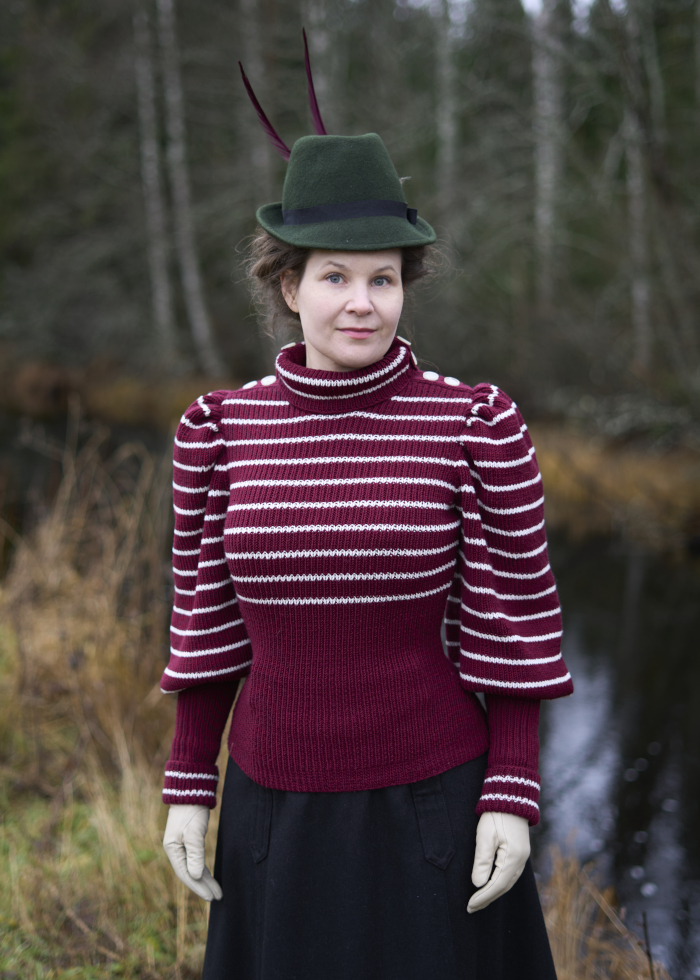
Bicycling or outdoors
outfit, 2024-25
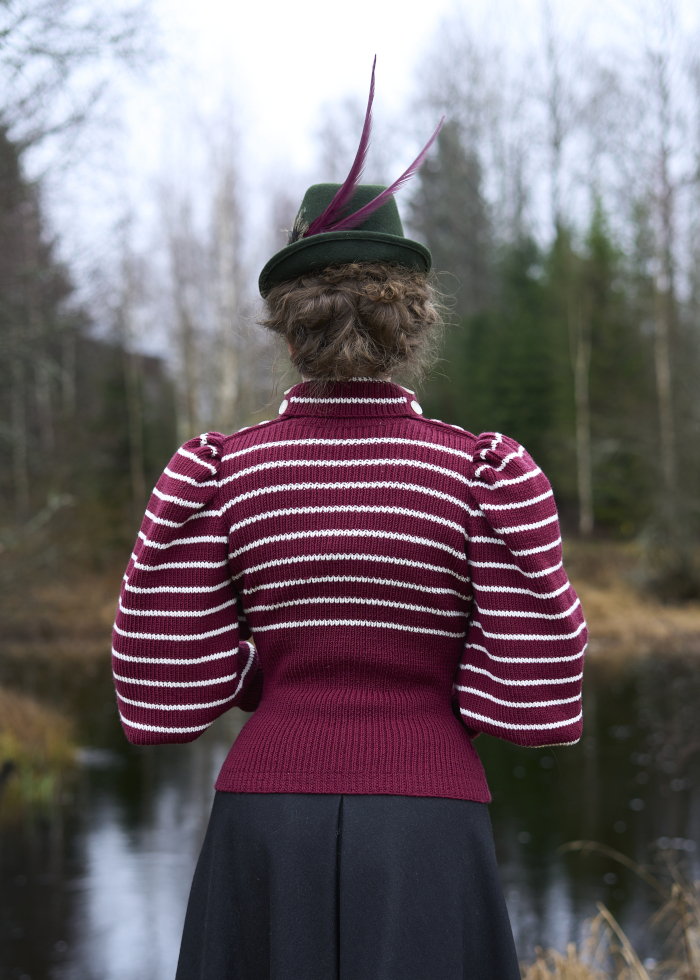
I have recently been haunted by a fascination with 1890s. Through a rabbit hole I ended up browsing images of the new fad of the era, bicycling wear, and stumbled upon this charming sweater from DAR Museum. The mid-decade balloon sleeves are both ridiculous and amazing.
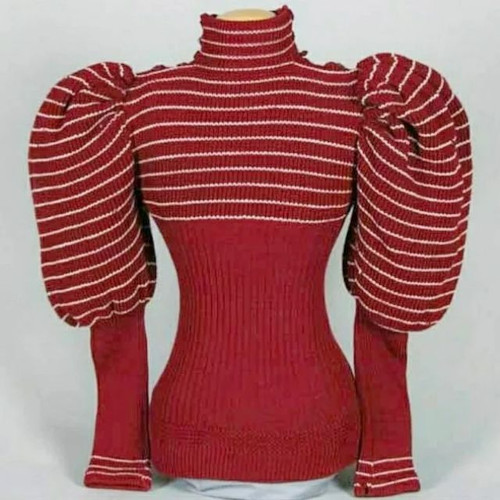
Mid 1890's sweater, DAR museum
I had never thought about making myself an 1890s bicycling costume, I haven't done the decade at all, I had no event in sight where I might even use it, and I don’t own an antique bicycle. But the sweater was cute and I like knitting, especially easier projects I can knit while watching telly. I’ve knitted a lot of socks, but I don’t need any more pairs, nor does anyone in the family as my mother is a knitter too. So why not try knitting something for my historical wardrobe?
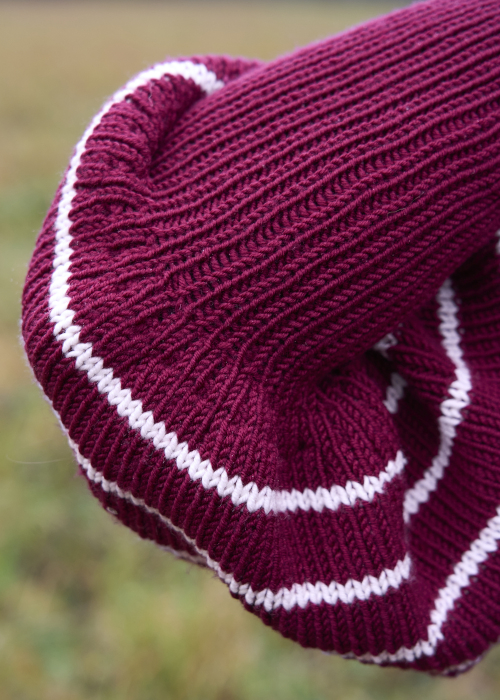
I didn’t find close up pictures of the striped sweater at first but to me it seemed that it could be made with 1x1 ribbing, which is the easiest thing ever to knit. Many bicycle sweaters that costumers have made have also been in ribbing. It’s also really stretchy so I would have a higher chance of getting a close fit.
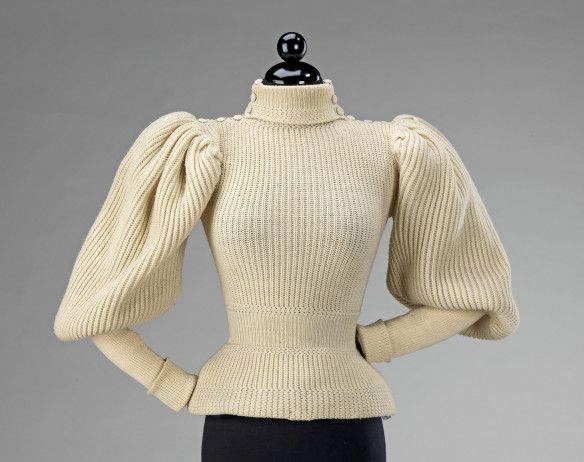
1890s sweater, MET museum
I also took a look at other original sweaters. This, more complicated style has a hem edge in some fancy stitch I didn’t recognize from the picture, but thought that I could maybe use something else. I also liked the button fastening on the shoulder. However, I decided to leave off the tighter waistband, because I thought it would be easier to keep things simple. I was not aiming for super accurate here, more like a relaxing pastime that would hopefully result in a wearable garment.
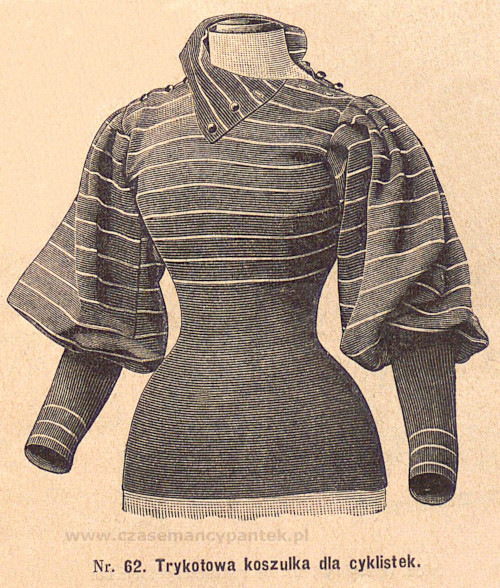
This illustration has similar stripes with the DAR one. It has button closure at the shoulder but no visible waistband.
With a bit deeper look I also found a wonderful Flickr file of pictures from the DAR museum, which gave me a closer look on the details. Well, it turned out that the original sweater was much more complicated than I had imagined with a lot of interesting details. However, I still decided to stick to my original simplified plan.
Additionally, I also found a lot of interesting and useful information on Sewhistorically.
Knitting the sweater
There are, of course, patterns and instructions available for bicycle sweaters, both original period sources and those deciphered for a modern knitter. The problem is that I’m not very good at reading more complicated knitting instructions even in Finnish, and have zero experience with English language ones (That’s why some of the terminology in this post may be a bit off, as I’m rather out of my league here). Also the final result depends on the yarn you happen to find and other factors. So, I somehow reasoned that I might actually have a better chance of getting the fit right by just experimenting myself through trial and error.
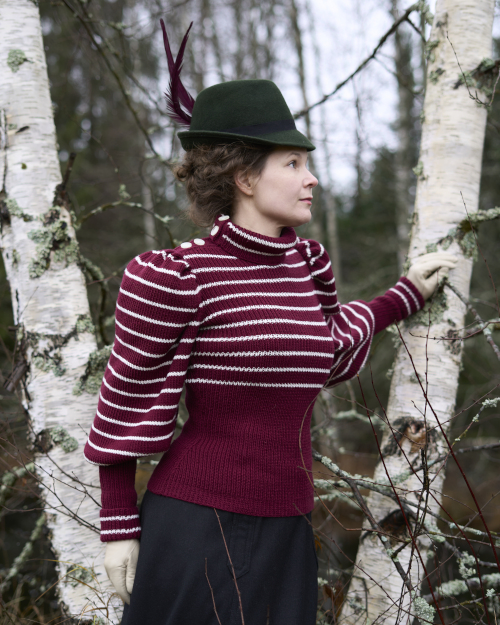
I found a really lovely yarn, Hjertegarn Extrafine Merino 120. It’s really soft, which is a must for me in a turtleneck sweater. The museum sweaters seemed to be made in a finer yarn, but this was a more realistic thickness for my knitting speed. Instead of the brighter red in the original I chose a slightly darker cherry red out of personal preference.
The recommended needle size was 3,5 to 4mm, I chose the smaller as I was doing rib stitch. I made a couple of swatches to estimate the stitch count. The yarn was ready smooth to knit, and on afterthought I might as well have used 3mm needles.
I began the knitting at the sleeves, because it felt the easiest starting point. In the fitted lower part of the sleeves it was easy to check if the stitch count was right and begin from the start again, which I had to do once. The lower part is a straight round knit tube with a few added stitches in a few points.
When I got to the elbow things became more interesting. I had roughly estimated the stitch count I would need for the wider upper sleeves. I needed to increase the current stitch count a lot, which was a bit trickier to get neat in the rib stitch than plain. First I changed much smaller needles and then began to add stitches on several rows, changing into gradually larger needles as I went. I had to start again once or twice to end up with adequate width, because I’m really bad at math, but I got there at the end. Happily I had written down and rewritten what I did so the other sleeve went much easier.
After figuring out that tricky part there followed the blissfully easy long stretch of straight round knitting, where the biggest challenge was to remember to change color for stripes. I tried the sleeve in progress on a few times to check the length until I arrived at what seemed to be a good place for armhole level.
If I had been smarter I would have tested the sleeve pattern with heavier knit fabric or thrifted knitwear. Instead I just drafted a rough paper pattern for the sleevehead and compared the sleeve on that as I went and estimated where and how much I would have to decrease stitches.
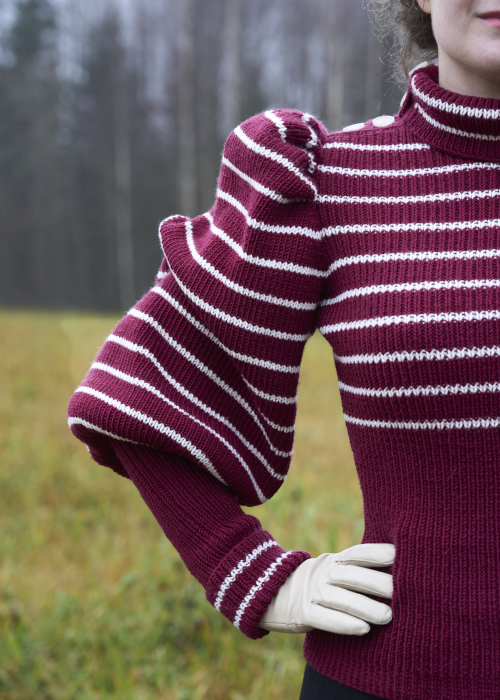
The stripes on the original DAR sweater were convenient for estimating how high the sleevehead would have to be. Not surprisingly, quite high. Mine is not quite that high as I was afraid the sleeves would collapse and just sag. The first finished sleeve looked more or less passable when I pinned it on a dummy, so I made the other one similar.
Before starting the sweater bodice I made the skirt I would wear with it to be able to test hem width etc better. More on the skirt later. After that I drafted a rough paper pattern based on the size and shape of an old fitted sweater I had. I tried to calculate the needed stitch count from the swatch, but the ribbing was so elastic that my calculations turned out to be totally off. So, it was the trial and error method again. At this point it dawned on me that maybe I could have tried to find a modern ribbing sweater pattern for roughly the same gauge and use that for the bodice.
I had at first thought to make the bodice in round knit too, but then remembered that stripes wouldn’t align when changing rows, which would be more visible at the side seam than in the sleeve. And I would have to shape the sides quite much too.
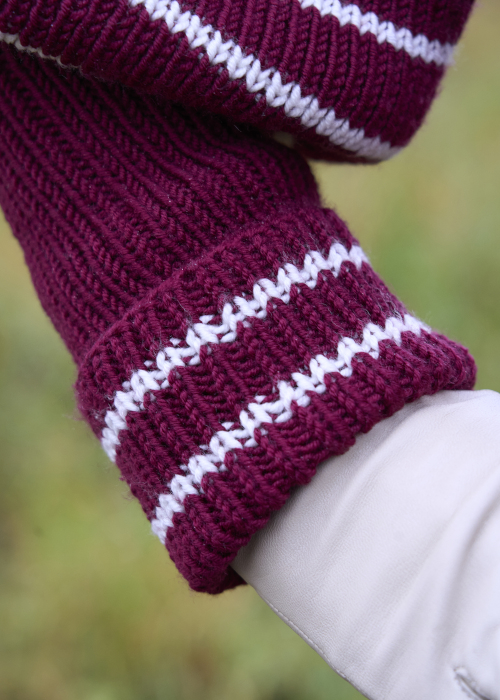
As mentioned earlier, I needed to find something withing my capabilities for the sweater hem edge. I decided to try something called “Broken rib stitch” (again, easy to knit, with an added bonus that the name resonates with my twisted sense of humor). After some experimenting I chose to use 2,5mm needles to get it sturdy and to match the super elastic ribbing in width. Again, despite making swatches I had to start over a few times to get the stitch count right.
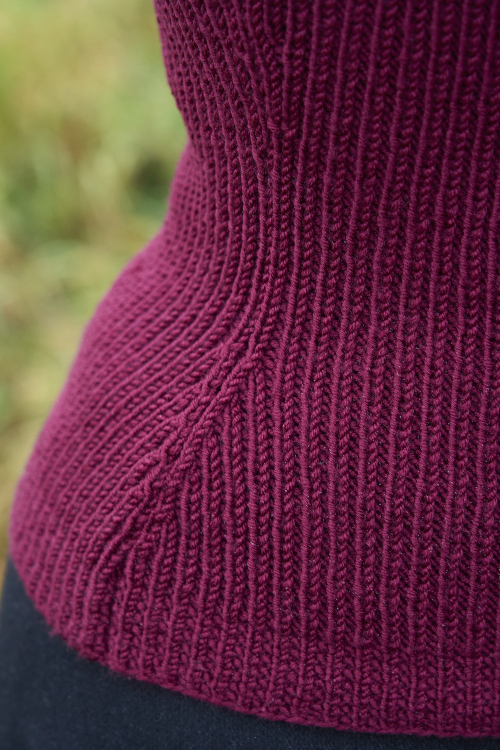
I started both front and back pieces at the same time and switched between them often, so I could pin them together and try them on at regular intervals to check the fit and shape. I made regular decreases from the hem to the waistline and a couple of increases from waistline to armhole. They might not 100% match at side seams, but it’s hardly visible.
I had thought that ribbing would be really easy to fit, but it turned out to be a bit tricky. It might stretch a lot more in wear. On the other hand I didn’t want to make it too small, because the stripe edges look messy when the knit is stretched.
When I got to the armhole I joined the side seams so it would be easier to try the sweater-in-progress on. I made armhole decreases to roughly match the paper pattern I had made from an old sweater.
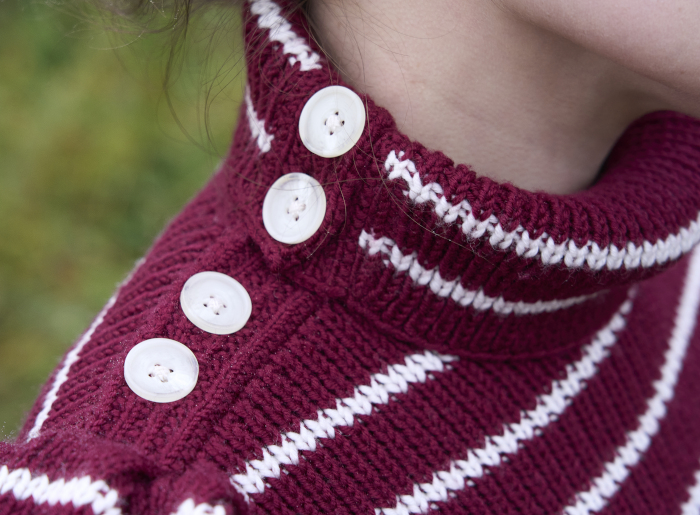
The shoulder and neckline were, of course, the tricky part to figure out without instructions. I was especially afraid that the shoulder seam would stretch out of shape. I was also unsure how large the neckline and collar should be. A tight turtleneck looks good for the period aesthetic but I have a problem with too tight wool turtlenecks. Though it would probably stretch I still opted on the safe side.
I began both front and back pieces of the collar from the top edge that turns over. When I got to the length where I estimated the collar would turn I changed into 0,5mm smaller needles. On the lower edge I knitted the last row in thinner cotton thread and didn’t cast off the stitches. Then I sewed the collar pieces on the neckline with back stitch through the open stitches and pulled off the cotton thread.
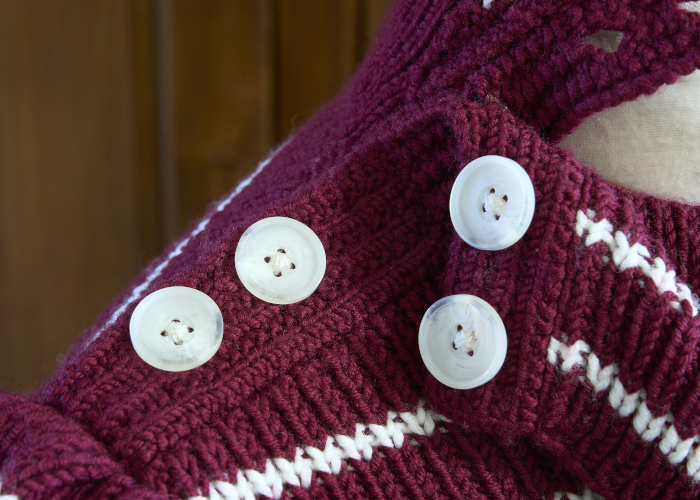
The buttoning strips are made with the same pattern as the sweater hem. I had experimented with the edges and buttonholes in a swatch, but the tricky part was again to estimate how much these would stretch and where to place the buttonholes. I also changed the right and wrong side under the collar turn.
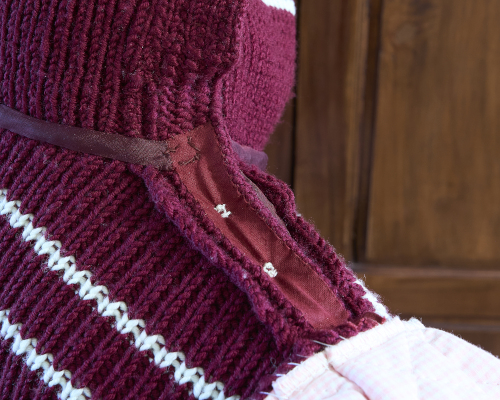
After sewing the buttoning strips on I sewed a good deal of bias bands on the undersides to control the stretching and support the buttoning. I also added a bias strip on the back neckline for the same reason, and in fact it looked so neat and finished that I sewed one on the front too, even though it wouldn’t have been as necessary.
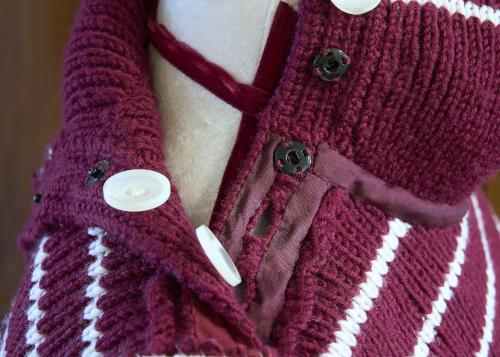
The turning collar was so heavy that I had decided to close it with snap fasteners instead of buttons on the inner side. This turned out to work well and they are more reliable and don’t stretch the knit.
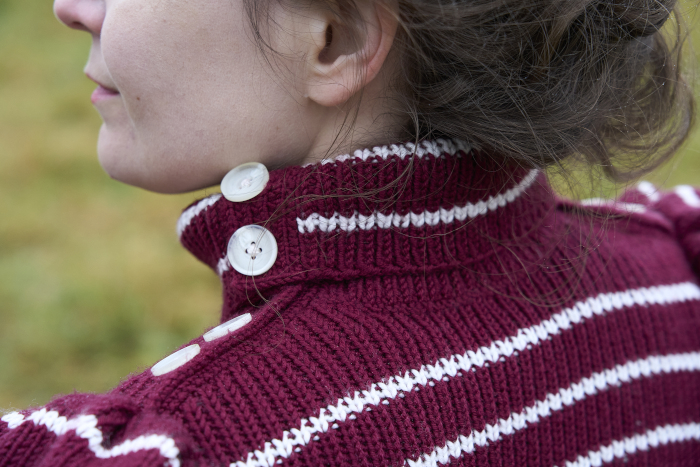
As you can see in pictures, the neckline ended up quite large. The lower edge also tends to rise, and the stripes don’t sit ideally and the top button is too high. And it’s likely to stretch even more in wear. Oh, well.
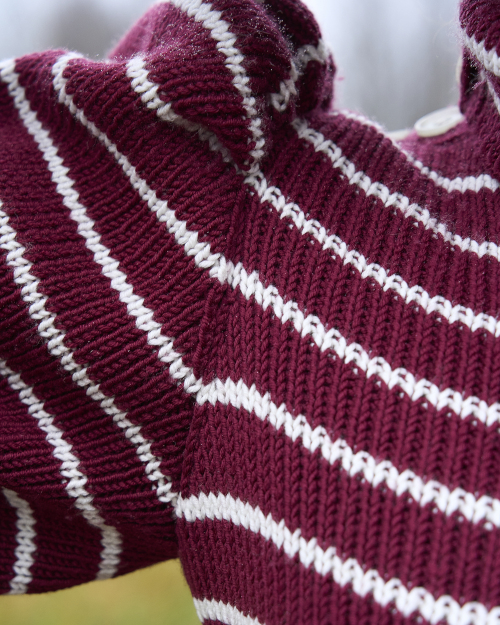
I first sewed the sleeves on at the underarm part (the stripes match, yay!), then formed the pleats on a dummy and basted them securely in place. After trying on the sweater on myself too I sewed the rest of the sleeves on with firm backstitch.
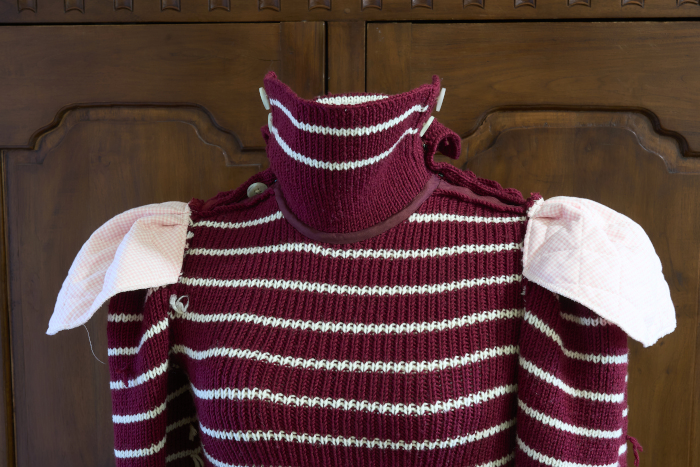
The ribbing is soft and and the gauge is on the loose side, so of course the sleeves didn’t look anything like the huge balloon sleeves in fashion illustrations. Did they use some kind of sleeve support in sweaters? Somebody out there probably knows, I don’t, but I wanted to try how it would look. I found a small piece of leftover quilted cotton from stash, cut it in two and pleated and pinned it on the shoulder of my dummy. It looked nice, so I just rounded the lower edges, run an overlock stitch around the pieces and sewed the pleats. The I basted the pads on the shoulder seams. I think they give a nice shape without sticking out, and also support the armhole seam from stretching under the strain or heavy sleeves.
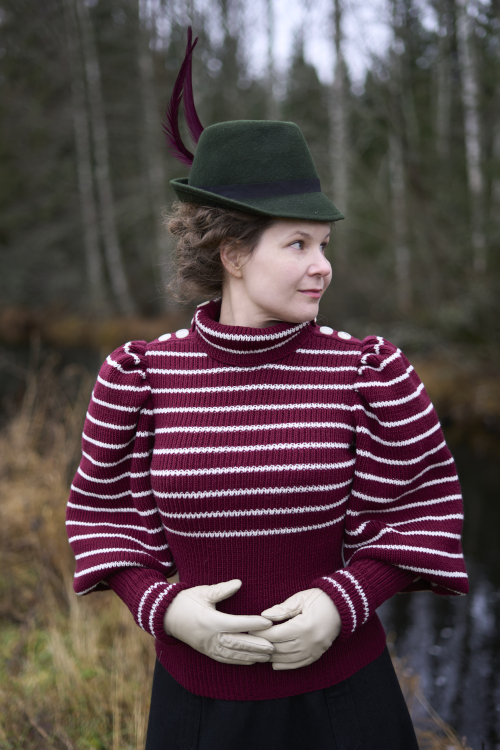
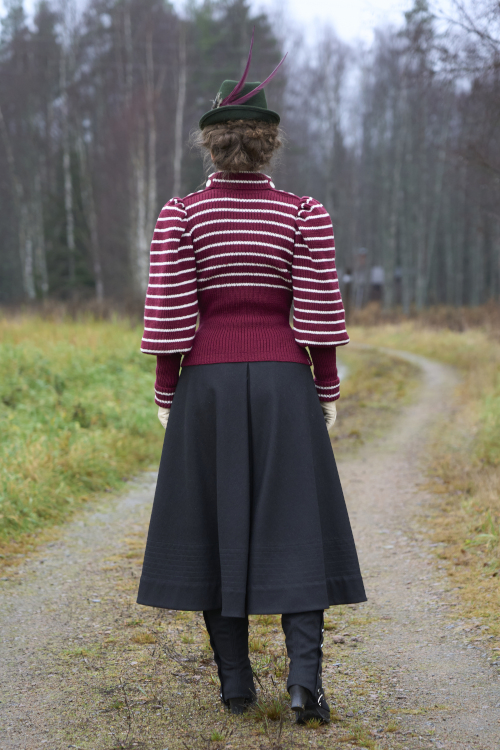
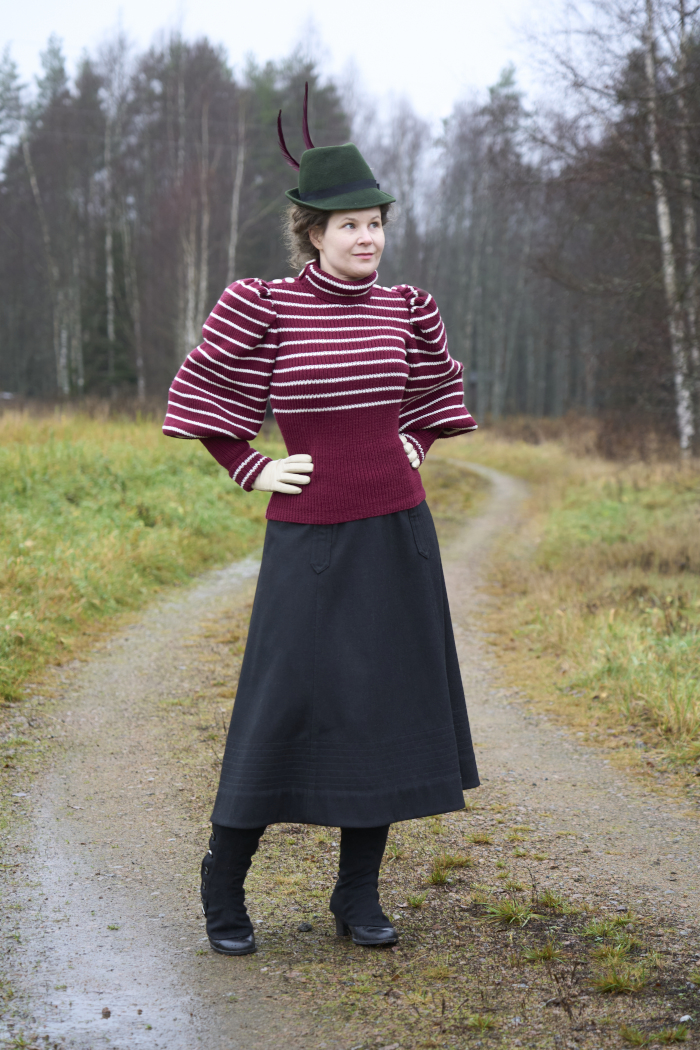
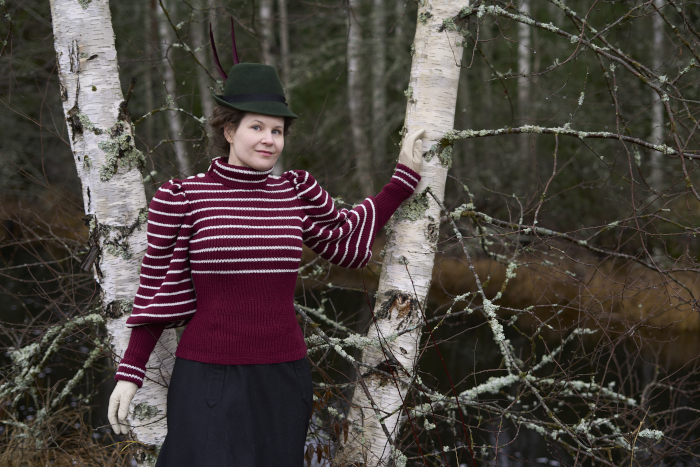
The sweater turned out cute, and to my eye the overall look is decently historical. It’s not in fine thread with a lot of intricate detail but not quite in the modern chunky yarn category either. There’s fit issues as the collar, and also the armholes might be a tad small, causing the back to pull slightly. The sweater is also very warm, even though not dense enough to be wind proof at all.
A more experienced knitter than me would have probably been much better able to estimate the stitch count, stretching etc, and gotten some things neater, but considering my starting level I’m pretty happy with the sweater.
Skirt
My minimal research for this project (period illustrations and a couple of wonderful blogs) had revealed that sweaters were used beside bicycling for other outdoor sports and by edwardian times even as comfortable home wear. As I don’t own an antique bicycle, in case I’ll get to use this outfit it’s more likely to be for some other outdoor activity.
I have never been particularly fond of bloomers, while they are definitely cute I can’t see myself in them. Instead I was quite fascinated by bifurcated skirts, another very practical innovation. But finally I decided that a simple mid calf length skirt would be the fastest and easiest to make, not much pattern testing needed and also not taking up that much fabric.
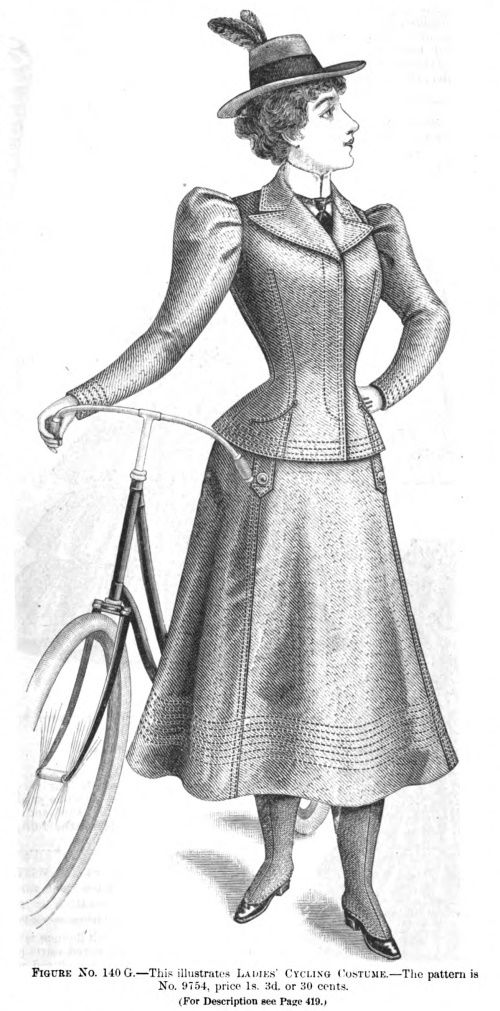
Based on the sleeves the picture below is a few
years off the mark, but I liked the skirt.
Based on surviving period garments bicycle outfits especially seem to have been largely in practical earth tones. The bad thing is that I don’t like most shades brown on myself. I thought that gray, muted blue or dark green would be nice, but didn’t find anything suitable within my allotted budget (knitting yarns are pricey!) Black was a colour I had not immediately thought I even though I generally use it a lot, it felt too somber somehow, but black it became in the end - thanks to finding a very good sturdy wool in black. It had irregularities in weave which made it very affordable. I managed to avoid the worst ones in cutting and the less visible ones mostly blend in.
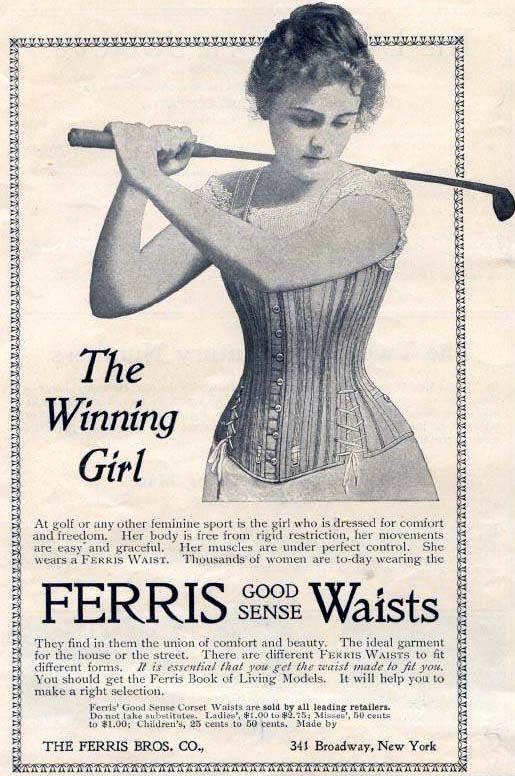
Advertisement from 1890s
I assume that the period correct thing for this type of outfit would be some kind of sports corset or “health corset”. I didn’t really want to take the time and effort for making one right now, so I had to think of other options. I had a ca 1870s short, breathable corset with really flexible spiral steel boning, but that too still had a steel busk. At the end I decided to fit the waist to a size I could wear entirely without a corset if I wanted to.
I looked at illustrations and took a look at some wonderful blogs, especially Sew Historically. I ended up drafting the skirt pattern based on a modern flared skirt pattern that fits me well. I added length at the hem, drafted side-front seams, removed the side seams (though I had to leave small darts at the waist) and flared the pattern a bit more.
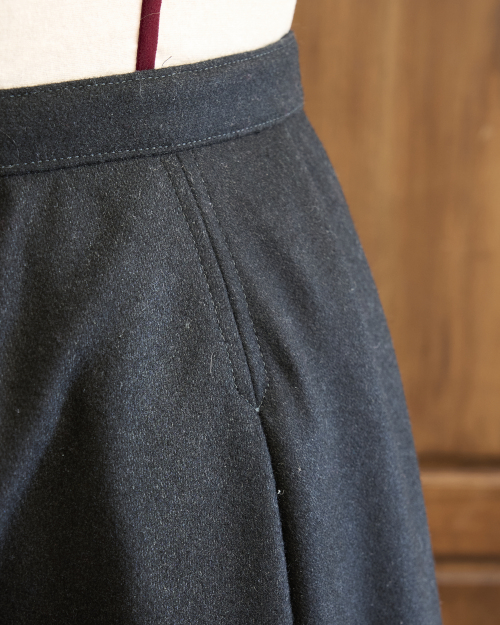
At the center back I added a deep box pleat. On the fitting I fine-tuned the waist fit a bit and shaped the waistband - straight at the back, slightly dipped and rounded at the front.
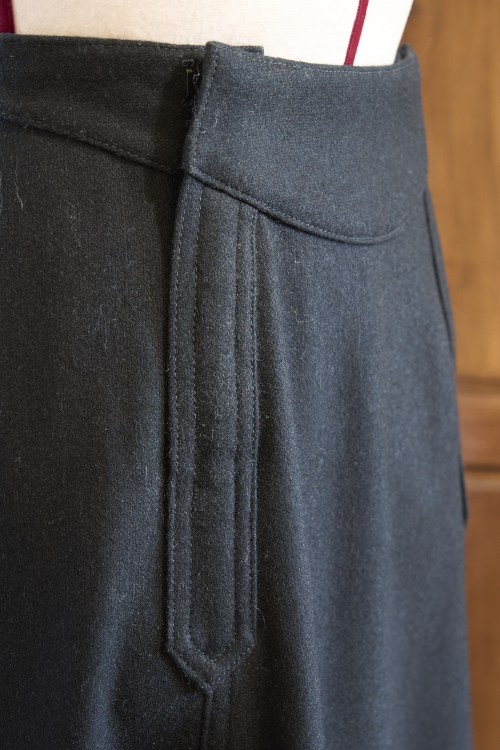
I made vents with sturdy hook fastening in both side-front seams. This leaves the option to move the hooks or eyes slightly, or add more in case I need to adjust the waist size.
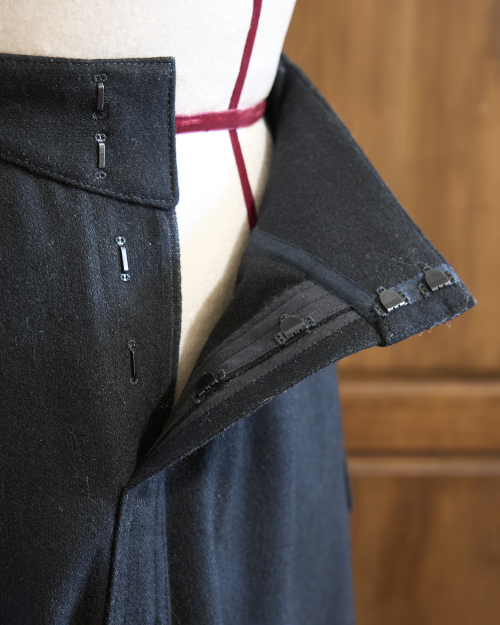
I sewed the skirt with a combination of period techniques and possibly more modern ones that seemed suitable to me. At first I had planned to use more overlock for seam allowances, but as the cut wool edge just oozed fine lint I ended up using hemmed or flat felled seams and finishing raw edges with cotton tape (much of it leftover pieces from other projects). I also realized almost accidentally just how useful tape was in joining pieces of thick fabric and so avoiding extra bulk at the waistline.
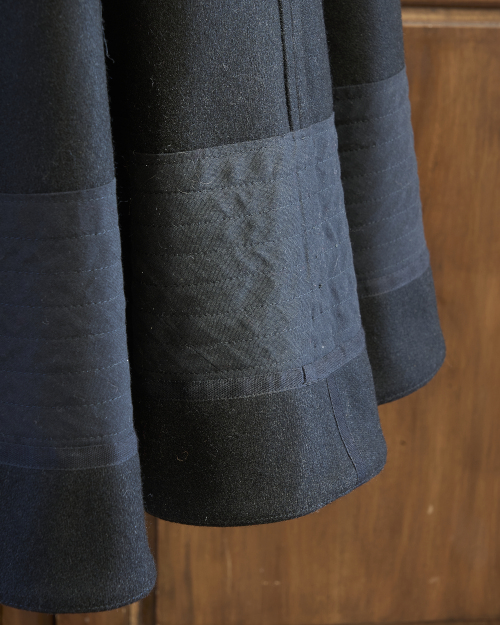
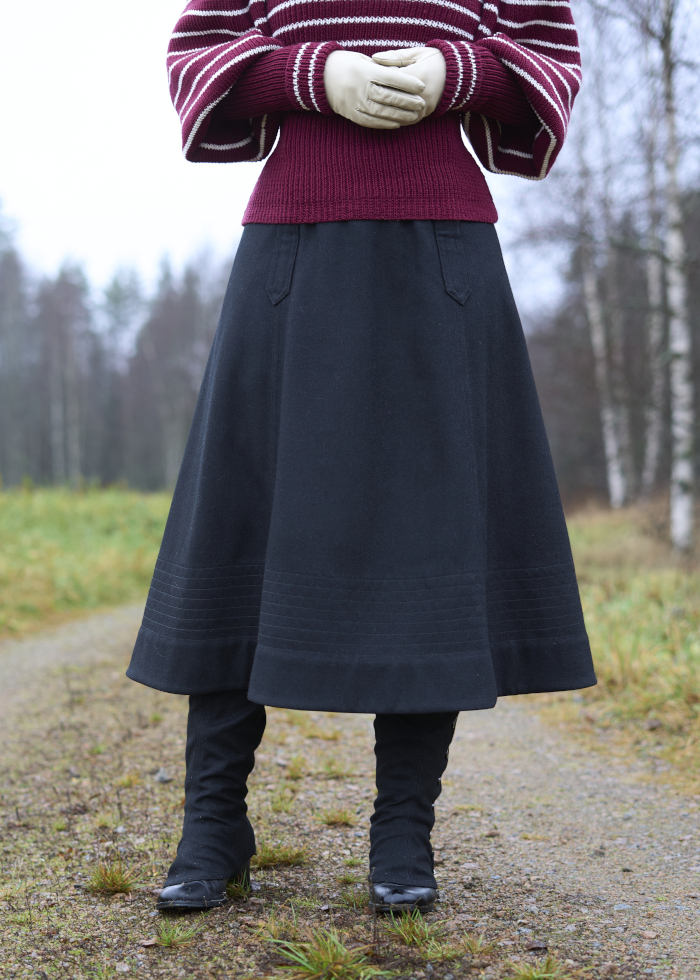
On the hem I basted a wide bias strip of cotton sheeting. Then I sewed eight rows of “Tailor’s stitching” to secure it. I turned the hem with a wide wool facing, sewed another cotton tape on its top edge and sewed it on the sheeting by hand. The finished hem doesn’t look as wide and stiff as in many mid-century fashion illustrations, but the stitching and facing give it a bit of shape anyway.
As stated above, the skirt can be worn without a corset, though the waistband is quite snug. The sweater adapts to any shape, and at first I thought I could wear just my modern bra and a long sleeved t-shirt. But when I tried the finished outfit on I had to admit that it looks so much better even with a very loosely laced corset. The waistline looks more defined and the rounder bust shape balances the massive sleeves. (I have probably already mentioned elsewhere that I use bust padding in my corsets, just as they would have done in the period if they found natural curves lacking). So, I decided to wear a corset for the photoshoot and then consider the underwear according to the activity involved in the future. I kept the modern t-shirt, though, as they definitely wore jersey underwear in the period too.
All my petticoats were naturally too long, but I still had in my modern closet a black knee length ruffle shirt from ca 2003. Leggings and woollen knee-high socks completed the undergarments.
Gaiters
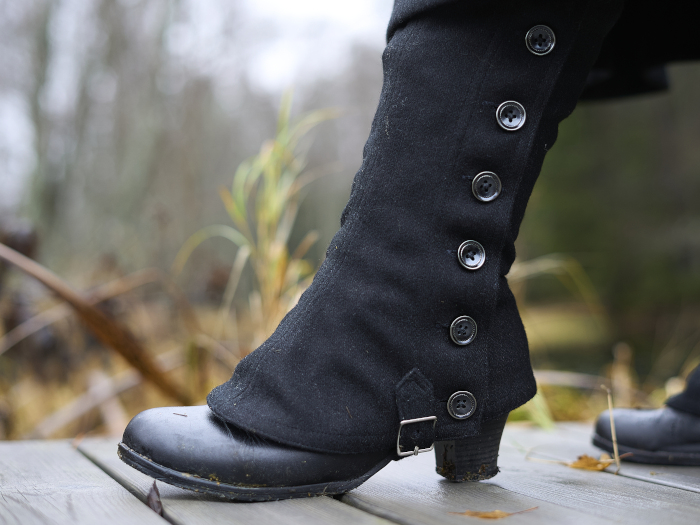
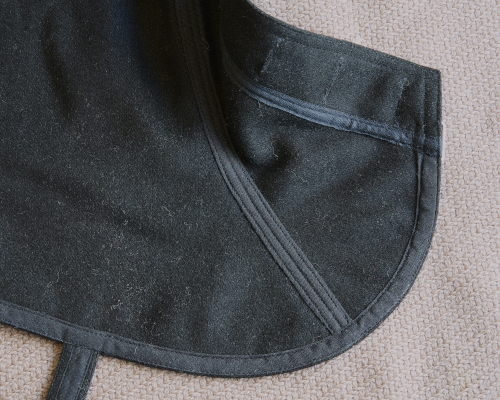
And of course the short skirt needed gaiters. I looked at pictures and chose a rather simple style ending below the knee.
“Fashions of the Gilded Age”-book had a couple of earlier patterns (not that they probably changed much), but I used them more as a guideline. I reasoned that I would probably get closest to a good bit by drawing the first pattern draft from the outline of my boot.
So, what shoes to wear? The modern but victorian inspired boots I use a lot with my 1870s garb had heels, which is not the best choice for sporty outings. The ladies on the fashion illustrations seem to wear boots with heels with bicycle outfits, though. So, I chose vanity over comfort, especially as I didn’t really have any practical shoes that would look even moderately historical.
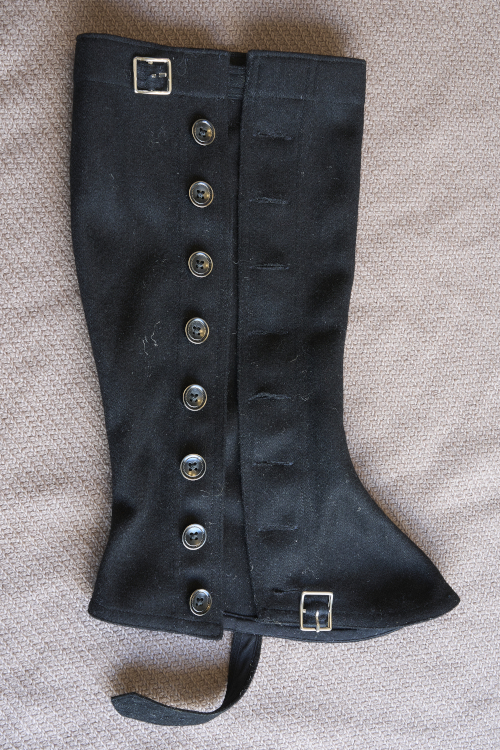
So, I drafted the basic pattern by the chosen boot and lengthened it at the calf following another modern boot with a longer leg. I cut a mock up in a cheap felted fabric with generous seam allowances and tried it on over the boot. After a bit of fine tuning I thought it would probably work.
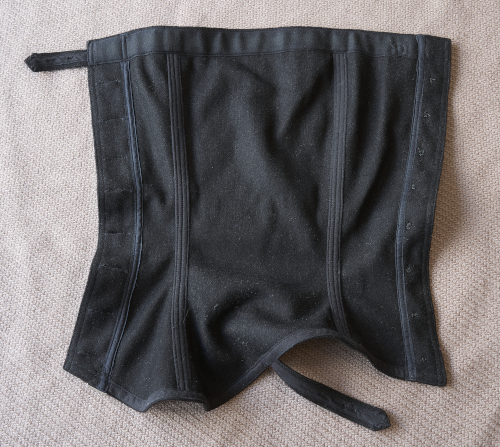
In the gaiters I again finished all the raw edges with various bits of cotton tape, both straight and bias.
I made the numerous buttonholes by machine. Unfortunately I don’t have a machine that makes nicer buttonholes with a curved end, so the thick fabric doesn’t lay smoothly between the buttons. Anyway, they will do.
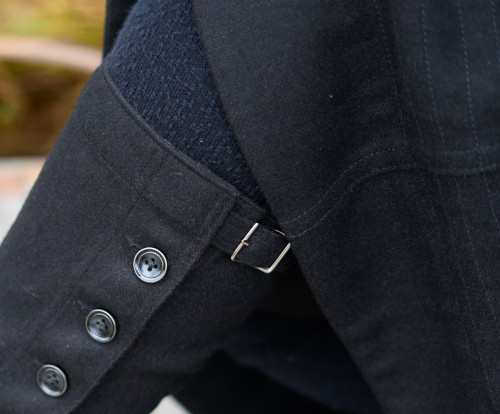
The gaiters ended up being a bit tight at the calf, but that was easily fixed by sewing the buttons a bit closer to the edge. I had also added a buckle closure near the top edge, mainly to fix the problem of having bought too little buttons, and it also proved to be convenient for adjusting the size.
The gaiters were quick and fun to sew and they look really nice.
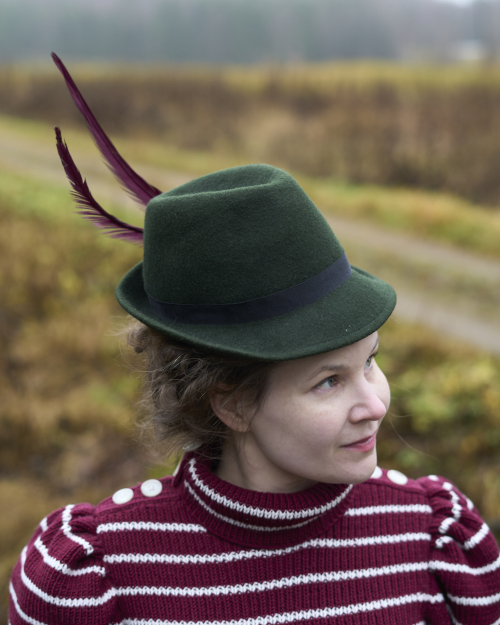
Hat
Boater-type headwear seems to have been popular with bicycle and sportswear (and of course generally popular in the 1890s). Unfortunately I personally find it a bit boring. In some pictures you see felt hats with partly upturned brims, which I liked more.
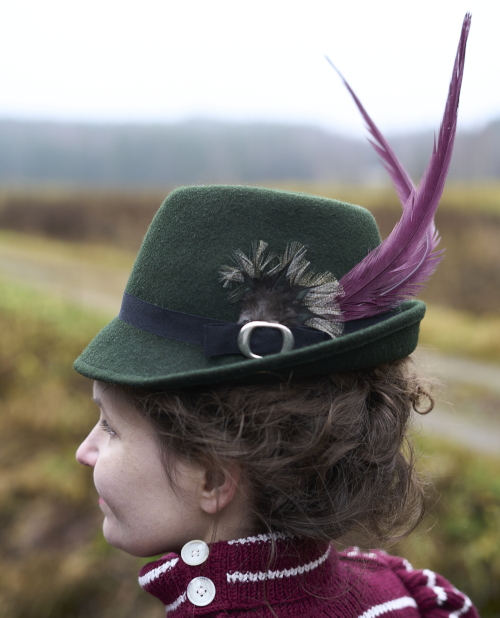
This thrifted felt hat is not probably quite the right shape, but I immediately liked it. It originally had a few rows of cord around the crown, which was not necessarily unsuitable, but I changed it to a black grosgrain ribbon to have something to match the skirt and gaiters. I also found a small buckle in the stash. I also couldn’t resist dyed pheasant feathers that perfectly matched the sweater, even though natural ones would have been probably more appropriate. The hat trimming is topped with another bunch of smaller feathers.
Conclusion
The bicycle / country outdoors costume turned out cute and comfy. The main purpose of it had been to get a nice knitting project, but other parts of the outfit were also fun to make. If I was into historybounding this outfit would work well as warm (really warm, actually) winter wear. Especially the sweater would be very wearable if only I had a coat where the sleeves would fit.
As for costuming / re-enacting wear, it has more than once happened that when I get a crazy idea to sew something without even an occasion to wear it in sight, sooner or later the perfect opportunity appears. Who knows, I might even get a chance to try bicycling some day. For a longer walk or a rougher terrain I may have to begin to look for more practical shoes, though, and hope the gaiters somehow fit with them.
I’m also rather tempted to try a matching jacket to complete the suit, as I think I may have enough fabric left. I actually chose the gaiter buttons because the same button was available in a larger size, and I bought those for the coat just in case. However, as usual I have a long list of projects I want to also get into, so the coat will have to wait either for some time or eternally.