2013 / 2014
This suit was yet another project in the long string of projects I had been planning for a long time but always postponed due to lack of time to properly concentrate on it. Something more pressing simply always came in the way or I just lacked the mental state to get it started.
Back in 2009, after having finally finished Jarno's first 18th century suit after a lot of struggles I didn't, to be honest, want to even think of making another one. Happily memories tend to grow less painful as time passes, and I also read and learned more about 18th century men's wear and acquired a much clearer vision of the subject than the shaky ideas I had began with. The second edition of the waistcoat also gave me a lot more practical experience and confidence. At some point I decided, that Jarno absolutely needed another a bit fancier suit some time in the future. It would be a proper three piece suit all in the same material, something which would bear some distant resemblance for 18th century suit silk and fit in my hobby budget.
So, I began to look around for a suitable material. The right one waited for me in Stockholm where I was visiting in my winter vacation in February 2012. Just like Jarno's first waistcoat, it was a viscose upholstery fabric in soft antique green with a small pattern in gold. For those backing in horror I'd like to point out that viscose was the first of the man made textile fibres, and was originally marketed as a cheap substitute of silk, and as it's made from wood cellulose it does have some qualities in common with textile fibers. Well, silk is not a textile fiber, but anyway. While the material I chose was completely not authentic it had a beautiful soft sheen, it was nice to work with, it's breathable and thus pleasant to wear (poor Jarno is always sweating in his wool suit), and of course affordable.
While I had the material (I bought a generous amount to be sure) choosing the style and decade took a considerable time. I love the cut of 1740's with the wide skirts and insanely vast cuffs, but then there is the cute idea of dressing up as a couple, which makes 1740's a bit early as most of my current wardrobe is somewhere between 1760's and 1780's. The great change in the shape of men's fashion seems to happen around 1760's, and while I love ladies fashion on the 1770's I'm not particularly excited about where men's fashion is going. The silhouette becomes very narrow, which looks best on tall and thin men, and the signature look is acquired largely by intricate embroidery instead of flamboyant cut. I find embroidery in a larger scale too time consuming, and am generally more fascinated by getting the cut right. I also think that the styles of the first half on the century, which despite the wide skirts look somehow more masculine look decidedly better on a big guy like Jarno.
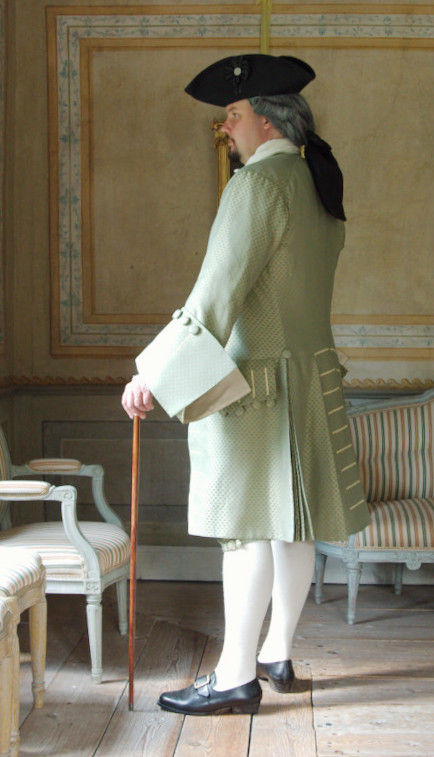
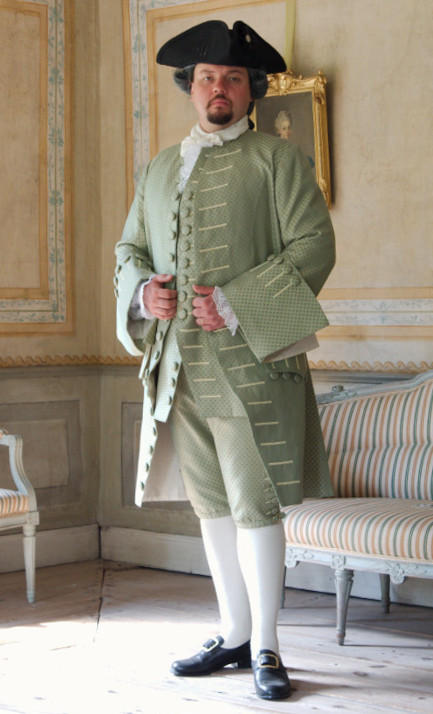
I searched the internet for ideas, and the one that remained my favorite in the end was this beautiful ensemble in V&A (T.137 to B-1932) Jarno liked it too. (You may wonder if he had any choice, but I assure you that he is particular about his historical garb). The suit even had a pattern a bit like the one in my upholstery fabric, though larger.
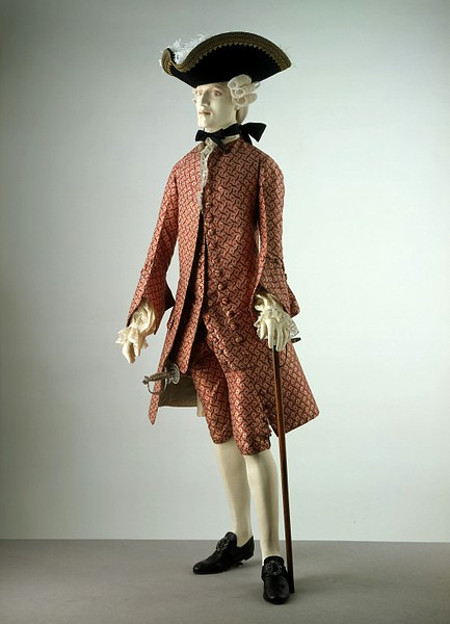
On the website it says that the suit is dated 1765-1770, which sounds a bit late to me considering the style, especially the striking cuffs of proportions more reminiscent of 40's or 50's. On the other hand the waistcoat is rather short, which is an element of a later style. But then again both the waistcoat and the coat have buttonholes and buttons all the way down! Okay, I still don't know that much of 18th century men's fashion, so all this is guesswork. Perhaps the suit was done for an older, more conservative gentleman, whom you can still see in their large cuffs in 1760's portraits? I should think the people on V&A know their job, so I have no desire to question the given dating – I guess it's an example of a period of changing fashion, still retaining some older elements.
EDIT. When I was revising this page in 2024 I checked the museum site again to fix the link, and found out that they had changed the dating to 1750's. That's interesting!
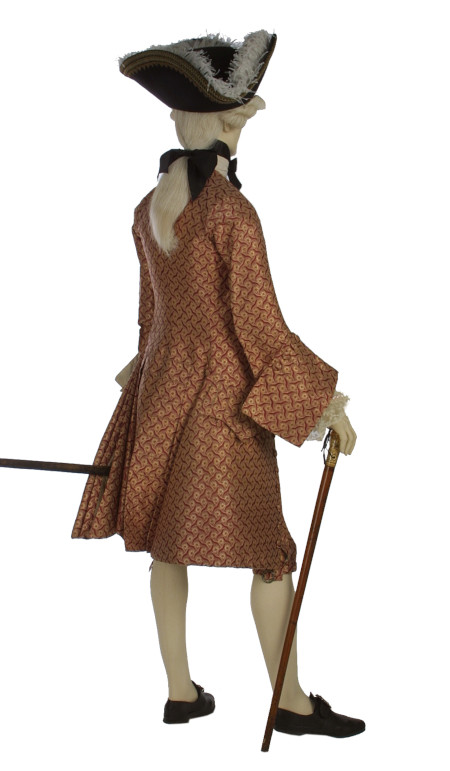
Anyway, what ever the exact year it was originally made may be, it is after all an existing three piece suit from which several good photographs from different angles are available. So I decided to pick this suit to be my sole pictorial design source for this project instead of attempting to make some creative patchwork from several different elements. Naturally when it came to construction and details not visible in the website pictures I would have to consult other sources too and try to pick the things most likely work according to my still modest knowledge.
So, this was the long planning stage. But to actually begin drafting the patterns still had to wait for finishing all more urgent thing which seemed to pop up all the time and other distractions, until at last I had some uninterrupted time to bury myself in the sewing room with rules, paper and old charity shop sheets for mock ups with also Jarno in attendance ready for interminable fittings. This was during my winter vacation in 2013, so the bolt of fabric had matured in the corner for a full year.
EDIT: At the moment the V&A site shows less pictures of the whole suit on a dummy, but intead more detail pictures including the waistcoat and breeches. It was interesting to note that the breeches were more or less like I had thought they might be, but the waistcoat back was different. (2024)
Drafting the patterns was naturally based on Jarno's first suit patterns. The basic cut I had chosen for this one was quite similar, only some details had to be changed, but the fit in general needed more work. I began by dressing up Jarno in his first suit and then taking a critical eye on what needed to be improved.
The waistcoat
was a piece of cake: Just pinning it a few centimetres shorter
and opening a bit more at the bottom. I had already drafted
the armhole higher for the silk one, so that
was pretty much it. I also decided that as the suit contained
so many earlier elements the back lacing would not be wrong
although I could only speculate its existence under the coat.
Päätin heti alkuun turvautua myös housuissa vanhaan kaavaan. Valokuvia tuijottamalla olin kovasti näkevinäni liivin alta pilkottavan sepaluksen napin, joten päätin että vanhempi housun malli napitetulla sepaluksella sopisi sinänsä hyvin. En ole enää aivan varma, onko Jarnon ensimmäisten housujen leikkaus ihan sitä mitä pitäisi, vyötärö on ehkä tähän vanhempaan housumalliin vähän korkea. Se kuitenkin toimii, ja enemmän edestä aukeavan liivin kanssa en lähtisi ainakaan vyötäröä madaltamaan. Toisaalta vyötärökaitaletta voisi vähän leventää ja madaltaa vastaavasti housujen yläreunaa, mutta myönnettäköön että olin liian laiska lähtemään muokkaamaan toimivaa kaavaa kohdasta joka ei käytössä juuri koskaan näy.
The old breeches had stretched in use hugely and at first I thought I would have to resize the pattern. I began by making a mock up with the old pattern to see how I would alter them, and to my happy surprise the mock up breeches fit perfectly. The too large waist which had caused problems was just right cut in non-stretchy material and also because Jarno had grown back to the size he had been when I originally cut the old breeches (he quickly lost weight right after that). I thought that my upholstery material would not give in as much as wool, and also decided to add a heavier interlining to the waistband. I did, however, shorten the waistband by a few centimetres, as Jarno's weight does fluctuate, and made the back slit a bit longer to give more allowance. I also lenghtened the leg 2cm so I could add a proper knee band on top of it rather than as a cuff like previously.

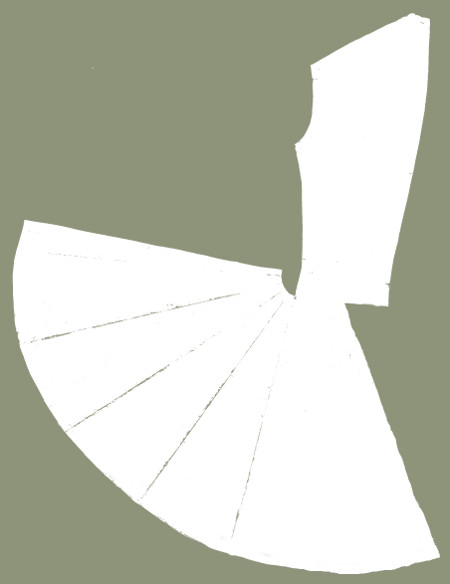
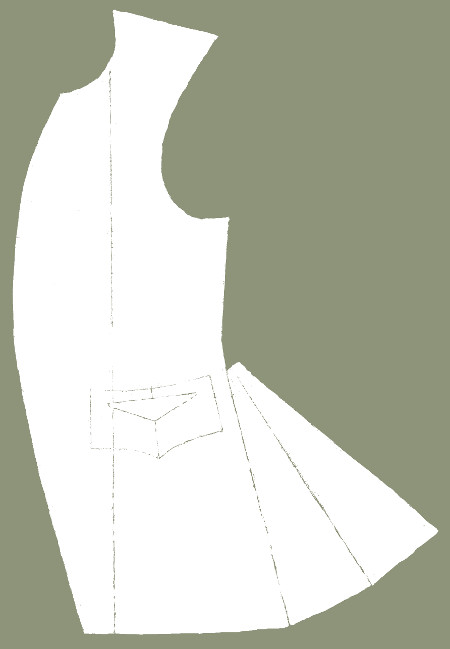
The pattern for the coat was a lot more work, as I was not by far happy with the previous coat's fit. The skirts and the pleating in them works okay, so I decided to keep them, but the coat torso and sleeves needed serious changes.
The once re-cut sleeves had been an expedient measure ruled by urging deadline, and I had never been totally happy with them. Their fit is way too modern, of which I am becoming more and more conscious all the time. The shoulders keeps sliding towards the sides all the time, so I guess they may be too small. So, I began working on both with numerous mock ups.
I also suspected the skirts starting too high, so I lengthened the waist by 2cm to begin with. Having studied the pictures of the V&A suit for clues of fabric grain on the patterns I decided to try to rotate the fabric grain on the coat fronts slightly, which happily worked miracles. The front edges began to curve out more and the pleats settled in the back. Of course I had also curved the front edge too at the bottom.
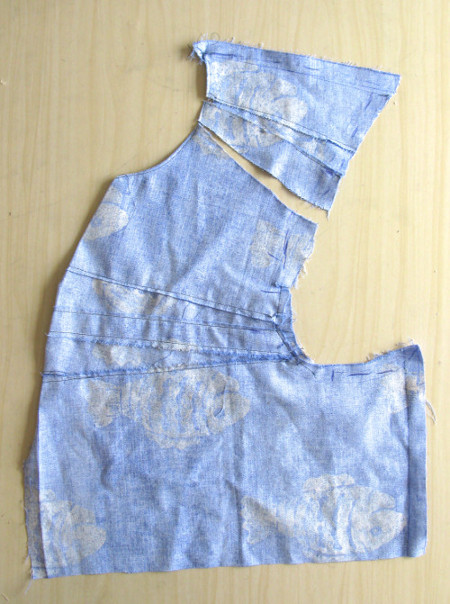
While the coat began to look nicer from the waist down, the top part was more tricky. It seemed too tight at the chest and shoulders. The great moment of inspiration came with cutting a horizontal line on the front at the chest line and pinning a scrap of material to fill the resulting opening. I ended up adding 1,5cm at the armhole and a bit over 8cm at the front edge. When I transferred this adjustment to the pattern I saw clearly why the period patterns curve out at the top, as my pattern suddenly had the same shape. I had, originally, drafted the coat pattern mainly bu enlarging the waistcoat pattern, and it had not occurred to me that the coat fronts, mostly left unbuttoned, needed a bit extra length to fall gracefully. The period coats also had padded chests, which of course needed room in the pattern too.
I also cut open the shoulder in a few places
and pinned some more fabric on the opening. Like usual,
Jarno's pattern looked somewhat differently shaped that
period ones as he has a very straight shoulder line quite
different from the sloping ideal of the period. Still,
something in the shoulder area seemed to be amiss, and at
last I ripped open the shoulder seams and let the fabric
settle on the shoulder as it was wont to without regarding
the seam lines.
To my great
surprise the front and back piece did not align at all when
not forced to, a useful remainder of never closing the
shoulder seam too early. When allowed to go where they wanted
the front moved towards the shoulder while the back settled
lower and more in. I ended up raising the back neckline for a
total 4cm and also widening it at the armhole. This might of
course be caused by lengthening the front at the chest, so it
might be that I was in reality going back and forth. Be that
as may, after some patchwork the new shoulder seam aligned
again and the shoulder area seemed nicer.
Like I mentioned earlier, I had originally drafted the coat pattern from the waistcoat and the waistcoat in turn based on modern waistcoat pattern. This may have caused most of my problems with the shoulder fit, but it's especially visible on the armhole. Now, having studied the period patterns more I realized that the armhole in the original coat pattern was huge both in width and height. Probably I had also been careful not to restrict the arm movements with a too small armhole and tight sleeves, but now, having also been introduced to late medieval sleeve cut in between, I have come to realize that the historical key to well fitting sleeves that also allow some arm movement without causing strain on the bodice was to make them tight but not too tight with a relatively low sleeve head. This is miles away from the fit we associate with formal suits today. So, no wonder that I never managed in incorporating an 18th century shaped sleeve into my vast armhole.
I worked on the mock up, pinning extra fabric on the armhole and adjusted it's shape both with and without the sleeve mock up. Again, adding space on the shoulder may naturally have caused the armhole move lower, and at some point I suspected having been caught in the trap of altering both on turns creating new problems all along. Anyway, having finally finished, I compared the new pattern to the original to find out that the new armhole was really smaller, especially on width, which added to the width of the chest. It was rewarding to notice that this new shape was much closer to period patterns. One thing which made figuring out the shape and proportions of the pattern was the sheer size of Jarno's patterns, which made it harder to take in on a view, a thing that has always caused me problems. This time I came out with a trick of taping the large pattern pieces on the door and taking a look from the other end of the hallway, and then comparing them to the scaled copy of a period pattern. I found this very helpful.
After all this
tweaking, having perhaps added too much on the shoulder
already, the waist began to look too long again. So, I took
out the 2cm extra length I had previously added.
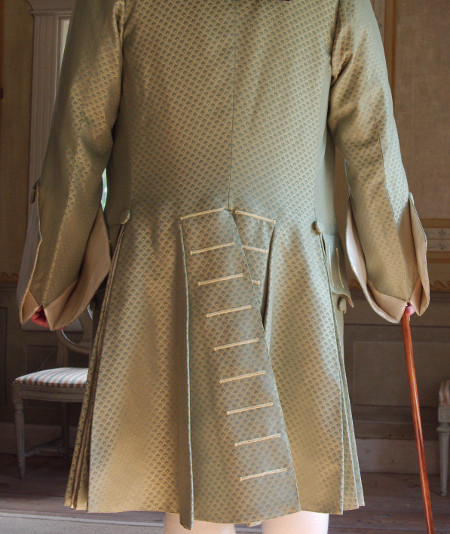
The pocket was
easy, I just copied the old pocket flap I was still happy
with, and only moved it's placement a bit towards the back.
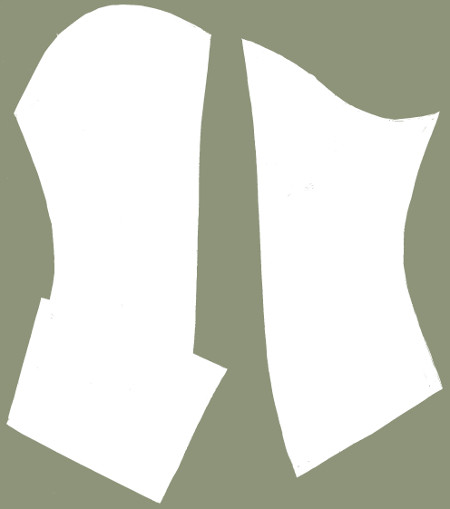
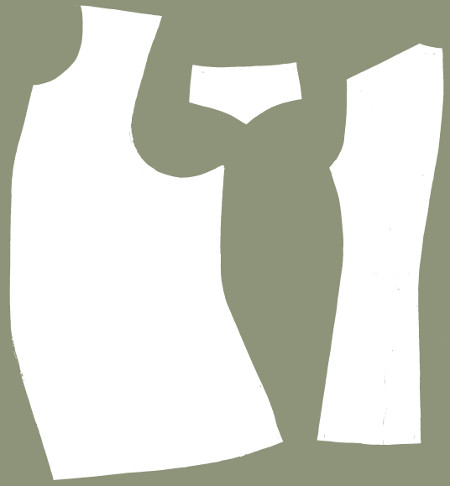
I worked on the sleeves simultaneously with the coat torso. I had already when trying the old suit on Jarno pinned the sleeves narrower, as I had decided they should fit more tightly on the arm. I slowly transformed the former sleeve pattern to a more period correct shape with many, many mock ups. My main period pattern source was a 1730's suit in Waugh's “The Cut of Men's Clothes” (diagram XIX), which I had consulted a lot for the coat pattern and especially the skirts. The 1730's pattern is of course much earlier than the date given at V&A, but the sleeve looks very much the same.
I curved the front seam more and widened the sleeve end. I raised the underarm a bit to make the sleeve head lower. I also had to shape the front curve of the sleeve head lower. Instead, I added more space at the back curve. It causes some wrinkling at the back underarm, but I have come to understand this is necessary for the arm movement and a feature of 18th century suits rather than something to be avoided.
After a lot of fitting and pinning and adding fabric I finally had a pattern I was relatively happy with. It looks totally different from what I started with. When I finally realized I had to make the front seam longer at the top and add more space there the sleeve head somehow mysteriously began to take a shape more similar with period patterns. It was lower than the original, but much wider, which gave the necessary space for the arm. Having acquired the sleeve head shape I fixed the armhole to fit it.
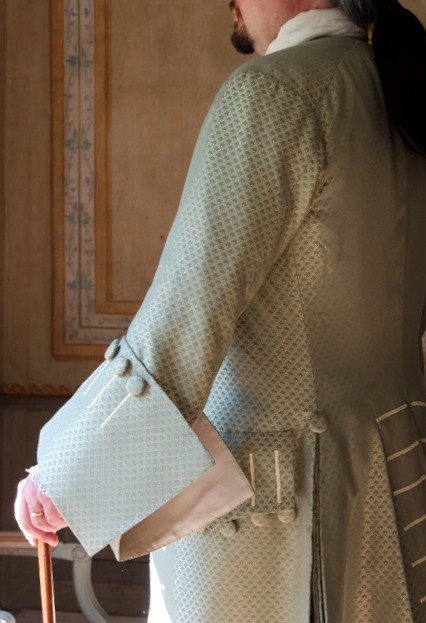
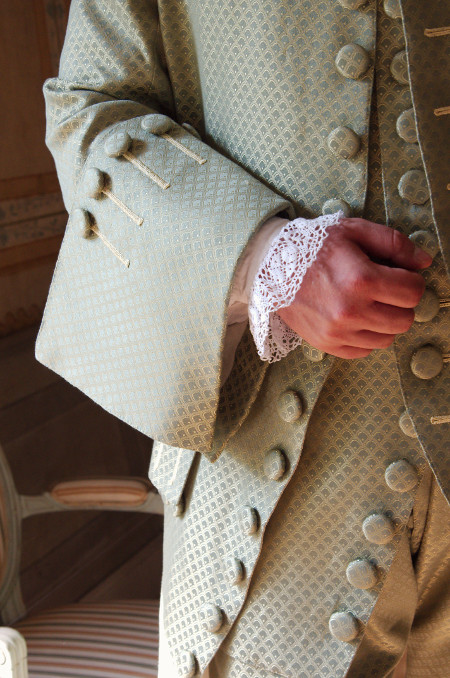
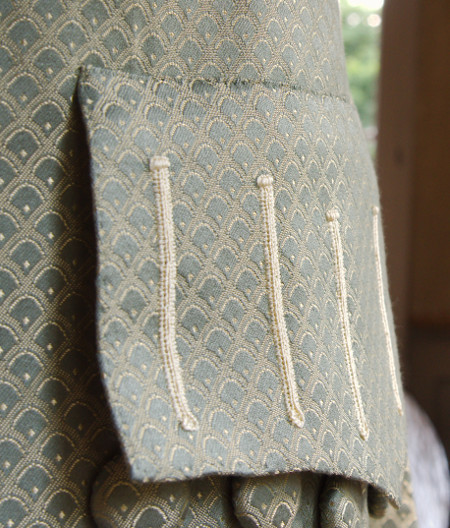
The sleeve cuff is also modeled after Waugh, and I also cut it out on old sheet to see how it would look. It may be slightly smaller than in the V&A suit, but looks balanced. With this type of large cuff the sleeve also had to shortened a bit to show off the lace cuffs and also not to look too heavy.
The grand
pattern reform had to be interrupted several times due to
other pressing matters, and of course also performance
anxiety and sheer laziness played some part. My goal was to
work on the patterns and test them with mock ups until they
would be absolutely perfect and final so that I could put
the suit together without too many fittings or having to
adjust anything. It would be damn inconvenient to have to
change my seam lines or allowances after sewing on all those
interlinings for example. At last, some time during the
spring I finally got the patterns finished to my
satisfaction.
The materials
Besides the
already mentioned upholstery fabric quite a lot of other
materials went to the suit as well. The breeches are lined
with cotton, though linen might have been a more period
correct choice. The back piece and lining of the waistcoat are
in linen, as well as the coat back and sleeve lining.
The whole
matter of lining the coat had caused me some headaches, mainly
concerning what to use for it. In
the Costume Close Up suit, and most of other sources I've
studied the coat is described lined in silk except the top
part of the back (and possibly sleeves too) with linen, as the
latter won't show when the coat is worn. My problem was what
to use for the “silk” part.

My textile knowledge of the period is not very strong when it comes to what the textiles of the period actually were like (apart from fiber content), the feel, the weight etc, having seen most of the originals only from photographs or from some distance behind a glass. As my fashion fabric, the upholstery viscose was not that stiff I thought it could use some backing from the lining added to the interlinings. My budget did not allow a silk taffeta lining, which would of course be insane with a cheaper fashion fabric too, and polyester taffeta would be too stiff, not very nice to work with and would not breathe at all. Modern ultra thin lining satin is too flimsy, and the bit heavier viscose one used for coats etc can be annoying to work with too. I had in my mind some sort of combination of the flimsy lining backed with linen, but then I happened to find a length of heavier satin (probably viscose) at my favorite second hand shop. It was in a perfect cream shade. I decided to use it, possibly backed with linen at some parts on the coat.
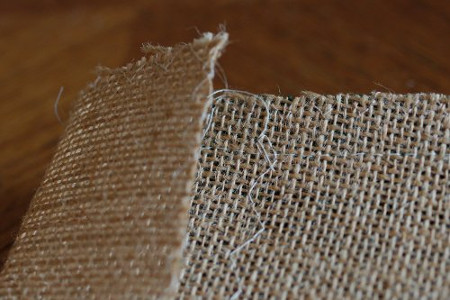
For the interlining I again used heavy
jute. I guess I should some time try and find real
buckram, but for the moment I like my inexpensive jute.
Its heavy but loosely woven so it breathes. In addition I
used linen of a few different heights and at places also
cotton tape to reinforce some edges.

On the silk
waistcoat I had used cotton embroidery floss on the
buttonholes. It had been nice to work with, so I had wanted to
use it for this suit too. But alas, believe it or not, from
the giant range of colors I couldn't find a shade that would
match either of the colors of the suit fabric! Frustrated, I
ended up trying the shiny viscose crochet thread I had used in
Jarno's
first waistcoat. It looked surprisingly good. It was
thick enough to get buttonholes done quickly (a thing not to
be underestimated) and seemed to have proved durable in use
too.
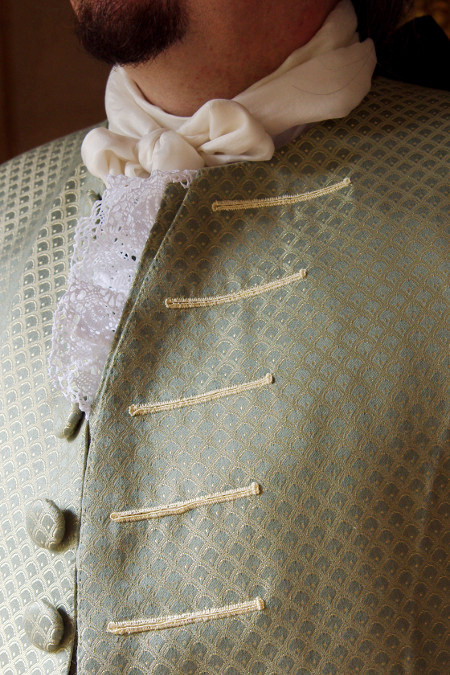
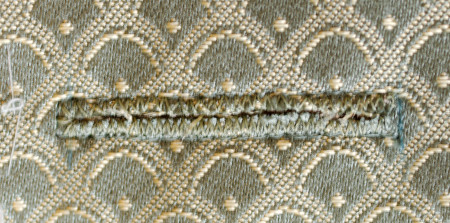
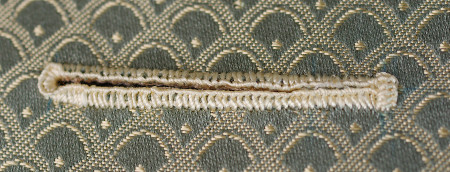
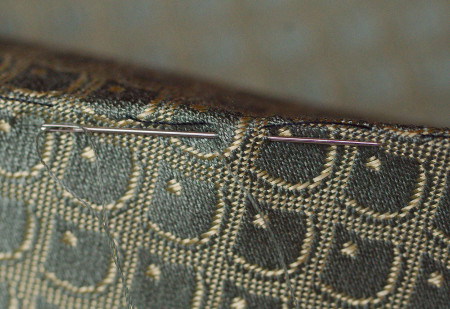
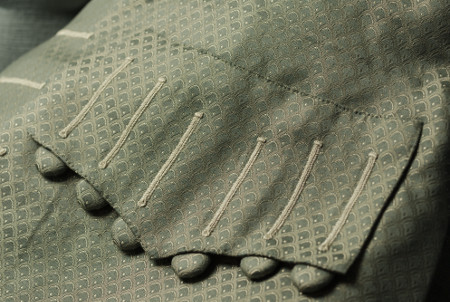
I had worked it over a heavier cotton thread base before to raise the buttonholes, but later, after having studied period examples more carefully I had realized that simple thread buttonholes tended to be slimmer. I made a test version on a scrap of fabric with only once length of the same viscose thread for base, and it looked much more delicate and elegant. I was not unhappy at all to get to skip covering the heavy thread ends.

I was still not, however, happy with the
thread color. It matched the fabric so and so in warm
indoors light (candlelight would be ideal) but on daylight
it was too rose gold for the light yellowish gold in the
fabric. There was another shade in the shop, which look
canary bird yellow to me at first, but went surprisingly
well with the fabric. It's quite light and almost jumps
out, and I'm still not quite sure if it accentuates the
buttonholes rather too much in a garish way, but I decided
to go with it nevertheless.
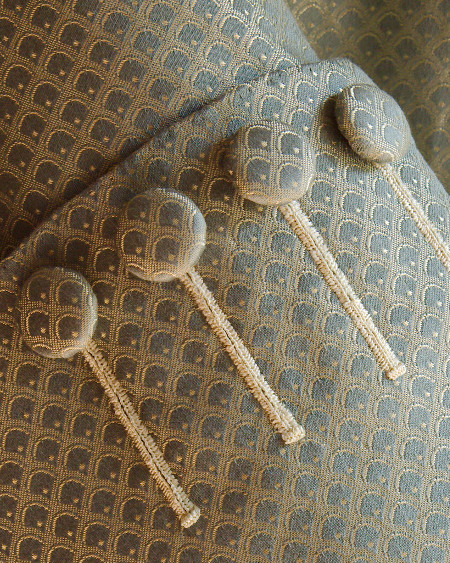
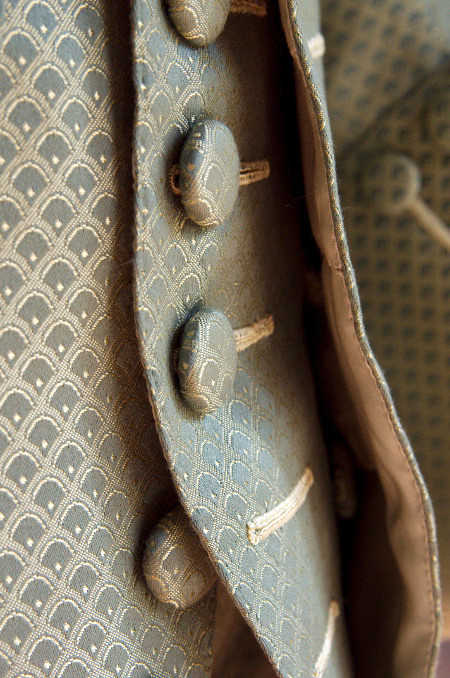
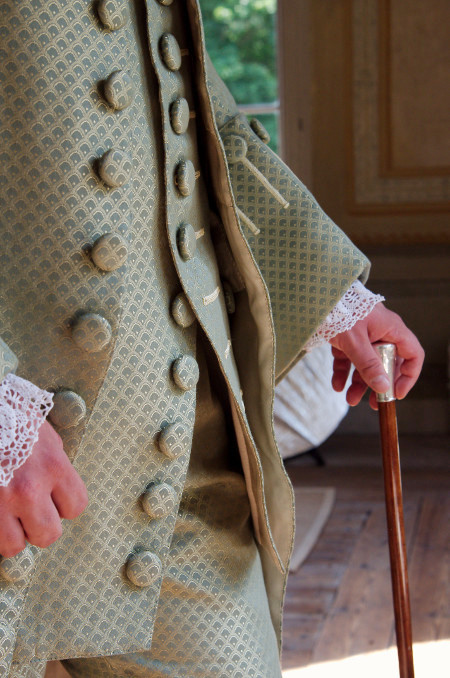
Buttons
In the V&A suit, as well as in
most silk suits of the period the buttons are covered with the
suit material. It's a great thing for a costumer with more time
than cash, because there are a total of 68 buttons.
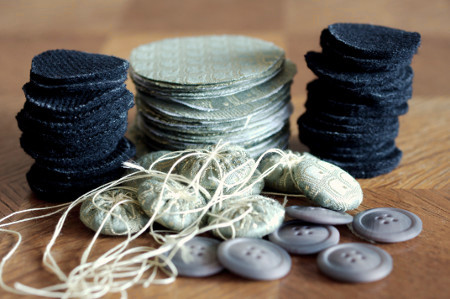
For the base I used cheap thrifted
plastic buttons. As the fabric frays easily I succumbed to using
iron-on interfacing, because honestly without it it would have
been nearly impossible. Tracing the
pieces, cutting them and ironing the interfacings took some
time.
For the breeches I used ca 1cm
diameter buttons, and they were really fiddly to make. The
larger buttons for the coat and waistcoat were much easier, if
also time consuming.

I the latter I added a piece of medium-thick wool, which made the edges beautifully rounded. I tried to improve my technique from the breeches buttons by gathering the edge regularly (it was made easy by the pattern) and then joining the ridges that had formed. On the larger button the allowances had more space, but the underside still became quite thick.
I worked on the buttons for a long time, a few at the time whenever I had a spare moment during a day. That way the work didn't seem so endless.
Beginning on the sewing
& Unfortunate turn of events
With the 15th century doublet and especially the above meationed silk waistcoat I had began to understand more hand sewing based construction methods compared to my school-taught modern sewing logic which was still ruling strong when I made the first suit, and realized how wonderfully they really make sense when you are working with something that was originally designed to be made that way. Another great break through in my understanding of 18th century men's wear was coming across the wonderful book “Costume Close Up” by Linda Baumgarten and John Watson with Florence Carr), which I first loaned from Riikka for some pattern and quickly decided that I needed a copy of my own. It really opened up some of the construction mysteries I had battled with. I gradually came to realize how little I had known before and how my attempt to force modern sewing logic and construction ideas to an 18th clothing century item had caused most of the problems I had battled with.
As usual, I had bought a generous amount “just in case”, and when I cut all the pieces at once I managed to fit them quite nicely even though the pattern had to be kept on the same direction everywhere.
After cutting the interlining pieces I finished the edges. I had first thought to use simple zigzag but to my surprise 3-step zigzag was most effective in keeping the edges from fraying.
I basted most of the balance marks and sewed on the first pieces of interlining in the pocket flaps and the back slit pieces, which I packed to take with me to my summer holiday (Sweden again). I had planned to begin with the numerous buttonholes in these small pieces and then begin slowly working with the rest of the suit.
At the second day we returned from a tour on Gripsholm castle to find that our car had been broken into. The filthy thieves had grapped my sewing bag with all my tools and the whole bolt of buttonhole thread. Even though I had left some of the pieces at my cousin's where we were staying I was unable to get on with my sewing for a whole week.
So, I had to sit empty handed on the car and elsewhere, which resulted in a lot of afternoon napping of course. Other than that, the rest of the holiday went great. But when I got home I was in for another nasty surprise: In the haberdashery shop they had run out of the thread. Happily they were lovely and ordered a new batch, for which I'm eternally grateful, even though I had to wait a month for it.
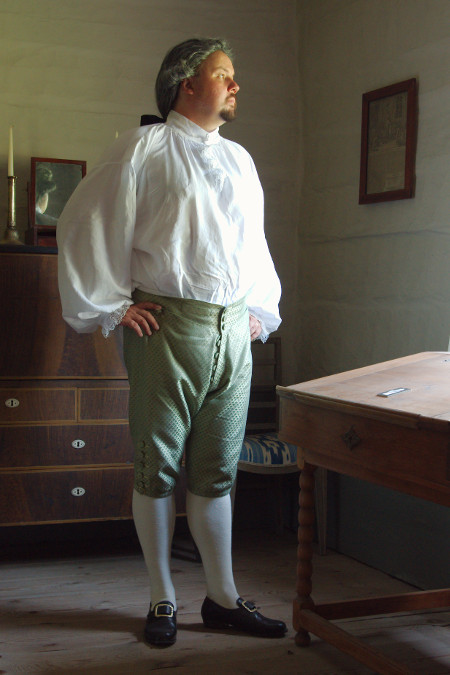
A month is a long time for one already impatient from the previous delays. What's more, I had planned to concentrate all my energies on this one project and thus didn't have absolutely anything else to sew. There was not much I could do for the suit (save sewing on interlinings) before getting things like pocket flaps done, and I was also craving to get something to do in bus and coffee breaks. Then I happily realized that there were after all the breeches which would not have the fancy shiny buttonholes. I had originally planned to begin with the waistcoat and coat mainly because I was too lazy to try to remember how the pockets in the breeches were put together, but now I was forced to face them.
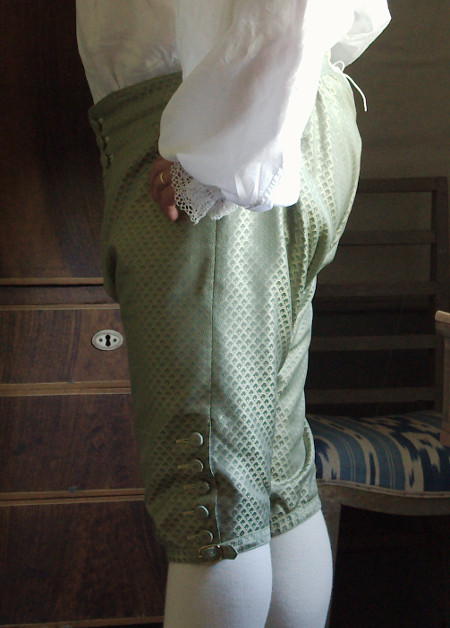
While I had kept the basic pattern the same I wanted to make the details in a more period correct way. I had lenghtened the leg 2 cm so I could add a proper knee band on top of it rather than as a cuff like previously. I also wanted to make a watch pocket on the waistband. Both follow the breeches (garment no.18, dated 1750-60) in Costume Close-Up. I did, however differ from it by leaving out the side seam pockets. Why? I thought them kinda useless, and was afraid they would gap, like side seam pockets tend to do.
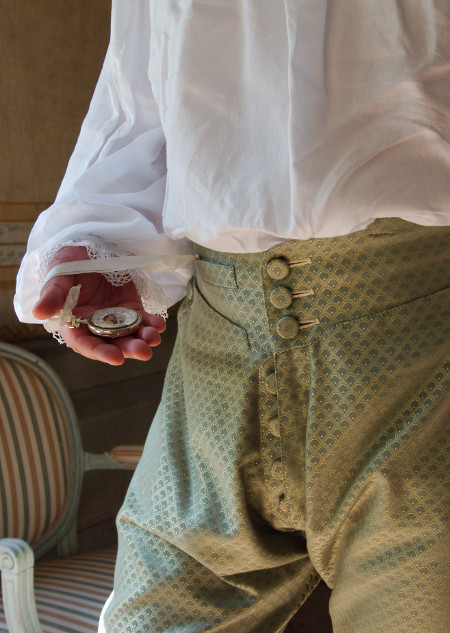
I attached interlining on the waistband, the buttoning piece on the fly, the top corners of the pockets and the knee openings at the top side where the buttonholes would come. I sewed the seam allowances on the waistband on the interlining and made a watch pocket on the right side waistband. I thought it must be something like a modern breast pocket of a coat, so I made it as such finished with hand-stitching. On the inside I put a loop of ribbon for securing the watch.
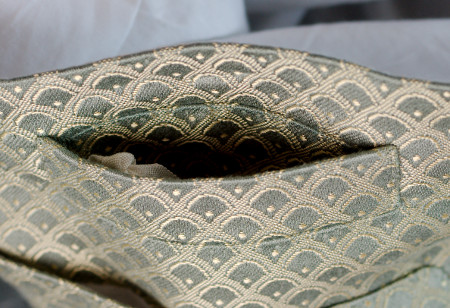
The front pocket
construction came back to me when I just began on them, so
it was really not that hard. I did have some problems with
the side opening ending in a tiny dart, which had been easy
on felted wool but on this material the narrow allowances
began to fray. After the pocket tearing already on the
making stage I gave up and resorted to a piece of modern
iron-on interfacing. Of course I also added a lot of hand
stitching to strengthen the slit.

This time I tried the trick of folding the inseams on the breeches and sewing them through the two layers as demonstrated on Costume Close Up. I thought it a simply brilliant way of strengthening the seams which take a lot of strain in tightly fitting breeches. After closing the seams I added an extra piece on the back piece knee for the buttons. Then I sewed on the waistband, gathering the back on it. On afterthought I should really have taken the time to do the gathering by hand, it would have been much neater. I sewed the seam allowances on the waistband interlining by hand and added a row of hand stitching on the top.
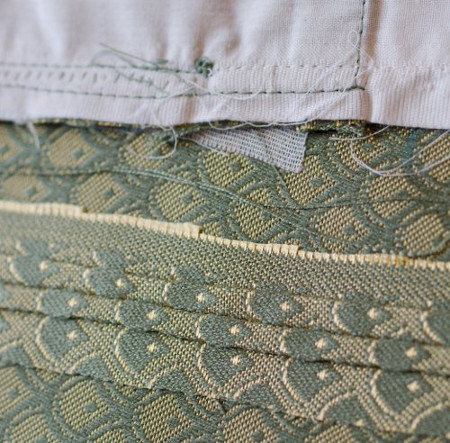
For the lining I used cotton batiste like in the first suit, but this time I did not try to dye it, having finally gotten rid of my modern obsession of the lining matching the fashion fabric. Following the Costume Close Up I made up the lining separate and sewed it by hand on the top edge of the waistband, back opening and fly opening. On the leg I left the bottom edge still open at this point but sewed the lining on the buttoning slits at the side seams. Then I began working on the buttonholes.

Kasasin myös vuorin
Costume Close-Upin mukaan kokonaan erikseen
vyötärökaitaletta myöten, ja kiinnitin sen päälliseen vain
vyötärökaitaleen yläreunasta ja taka- ja sepalushalkioiden
reunoista käsintikkauksella. Lahkeissa jätin alareunan
vielä auki ja kiinnitin vuorin napitushalkioiden reunoihin
askarrellen päällisen tapaan lisäpalan napitusvaraan.
Sitten aloin työstää napinläpiä.
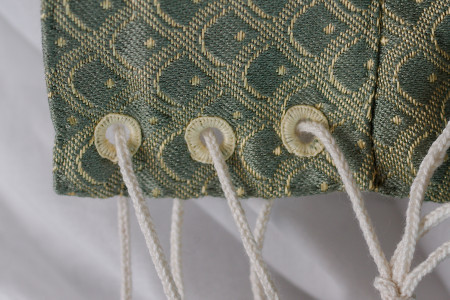
Actually I had already began the buttonholes from the separately made buttoning piece that would go on the fly opening, having made up that little piece early on. Unfortunately I had not hack much luck in finding a silk buttonhole thread that would match the fashion fabric, so I had to settle for a polyester one. It's not as nice and shiny, but will do for the breeches where the buttonholes are not as conspicious. On the back edges of the waistband I made lacing holes.
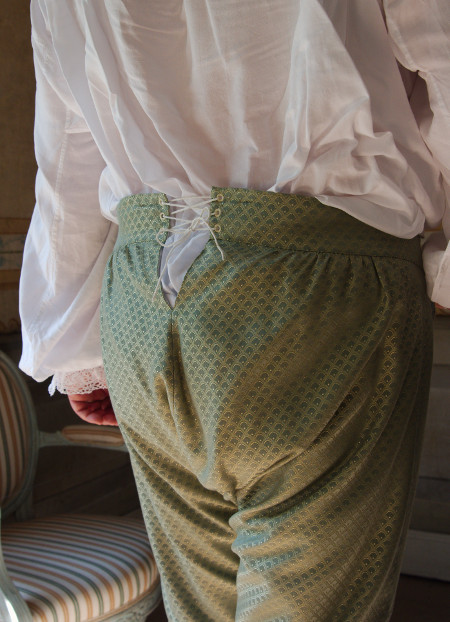
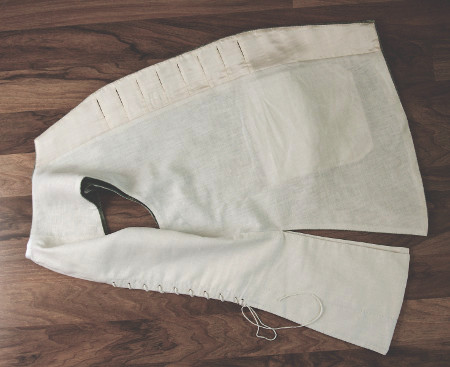
When I had made the buttonholes and sewed on the buttons on the fly and knee openings, and of course the back lacing too, it was the time to try the breeches on Jarno. The back vent opened quite much, and this made the gathering at the back to settle more towards the side than I had intended, but then again I have never made nor bought pants that would not give in a bit at waist with some wear. The top part of the breeches seemed okay, and I mainly wanted to see the legs.
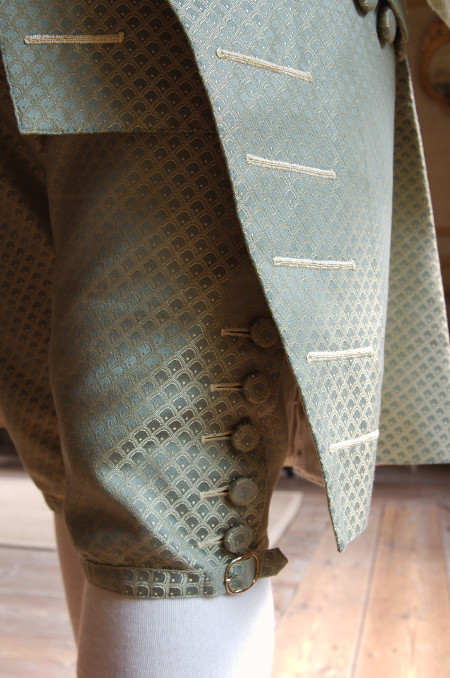
On the previous pair of breeches I had finished the knees with a separate cuff, gathering the front to get some room for the knee while keeping the edge tight. This time I wanted to make a proper period correct knee band sewn on the top of the leg and closed with a buckle. I'm not sure whether you are supposed to have gathering at the knee at all, especially on stiffer silks it might not work, but I decided to try to sew gathering threads on the legs and see how it would work. On the fitting my slightly gathered knee looked okay, so I turned the edges under and sewed the lining on.
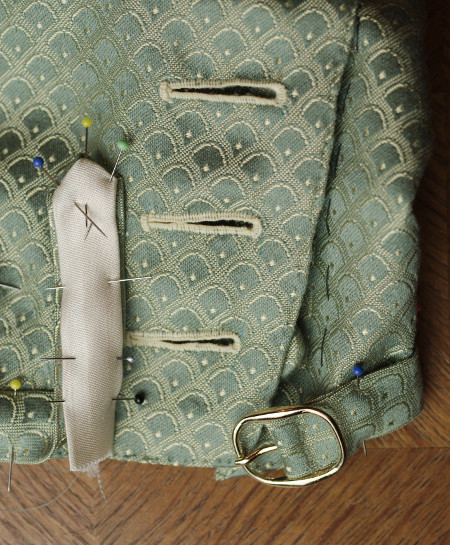
Costume Close Up shows a knee band cut in bias to mold better on the curved leg, which was very welcome news. I cut a piece of generous length, pressed the seam allowances and pinned and stitched it on the knee. In place of period correct knee buckles I cheated a bit and inserted a regular buckle on the other end of the band. I lined the another end and worked an eyelet for the buckle tongue. I'm still a bit confused whether I got the knee band construction quite right, but at least it looks pretty much right from the outside.
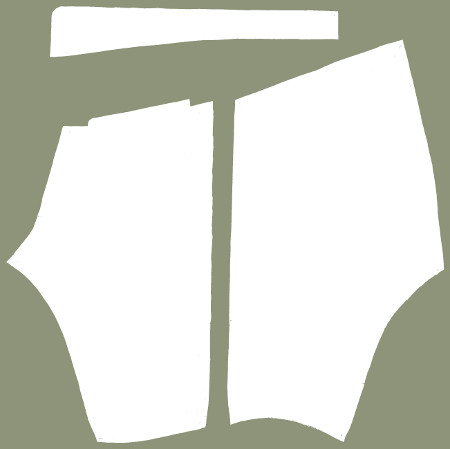
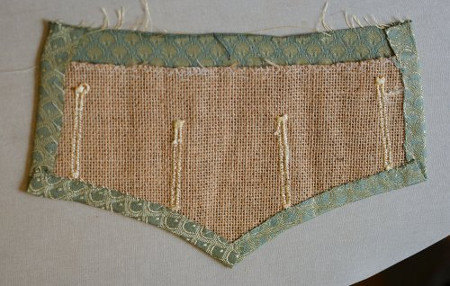
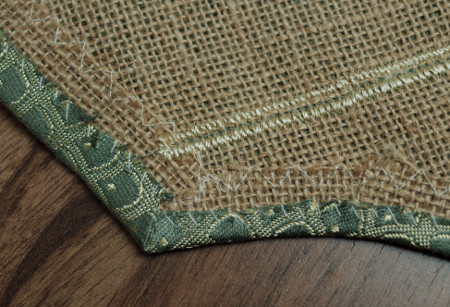
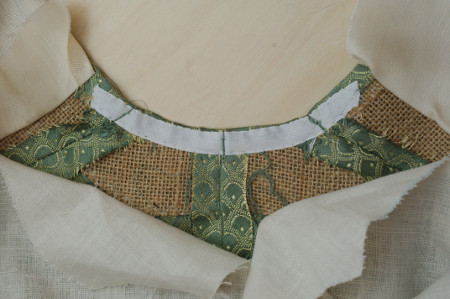
Next I moved on to the waistcoat. I began with the back pieces, which I made of two layers of linen. Like in the silk waistcoat I added pieces of fashion fabric on the back vent edges and neck, which might peek out under the coat. On the bottom layer of linen I sewed pieces of linen band to reinforce the back vent edges where the lacing eyelets would be. I bag lined the back pieces joined at the top, leaving the top and the side seams open. Then I packed them in my handbag for hand-stitching the edges and making the eyelets. I had recently grown very lazy on my coffee breaks and public transport time, slipping into reading (too often very mediocre literature) instead of sewing, but if I was ever going to finish this suit I'd better work on it every single day.

I had cut wide interlining pieces on the front edges and further reinforced their curved edges with a straight strip of cute, 2cm wide on the buttonhole side and 4cm wide on the buttoning side. I also tacked interlining pieces on the pocket places and the side vent edge.

To my great delight the buttonhole thread had finally arrived in the shop when I had almost finished the breeches (I was so overjoyed that I bought them flowers). I bought two bolts at once just to be sure I'd have enough, and attacked the pocket flaps.
This time I wanted to make the decorative buttonholes before attaching the lining, which really made much more sense. I had first basted the fashion fabric on the interlining, then pressed the seam allowances to turn over the interlining edges and sewed them on the interlining. Now I could begin making the buttonholes, following the basted lines. Less layers made the work easier, and I didn't have to worry about getting the underside neat. For the last thing I sewed on the lining with stitching through the edge. Previously I had left the top edge of the pocket flap open and sewed the fashion fabric on the waistcoat by machine and then the top edge of the lining by hand on the underside. It sounds tricky, which it is too. Now I realized that it would be far easier to make up finished pocket flaps and then attach them to their place by a simple row of hand stitching with a bit of extra stitches to secure the edges. Another little step away from the modern machine sewing logic!
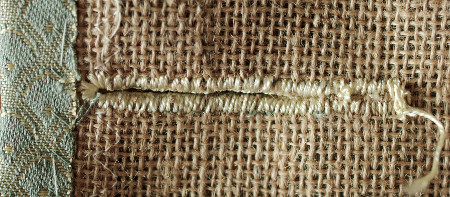
Next I made the triangular pocket opening, reinforced the edges with hand stitching and then sewed on the other layer of the pocket bag, and for the last thing attached the pocket flap. I had very stupidly cut the pocket interlining to stop just just before the buttons, so I sewed pieces of linen band on the underside to support the large buttons.
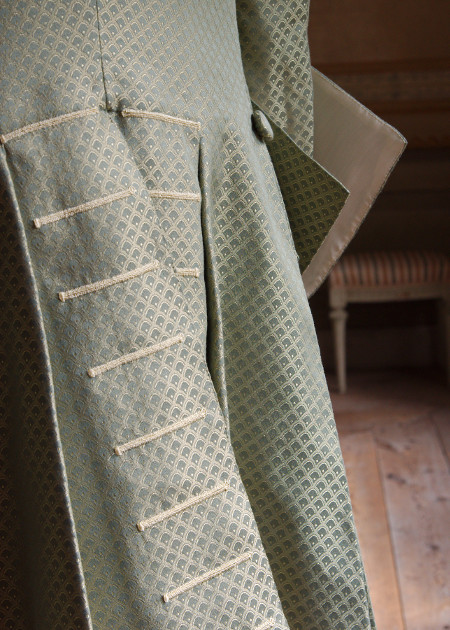
So, with both the back and the pocket flaps prepared and scheduled for coffee breaks and social gatherings (not to mention a weekend in a Carolean army camp) it was time for the larger front pieces. Already when making the first suit I had had a faint inkling of the period method of making buttonholes before lining the suit and when putting on the lining later sewing it on the buttonhole edges, but it had sounded a little laborious and intimidating so I had just made the buttonholes on the finished coat and imagined I had saved myself a lot of trouble. This time I decided to get more ambitious and give it a try, especially as most of the buttonholes would be purely decorative and as they extended all the way to the bottom the undersides might actually show in wear if worked through the lining too.
After tacking the interlinings on I began the buttonholes from the bottom upwards. When I got to the opened ones I first sewed a row on machine stitch around them, then cut them open and reinforced the edges with zigzag. My poor old much used zigzag machine didn't manage to get the stitches tight enough, so I made them while visiting my parents on my Mom's machine (The first sewing machine I have used in my life, by the way).
So far so good, but when I began to cover these reinforcing stitches on the buttonhole thread I realized that I had made the decorative ones at the bottom edge more narrow. I did not want to remake my reinforcing stitching narrower as I was afraid that the loosely woven interlining might break if stitched too near the edge. So I made them as I had planned, then took a critical eye and finally decided that the contrast to the narrower buttonholes was too visible, therefore the latter had to go. I carefully picked out the thread and remade them roughly as thick as the opened ones.
I had already taken a liking to the more slender buttonholes and at first the new ones looked too heavy, but as I did not dare to make the opened buttonholes slimmer there was no other way. At this stage the pocket flaps were already finished, with buttonholes of the slimmer variety, but as they did not sit directly next to front buttonholes I left them alone. Well, happily I encountered the problem already with the waistcoat before beginning the coat.
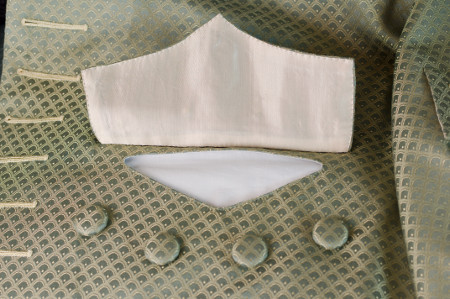
The Costume Close Up waistcoat (No 17, Suit coat, waistcoat and breeches, dated 1765-1790) is lined mostly with linen but has silk facings at the front edges and skirts. This seemed to me a very neat way of doing things, as especially the top corners easily turn up with the shirt ruffles and a satin lining would look nice there. I did, however decide to leave out the skirt facings with this longer waistcoat.
The picture of the open waistcoat shows most frustratingly only the button side of the lining, so there is no clue how the buttonhole part was actually finished. I have read before vague descriptions of “cutting the lining open at the buttonholes and sewing it on their edges”, which sounds to me courting fraying. I've seen it work well in woollen military garments, but there is no way I'm going to try that for viscose satin. Happily the brilliant “At the Sign of The Golden Scissors”-blog happened to post about riding habits with a clear photograph of the “pieced facing”-technique, where the lining is cut on separate pieces joined at the ends of the buttonholes. So, that was what I would do.
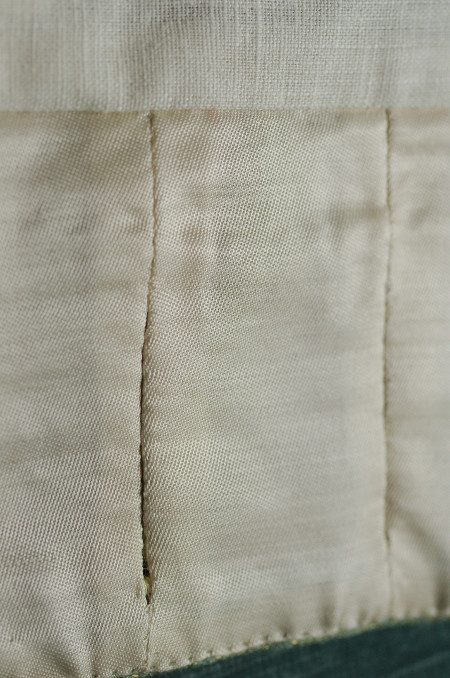
In a perfect world where all measurements are exact and all pieces magically match I might have been able to join the pieces by machine and just leave the seam open at the right part, but in this reality I thought that no matter how carefully I'd cut them all the pieces would not settle perfectly between their buttonholes without some adjusting and re-sewing, so I sewed them on the interlining and the buttonhole stitch by hand one by one. This of course took some time, but the meticulously neat result was well worth the effort.

I pinned the rest of the facing and attached it on the front edges with hand stitching through all layers. I used a row of stab stitches, here and elsewhere in the suit, as the proper “Le point a rabattre sous la main”-stitch is hard to make through the heavy interlining.
After the facing came the rest
of the linen lining. On the shoulder I pinned it just a
bit smaller than the fashion fabric to follow the curve of
the shoulder. On the shoulder and side seams I just
machine stitched the seam allowances together.
The fronts and
back being now both finished it only remained
to join them. On the silk waistcoat I had
sewed the back piece between the two layers of
fronts at shoulder and side seam, which had
resulted in a giant bulky seam allowance at
the shoulder seam ends as the front pieces
curve out. Now I tried to join them the other
way around. I had left the side seams and the
shoulder-neckline-part open at the back, and
now sewed the front piece on the top layer of
the back. Then I pressed the seam allowances
to turn towards the back piece and the back
neck allowances to turn under. Then I pinned
the bottom layer of the back with the seam
allowances turned under, just covering the
machine stitch, and at the neck to turn a few
millimetres from the edge.
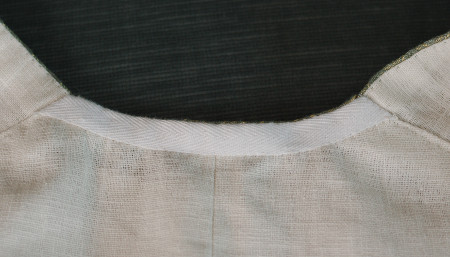
I finished the neck by hand and added a cotton band to prevent it from stretching. I have no idea if the latter was used in the period, but it seemed like a goof idea to me. For the last thing I top-stitched all the seams to fix the lining. The result looks neat also from the inside.
The waistcoat was thus finished. As said, I had trusted my well-proved pattern and had not had a single fitting while making it. Now it turned out that I had obviously picked an older version of the back piece pattern without the back lacing, as the edges came together with no gap in between. Well, of course it looks nice and neat without a gap, but it kind of makes the lacing useless as means of adjusting the size smaller. Jarno assured me, though, that at this stage of life he is not likely to lose weight. Anyway, despite this the waistcoat looks quite was it should be.
Coat
The great challenge, the coat was left the last thing. The aforementioned “Costume Close Up” opened the construction to me in a brand new light. According to it the front and back pieces were finished and even lined separately before joining them at a late stage. Remembering all the trouble I had had with the lining (mainly at the skirts) with Jarno's first suit this seemed to me a brilliant idea. The pleats could be pressed neatly before they stretched while hanging and the lining pinned and hand sewn on. I could still tweak the sleeve setting if needed and leave the hem open for checking the balance when I could try the coat on. The sheer size and weight of the coat alone made the idea of working on individual pieces as long as possible welcome.
As soon as I had finished the pocket flaps for the waistcoat I had began working on smaller pieces of the coat, pocket flaps, cuffs and back vent pieces.
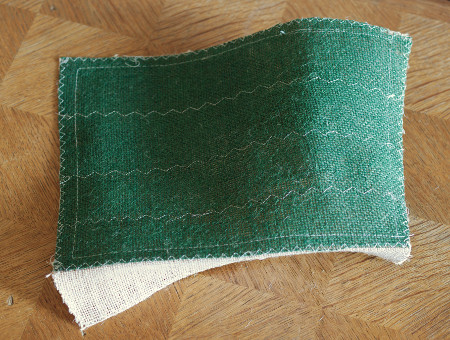
The interlining for the large cuffs needed to be quite stiff, so I added an extra layer of even heavier jute and sewed the two together with rows of zig zag. I also tried to leave the top layer longer and make them slightly curved to begin with. The extra layer stops at the fold, which makes it sharp. I basted the fashion fabric on the interlinings and then moved on to make the buttonholes.
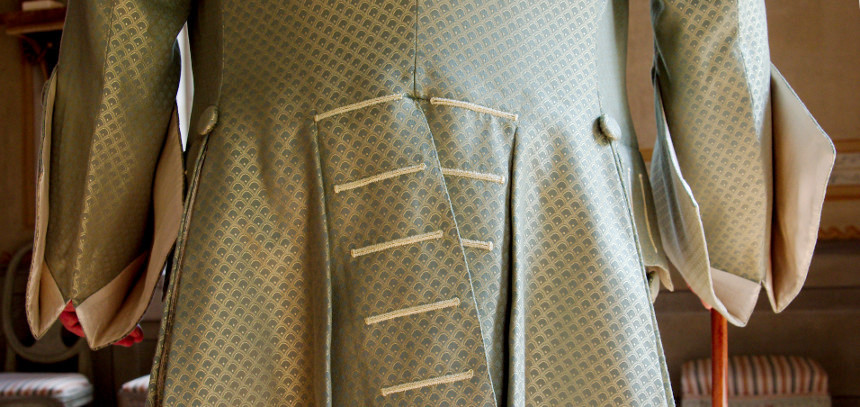
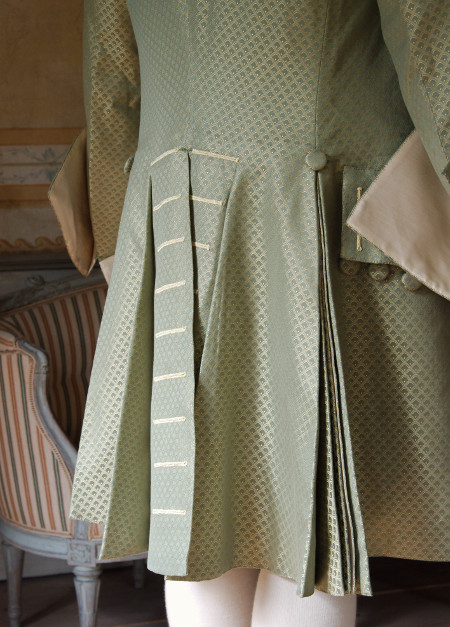
In the back vent piece I had
originally basted only guideline threads on the fashion
fabric to mark the buttonhole places, but after making a
few first ones I noticed that on this larger piece the
viscose fashion fabric tended to move despite careful
basting. So did what had been proved useful in the past,
sewed a machine stitch line on the buttonhole places
through all layers, and this solved the problem. On
afterthought I really should have done the same already
for the pocket flaps, as the fabric moved a bit in them
too causing some minor wrinkles. Anyway, making 18
buttonholes was much nicer done on separate pieces than on
a large finished coat.
I began working on the large main pieces at the left front. The front edge interlinings had an extra straight strip sewn on the curved edge like in the waistcoat, 1,5cm wide at the buttonhole side and 4cm wide at the button side. First I accidentally tacked the wrong one on the left front, but happily I noticed it before beginning the buttonholes. I ripped it off and replaced it with the right one.
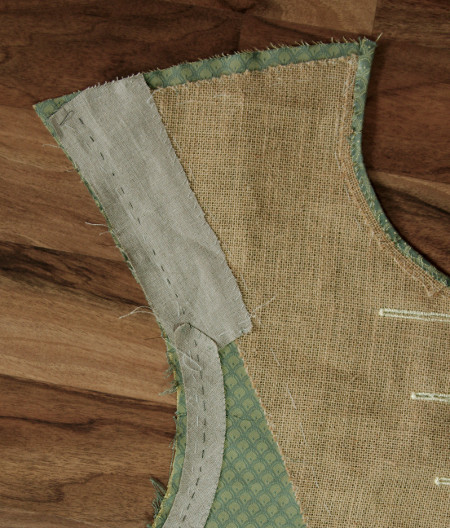
According to Waugh's diagram of interlining a coat (diagram XXXIV) the front edge interlining should not quite reach the armhole on the shoulder. This was hard for me to understand, especially as the shoulder was cut almost to bias. I originally cut the interlining dutifully to end 4cm short of the armhole, but then I became anxious again and cowardly added a separate strip of thinner linen to reinforce the shoulder. It was cut on the straight to prevent stretching but would not make the armscye seam too thick.

On the rest of the armscye I tacked a bias cut strip of the same linen, pressed to follow the shape of the armscye. The side vent edges also got a 4cm wide jute interlining.
I had basted the buttonhole lines straight after cutting the pieces. I was a bit unsure how many of the buttonholes should be working ones at this period, but in the end I made three at the top blind ones, the six following them working ones, and the rest at the bottom blind ones again. I machine stitched a line around the opened buttonholes (this time very narrowly). I didn't have time to drive to my parent's this time for the zigzag, so I reasoned that some blanket stitch by hand would be a drop in the ocean with all the other handwork in this suit.

I worked on the buttonholes little by little. At some point I also managed to tack the interlining on the right front piece too. And then it was beginning to be high time to finally decide what to do with the lining or possible interlining for the skirts.
The confusion over the dating
of the suit caused further confusion about the possible
construction methods. Was it way too late
for the stiff horsehair interlined skirts of the 1740's?
In the picture the skirts look like stiff, but then it
might be just the heavy silk. My upholstery material would
not stand by itself backed only by a flimsy lining, and
might also stretch at the bias cut parts in the flared
skirts.
According to Waugh skirts were
interlined up to 1760's, which would be close to the
dating of the suit. In her diagram for interlining the
front skirts have it all the way but at the back only the
pleats. This interlining is described as some kind of thin
wool or wool wadding, and I have no idea what it should be
like, as obviously it should give some support. After consulting my friend
Riikka I decided to buy some stiff linen and add it on the
skirts, front and back.
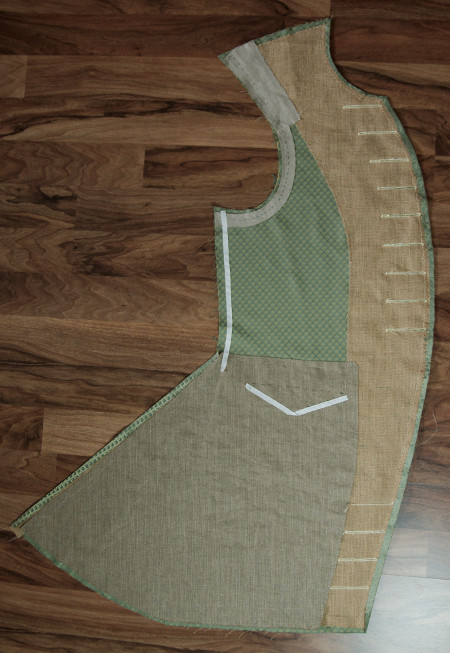
On the front piece the
interlining that went up to waist level also supported the
pockets. To be sure the pocket opening would not stretch I
even tacked cotton tapes on the diagonal edges. Then I
sewed on the pocket pouches, hand-stitched the edge and
sewed the pocket flaps on the top. I also sewed on the
buttons on the pockets and front edge.

After tacking the interlining on the back skirts I joined the back vent pieces, pressed the seams and tacked the seam allowances on the interlinings. I also reinforced the tight corner at the waist with some stitching and then tacked a 3cm wide jute piece on the waist from the center back to the side seam. Then I made the last decorative buttonholes to cover the seam at the waist. Neck opening at the back also got a piece of jute, and to strengthen the center back and side seams I basted cotton tapes on both sides of the seam. I thought these necessary to support the heavy skirts, especially at the center back seam which was cut quite angled.
And then it was the time for the lining. As mentioned
above, I had decided to use the viscose satin I had found,
except for the top of the back and sleeves, which I would
line with linen according to the economical period custom.
I also thought that a back lined with linen would breathe
more and thus be comfortable.
I began attaching the lining at the fronts. First I sewed the small pieces between the buttonholes. Then I pinned the lining on. On the pleats I tacked the lining to the interlining on the folds in herringbone stitch (or catch stitch), so that all the layers would now stay together. On the neckline and front edge I turned the seam allowances under and stitched the edge through all layers, like in the side vent too, though leaving a long part still open at the top to be able to work on the side seam. At the side seam, shoulder and hem I basted the lining on about 5cm from the seam.

On the back I first attached the lining in the back vent pieces. Then I moved on to the rest of the skirts, beginning at the center back. I pinned the lining on the folds one by one, first pressing the fold and then tacking the lining to the interlining with herringbone stitches. At last I arrived at the side vent, where I stitched the edge leaving the top unfinished like in the front.
This construction order, making the individual pieces as finished as possible before joining them together is quite reverse to modern sewing logic, but the sheer size and weight of the pieces alone made it sensible. It was also practical to keep the pieces separate and flat as long as possible, especially when attaching the flimsy lining. The downside of course was that after all this preliminary work it was somewhat intimidating to actually close the main seams and see how the coat would look on Jarno.
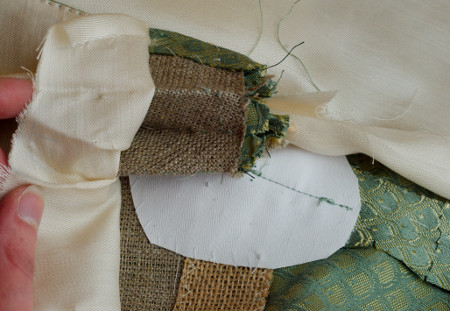

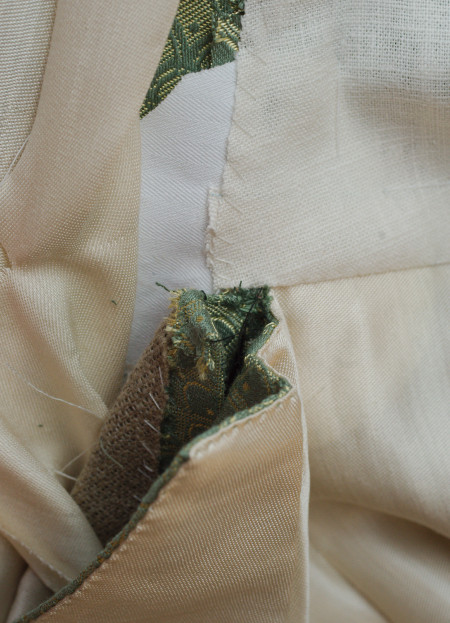
I began with the side seams. After sewing them I slipped round fabric pieces with a slit cut from the edge to center on the top edge of the side vent so that it circled the end of the seam. As I thought that one cannot have too much support at this crucial point (Waugh also points out “extra stiffening” here on her diagram of interlining) I used coutil for them. I tacked the coutil pieces to the interlining, sewed a couple of stitches through all the layers at the top of the vent, and then further secured the pieces by a machine stitch between the side seam. The last trick may be a bit modern, but could be done by hand too, and it works.
Next I finished the top edges of the pleats by turning the fashion fabric seam allowances over the lining, tacking it and attaching the lining by stitching through all layers. I was not quite sure whether the linen lining at the back should be added as the last thing, but I thought I could as well baste it on now, just leaving the seams open. I was already able to sew it on top of the skirt lining edge at the waist, just leaving a bit open at the center back for closing the seam. At the side seam I tacked the linen on the fashion fabric seam allowances.


The final result is quite thick due to all those layers of interlining, but feels secure. I must say this way of assembling the side vents was a very much less painful experience than my fumbling with the first suit.
Next it was finally the time to close the shoulder seams and center back seam. As I was feeling very energetic and optimistic that day I also tacked the supporting tapes on the shoulder seams and neck, tacked the seam allowances on the interlinings and even finished the back lining before putting the coat on Jarno.
Aaaand this turned out top be a great mistake. The shoulder seam looked awful on, it was just like the back piece part would have been way too long. I had either made some mistake in fussing with the pattern in the early stage, not measuring that the edges matched, or then the weight of the finished skirts pulled the whole back piece downwards in a way that had not been as visible in the light mock up. The center back seam also curved out at the shoulder blades, not following the spine closely as it should, which I should actually have been able to predict. Well, I ripped out the lining and tapes and took another try at the seams.
The center back was easy, I just removed the supporting cotton tapes, cut them about 1cm shorter and basted them on again, gathering the fashion fabric very slightly between the shoulder blades. Then I steam pressed the fashion fabric to settle evenly and closed the seam again. This time it looked much better. The shoulder seams, on the contrary, were a much harder battle. I shortened the back piece edge and also shaped it a little anew at the armhole. At last the top of the back began to look tolerable, and I could sew the supporting tapes and the lining back on and finish the neck.
Now let us take a look on the sleeves.
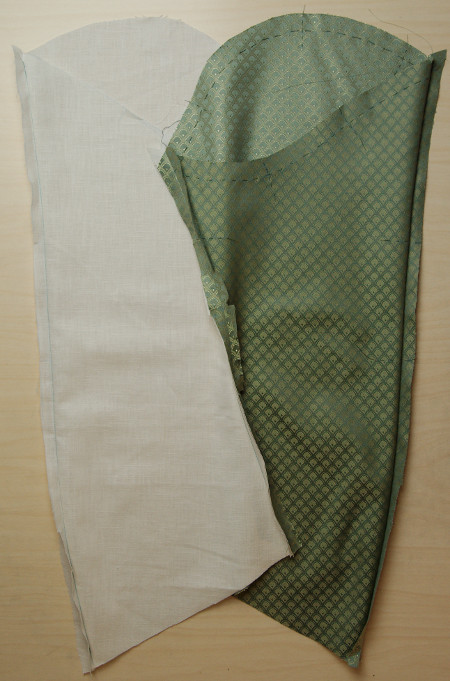
As mentioned above, I lined them with the same cream colored linen as the waistcoat. Here was again a great opportunity to try out a new technique: Elisa from Isis Wardrobe had recently posted about the period way to line a sleeve, with great pictures. There you sew the fashion fabric and the lining together at the top seam of the sleeve before flipping them around, and it's surprisingly handy and also keeps the lining following the fashion fabric closely in a curved sleeve. As I wanted to sew just the fashion fabric of the sleeve on the armscye and sew the lining on later I left the joining stitch end a few centimetres short of the top edge, and sewed the layers separately from there on. I also sewed a gathering thread at the fashion fabric sleevehead.


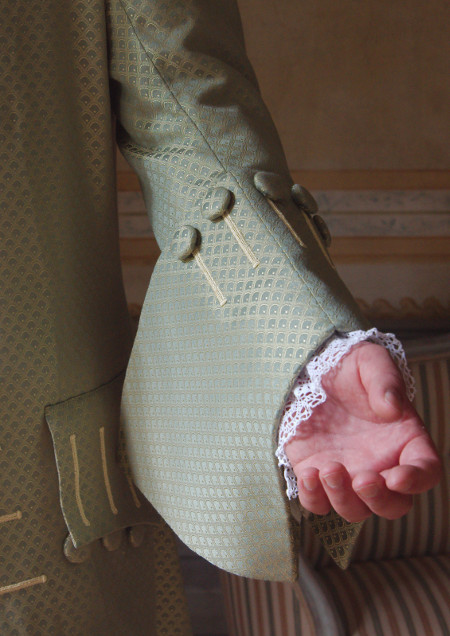
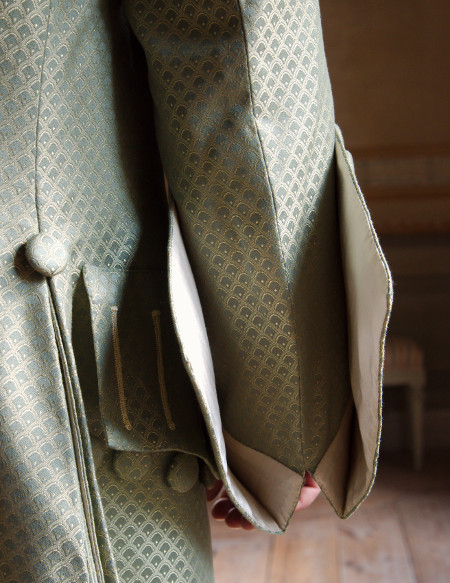
After finishing the buttonholes at the cuff pieces I joined them together and tacked the seam allowances on the interlining. As the cuff is made from two separately interlined pieces it folds at the top with the sleeve like in museum suits, and it was nice to notice how small things like this help to bring the period look to the garment.
Lining the cuffs was a bit tricky, and I pinned the lining on several times before getting it relatively even. As the cuffs were open at the back any bagginess in the lining would show. At last I got the cuffs lined and decently looking. On the turned part I left the lining open for sewing them on the sleeves.
I sewed the cuffs on the sleeves with machine and pressed and tacked the seam allowances on the cuff interlining. For the last thing I sewed the cuff lining on top of the seam.
Now it was the time to sew the
finished sleeves on the nearly finished coat. Sleeves have
a nasty habit of turning out tricky now matter how many
mock ups with balance marks you have made. This time was
no exception. I pinned and basted the sleeves on many,
many times, but they always seemed to either pull the
shoulder to the sides or settle too low and far out. There
also seemed to be all of a sudden more fullness on the
sleevehead, perhaps caused by altering the shoulder seam
and thus the armscye at a late stage. The sleeve also
seemed to settle higher on the underarm. I fixed the
problem on extra fullness partly by setting the sleeve
further at the back than planned, which is also true to
the period.
So, I was pretty nearly done with the setting of sleeves, when I noticed that the back skirts did not look quite the way they should. The back vent edges fell crossed on top of each other instead of aligning and the top of the side vents seemed to have dropped downwards. After a bit of pondering (and tearing my hair in frustration) I tracked this problem down to the sleeve setting again. I ripped the sleeve seam open at the underarm, pulled the underarm up about one centimeter and forced the sleeve to settle back, sewing the supporting tapes back on fast before any more stretching would occur. The underarm was left with some wrinkles especially on one side, but happily it's not a place where you look at first. With the raised armhole the side vents were pulled up enough to look more in line with the back vent, which also straightened a bit. I have been told since that as the skirts are flared the back vent edges are supposed to overlap a bit.
The extra fullness at the sleevehead still
hurt my eyes, so I decided to try adding some
wadding to fill it out. The effect was not very
visible, but it doesn't make it worse either, so I
left the wadding on. I finished the armholes on the
inside of the coat by sewing the sleeve lining to
cover the seam.
On the hem I had basted the lining on about 5cm from the
edge, as I thought the balance of the skirts might change
when the coat was finished and the sleeves set. I had been
right. Especially at the back the skirts were too long.
The annoying bit was that the last buttonholes on the back
vent piece almost hit the evened edge. After getting over
my initial frustration I ripped them off. Happily the the
stitch marks disappeared with furious steaming. I also had
to take off some of the tacking on the interlining and
lining at the hem.
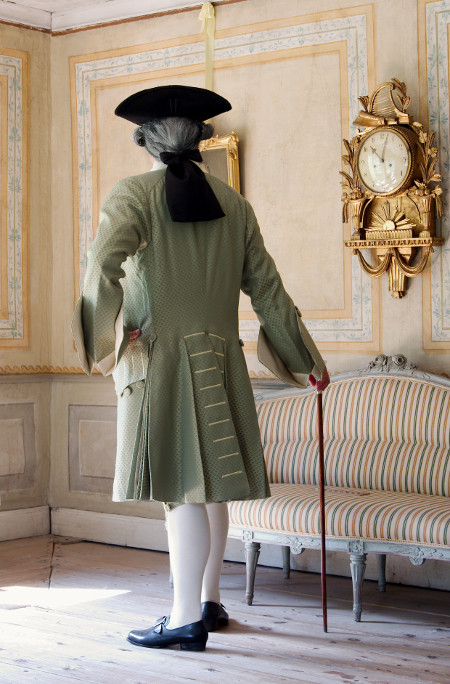
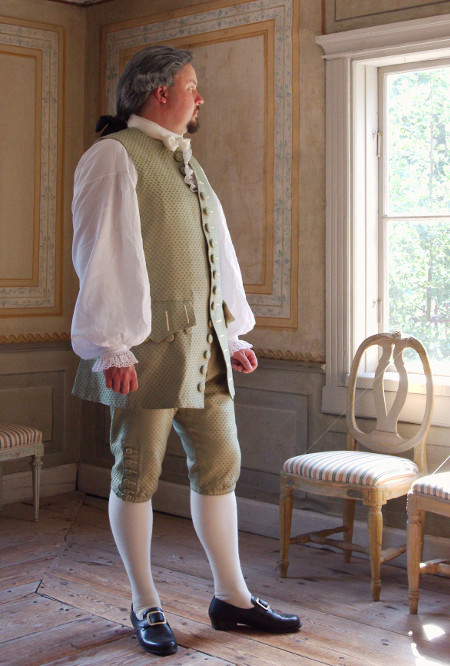
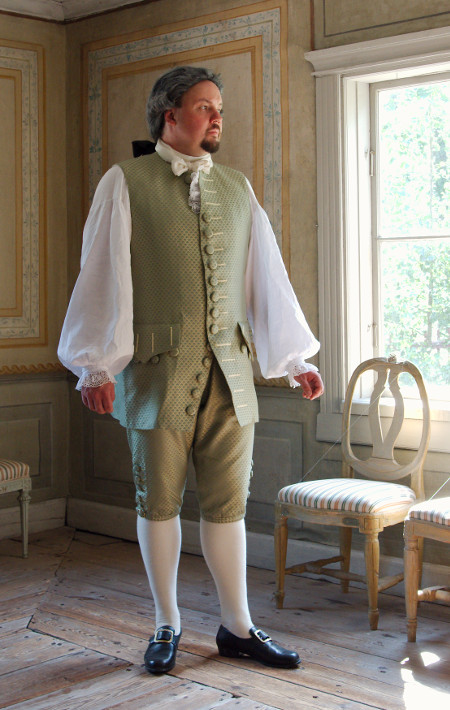
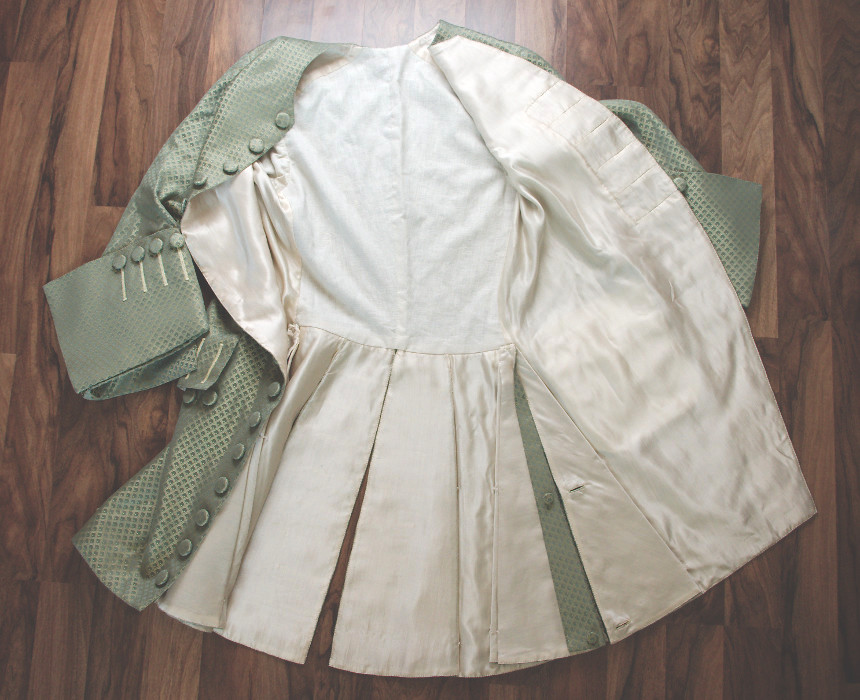
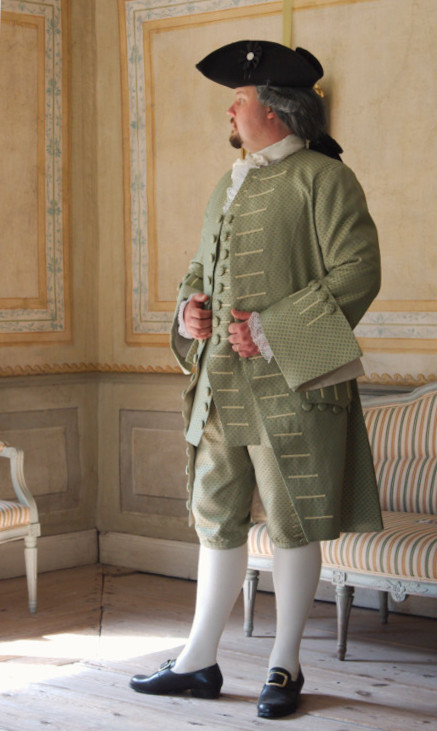
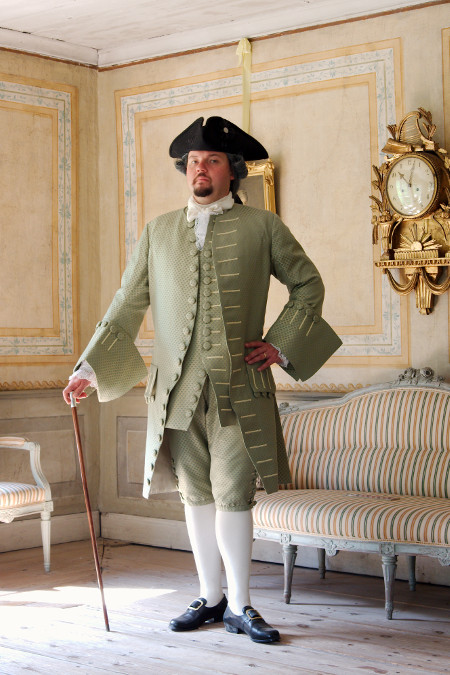
All the pictures are,
naturally, of the fixed and finished coat.
I evened the hem when it was on Jarno, first pinned the right length, when basted a line for the edge. Then I cut the extra interlining off according to the basted line, cut the fashion fabric with a small seam allowance which I turned over the interlining edge, pressed and tacked on the interlining. For the last thing I pinned on the lining and finished the edge by stitching through all layers. The lining was the most tricky part, and a few times I had to pin and sew some parts anew as the lining was too tight.
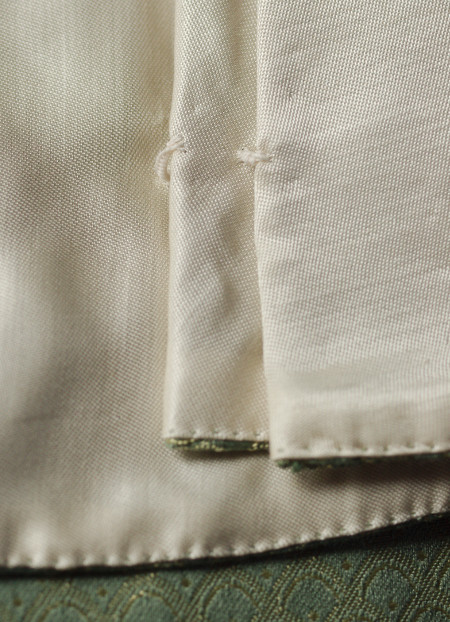
I finished first one side and then evened the other to match, checking that all the pleats were of the same length at the side vent. Somehow the back pleats still managed to stretch, being cut bias, and I noticed they would peek under the hem when the coat was on. I shortened them with a heavy hand, perhaps even a bit too much, but at least they don't show now. So, at last I had the hem evened and finished, and could make the last buttonholes on the side vents, at the midway and the bottom. For the last thing I sewed thread loops covered with blanked stitch to hold the underside of the pleats together. I had skipped this part on the first coat, and I must say that it does keep the pleats neat. If they still stretch and the loops begin to pull I can always fix them.
I worked on this suit in total
for over a year, of course making a bunch of other smaller
things simultaneously. Especially at the last stages of
the project the coat lied untouched for long periods at a
time, as I was too uninspired to tackle the problems that
had turned up. Part of that may have been due to this year
being a stressful one at work, but on the other hand a
large hobby project was also rewarding and therapeutic.
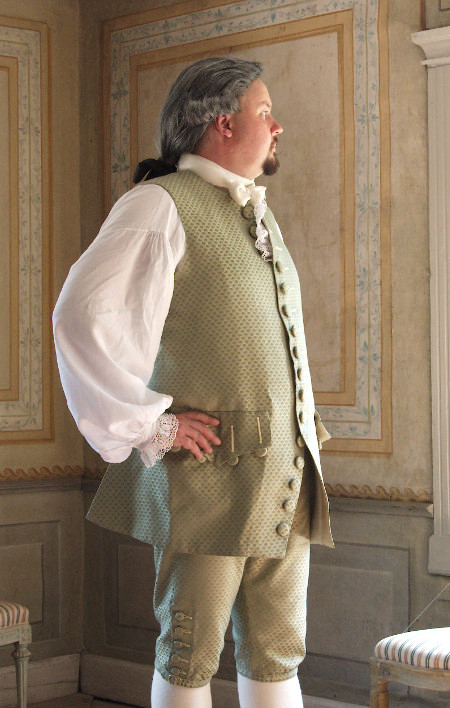
As usual, when finishing something you have worked on for a while, at first I was simply happy that I didn't have to see it on my sewing table anymore, but it usually also happens that when you look at the pictures of the finished garment you begin to feel proud and happy. The mistakes are there, of course, like the problems with the shoulder seam and sleevehead, and especially the front edges of the coat which don't fall quite straight due to the interlining which had stretched on the edge when I sewed on the straight cut reinforcement strip which was supposed to prevent that very thing. This is a good remainder to do all the stages carefully. Anyway, I can live with that. Another thing that began to bother me a little on the finished suit is that I originally thought that the buttons for the coat and waistcoat could as well be the same size (the buttons on the waistcoat tended to be smaller in period suits), but now I think that doesn't look quite right. But the things I still love are the material and the style and cut of the suit.
The heavy construction of the suit makes it keep its shape well at least for now, also when packed. Time will show how it takes wear. Another good thing is that Jarno assures it's a lot cooler on than the old wool suit, even though the day of the photoshoot happened to be very hot.
I'm also very happy that although I encountered some problems this time too, I felt more in control of what I was doing than with Jarno's first suit, and I was left with a far more positive experience and clearer view of the whole thing. In both pattern drafting and sewing methods I clearly took a step forward, and I can see myself making a third suit to follow. Not anytime soon, though!
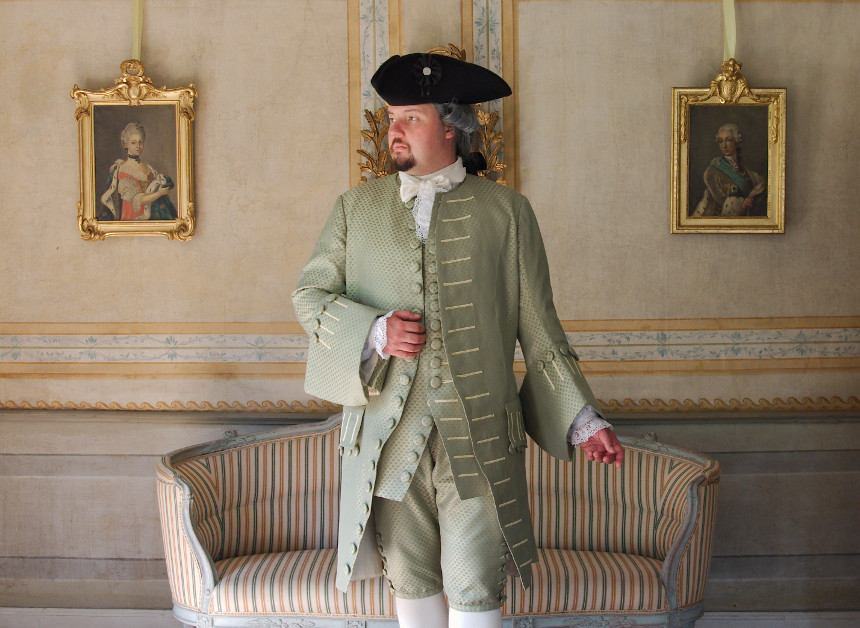
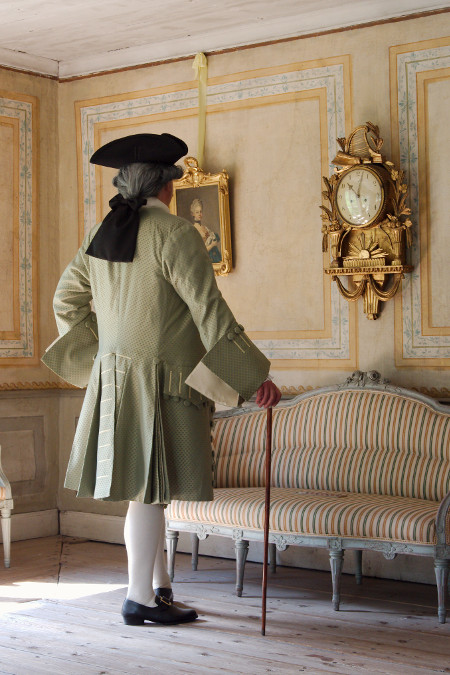
I would like to thank Seurasaari Open-Air Museum for the kind permission to arrange a photoshoot in the beautiful Kahilahti manor house.