
Banyan,
2025
When visiting the Victoria & Albert Museum years ago, one of the many garments that really sparked my interest was a woman’s dressing gown or banyan. According to the museum digital archive entry it’s a rare piece, combining the T-cut of men’s banyan (of oriental origin) with a fitted, pleated back of women’s dresses of the time. It also seems like it might have side pleats which would give room for petticoats.
The description tells that the garment shows signs of earlier seams, and the theory is that it’s remodelled from a man’s banyan by fitting the torso and stitching the pleats into a linen lining, like you would in a dress.

Accession number
T.92-2003
©Victoria and Albert Museum, London

©Victoria and Albert Museum, London
©Victoria
and Albert Museum, London
I rediscovered my wish for a dressing gown-type of garment when @sewthroughtime made a beautiful dressing gown in an indienne-style fabric bought from Ikea. For a while I considered whether to make a super easy t-shaped men’s style, the more fitted Swedish style or attempt the intriguing V&A banyan. The latter one won in the end.

The
material
Imitation is the sincerest form of flattery, they say, so I wanted the same fabric as @sewthroughtime. Ikea didn’t have the print “Nässelklocka” as a fabric anymore, but instead they had a set of a double wide duvet cover and two pillowcases. The duvet cover had a back side of the same material in the print ground colour, so I got a nicely matching lining with a similar drape into the bargain.
The slight downside was that the material was a rather flimsy cotton sateen, which looked limp compared to the original silk one. On the other hand, many modern materials tend to be too heavy rather than too light compared to historical ones, and at least the pleats wouldn’t be too chunky.

Drafting
the pattern
As mentioned above, the V&A banyan is possibly altered from a man’s garment. Based on the pictures I thought the side seams would be more fitted at the waist. I had a nicely fitting kimono-sleeved jacket (a style popular in Sweden in the 18th century), so I thought that pattern would be a good starting point.

I had imagined that I would only widen the pattern and add the shoulder pleat, but pretty soon I noticed that the only sensible way to make this was to drape it on the body (or dressmaker’s dummy), just as it was almost certainly done in the original. I didn’t test the full pattern, but I draped a piece of mock up fabric on a dummy to see how the pleat would drape and how deep it should be. I ended up with a 7cm deep pleat on the shoulder, tapering to a slightly deeper one at the front and back waistline. In the original the pleat seemed a bit deeper but this somehow seemed to work. The center back is shaped roughly according to the jacket pattern back, and opens up in a pleat at the waistline to give some additional fullness on the skirt.

I wanted the front edges to overlap to fully cover the stays underneath, so I curved the front edge slightly at the bustline, just like it would be shaped on a dress. Considering that the original might be shaped from a man’s banyan this was maybe stretching it a bit, but I stuck to it. It still fit on the cutting plan or continuous back width and front edge slashed open.
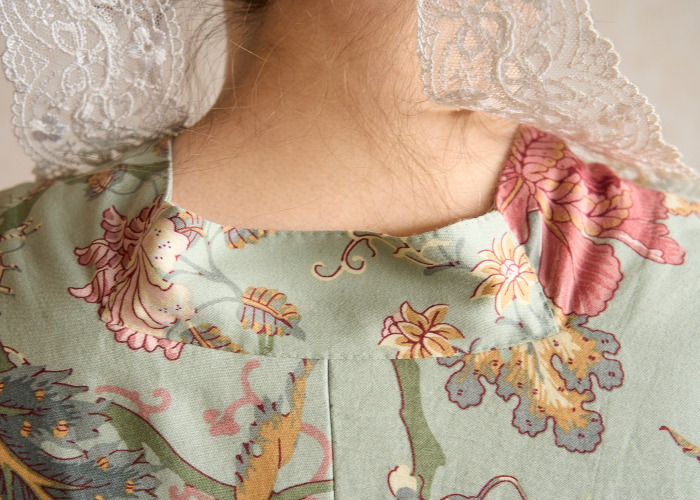
The most intriguing detail of the original V&A banyan was the back neckline. To be honest, to a modern eye it looks just really awkward. It seems to be made by making a horizontal cut on the neckline edge and inserting a folded strip of fabric on it. While the back neckline of dresses on the period is usually finished with a fabric strip, done like this its jutting backwards and folding on itself.

While draping the fabric on a dummy I tested this, and noticed that the cutout actually worked in opening up a bit of room on the straight shoulder, thus making the neckline rise a tiny bit to fit better against the neck. I sort of got the idea that if this cutout had been a bit higher this would have had even more effect, and if it had been considerably higher the inserted fabric strip might have worked as a collar. But then again, women’s dresses on the period usually had a deeper back neckline as a rule, and as the garment was shaped to resemble a dress maybe this neckline depth was logical. Or maybe it resulted somehow from the altering of the previous style. Anyway, in my pattern I cut the back neckline as high as the folded fabric width would allow, which resulted in a somewhat higher neckline.

Bodice
lining
According to the museum entry description the folded bodice is mounted on a linen lining, just as it would be in a dress. There’s no picture of the garment inside available (as far as I know anyway), so I just cut it like I would cut a robe lining.
The back lining is shaped to match the folded back. On the front I drafted the lining front edge to follow the underside of the pleat, and slanted from the bust level to shoulder to make the side fit better. The front pleat edge would flap at the bustline anyway.

The kimono cut side seam curves from the waist towards the sleeve, but I decided to make the lining side seam straighter and more fitted to the body.
I made a quick mock up of the lining, as it would determine a lot of the main garments fit. One important thing to check was the waist length. I fitted the mock up over very loosely laced stays because I wanted this to be a very relaxed and comfortable garment, as it was originally intended to be.

I wanted to use some leftover pieces from other projects, so I cut the front and shoulder pieces from a lightweight but sturdy enough linen from a medieval tunic. It even happened to be green. On the back I used cute light pink linen from a modern dress, but that turned out not to be ideal for this use. Soft, stonewashed linen is lovely for a summer dress, not so great for a supportive lining as I discovered later.

Cutting the
banyan
I took the pre-washed bedding set apart and
ironed the pieces thoroughly. When I used a duvet cover for
Jarno’s Victorian dressing gown / smoking jacket I had huge
problems with matching the pattern as it wasn’t printed on the
grain, far from it. The large scrolling vines on this fabric
were so confusing to the eye that no matching whatsoever
wouldn’t really be necessary, but I still wanted to get the
pattern straight at least on the front edges and hemline. This
needed some further ironing and smoothing out the fabric.I had made a paper pattern for the bodice and sleeve. I had planned to make a vertical seam at the back waistline due to the duvet cover length, but otherwise I largely improvised the needed fabric joins when I had the fabric laid on the table. The duvet cover was wide enough to cut the top material sleeve full length. I also cut the front skirt as wide as the material allowed on the sides for the side pleats.

I marked the pattern on the top material first and basted the lines for the pleats, bodice back seam and other helpful guidelines. Then I laid the top material over the lining, which was tricky to say the least, with two soft, clingy materials.
After cutting the continuous main piece I began to cut pieces for the left of the garment from the remaining fabric. The pillow cases were luckily made from one long continuous piece, so they were perfect for the back skirts. They were just wide enough to reach over the side seam enough to hide the join in the side folds. (Not that it would have been necessary, but it was nice).

I had cut the sleeve lining much shorter than the top piece, but the lower part came conveniently from the leftover bits of the pillowcases and another strip from the duvet cover top. The sleeve end would have had to be in the top material anyway for the wide cuffs.
The shorter sleeve left some extra width on the sides on the lining material, and pieced with an additional leftover piece it was just enough for the back skirt.

The original garment has a lot of fabric joins, as was common on the period, so having a few barely noticeable in mine is not a problem at all, even though it was extra trouble to assemble. My modern self was also slightly annoyed that some of the original stitch marks and folds from the original pillowcases wouldn’t completely disappear in spite of thorough ironing, but in fact that was also a very period thing. The pattern direction changing in some pieces is also very acceptable, and in the crazy pattern it’s not even very noticeable. It was actually satisfactory to be left with only small pieces of material after the cutting.

Sewing
I machine sewed the seams and bag lined the
top and lining together, leaving the hem open as I would have to
check the length later anyway. On the bottom of the side seams I
made a deep cut in the allowance so that I could turn the
pleated part facing upwards of both layers. I had cut a lot of
extra height on the top of the pleats, way too much as it turned
out, but better safe than sorry. Then I began to shape the
combined layers.
I closed the center back seam. To get the pleat lay more smoothly I trimmed the seam allowances above the waistline. On the back neckline I stitched the layers together to keep them in shape while waiting to eventually get to finish the neckline.

Next I ironed the pleats following the basted lines. Then I sewed the inner folds on the lining. On the shoulder I stitched them by machine, but then it occurred to me that on the front the stitching might peek under the fold so I stitched it by hand. On the back I first tried machine stitching, but the too soft lining kept stretching and wrinkling so I decided to just hand stitch it too.

The outer edge of the fold is stitched with a running stitch 2cm from the edge. On the front and shoulder its a loose pleat, on the back it’s stitched down on the lining.
On the front and shoulder I turned the lining front edge under the pleat and stitched it loosely.

On the back neckline I stitched a small machine stitch to support the cutout, and then sewed the collar strip lower edge on.

I sort of improvised here, when pinning the collar strip in place it seemed to settle nicely when I cut a larger triangular opening on the neckline. I slip stitched the ends of the strip and reinforced the corner with extra stitching.


Then I turned the other side in place and stitched the collar piece all around with a running stitch before finally slip stitching the top of the lining in place. Oh, I so love a neat inside finish!

The finished collar strip is somewhat angled backwards in wear, but it doesn’t fold in the sides. It’s also set higher than in the original, as noted before, so the overall effect is quite different. It looks balanced to the modern eye, but no, it’s not a faithful reproduction of the original by far.
Moving forward, I cut a pocket slit and hemmed it, and then folded three side pleats on the front and back sides. I stitched their top edges together individually.
I put the banyan on a dummy with a quilted petticoat, and pinned the side pleats so that they fell smoothly over the petticoat. Then I stitched them together, trimmed the extra allowance on the top edges and sewed them on the edge of the lining.

The number and depth of the side pleats, determined simply by how much material I had turned out to be fully adequate, the full hem circumference is almost 310cm. In fact I could have managed with a narrower hem but in the lightweight material the extra width settles smoothly and looks very pretty.
When the top part of the banyan was almost finished it was the time to cut the pieced hem part to an even length. Unfortunately I had assembled and bag lined the bloody thing in a hurry when I was really tired (always a hazardous combination), only to discover at this point that the top fabric and lining pulled a full 3cm in different directions at the hem. Not that unexpected, really, considering all the piecing, but I should have been smart enough to check this much earlier.

I ripped the front edges open to the waist level and smoothed the lining to fall where it naturally would. I had to cut the front edges to a bit more slanted shape to make the lining reach the edge on one side. This makes them gap easily at the hem, but I as I happen to have a perfectly color-coordinated petticoat it just looks cute if not quite how the garment is supposed to look.
Then I finished the hem by machine sewing the layers from the inside, apart from a gap for turning the garment outside up again. I finished all the bag-lined edges with running stitch to get a more period-accurate look and keep them in shape.

The final thing left was to figure out the front fastening. For some reason I had originally thought of bow ties, but the V&A banyan doesn’t seem to have any and there is no mention in the description of signs of there ever having been any. According to Riikka Pylkkänen, a Finnish fashion historian, the dressing gowns of a different style worn in Sweden at the time might have a decorative bow, and there are some mentions of decorative clasps. As in dresses, pinning would seem one likely fastening option.
I contacted Hana Polásková, who has made a very faithful reproduction of the V&A banyan. She told me that she uses pins for the front closure, but has added ties to the center back to fix the waistline for easier pinning.
The reason why I personally wanted to avoid pinning as the only front fastening was the softness of the material, which would probably stretch or ever tear with pinning. The bodice itself is not tightly fitted, but the side pleats add extra weight and pressure on the bodice.

I ended up with adding four pairs of tape ties on the front lining edge as the real fastening, and pinning the front edges loosely to cover them. This way there’s no real strain on the edges. I couldn’t resist adding a single bow on the bust line though, as I happened to have a ribbon in just the right color.

Conclusion
The banyan turned out really cute. As noted before, the fabric could have been stiffer, but then again it’s super comfortable and the kimono sleeve falls gracefully without extra bulk on the underarm. The floral pattern is, admittedly, quite large for a clothing fabric of the period, but its style is definitely Indienne-ispired. The sea green ground is maybe not typical for Indienne prints, but with the pink flowers it’s really pretty. As this garment was more of an interesting project than something I really needed, the fact that the total material cost was quite affordable weighed in a lot.

With the narrower front pleat, altered collar and probably deeper side pleats the banyan is definitely more inspired by the V&A original piece than a faithful recreation. This is the approach I usually either begin with or somehow end up with. In this case, this garment was essentially a more relaxing project at a time when I didn’t have time or energy to begin anything long and complicated. I (mostly) enjoyed making it (well, the hand sewing bits at least), and I personally like the finished thing.

And for the last thing, the almost obligatory picture of the banyan with color-coordinated underwear.