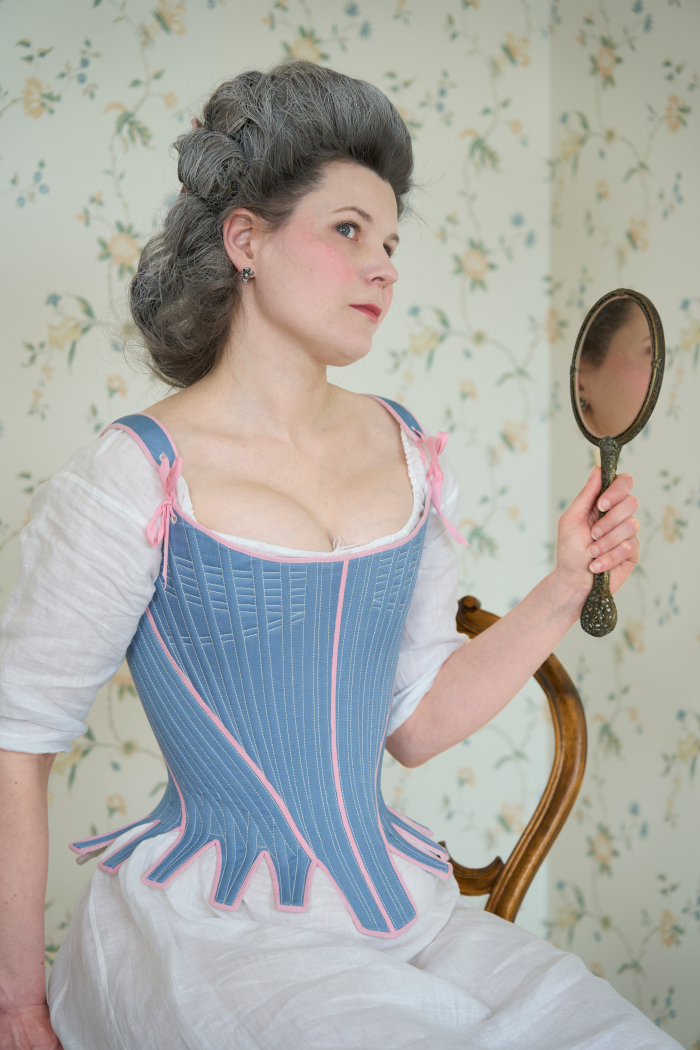
Stays, 2024
I have made several pairs of 18th century stays during past years, mostly improving my skills and the fit with each, and the light blue stays from 2012 were already quite good. I have used them for years with more festive and formal dresses, while preferring the lightly boned pink stays for more casual wear.
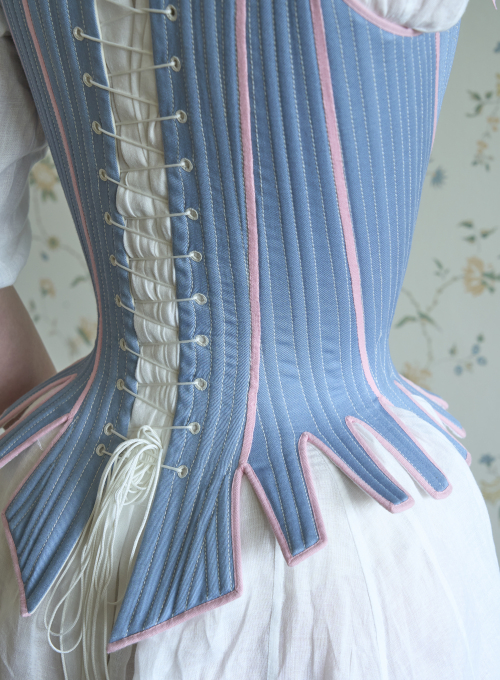
I put a lot of time and effort on the light blue stays and I loved it very much, but unfortunately it still wasn’t perfect. It looked pretty, but there were issues with the fit. The main problem was that the back was way too straight for my sway back, and when the stays were tightly laced they began to press my lower back very uncomfortably after a few hours of wear. I used to cope with the problem by leaving the bottom lacing holes unlaced and leaving the lacing wider at the waist. It wasn’t an ideal solution, but helped a bit. Then there were other minor things, like the shoulder straps tending to peek out with wide necklines.
I had a vague plan to make new stays some day, but then I was faced with a necessity. I forgot the stays in a hotel room while packing in a hurry, and noticed their absence only some weeks later. It eventually turned out that the cleaning service had found them, but then the postal service lost the package. What a sad fate for a well-beloved garment.
So, I became more neurotic about checking hotel rooms when leaving and began seriously planning making new stays.
Choosing the
style
It might be an interesting project in itself to try to make a more accurate copy of some museum piece, some day, but at the moment my goal was to make something well fitting and practical. It would also need to pass good enough for a period from 1760s to 1780s so I could wear it with all my gowns, so I would have to compromise on accuracy anyway.
I had obviously forgotten how much extra work visible boning channels can be, so I wanted to have them again. The stays would also be half-boned like the previous pair, because fully boned stays with plastic boning is something I don’t even want to try to wear. Besides, my rather modest bust doesn’t need maximal support and I’ve become too comfort-loving for any serious waist compression.
Materials
First I toyed with the idea of making the stays in period-correct linen for once, but I didn’t easily find linen that I trusted to be non-stretching and non-fraying enough. I’m sure there is some out there, but then I reminded myself of the goal of making a working replacement for the lost pair and decided to stick to the familiar and trustworthy cotton coutil. I didn’t find the same quality I had used before, and had to settle for a bit softer one, but at least it might be easier to sew.
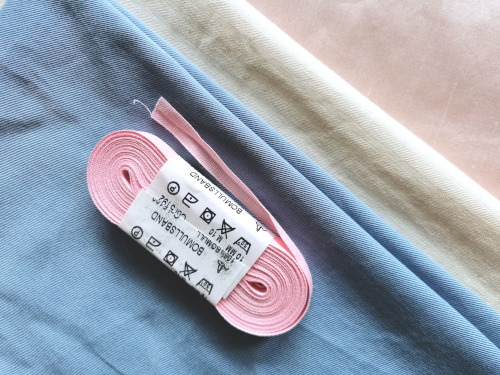
Of course I still wanted the stays to look pretty, so I bought a blue cotton twill for the top layer. The underside lining is the same trustworthy lightweight linen I have used for several shirts, shifts and linings for years. I pre-washed all the materials in case I would someday have to wash the stays.
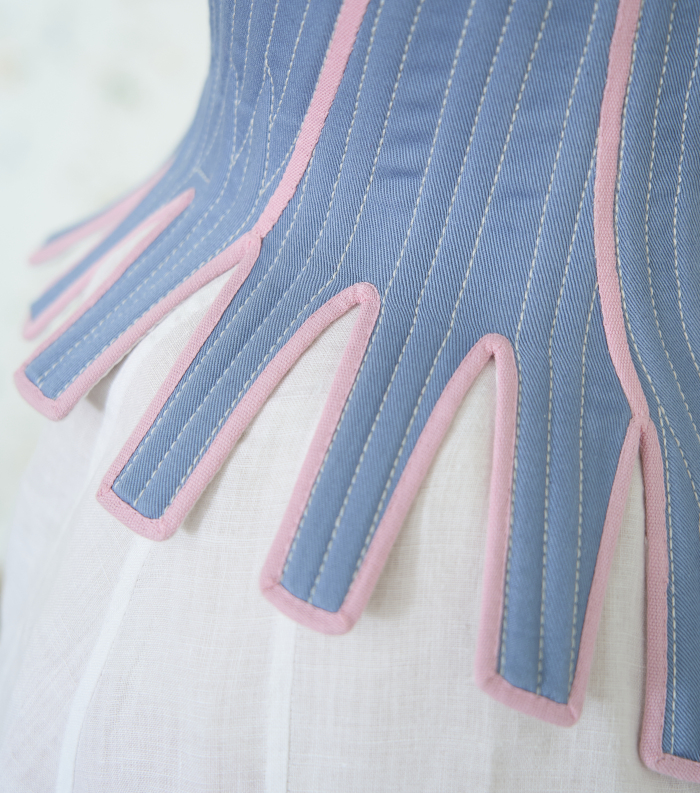
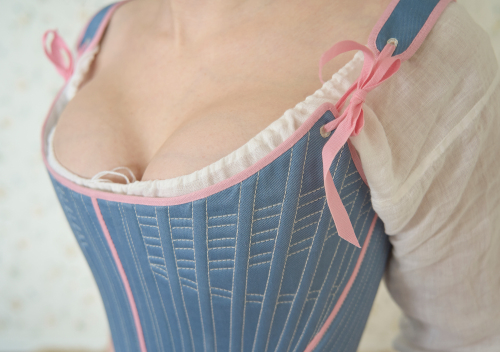
Colored stays seem to mostly have had edges bound with white, cream or tan tape, but I have always thought that white binding looks boring against a white shift. Instead I brazenly bought a pink cotton tape.
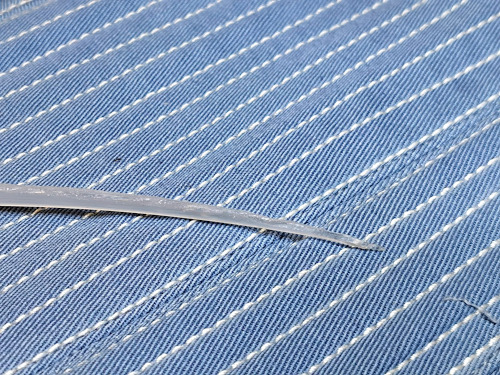
In my previous stays I have mostly used a 7mm wide cable tie for boning. It stiff enough, comes in long enough pieces and, of course, it’s cheap. Unfortunately it’s also much, much wider than what they used in the period, which can look quite heavy in visible boning channels. It also makes many of the intricate boning layouts of the period impossible.
I have never tried reed as a boning material - again, it would be interesting to experiment with, but not this time.
I considered buying 4-5mm wide “German boning” that many people swear by, but then I also had a bolt of cheaper plastic boning I had originally thought for dress bodices. It was 6mm wide but at least thinner than heavy cable ties. As I wasn’t sure if this pair would be the perfect one either, I decided to use what I had instead of buying shiny new stuff all the time.
The pattern
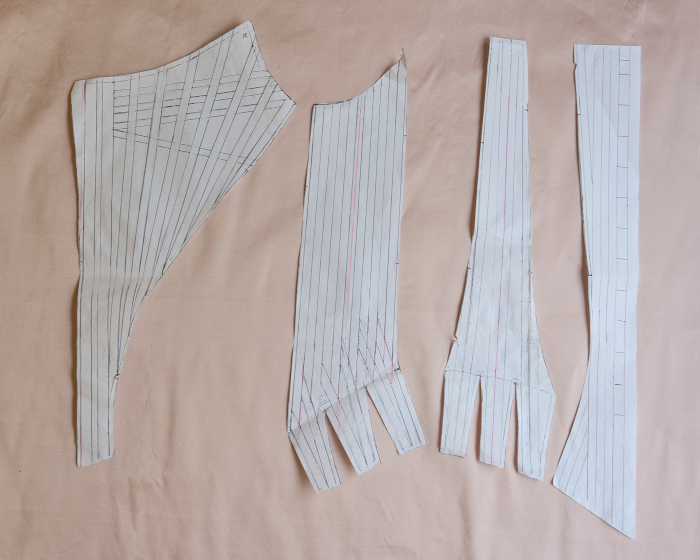
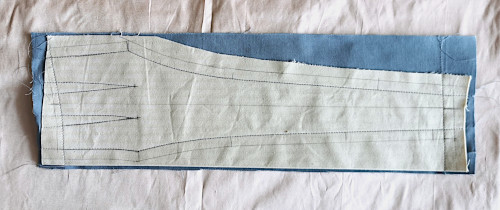
Fixing the pattern was of course the key to success or failure. Added complication was that I couldn’t get too carried away with the shape as all my old dresses would have to fit over the new stays. I began by copying the old pattern and drawing the alterations I thought it needed.
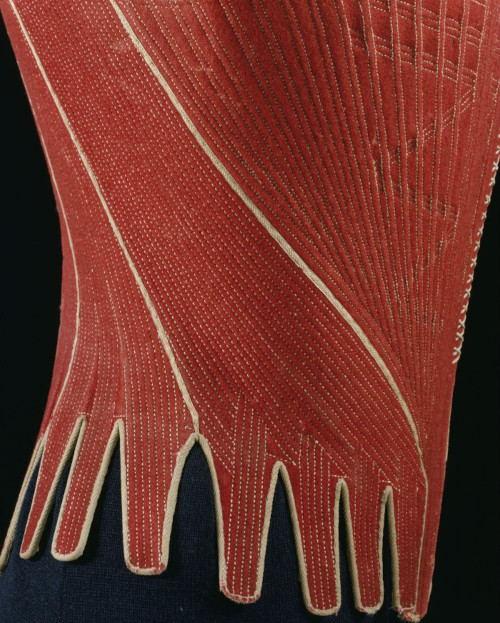
While I worked from my original pattern, I looked at museum pieces, for example the brown stays in Kyoto Costume Institute, dated by museum from 1760s to 1770s. In general especially the 1780s stays curve a lot at the back, so that was a good direction to go.
FASHION: A History from the 18th to the 20th
Century, Volume 1.
Pattern made by KCI
(I'm adding a picture of the pattern here because someone else had already uploaded it in Pinterest)
Pattern made by KCI
(I'm adding a picture of the pattern here because someone else had already uploaded it in Pinterest)
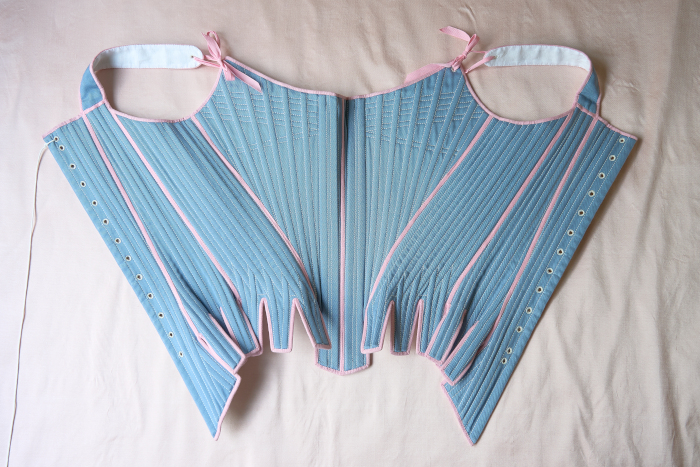
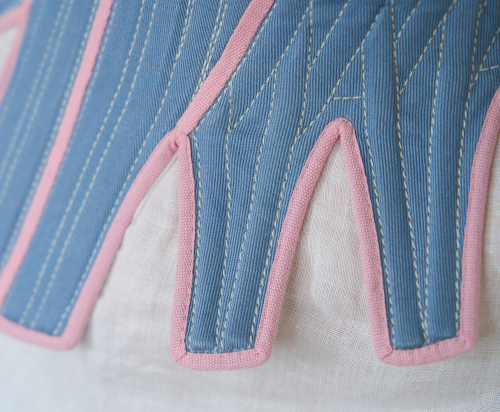
I began with the side-back piece, curved it out at the waistline and added a third tab so they could spread out more. I also lengthened the side-back seam a bit downwards and widened the bottom a bit.
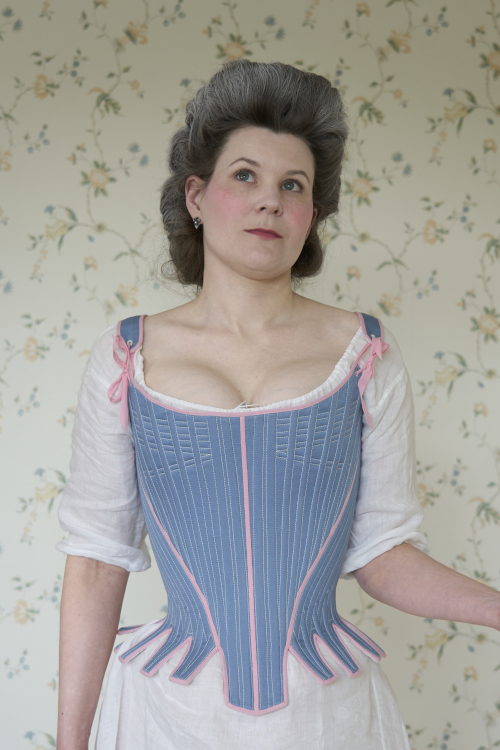
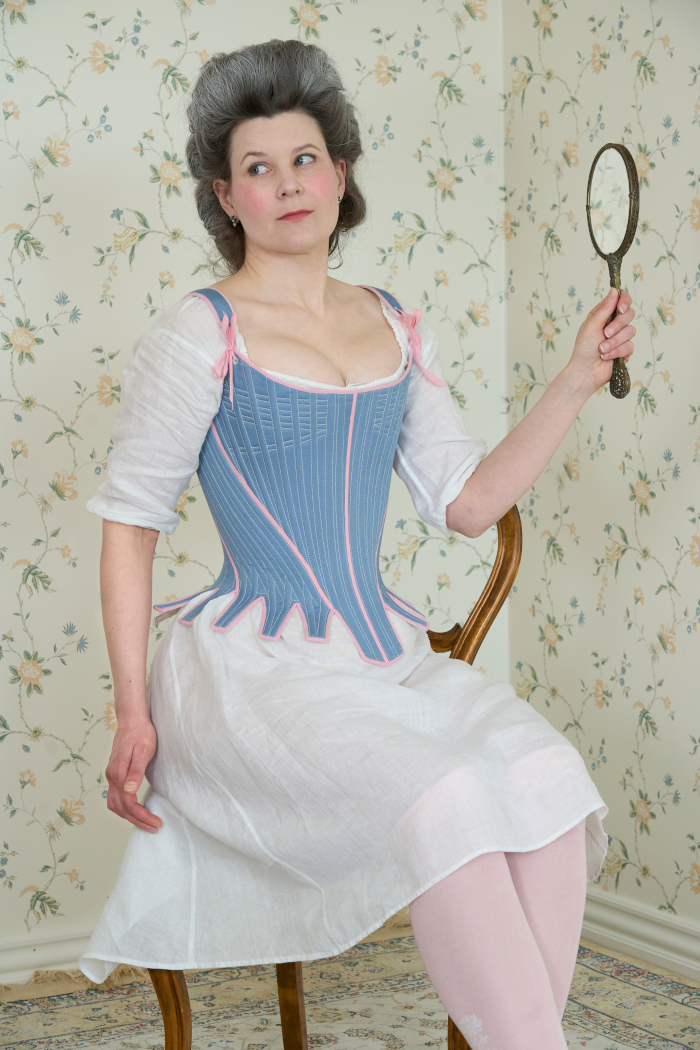
1780s stays are typically very wide at the bust and very narrow at the back. I’m not used to holding that rigid posture, but a light move in that direction wouldn’t be that bad, so I widened the front upper edge a bit and narrowed the back.
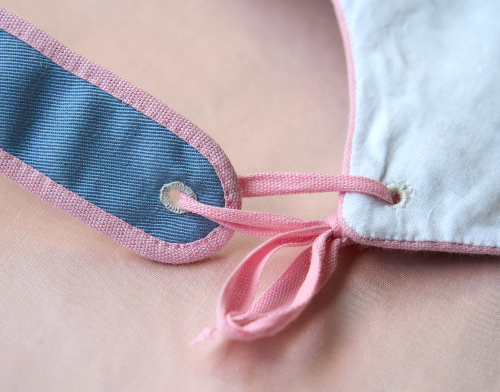
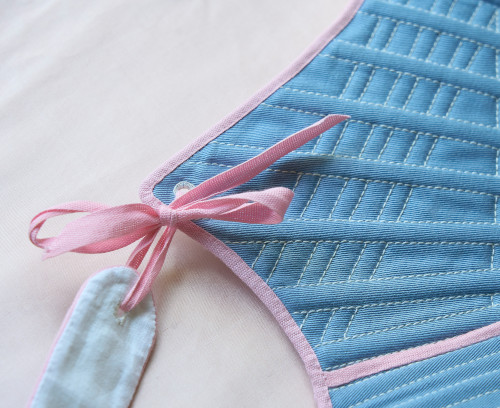
Another problem I had had with the previous stays had been the shoulder straps sometimes tending to peek out from an open neckline, so widening the front edge and moving the lacing hole sidewards might help with this too. I’m used to drafting a clearly rising point for the lacing hole, but now I just ended the gently curving neckline to a corner at the armhole.
On the afterthought, the shaping of the center front bottom in the light blue stays didn’t look so nice to my eye anymore, so I changed it back to a straight, almost square point. It’s not as narrow as those in many 1780s stays, which look amazing, but I thought a wider one would provide more support for the belly.
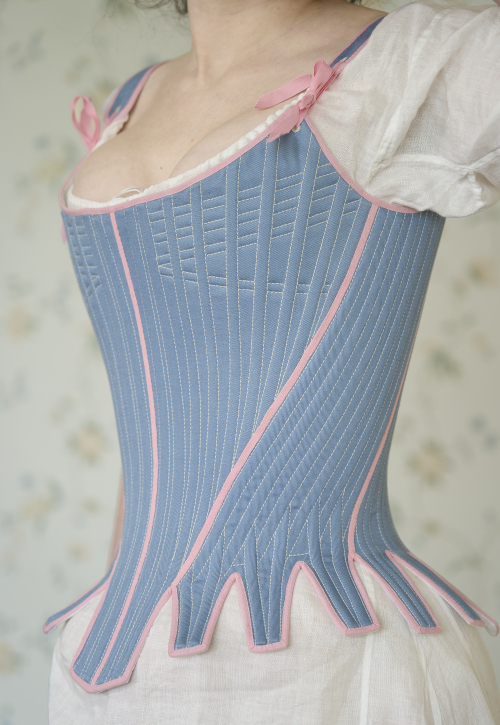
While I tried to stay wary of changing the overall fit too much, I still wanted to try to curve the side of the front pieces more. I had always thought that this wouldn’t work on my body which doesn’t have that much soft tissue to compress or move, but to my surprise it made a nice shape and didn’t feel oppressing at the lower ribcage. The seam shape also looked nicer on.
The side front piece didn’t change much, I just raised the armhole a bit and drafted the tabs ever so slightly narrower at the bottom as the new boning would allow that.
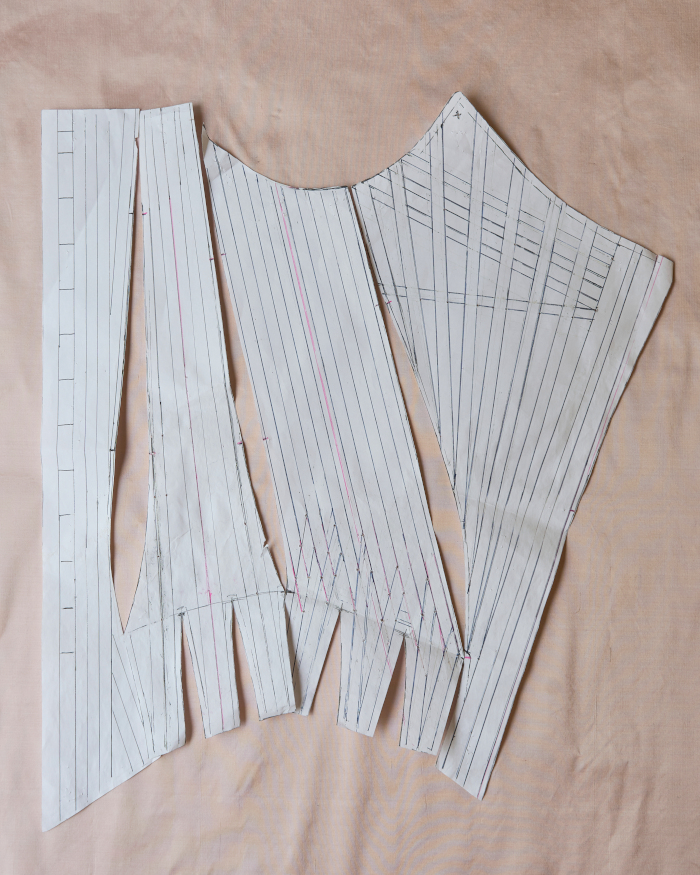
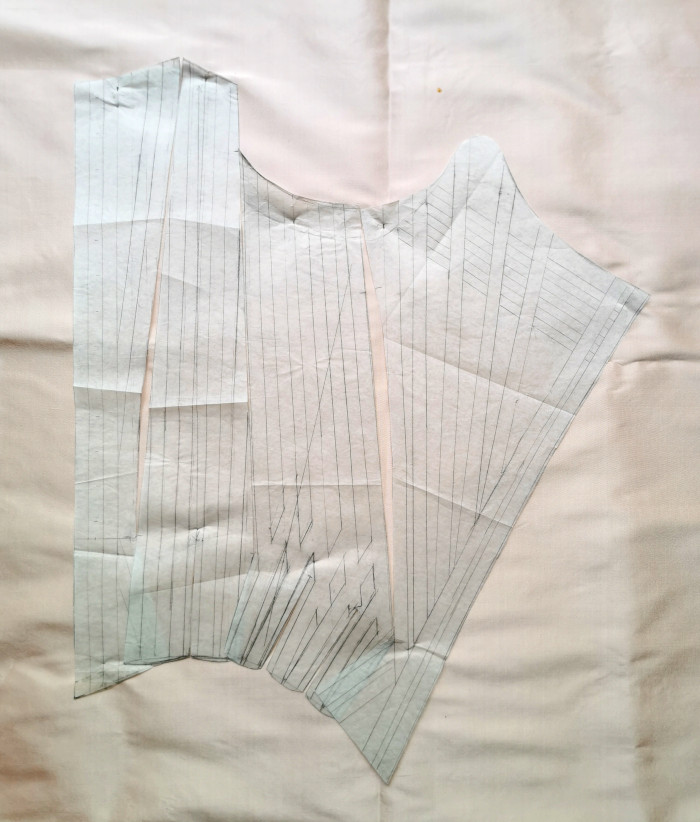
As you can see from the pictures above, the final pattern pieces are much more curved than in my old pattern used for the light blue stays. This makes the stays less rigidly cone-shaped, and instead the follow the natural curves of the body better.
I made the first mock up with cable ties, tweaked a few things and then made a second one in heavier material with mostly the boning I was going to use.
Boning channels
placement
Visible boning channels need a well-thought plan and finished pattern. Again I tried to roughly follow typical boning placement in historical pieces, but had to make several compromises for various reasons.
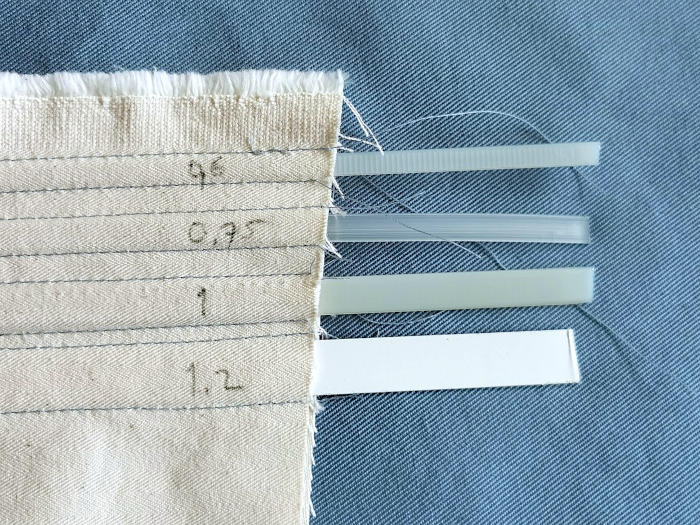
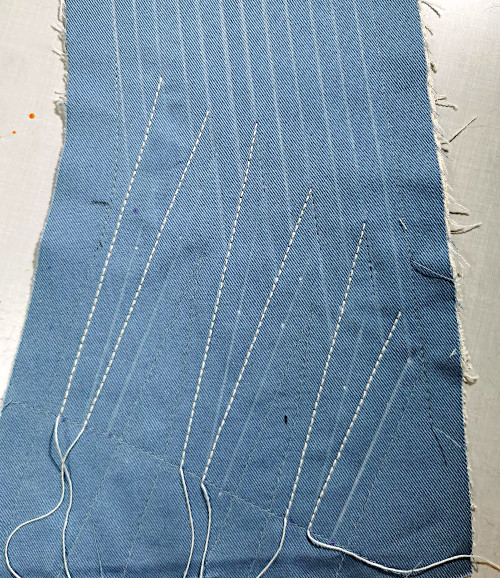
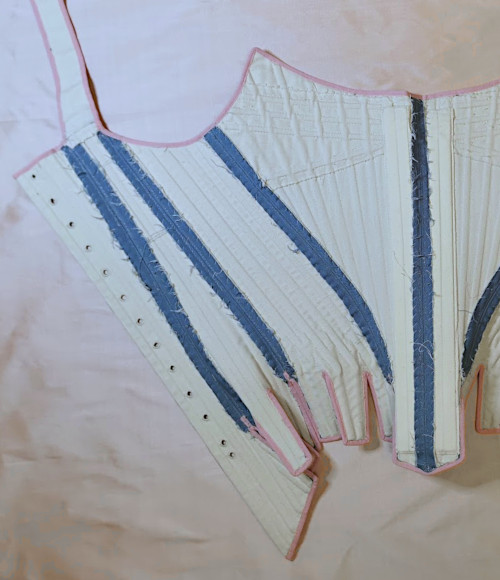
As mentioned before, my main boning material was 6mm wide plastic bone. On both sides of the center front seam and at the edge of the back pieces I used the heavier 7mm cable tie. It bends less sidewards so I thought it might work well for supporting the lacing. On the vertical boning at the bust I used 5mm cable tie.
I’m too old, cranky and comfort-loving for a rigid wooden busk, and in my opinion a stays front curving at the bottom isn’t that serious. It’s not ideal, sure, but it’s usually to some extent disguised by the skirts. However, the light blue stays bent quite a lot at the front waist when laced tightly.
As a kind of (dreadfully anachronistic) compromise I decided to try adding separate extra boning channels on the underside on both sides of the center front seam for 1cm wide steel bones. They bend, but less than plastic. At least in the mock up version the combination of steel and heavier able tie seemed to give nice support without being too uncomfortable.
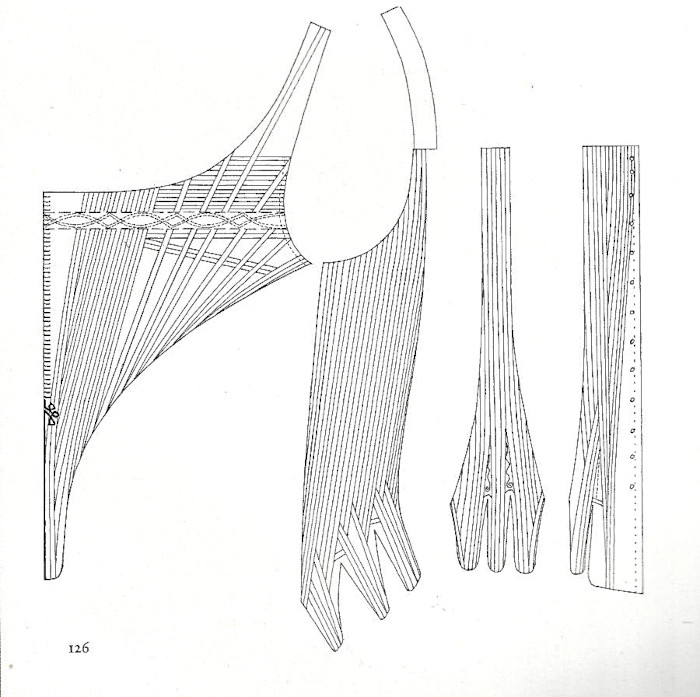
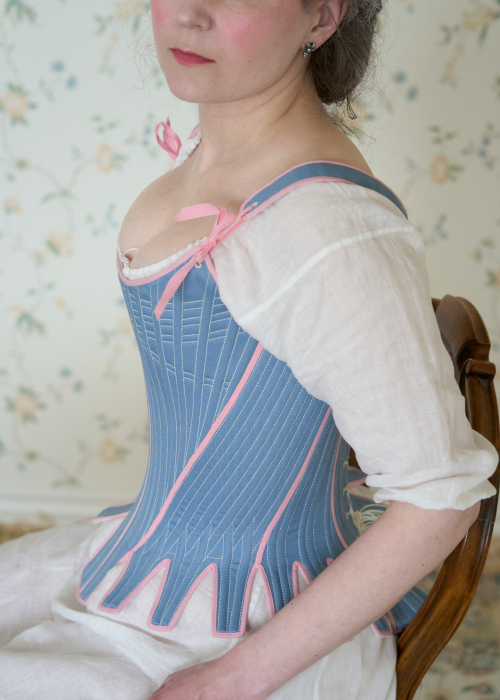
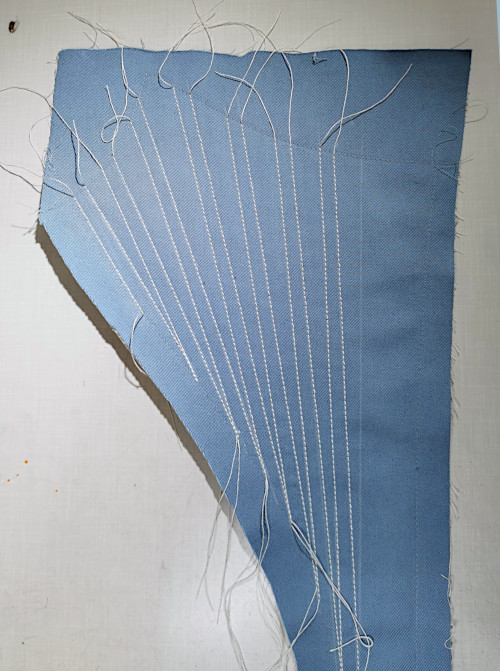
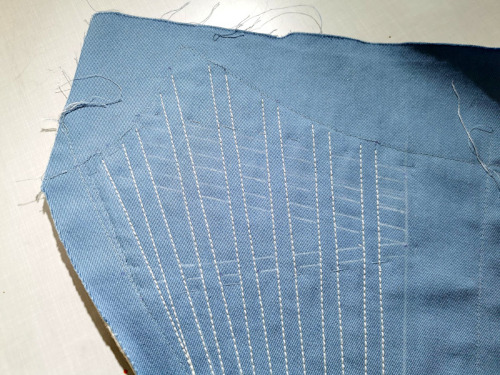
To continue on the front pieces, the bust area again has 3 rows of horizontal bones. On the mock up I also added another, slanted bone below them (following the KCI stays among others). I’m not exactly sure what it’s supposed to do, perhaps to support the side of the bust, but it looked nice so I kept it.
Stays, 1780s
Victoria & Albert Museum, T.192-1929
On the front side piece I again tested the boning layout
seen in period examples, with bodice and tab bones meeting
in triangular groups. Again, in the mock up it failed to
give a smooth curve that didn’t dig into my waist. Maybe
it only works in fully boned stays with narrower boning, I
don’t know, but I abandoned it again.Victoria & Albert Museum, T.192-1929
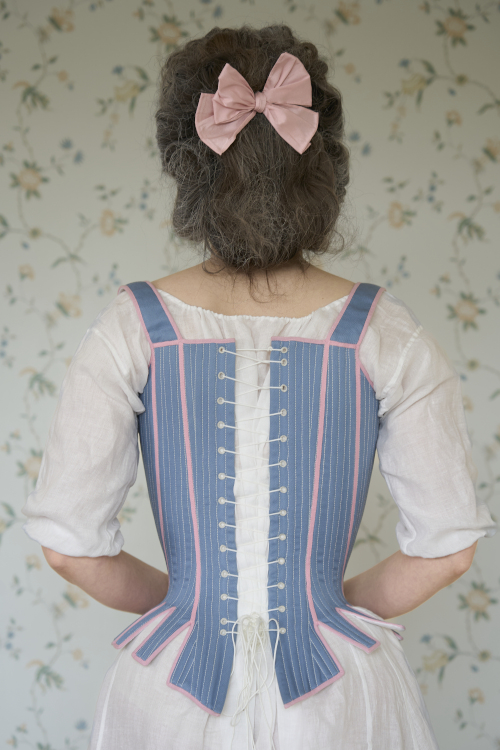
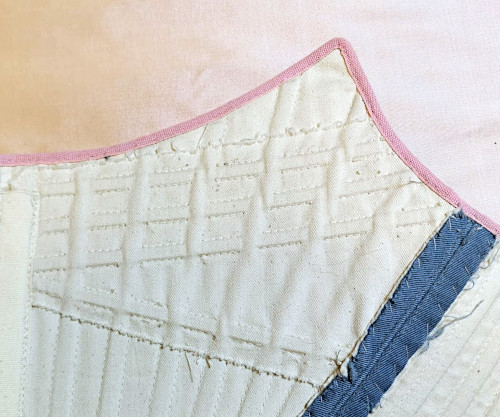
In a couple of my earlier stays I have crossed the boning channels above the waist with a lattice-type channel layout. This works, especially in more sparsely boned stays, and is also a period correct style, but unfortunately it seems to be mostly a later style out of my timeframe. This time I ended up crossing just the end of the bones, which looked kind of closer to the KCI stays for example.
At the back pieces the boning channels were almost identical to the light blue stays. The very much altered side back pieces needed much more thought.
A sharply narrowing piece was a bit of a challenge with half boned design. I ended up drafting the boning channels in pairs so that I managed to get two bones in each tab. In the mock up fitting I noticed that the 6mm plastic bone bends sideways enough to curve the channels slightly.
Sewing
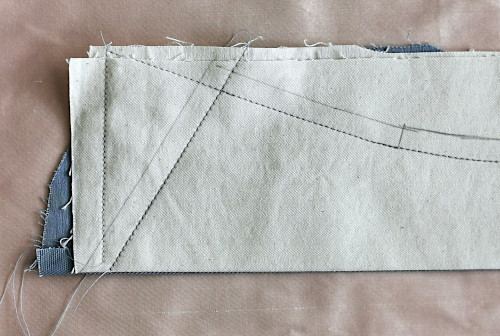
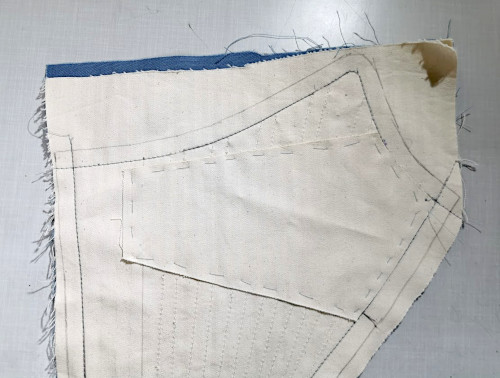
I followed my usual technique of beginning by drawing the pattern edges and balance marks on the coutil with a pencil. Then I pinned another layer of coutil and the twill top fabric under it and stitched the edge lines. After this I cut the pieces separate, and left allowance around them wherever I could.
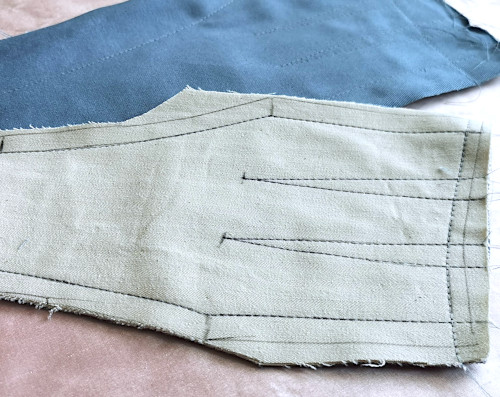
The exception from this were the back pieces, where I sewed the twill on the coutil, then turned it to the face side and folded the coutil at the back edge. Only then I marked and stitched the layers together.
Some original stays with visible inside (like this one at Lara Corsets) seemed to have some sort of reinforcement bands or pieces at the waistline. This seemed like a smart idea to me, as especially the side front piece waistline was almost in bias, and it would take a lot of pressure in wear. I slip stitched a cotton band right above the tabs.
I stitched the boning channels by machine with a thick thread. Unfortunately my sewing machine didn’t really like it, no matter how I tweaked the thread tension, so I had to use a regular sewing thread as bobbin thread to coax it to work.

The downside of this was that I had to sew the boning channels from the top side, while it would have been so much easier to mark them on the wrong side with a sharp pencil. Chalk pencil can wear off surprisingly fast, unless of course you draw a line in the wrong place - then it can sometimes be hard to remove without washing.
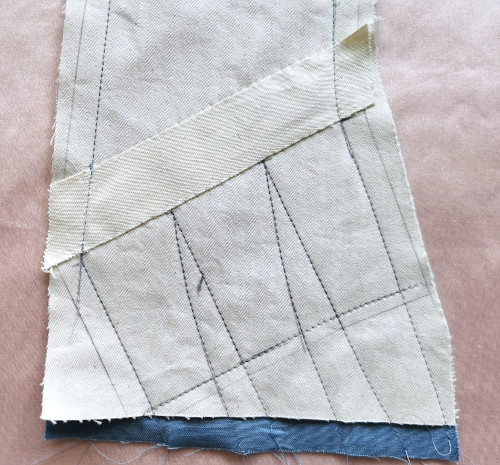
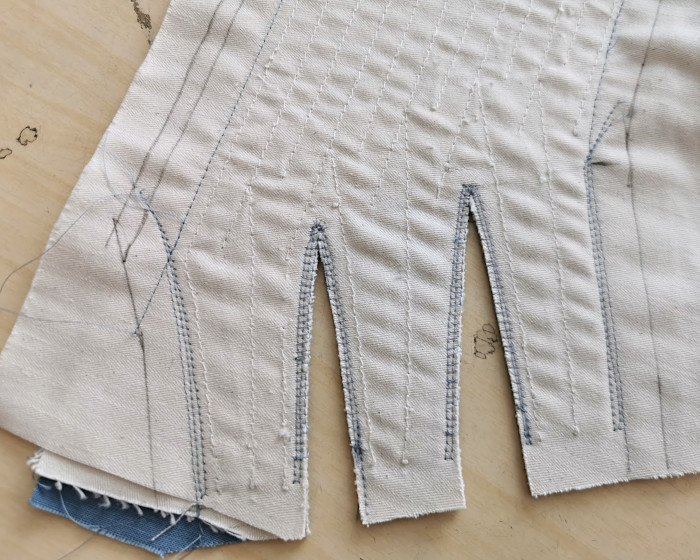
I marked some of the channels as I went to keep the channels even and symmetrical. Especially the fan-style boning in the front pieces needed constant checking to make sure the bones ended at the seam at the same height in each piece.
One of the tricks I came up with was to sew boning channels on one piece, then pin it exactly over the corresponding one and stab markings through both with a darning needle.
I had punched holes in the paper pattern for the crossing bones to mark the corners precisely. Despite all this, towards the end of all the stitching I became a little tired and impatient so some of the channels vary a bit in width.
Like in the light blue stays, on the front pieces I stitched the main boning channels first, then whip stitched an additional layer of coutil at the top part. Then I stitched the horizontal boning channels through all the layers, which created separate channels for the horizontal boning. This made the surface smooth without bulky crossings.
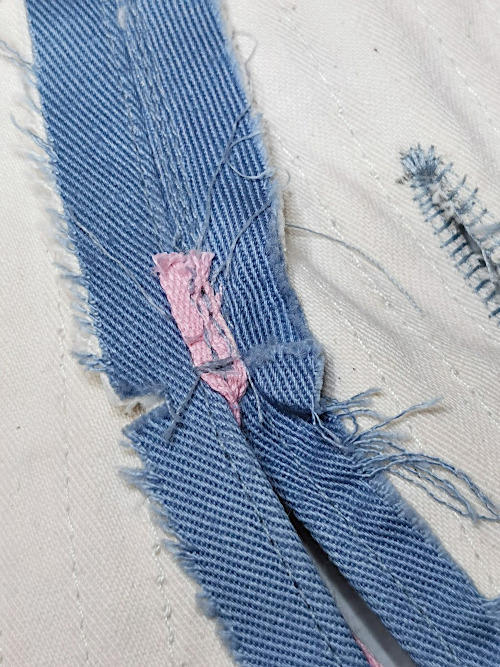
This time I tried the same trick on the side front pieces. Cable ties, which I have formerly used, have the advantage that they come with the other thinner, which is very convenient in boning channels that cross at the ends. Even though the boning I used now was slightly slimmer, I still wanted a smoother surface, so I reasoned that adding a layer between the crossing channels might work here too. It would also allow the stitching to indicate a more period correct boning layout, as explained before. Yes, this was blatant cheating, and I don’t care.
I thought it would be easiest to add another layer on the whole piece. I began by stitching the back edges of the boning channels, then added the extra layer underneath and stitched the rest of the channels.

This way the bodice boning ends reached under the tab bones. Later, when inserting the boning, I also thinned down the ends.
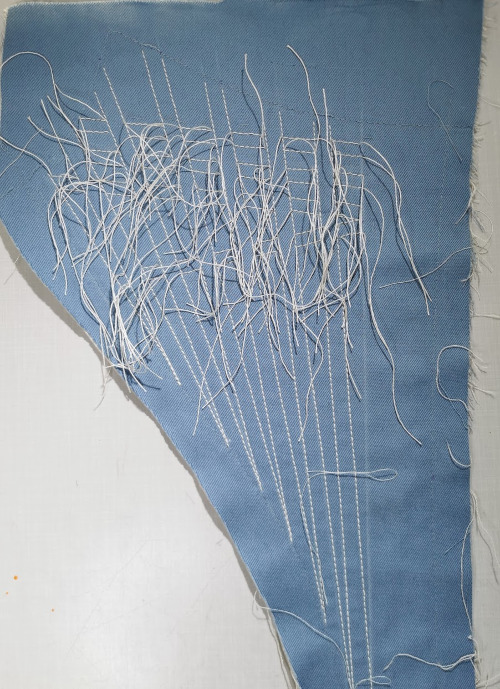
On visible boning channels machine sewing is fast and precise, but of course it’s a bit clumsy when you have a lot of crossing channels. With a thick thread you can’t really stitch the same line twice, or just jump to the next place. The binding ribbon was also so narrow that I was reluctant to just sew a few stitches back and forth at the edges. This all left me with a huge amount of thread ends to knot and tuck between the layers. It was one of those parts of the sewing process that you don’t usually really think about, but here it took a lot of time.
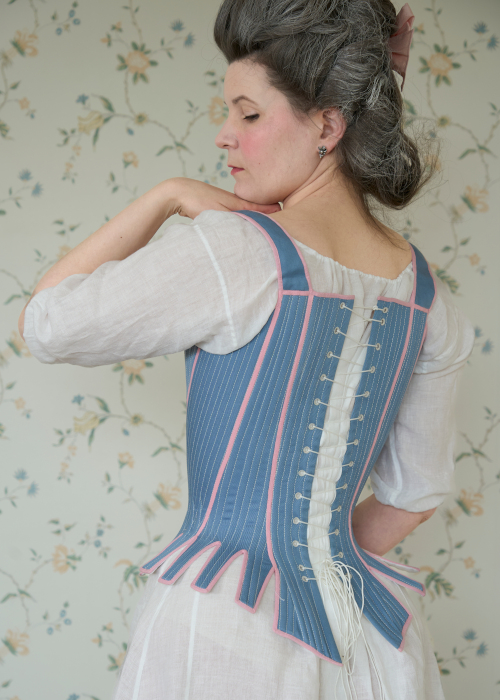
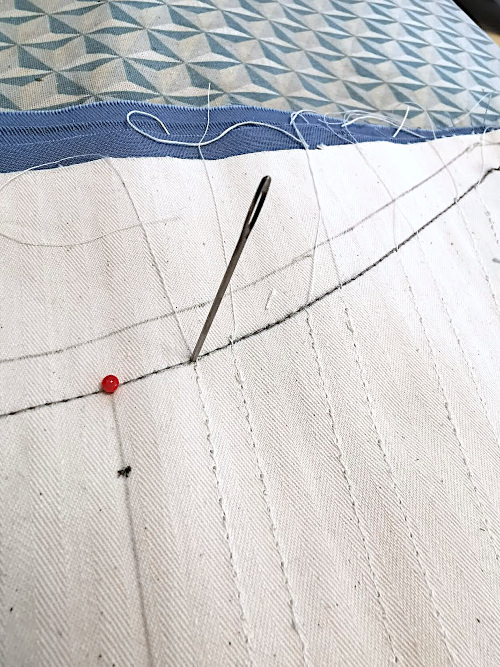
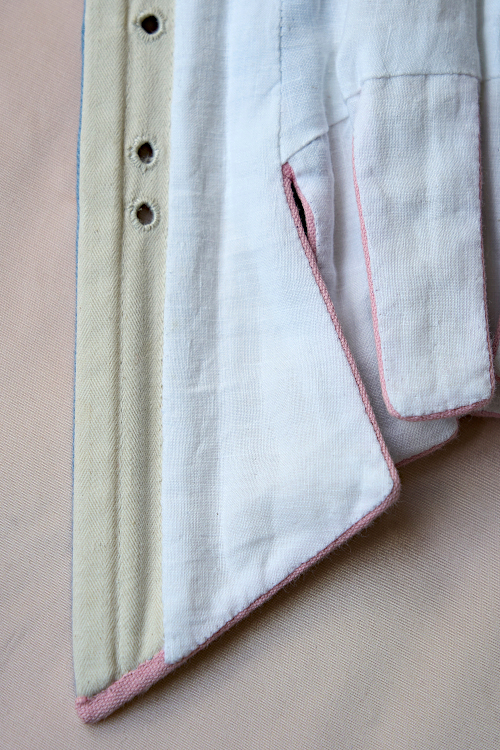
At this point, while the pieces were still mostly separate, I also worked the lacing holes at the back edges.
To return to the front pieces again, after closing the front seam I added separate tape casings for the steel boning next to the seam, under the top boning. Their edges were secured by the front boning channel stitching. I left the boning casings shorter at the top so that the stiffer steel bones would not stick out or compress the bust too much. After all, they were primarily meant for supporting the lower belly. After inserting the steel boning I closed the top of the casings by hand.
One new thing I wanted to try was adding the lining last after binding the edges. This is a period technique that allowed the lining to be easily changed if it wore through before the rest of the stays. I use stays so rarely that it’s an unlikely scenario, especially as the linen I use for lining has proven to be very durable. But then again, it might have other advantages. The pink stays I have used a lot eventually got really dirty at the underside of shoulder straps, as the shift beneath occasionally slipped down. Being able to easily replace a small strip of lining might be convenient.
There were also other tempting advantages, such as having one layer less under the narrow binding. My choice to put the steel bones in separate casing also allowed them to be removed for gentle washing of the whole stays if that would become necessary. And there unpicking the separate lining from the neckline for a short space would allow me to reach them easily.
And, of course, I love a neatly finished inside on a garment and cannot lie.
But alas, before getting to the lining stage there was still a lot of work ahead.
I machine sewed a few extra rows of small machine stitch on the tab edges, and some back-and-forth stitching at the top of the slits. I left the end of the tabs open for inserting the boning later, and left some allowance there while cutting the sides on the final shape.
The machine stitching might well have been enough to control the fabric fraying, but I’m in the habit of adding a row of blanket stitch on the edges before binding. Sometimes I have used zig zag for this, and it works equally well (though of course the ends of the tab slits are tricky). Now, however, I felt like hand sewing because I like it.

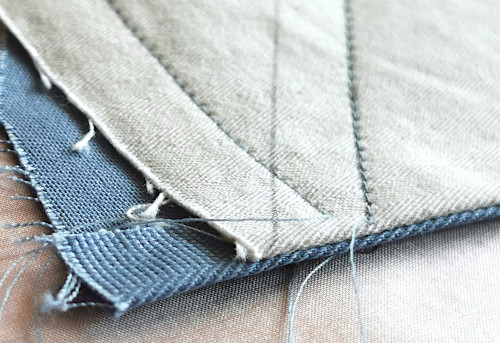
The exception from this technique were the tab sides ending on a seam. There I trimmed the coutil carefully right to the tab edge, apart from about 1cm at the top. After closing the seam I turned the twill layer under and stitched it in place near the edge.
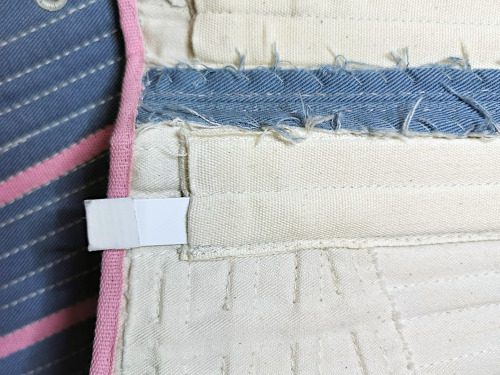
I pressed the seams open and stitched them narrowly so that the stitch line would be hidden under the tape that would cover the seams. It’s a modern trick, of course. At this point I also stitched the seam cover tape bottom ends on the underside.
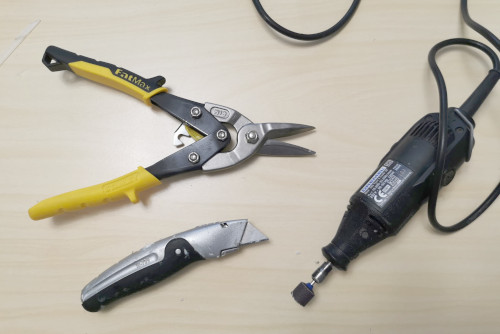
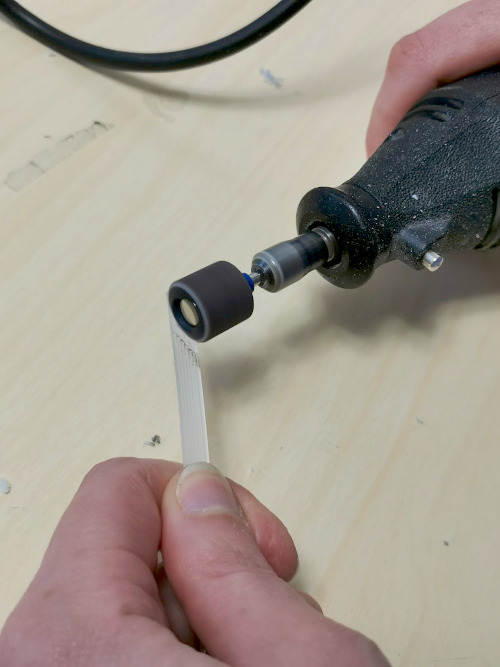
At this point I added most of the boning. Cutting them and shaping them to fit the pattern shape took some time, even with decent tools. Especially the bones at the side back piece had long, narrow top ends and had to be cut carefully.
I filed all the ends slightly rounded at the corners so they wouldn't chafe and tear the fabric. With plastic boning and coutil the risk is not great, but better safe than sorry.
As already mentioned earlier, I slimmed down the crossing ends at the side-front piece waistline to make them slip on top of each other more smoothly.
At this point I still left a little bit of extra length on the bones at the neckline, just in case I might still have to alter the height or shape.
I whip stitched the seam allowances loosely on the base, and then began to sew the tape over the seams.
It was easy in the places where the tape width matched the seam stitching width, and I could easily stitch through all the layers. But then in others, where it was placed over boning it was hard and slow going. While I had tried to be very precise in both sewing the boning channels and joining the seams, especially the latter had been challenging with all the stiff layers, and in some places the boning channels had ended up in a slightly different distance from the seam. I managed to fix this a bit with the placement of the tape, which unfortunately meant that I had to sew over the boning in places.
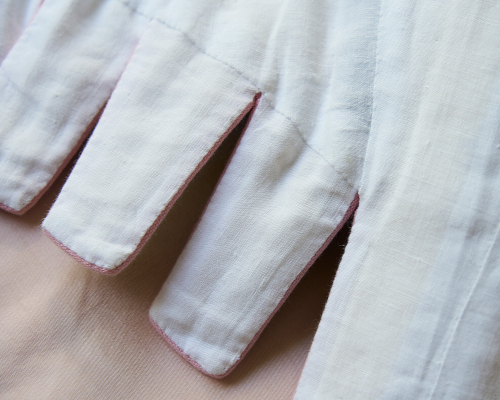
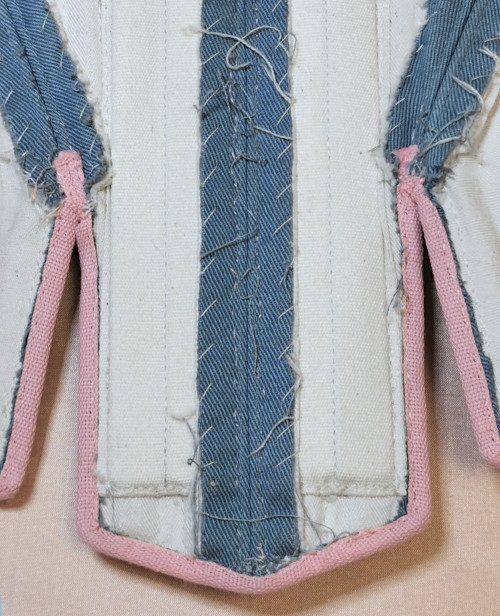
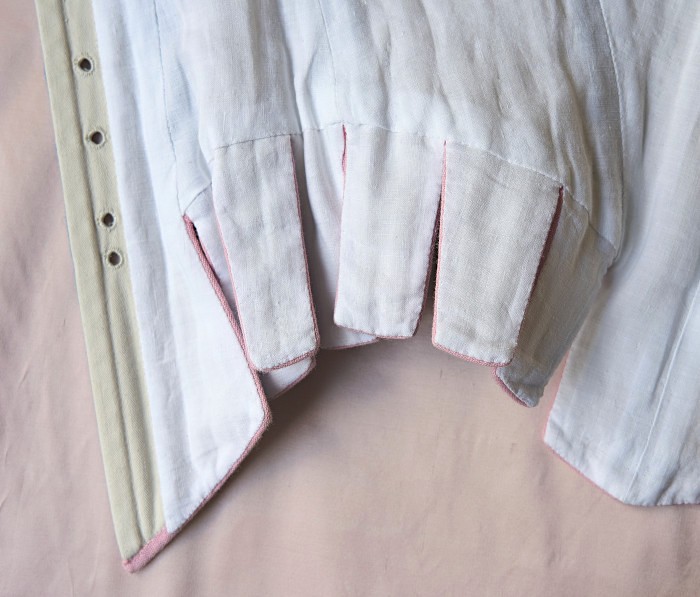
After finishing the seams I finally closed the tab ends, trimmed the allowance and added the blanket stitch.
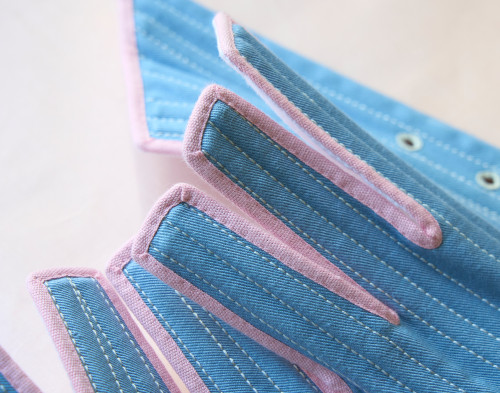
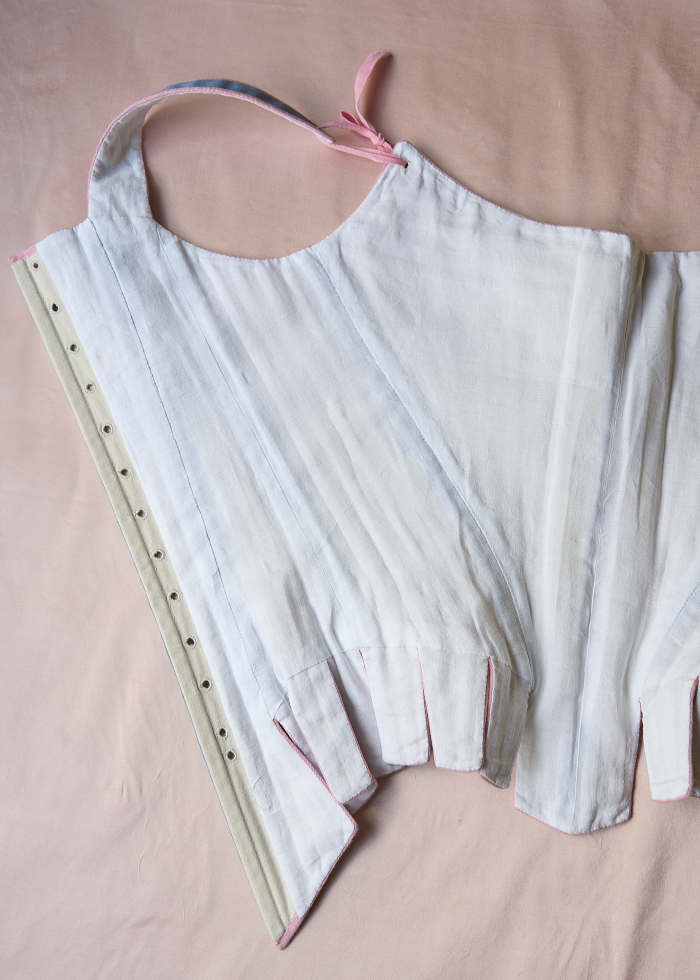
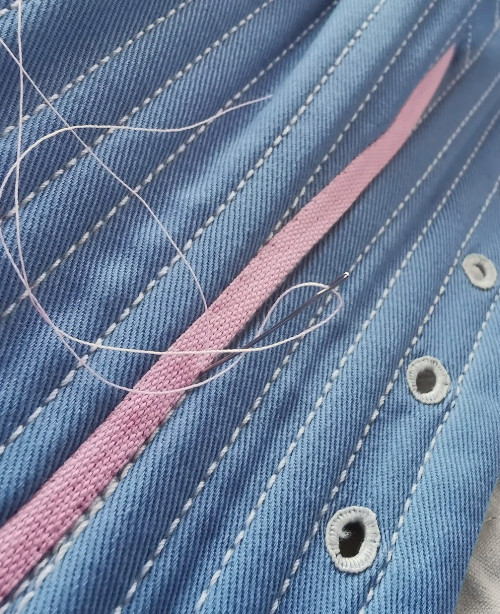
Then I could start the binding. That was rather uneventful, though occasionally tricky to get neat and symmetrical at the tab joins. I have to note that the cotton tape was so much easier to work with than the viscose taffeta tape I had used in the light blue stays. The more square tab ends are also actually easier to bind than curved ones.
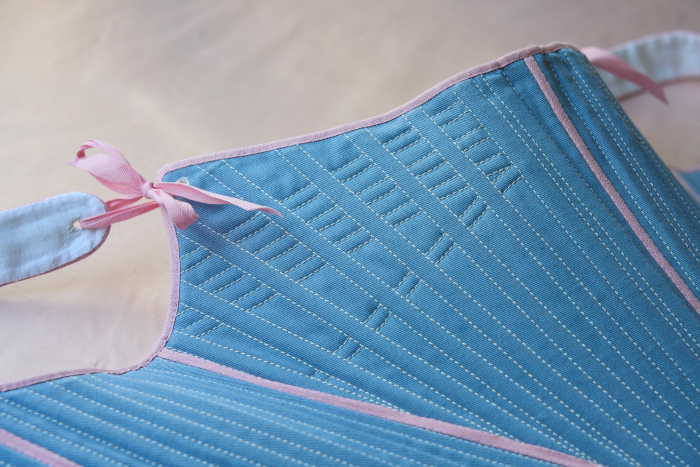
When the bottom edge was finished I could finally try on the stays for real without fear of tearing or fraying at the waist. I had left some extra allowance on the upper edge of the front to be able to adjust the front width if needed. Now, with the stays properly laced to the intended fit, I was happy to note that the neckline shape still looked just right and the added width didn’t dig into the armhole. I finished the top edge similarly to the bottom edge, only it went much faster without all the tabs.
As mentioned earlier, one reason for choosing to add the lining last was to be able to change it easily if particularly the shoulder straps should get stained in use. Of course the binding would be equally exposed to skin if the protective linen shift were to slip off. With this in mind I added a join in the tape at the top of the back armhole, so I could more easily change the tape in shoulder straps along with the lining if needed. I had plenty of tape left from the bolt I had bought anyway. Time will tell if this precaution proves necessary.
Before adding the lining I wore the stays for a few hours on several days to see if it would stretch in wear. I was also concerned about the neckline corners, which were almost in bias, stretching out of shape with the additional pressure of shoulder strap lacing, so I added small pieces of linen tape on the corners. I’m crazy about supportive layers, you see.
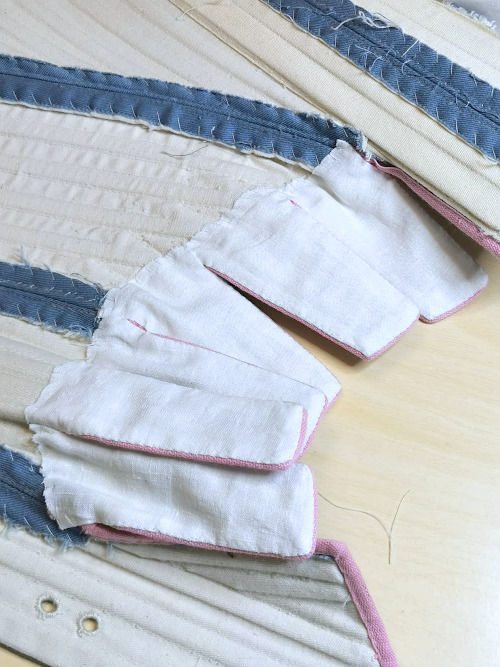
I began attaching the lining from the tabs, which got individual pieces closely slip stitched at the binding. This was also a good way to use all the assembled cutting scraps from whatever I had made of that fabric before. At the waistline I basted the top edge of the pieces on, bending the tabs outwards so that the lining wouldn’t pull in wear. Then I sewed the lining of the shoulder straps.
I joined the lining side seam with a machine and then whip stitched the other edges of the joined pieces loosely on the stays seam allowances. Then I folded the bottom edge under at the waist line and slip stitched it on, and sewed the top edge on the armhole.
Then I added the back and front pieces of the lining, and slip stitched the folded edges on the side pieces and next to the lining at the back.
For the last thing I worked the lacing holes at the shoulder straps and neckline corners.
Conclusion
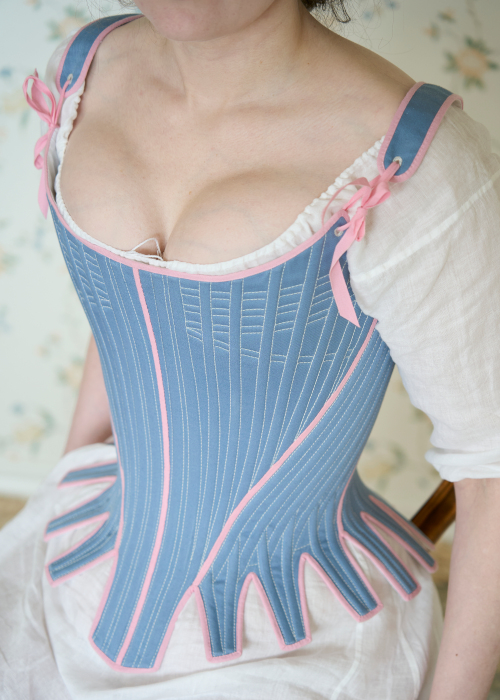
I’m quite happy with the finished stays. After a few wears they feel very supportive but more comfortable than the previous pair, though of course new problems may arise on a longer wear. Time will also tell how the new coutil and boning will last in use.
Looking back, adding the lining last was more work than I had expected, or maybe it’s just that towards the end of a project you sometimes get impatient to get it done. It may be a bit unnecessary detail, but I have to admit it gives a nice look. I might or might not use it in the future, depending on how much effort I’m going to put into a potential future pair of stays.
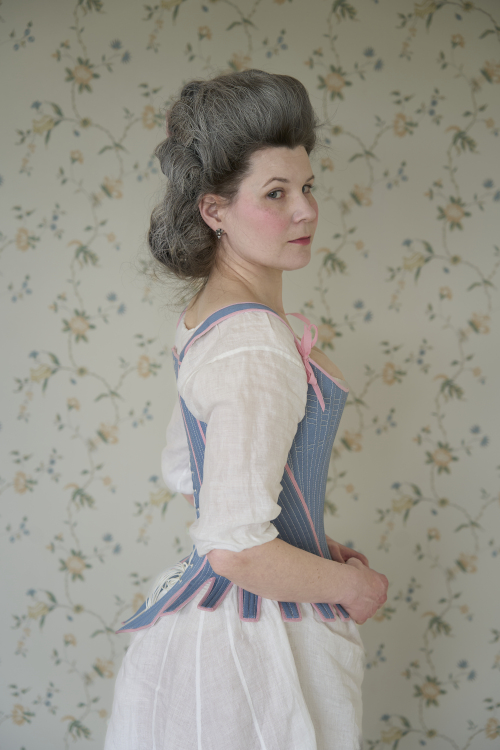
The updated pattern looks quite different in some places, but after trying on several of my old dresses over them it seems that the fit is still decent. While I had widened the waist at the back I had also curved the side front seam enough for the total waist circumference to stay roughly the same. The reason why the new shape is more comfortable is probably that the muscles in the back can’t be compressed much without pain, while the softer tissue at the front side of the body between the lowest ribs and pelvic bones naturally gives in much more, though of course this varies from person to person.
The breast circumference also stayed the same, though the neckline is a bit lower and wider. Overall I think the bust fit has been improving in every new pair of stays I’ve made, which is maybe not surprising considering I began with a commercial pattern without much understanding of the period.
The front side piece boning also seems to work nicely so far, it looks smooth and doesn't dig into the waist uncomfortably.
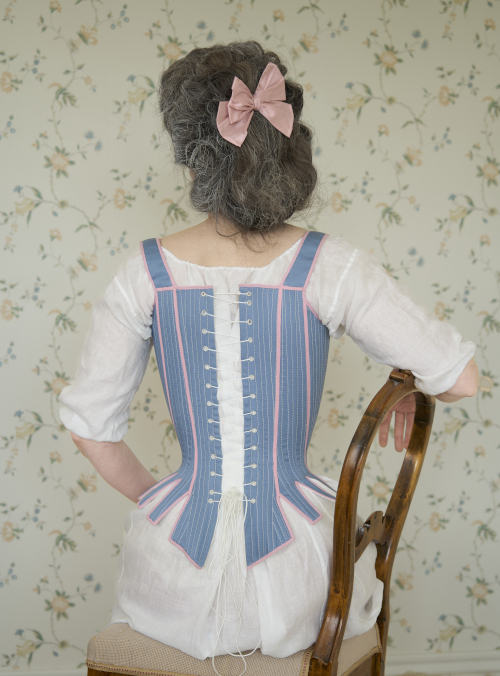
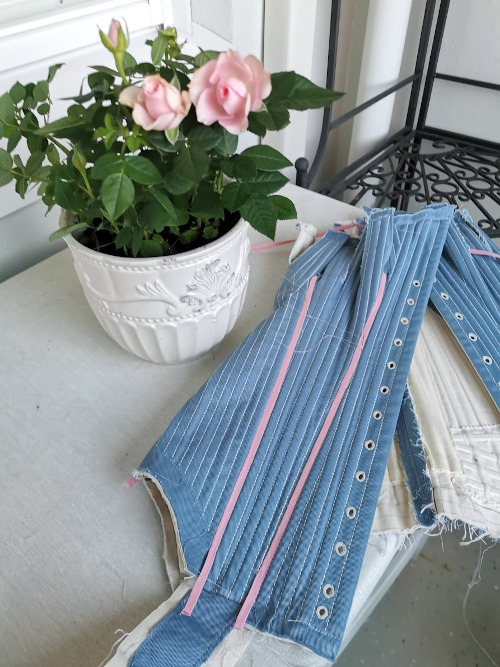
The stays are quite tight, and as you can see from the pictures there's quite wide lacing gap at the back. When drafting the pattern I wasn't sure whether the new, softer coutil I used this time might stretch in wear more than the one I have previously used. It's of course still possible that will do that with more wears. Anyway, my purpose had been to make tight and supportive stays to wear with my finest 18th century dresses, for more relaxed wear I will still be using the lightly boned and comfortable pink stays.
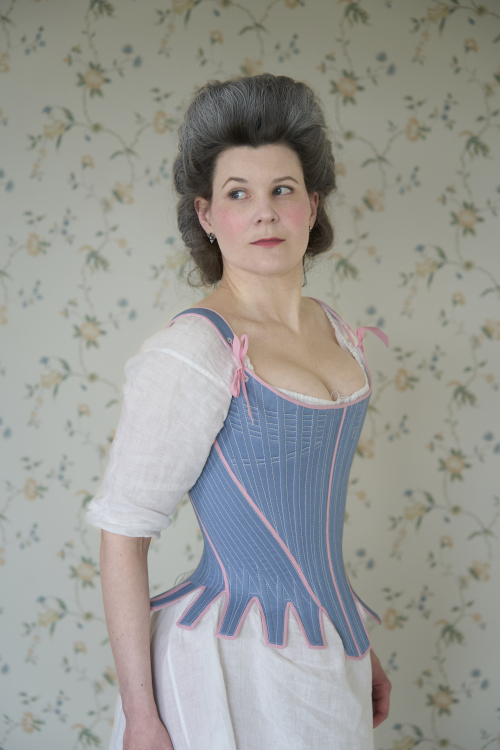
Visually the stays look attractive, though not strictly period accurate. The style is something of a mishmash of elements from different styles and different decades. As noted several times in this post, I just needed a new pair of stays and didn’t want to stray too far from my basic pattern and construction style developed over the years. For example, when the pattern moved closer to the 1780s in style I maybe should have added the partial front lacing or different style of shoulder straps, but decided to stick to the familiar.
The coloured top material with white stitching is in itself typical for the era, but the pink edging was definitely an artistic choice. I really like the shape of 18th century stays with the tabs, so quirky to the modern eye, and it was irresistible not to highlight them with a contrasting color.