18th century caps
The basic 18th century head covering is a linen cap. It was worn not only for decency's sake (although that was an important thing) but also, for lower classes, to finish and cover hair which might not always be so elegantly done. Apart from being period accurate I have found the cap being a great thing for exactly the same reason.
People usually consider caps at first to be priggish and silly looking. I admit I had my prejudices too, but lately I have found myself wearing even more covering and frilly caps in public.
2009
This basics for this very simple cap, that's really a piece of linen edged with lace, can be found on La couturiere Parisienne
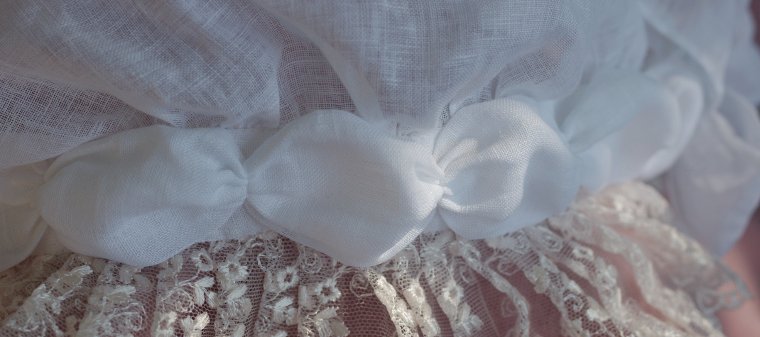
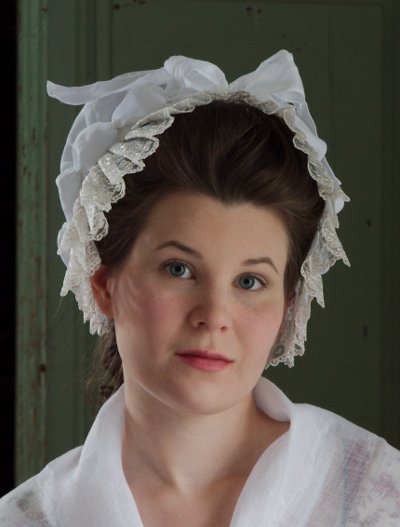
It was hard to find a perfect lace, but at last I picked an embroidered tulle lace with curved edges. I joined to rows to form a single one, and made the ends curved as the form-made period lappets would have been.
The bottom of the cap has a drawnsting, and the edge is slightly gathered. I also worked tiny loops for pins.
2012
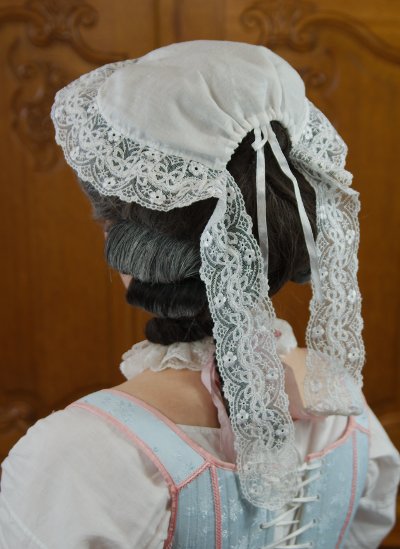
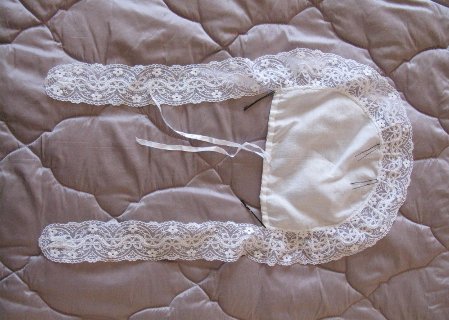
When I made a more modest outfit for change I realized that the lace lappets would not go with it, so I had to make a new cap too. This time I decided to go for a very prim and decent coverage level, though I compensated with a frivolous double frill.
On the construction of a basic 18th century cap I was greatly enlightened by the aforementioned La couturiere Parisienne and especially this fabulous tutorial at Art, beauty and well-ordered chaos, though I also used construction methods that seemed practical to me.
For the material I chose a very fine and densely woven linen, which I have also used in shirts and chemises. It was also perfect for a cap, the only downside being that it was a lot harder and slower to sew by hand than linen with a looser weave.
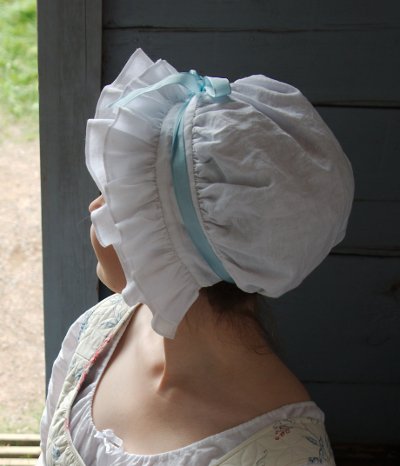
I began by sewing a cord channel at the back of the cap and hemming both ruffles by hand. Then I gathered both ruffles each on its own 3cm wide piece of linen which would become the cap band. I gathered the cap back piece on the top band, and then sewed the bottom band piece on the underside. For the last thing I sewed the front edges of the band together through the folded edge and turned the ends under.
I fastened the ends of the light blue ribbon on the underside on the band. I could, of course, have already put them between the layers, but this option is way more handy if I ever want to change the ribbon.
I have been told that the cap makes me look like I should still be in a cradle, and indeed the association with a baby cap is hard to avoid. Nevertheless I wear this cap proudly and secure in knowledge that in the period it would have been considered very pretty.
2012
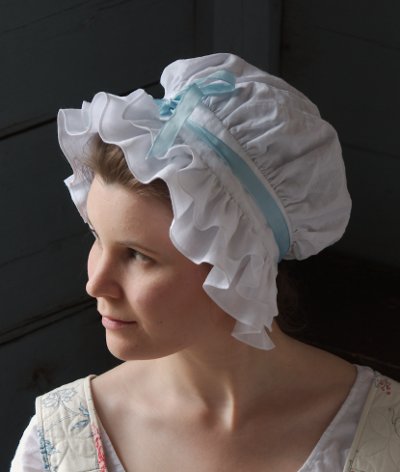
With the cap project before I had become more interested in caps than I had previously been, and also realised that this outfit absolutely needed a fluffy dormeuse cap. This lead in turn to a round of websurfing but with dishearteningly scant results as to how to actually make one - perhaps I just didn't know where to look. J.P.Ryan sells a pattern, though, but I was reluctant to order just one pattern before at least trying out what I could come up with by myself. Modehistorique.com at least had a nice selection of inspirational picture sources.
So, this is my interpretation of the dormeuse based on very little research. Quite possibly the next week I'll accidentally come across the article which shall reveal all I should have know while making this.
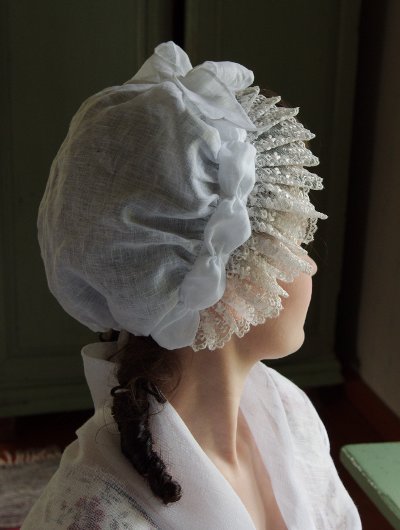
I reasoned that the basic idea of the cap above would work with the shape and size of the pieces altered to fit over a beehive hair. At least according to La couturiere Parisienne dormeuse seems to follow the piece-gathered-to-band-construction. When I got home from an event one day I remembered that I must do a mock up while I happen to have the right hair, and luckily it seemed right almost at once. The back piece is 35cm wide at the widest part, 35cm high and shaped like an egg with the narrower end cut off, the bottom edge being 27cm wide. The finished band is 3cm wide and 60cm long.
One of the things that inspired me to make a dormeuse was that I had finally managed to purchase some very fine and transparent linen. Not quite as fine as the period quality, which I'm told no longer exists, but sufficiently fine anyway. It was also nicely crisp.
I began by making a cord channel at the back piece and then gathering it on the top band piece. First 4cm at the sides are left ungathered and the rest gathered evenly.

Next I ironed the pleats into two pieces of lace, basted the pleating on machine, pinned them on the band and sewed them on the band edge by hand.
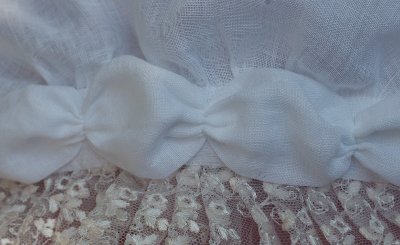
One typical element of the dormeuse seems to have been a row of material gathered into puffs covering the band. I gathered a doubled piece of linen at every 6,5cm and sewed it on the band into about 5cm long puffs. This decoration looks pretty and was very fast to make, so I may well use it in the future on other things as well.
On the afterthought the band might have been narrower so that the puffs would hide it better, but I can live with it as it is.
For the last thing I sewed the underside of the band on to cover seam allowances and added a bow of finely hemmed linen on the top. There seems to have been no end to the frills and bows and what-not that they put into dormeuses, but I decided be happy with this basic model, especially as the clock was already ticking away fast to the photoshoot.
Despite it's relative simplicity this pretty, silly cap has the main elements of the dormeuse that I wanted in it: The cute row of puffs and especially the wide lace that frames the face beautifully.
2014
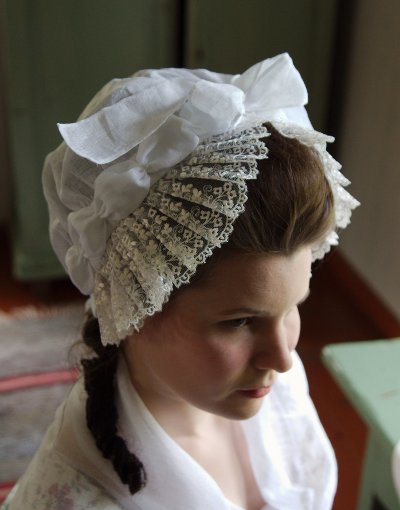
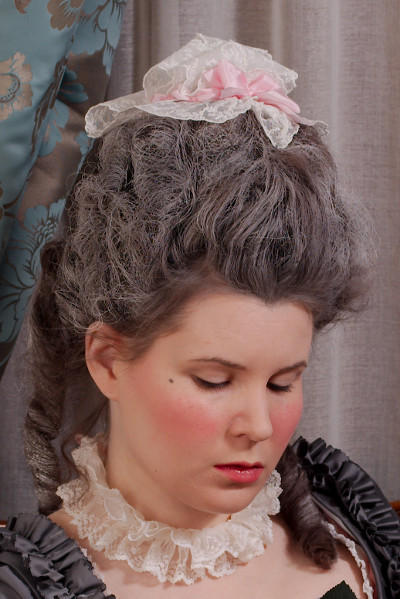
I had for a long time wanted a new a bit smaller cap which could be worn at the top of a hairdo rather than covering it. When I was making the Brunswick based on the portrait of Lady Mary Fox I also began to fancy her frilly cap. I wanted to make something in that style, though maybe a bit more modest version.
On portraits caps easily look like just a mass of lace to the uncultivated eye. Happily I found Isis Wardrobe's post "18th century wired caps", which helped to recognize the features of wired or "butterfly" caps with a dip at the front.
My chosen lace, bought years ago was embroidered tulle, quite stiff so I thought it wouldn't need wire to support the edge. I cut the small center part of another lace and pleated the lace on it's edge. I gathered the lace in the front to form the dip and fastened it with stitches. It might have been made by just starching, but I wanted it to keep shape.

The lace could use a little stiffness so I decided to experiment with starch. Potato flour worked great for this and made the cap crisp and neat.
I covered the center piece edge with pink silk ribbon and tied the ends on a bow at the front. I reasoned that the lace ruffles at the top of Lady Mary's cap might be the lappets pinned up, which my friend Riikka confirmed. I did not have very much lace, but I made as long lappets I got out of it and pinned them on a few loops at the top. The pins also stay better on a starched lace.
On the underside I added loops for pins. The dip is pinned through the front tip.
As it easily happens, the cap seemed even a bit oversized when I was making it, but when I put in on with a finished tall hairdo it suddenly began to look tiny. Nevertheless, it turned out very cute, and gives a nice finishing touch to a hairdo.
2021
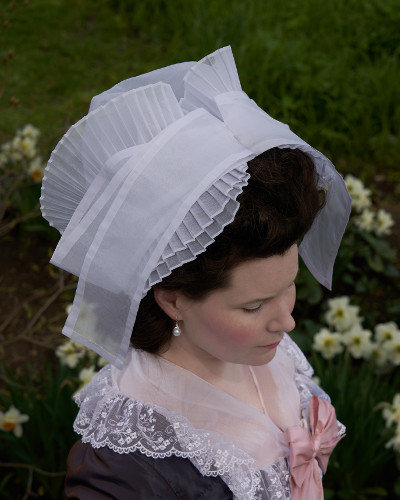
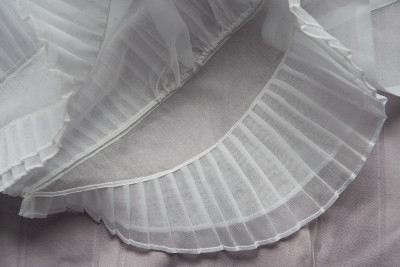
Huge headwear concoctions are an essential part of 1780s look, so I needed such for my new taffeta gown of the era. “The American Duchess Guide to 18th Century Beauty" book included a model called "Bonnet á la Jeannot, which seemed to me to be a perfect choice.
I had fine, rather sheer cotton organdy in my stash, especially bought with fancy accessories in mind, so I chose that for the cap. The super transparent linen organdy of the period is no longer available anywhere, and I was afraid silk organdy might be a bit delicate material for being in contact with a lot of hair styling products.
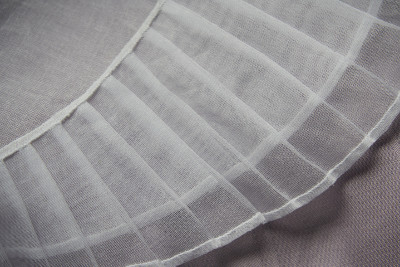
The book offered a pattern, so I did not even bother to make a mock up (as I usually do for pretty much everything), and just copied it and cut the pieces.
The organdy was so crisp and easy to handle that I didn't even need to iron the hems before sewing, I just folded them and pressed them flat with my thumbnail. Narrow hems are much easier to turn by hand anyway. Hemming the cap pieces with long lappets and ruffles with small stitch took a considerable time, of course, but I worked on them little by little when I had a bit of time. I used cotton thread for the sewing.
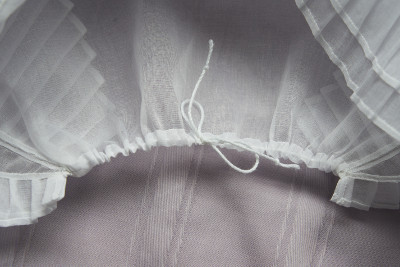
As for assembling the cap, the book offered clear instructions with illustrations for each step. I was so relaxing for once to concentrate only in the sewing without having to interpret the model by myself and test the patterns and do a lot on planning and checking. In all, the book was absolutely worth its cost many times over, it was packed with info and a lot of interesting project ideas for the future.
It was also addictive to actually sew an 18th century thing all by hand using only legit period techniques. It gave me further understanding of how such a delicate piece can only be achieved by period those without heavier modern seam structures. Of course my hems could have been smaller still, but I think they are fairly adequate for a modern reproduction.
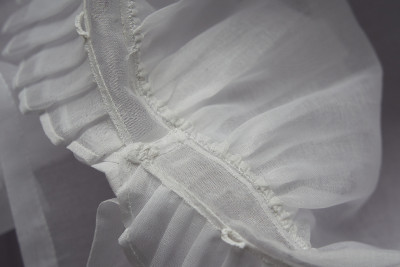
I added two loops for pins on the front edge to keep the flimsy cap straight over the hair. The only problem that appeared was that the day of our photoshoot was rather windy, and the lappets tended to fly away and often end up in the same side of the head. Of course, out of doors it should be properly worn with a hat, and the problem shouldn't occur indoors.
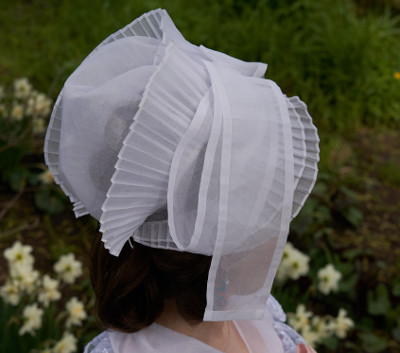
The cap turned out quite perfect, just the right size and shape and it works great with the dress it was planned for. I hope it will get a lot of wear in the future.