Houppelande, 2012
Okay, I'm ready to admit that beginning Jarno's medieval wardrobe with a woollen doublet and joined hose was not one of the smartest decicions in my life. Not that hadn't finished them at last , but they just aren't very practical in use. When Jarno was going to Academia de la Danza without his personal valet (that would be me) it was a high time to make him some garments more comfortable and easier to put on. Not to mention cooler - like the names give to understand, the event is all about renaissance dancing.
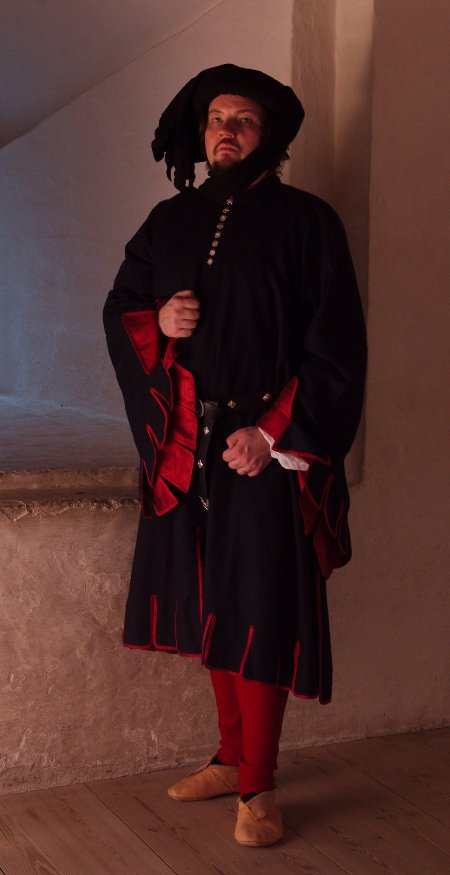
Despite aiming for something comfortable and relatively simple I nevertheless wanted the outfit to be elegant. That's how I decided on a houppelande-styled dress of moderate width. It could be made on thin wool and worn over just a shirt so it wouldn't be unbearably hot. The wide sleeves would be showy even if they weren't actually trailing on the ground like the most elaborate ones at the period.
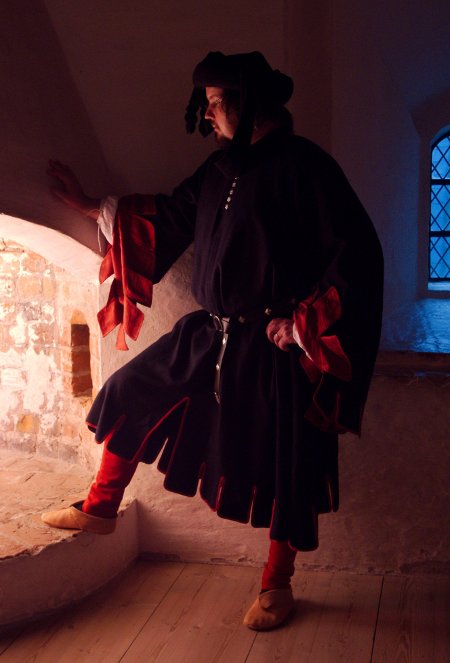
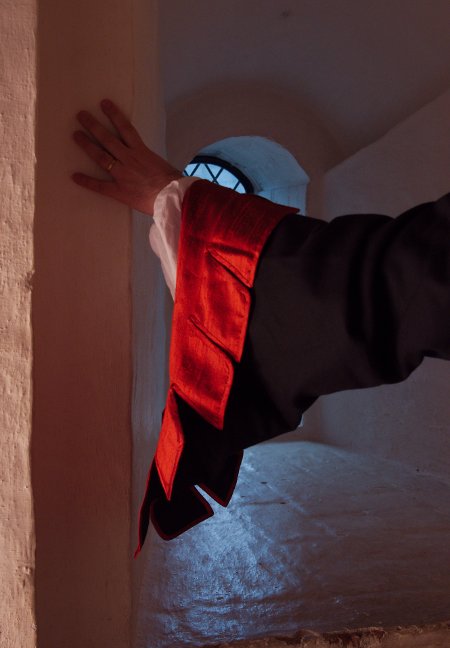
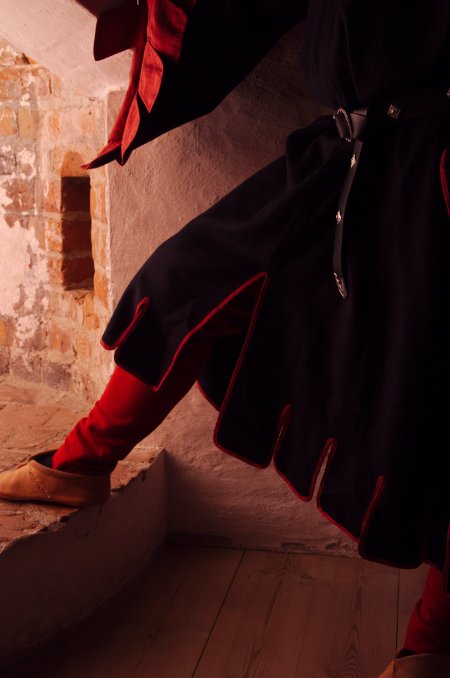
I found a beautiful, soft 100% wool fabric. It was a dark blue and needed a flash of accent color. Embroidery would be way too much work for my schedule so I went again for the late 14th century fashion fad, colorfully trimmed dagging. With the fine wool the edging of course had to be silk. The local fabric store unfortunately only has very lumpy dupioni, which is not period, but to which I resorted anyway as I found it in a nice warm red shade.
The pattern for this project comes once again partly from Thursfields "The Medieval Tailor's Assistant", partly from my own reasoning and other sources. The bodice is based on Jarno's modern shirt pattern which I flared from the armhole down as wide as the fabric width allowed. The shoulder seam is shortened to a more late 14th century fit and the armhole dropped a bit to give space for the wide sleeves. The finished hem width is about 3 metres. A houppelande could be very full, but as I intended this one to be more practical this width is acceptable. For extra movement allowance and also as a decorative element I added long slits at the hem on front, back and sides.
I've had problems with Thursfield's sleeves (and also Jarno's sleeves in general) before, so it should not come as a surprise that my first sleeve mock up that came straight from "The Medieval Tailor's Assistant's" diagram was an epic fail. My next attempt was to draft a whole new modern shirt sleeve pattern according to the slightly altered armhole, but with a 2cm allowance on the sleevehead as the sleeves sits higher on the shoulder than a regular shirt sleeve. This pattern finally worked, and while it may not be quite period I decided to use it anyway. The lower part is flared according to the book's diagram. The collar also comes straight from MTA, though it's a bit lower to be more comfortable.
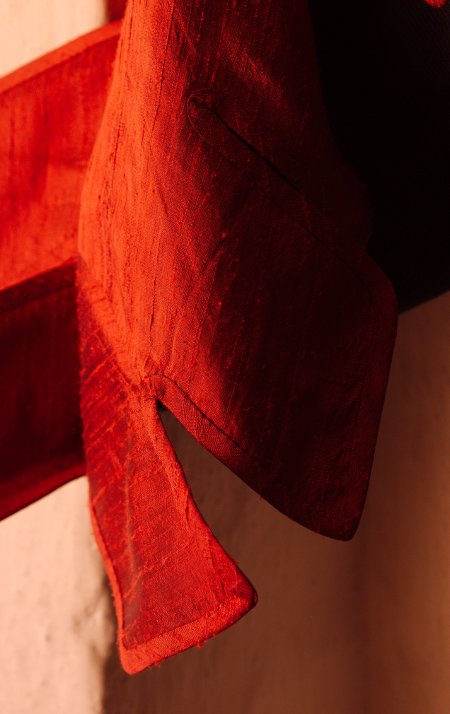
The dagging in the hem is cut 13cm deep and spaced evenly with 10,5cm between the slits. The sleeve dagging has 9,5cm long diagonal slits 10cm apart, their direction changing in the middle of the sleeve.
I had 3 meters of wool, and it was just enough when I cut the large sleeves in three pieces. I lined the sleeves the the red silk quite high which covered the joining seams neatly on the inside. The rest of the silk I cut into bias strips for the edging. I had bought 1,5 meters of silk, which I had originally thought being perhaps too much, but for once I was right in buying some extra. The edging consumed an unbelievable amount of material.
I began by facing the front buttoning edges with cotton tape. Then I sewed the center front seam and began to work on the hem binding, as it was most convenient to make while the pieces could still be easily laid flat for pinning the bias tape. I experimented with both 1,2cm wide and 1,8cm wide tape, but while the former was elegantly narrow I chose the latter as the wool frayed very easily. I sewed the binding on with back stitch and left some extra on the side slits to be finished later. Then I worked the back hem similarly. While the pieces were still flat it was also convenient to make the buttonholes on the front opening before closing the shoulder seams.
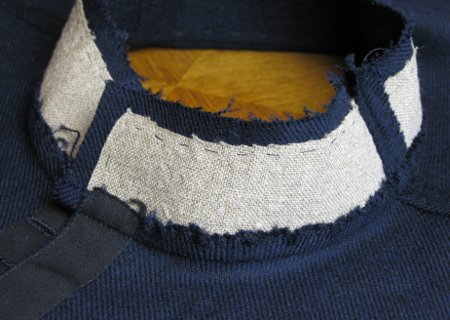
The collar is interlined with heavy linen which I sewed on the seam allowances by hand. It's lined with the same wool and the top edge is finished with a silk tape. Having finished the collar I worked the remaining two buttonholes on it. As the loosely woven wool frays easily I used proper buttonhole stitch instead of blanket stitch this time. Despite my close stitches the material still managed to fray on some places.
With most of the bodice details finished now I closed the side seams. I pressed them open (like the shoulder seams too) and turned the seam allowances by hand.
Then it was time for sleeves. I joined the pieces, leaving the sleeve seam still open, and basted the silk lining on from about 5cm from the seam line. I sewed the upper edge of the lining on the wool by hand, and thanks to the softness of the wool it's almost invisible on the outside.

On the sleeve edge I marked the dagging lines with a pencil and machine stitched close to the pencil line. I trimmed away the extra seam allowance (save close to the sleeve seam), cut open the slashes and began binding the edges.
As both sides of the binding would be visible on the sleeves I sewed the outer side first with back stitch and then sewed the inner side on the silk lining to get a neater result. By the way, I'm fully aware that bias cut binding is totally unheard of on late middle ages (and also much later), but once again I decided to ignore this fact as straight grain tape with the soft, slightly stretchy wool would probably have been a disaster, or at least required much more skill and patience than I had at the moment. Bias tape, on the other hand, worked beautifully and most of the remaining wrinkles disappeared with pressing.
After finishing most of the binding I closed the sleeve seams. On the top of the sleeve which was left unlined I pressed the seams open and turned the seam allowances under. I ironed the seam line on the silk and sewed it by hand so that the stitches caught the seam allowances of the wool and thus kept it in place. Then I worked the remaining bits of the binding on the sleeve and side slits.
As the wool was very soft, just sewing the gathering threads on the sleevehead reduced it with exatctly the 2cm needed. Even the shoulder seam mark ended up in the right place. Thus setting the sleeve was, for once, pure pleasure. I pressed the seam allowances on the bodice into a flat felled seam, which, though curved, settled beautifully on the soft material.
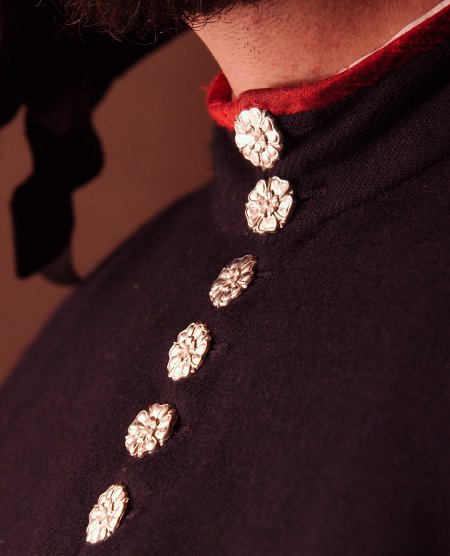
Then the one thing left was to sew on the nice and shiny pewter buttons, that came from Tippet.fi, as did the pewter decorations and the buckle on the belt too. They bring a nice bit of bling on the dark outfit.
I also made a pair of red woollen hose to wear with the gown. As the gown is so long I could make them separate, without troublesome lacings and only fastened at the center front.
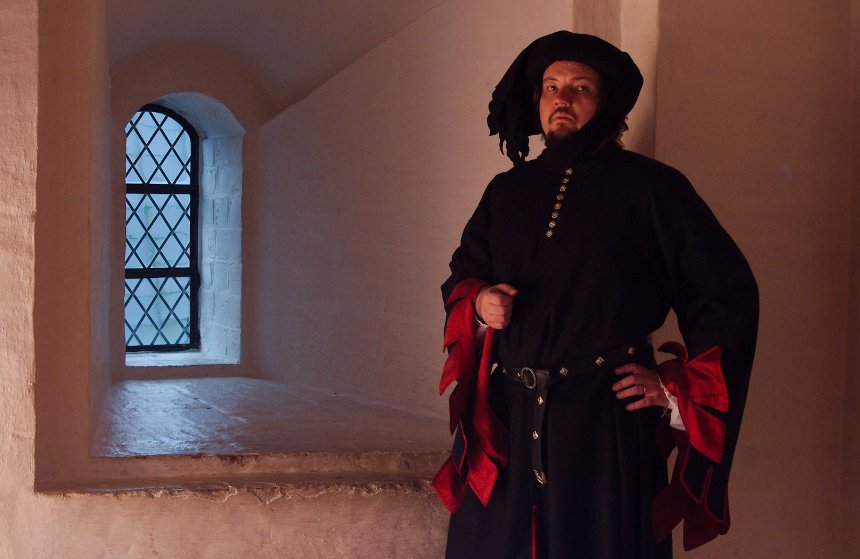
Houppelande turned out very nice in the spirit of Très Riches Heures du Duc de Berry. It's also very comfortable, and has become one of Jarno's favorite period clothes. The rich red silk and the pewter buttons look their best on candlelight, and thus this outfit is a must for a feast.
Many thanks for the photoshoot location: Finlands National board of Antiquities /
Häme Castle
The shoes are made by Lauri Niskanen. Many thanks for completing the outfit!