
Most of my
period projects are influenced by many sources, and don't
attempt to reproduce any single example, but this one is one
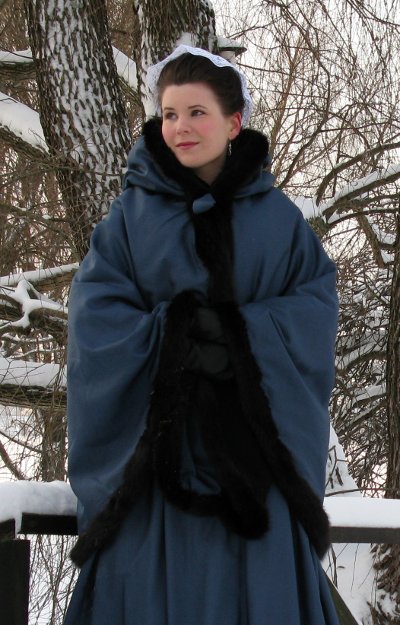
of the exeptions. In Nattiere's painting “Comtesse de
Tillieres” the Countess wears such a lovely satin cloak that I
wanted to have a similar one. I would also need a cloak sooner
or later, and I even happened to have the materials already
waiting.
I shop at flea markets regrettably seldom (as it's so time-consuming and because of my work I'm often fed up with random piles of clothing), but on one of those rare visits some years ago I had stumbled upon a mink coat, only a bit worn at edges but otherways on great condition, with a very nice price. As for the blue satin there was still some left of the ridiculously cheap one I had already used for my petticoat. It looked lovely with the dark brown mink, but yet I pondered for a while whether the combination of acetate and mink would be a total sacrilege or should I rather use woollen material. But alas, I was so bewitched by the cloak in the painting that I couldn't resist the temptation, and using real silk satin for a cloak actually meant for protection from snow and rain was not really an serious alternative.
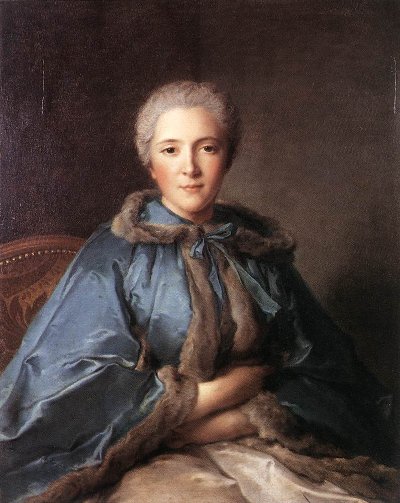
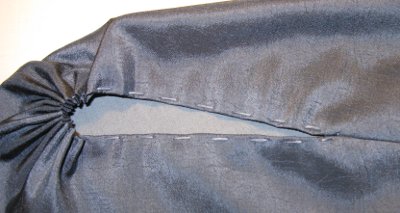
The pattern and the sewing instructions from Garsault's L'art du tailleur, found on La Couturiere Parisienne helped me along. The cloak in the painting seems to me to be a shorter mantelet with curved front edges rather than a longer one (plisse) with separate arm openings. According to the pattern provided it is rather short (perhaps due to the narrow material widths of the time), so I made it considerably longer all around to cover my arms fully. Perhaps the correct way would have been to choose a different type of cloak altogether, but once again, I just wanted this model but also to keep warm.
I mainly followed the sewing instruction provided as far as I understood it, and I also had to adjust it a bit due to my thick lining material, the original instructions were clearly meant for satin alone. Then there was also the fur trimming to consider. In the end, I relied on the good old modern technique of bag lining, for better or for worse.
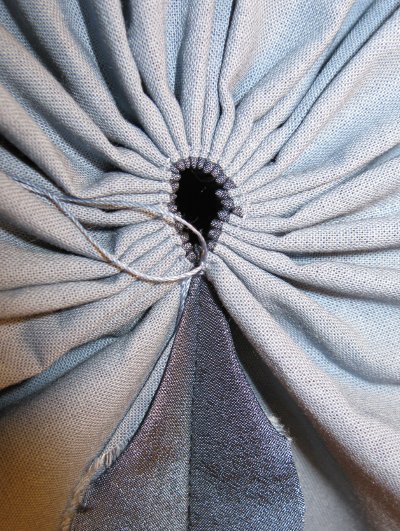
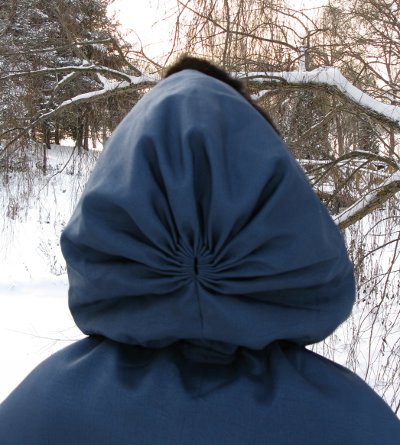
I began by making the hood. As the
satin was so very thin I added a cotton interlining (I
happened even to have a matching color for it, though it
doesn't even show) to give some fullness to the pleating at
the back. I believe cartridge pleating is the correct term for
it, and at least it looks awfully like some pictures I've seen
of hoods, so it can't be way off. At least it turned out so
pretty, that I was immediately convinced again of my decision
to go with (artificial) satin.
The woollen lining was altogether another thing, then. It was obvious that the same technique of pleating wouldn't work, so I made radiating darts instead, opening them as far as possible and ironing them well. They actually worked even surprisingly well, and don't look conspicious at all. Then I sewed the hood and the lining to the pain pieces, and began to attach the fur trimming to the edges of the satin.
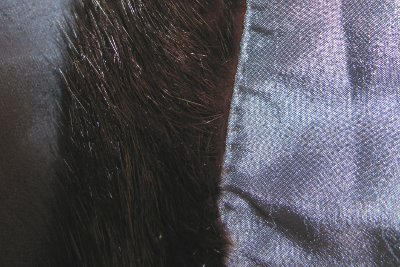
Ah, the fur trimming. I had thought that I'd get nice, even pieces of just the right width simply by taking apart the vertical seams of the coat. Picking the tiny fur stitch did take some time, however, and although I had by this method imagined to reduce the need to actually cut the fur to next to nothing, I was nevertheless covered in fine hair (especially the innards of my nose and throat), as was a good part of our apartment too. Actually I began to suspect between the sneezing that animal rights people may actually have been fur coat makers in their past life. Added to the discomfort even my jaded consciense was a little troubled by seeing and touching the underside of fur, which worked as an unpleasant reminder that this lovely material has actually once been a little animal. The feel of the fur also gave me powerful flashbacks and dreams of my parent's late dog, who was my friend for 17 years.

At last I had about 6cm wide piece of fur long enough to go round the hem of the cloak (the necessary seams done with a machine as neatly as possible), and after stuffing the remaining part of the coat to a bag tightly closed I began to attach the fur the the edges of the satin. I had cut the woollen lining a bit larger so that the fur trimming would be wider on the outside of the cloak. I had already mentally prepared for the fact that the finished fur edging would probably be far from neat, and pull the edges terribly (which the shiny satin would mercilessly show), and thus decided to simply do my best. Getting the thick fur to follow the curved edge of a thin material, sewn with a machine is not the easiest thing on earth. Well, I spent an eternity with paper- and curtain clips, working in short pieces, until finally I had somehow gotten around the whole cloak edge. I guess I must have cut marks in the satin and lining to get them evenly united. Sewing the fur to the woollen lining went much easier, as it behaved better than the thin satin and also didn't have to be so very neat as it would show less.
I turned the cloak around, and was overjoyed to find that the edging had turned out really quite decent, and sewed the neck seams of the satin and lining together. Then I laid the cloak carefully on the floor, smoothed it out and pinned the satin and lining together. As the edging was narrower on the underside I could easily stitch through both layers so that the stitching fell right next to the fur edging on the right side.
I used black thread so that the stitching would not show too much on the underside, and at first I wondered a lot how a thick black thread would look on the blue satin, but when I tried it out it actually look pretty nice. Hand stitching, even on a contrasting color, has a delicate look quite different from machine stitching. Apart from this hand-finishing, the construction method of the cloak is really suspiciously modern, but I really would not have had the patience to hand sew fur, at least not this time.
I added a casing for a ribbon in the neck (by hand) and made a wide matching ribbon from the satin. Unfortunately the pretty bow happens to be in hiding in all the pictures. As I tried it on I noticed at once that the adjusting the neckline with a ribbon casing does not work terribly well on a thick material, as I should have guessed. Oh well, I was too lazy to take the neck apart and try pleating or darts which might not be much neater in the end, so I decided that the hood covers the mess pretty well anyway.

The size of the hood was one of the things that I wondered about a lot in the beginning, and at first I thought the hood in the pattern was a bit too large. But it happened instead that when I wore the cloak for the first time for a ball, the massive result of my furious backcombing would not fit inside the hood. It seems to work best with a moderate coiffure. Always having the final underwear at fittings is tattooed in my mind, but obviously the right hair belongs to the same category of basic rules.
By the way, I am aware of looking like a certain Southpark character.

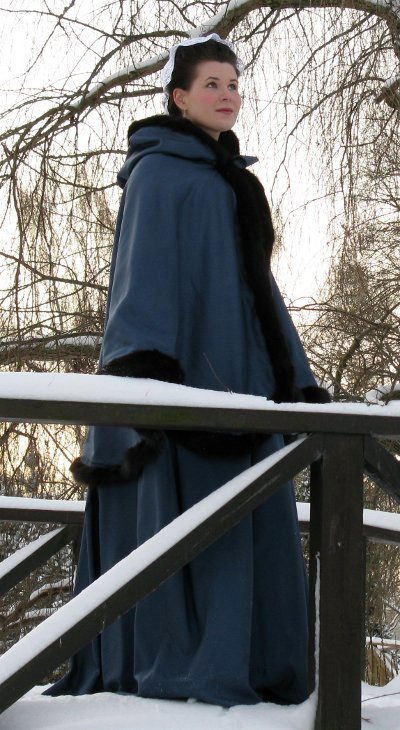
The finished cloak is a bit theatrical, but on the other hand irresistably cute. It is also a very practical garment, and even finished with a rather low budget. On the shooting excursion on Christmas day, in minus 15 celsius degrees it was also proved to be very warm. And it even looks something like the Nattier painting.
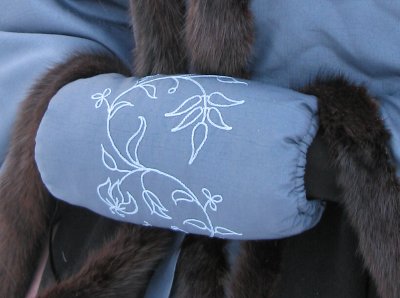
I had originally planned to make also a muff, but as my
vacation ended too soon once again and having gotten fed up
with working with the mink (and all that hair around) I never
got to it.
All fur muff would be easy, but as there was still much left of the coat I may want to use it in some other project in future too. I ended up making the muff in the same blue satin as the cloak, and lined it with wadding and woollen cloth. The ends are gathered with a ribbon. It's quite warm, though wind still gets through it.
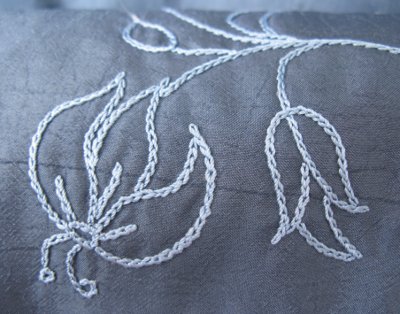
A basic satin muff felt too boring, so I wanted to have some embroidery. As I didn't have very much time I drew a very simple design and embroidered it with chain stitch.
The thin satin is backed with cotton batiste, on which I copied the design. Then I basted it so the design was transferred on the outer side. For the embroidery I used buttonhole silk thread.