I
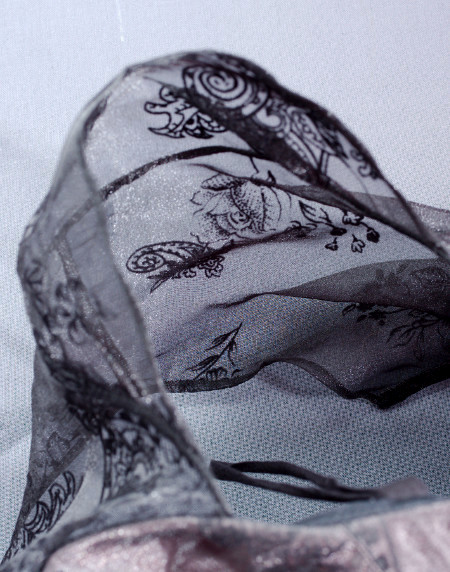
remembered having once bought a piece of black organza
with a beautiful cut velvet pattern. My plan had been to
use it on top of a light toned satin in a 50's inspired
circle skirt dress. After a bit of digging I found it from
the storage, and also a lot of greyish lilac satin. The
combination of them was darker than I had originally
thought, but it had a nice gothy charm.
One day I happened to walk by a shop in Tampere and ended
up trying on a tulle petticoat just to see the silhouette
and get inspiration for the dress project. Only the
petticoat happened to be so perfect that I just had to buy
it. True, I could have made it myself cheaper, but I'm not
overly fond of gathering tulle and I had so many other
things in line for the time it would take. And it was
actually made in the shop, not in China, which is always a
nice thing. The tulle petticoat is fabulous, it's so poofy
that it literally stands by itself and the only downside
is the space it takes in the crowded closet.
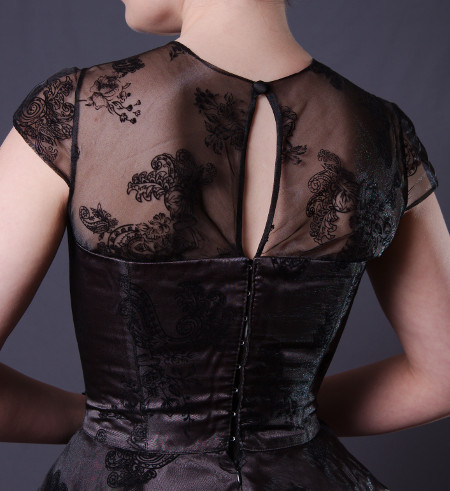
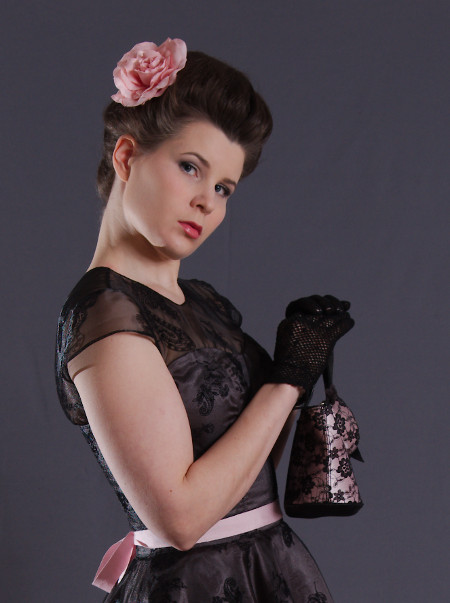
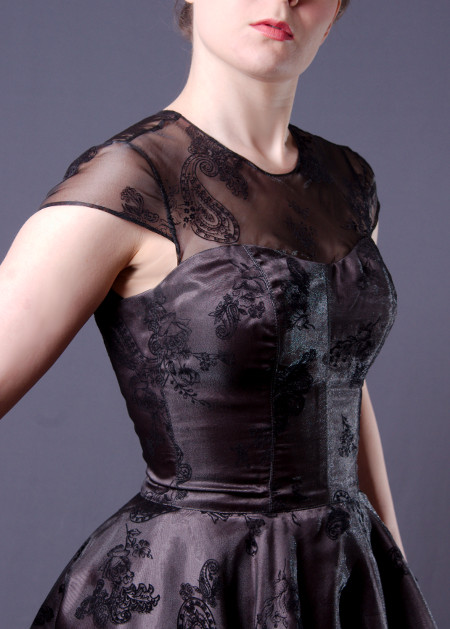
My original idea when buying the black organza had been, I
seem to recall, a bustier dress, but now I got into my
head that a transparent shoulder part and elbow-length
sleeves would look stylish. To my great disappointment I
had to give up the idea as the organza piece turned out
too small, but I managed to get the tiniest cap sleeves
instead. I wanted to cut the shoulder part on bias to get
it fit better and hopefully have some stretch. The sleeves
had to be cut on the straight grain, however, to keep the
sides of the sleeve head on bias. The skirt would of
course be cut as a full circle, so it's length was
determined by the fabric width. I calculated that I would
get a knee length hem.
|
|
I
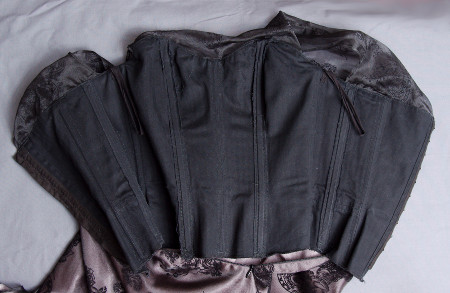
decided to build the dress over a boned coutil base which
would also function as the bodice lining. I happened to
have a just large enough leftover piece of black coutil,
too. I imagined I could lift the pattern straight from the
strapless top I had made for the Winter Fairy-costume,
but obviously I had been momentarily really skinny at that
time, as when I tried it on now the zipper almost wouldn't
close and there was some extra flesh spilling over the top
edge.
So, once again I ended up in a fit of thorough pattern
drafting madness including one mock up. At first I was
just going to add a bit on the top of the side-front
shaping seam, but I ended up making a lot of other
alterations on it too. I also added a center front seam to
get a small vertical bust dart towards the center front,
which really improved the bodice fit and brought a nice
corset-like flair. As the circle skirt would start at the
waist I realized that for once I wouldn't have to worry
about getting a flat stomach, and happily curved all the
front seams outwards from the waist down. The tight
fitting bodice became at once much more comfortable, and I
could even get the waist smaller now that the abdomen did
not fight back - something I have also noticed in
corsetry. Indeed, the silhouette created resembled a
victorian corset a bit.
|
|
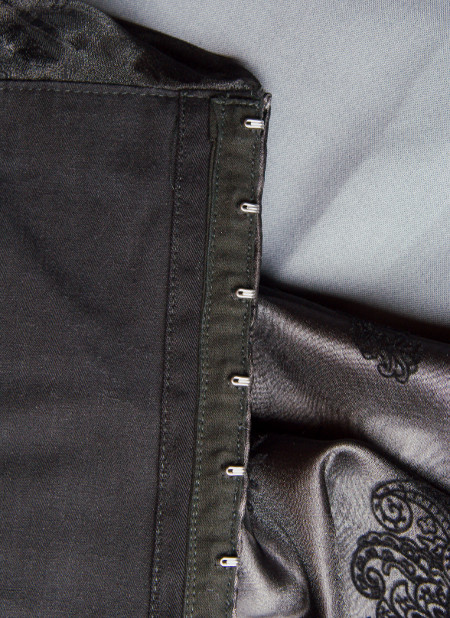
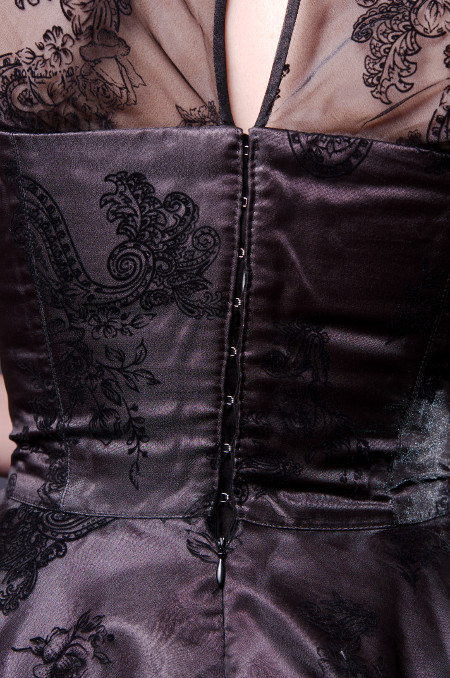
When I
was happy with the mock up version I though it safe to cut
the coutil. I sewed the tapes with hooks and eyes at the
center back opening at once to be able to try on the tight
bodice which would be hard to pin. I made boning channels
on all the seams and the center back edges. I cut bias
strips of the coutil and sewed them on top of the seams
for the boning channels. As I wouldn't make a separate
lining I first tried to sew the boning channels on the top
side beneath the satin, but on the side-front seams I
became worried that the boning on top on the bust would
show through the satin, so I put the boning channels on
the underside instead. I still left out the boning
channels in the side seams so that I could alter them
after fitting if necessary.
Despite having made the mock up I still had to tweak both
the side- and the side front seams. On the mock up the
side front seams had looked okay, but on the stiff coutil
they looked more like Madonna's iconic bustier than the
smooth curve I had in mind. Seeing them was quite a
deja-vu from the similar unpleasant surprised I had had
with my
Mother's finished corset. |
|
Manic
steaming and pressing was to no avail, so at last ripped
the boning channels out of the bust curve, pinned them
anew about 1,5cm shorter and sewed them back in a violent
manner. One seam got a small tuck in the process, but I
decided to ignore it. But when I tried the bodice back on,
the bust curve was perfect. This was a very useful lesson
to learn.
|
 |
As the
back was shaped with only one side-back seam, the coutil
crumpled a bit at the midway of the side back piece (where
one should always try to put a seam in a close fitting
bodice, especially with my hip curve). I added an extra
boning channel there, which helped a bit. I also had to
take in a bit still at the side seams, as often happens
when fitting a tight bodice. Now I was at last happy with
the bodice base and after copying all the alterations on
the patterns I moved on to the organza.
I had already begun drafting the organza shoulder part
while working with the bodice pattern. I sort of combined
my good old basic dress pattern block and and a fitting
blouse pattern, and drafted a joining seam to match the
top edge of the bodice lining. I made a mock up of a thin
but crisp material, tried it on with the bodice mock up
and pinned the joining seam. The mock up looked so
promising that I cut the organza with just 1cm allowance
on the shoulder and sleeve head, leaving a bit more
allowance on the joining seam of course. I cut the full
circle skirt at the same time. As I didn't have any extra
material I could not really match the pattern but just
tried to get all the pieces fit in.
|

|
While
planning the dress construction I had first thought to
finish the shoulder part seams and edges on narrow black
binding or possibly a transparent one, but then asked
myself why couldn't I just finish them by hand. Really, if
I had made the insane amount of organza hemming in the striped polonaise
a few short seams would be nothing. Moreover, as the
material was black the stitched wouldn't even show so they
wouldn't have to be so tiny and neat.
First I closed the shoulder seams, flat felled them by
hand and made a narrow hem on the neck. I also hemmed the
sleeves. Bias cut pieces are always a bit surprising as
they stretch in opposite direction than you are used to,
as I found out several times during this project.
I had worked a lot to get the coutil bodice fit, and yet
there was more tweaking on the way with the organza. After
finishing the shoulder seams and neckline I asked my
friend Riikka to pin the shoulder part on the coutil
bodice and the sleeves on.
|
 |
The
surprise number one was that the bodice was so tight that
there was some extra flesh spilling over the top edge, and
the shoulder blade also needed some moving allowance. Thus
the organza had to be wider and gathered quite much, with
the back width I had drafted being barely enough. The
shoulder part also settled lower than I had thought, so
the sleeves had to be gathered more than I had planned. I
also had to curve the organza edge a bit more at the side
fronts.
After the fitting I basted the new joining seam line and
some matching points. Then I sewed the sleeves on. I was a
bit too hasty and careless as I had to do a bit of
unpicking and re-sewing, where I made my second mistake: I
was too lazy to unpick the whole sleeve head, so I just
fixed one part and finished with back stitching, which
left tension on the seam. At this point I ignored it.
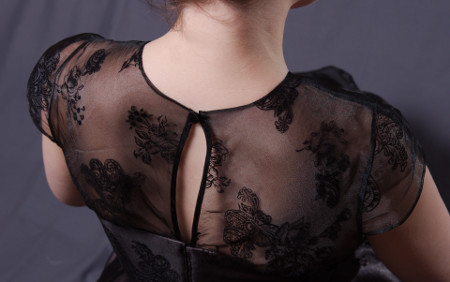
I also made another very stupid decision by finishing the
shoulder part back slit edges with a binding which I cut
straight. I suppose I reasoned that a straight cut binding
would not stretch and thus keep the edges on the length
measured at the fitting, but without any stretch it of
course also looked terrible.
|
|
I sewed
and unpicked the back edge of the organza a few times
before I got the gathering on the right place, below the
shoulder blade. I had imagined the bias cut to give more
moving allowance for the shoulders, but as already
mentioned, bias cut can take an inexperienced seamstress
by surprise. Even though the back pieces had some extra
vertical and horizontal stretch, lifting your arm causes
also diagonal tension on the back pieces, which now met
with an unyielding straight grain. Finally, after
gathering all the extra allowance I could below the
shoulder blade the shoulder began to have a bit less
tension. I should really learn more about human anatomy,
as it does play a great role in fitting.
|
|
When I
began to pin the front edge on the coutil I met with
another nasty surprise. It seems that back in the fitting
the coutil bodice had been a few centimetres too high, and
now settled lower, as the front of the shoulder part was
hopelessly too short. I once again cursed my damned
hastiness on fittings, and wondered why I had not been
alarmed at all by my basted seam lines settling several
centimetres off.
Well, happily I had just pinned the front and whats more,
not yet trimmed the large seam allowances at the back, as
the straight seam did not need any cutaways. So, I once
again unpicked the back joining seam and steamed and
scratched furiously with my nails to get the needle marks
away. Luckily they vanished quite well, and the velvet
patterns disguises the rest. Then I closed the seam for
the last time with the organza over 1cm longer. The front
part with the curved seam was a bit trickier, and I had to
adjust the sides a bit still.
|
|
There
were still some issues with the fit left. With all the
re-doing on the joining seams the shoulder line had
somehow moved frontwards, and now the sleeves were too
tight at the back and gapped at the front. There was also
tension on the sleeve head stitching like I mentioned
earlier. Again, happily I had not neatened the sleeve head
seam allowances yet, so I took the sleeves off and steamed
the shoulder back to normal. Without the sleeves the
shoulder part felt much better on. I still wanted the
sleeves, though, so I begun very carefully pin them back.
I had removed the gathering threads as they tightened the
sleeve head too much and too irregularly, but the organza
had somewhat settled into the gathered shape so they
settled quite well. I pinned the front side myself and
Jarno helped a bit at the back. Jarno was of great help
during all the numerous fittings, as I couldn't close the
hooks at the back myself.
The re-fitted sleeves were less gathered and they didn't
feel so tight anymore. There was one mistake left to fix
still: The center back slit binding had been ugly to begin
with, and now that I had lengthened the back a bit it
gapped terribly. I ripped it off, cut new binding tapes on
bias this time and pressed the extra stretch away which
also made them more attractive narrower width. I gathered
the organza to match the measured tapes, and sewed them by
hand on both sides as it was already too late for loud
machine sewing. The bias tape finishing looks much better
and still has some stretch so that it settles nicely on
body.
|
|
There was still to flat fell the sleeve head seam and hem
the tiny bits on the sides after the sleeve ends, and add
a button and a loop at the neck. Then I moved on to the
gray satin. |
 |
I cut
the skirt to match the organza top layer and the bodice
pieces with the fixed coutil base pattern. Then I placed
the organza bodice pieces on the satin ones and sewed them
together at the edges. At this point I was beginning to be
in a hurry to get done with the damn dress and move one to
the other things scheduled for my holiday week (not to
mention the wedding coming along), so I didn't have enough
patience to baste the layers together. I closed the bodice
seams, pressed the seams open and decided to stitch them
on both sides so that they would stay neat. Some stitching
also added to the corset-like flair.
|
|
I sewed
the stitching in a hurry before running to the baroque
dance class, and managed accidentally sew though my
fingertip. I felt that all the difficulties I had had with
the dress culminated on that broken needle in my bloody
finger. Happily the damage was not very serious, as the
needle had safely passed the bone and only torn my
fingernail, and the broken needle had obviously not left
any splinters inside the fingertip as it healed amazingly
fast. But as you can probably imagine, when I attacked the
dress again the next morning with a bandaged finger I was
mainly determined to get it finished and fast, no matter
if it wouldn't be perfect.
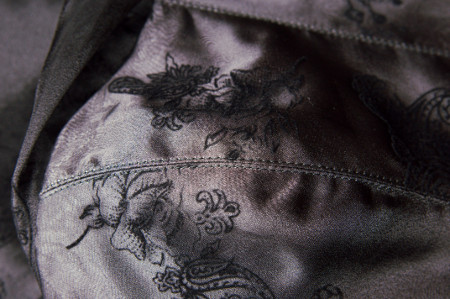
I stitched the rest of the back and front shaping seams,
but at this point I had still left the side seams open. I
pinned the front and back on the coutil base to see
whether my side seam lines still matched after the
fittings and inserting the boning. After pinning the side
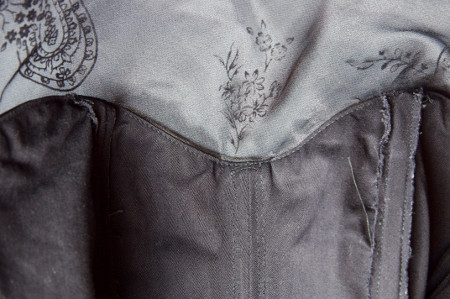
seam lines I closed and stitched them too. At this point I
noticed that the organza did not lie smoothly over the
satin everywhere, especially at the bust area the satin
was crumpled under it. But as I had already trimmed the
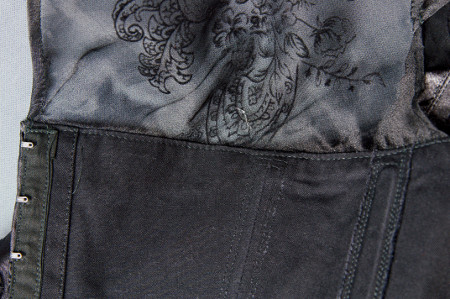
seam allowances and stitched the seams I decided to leave
it like that, and just sewed it on the top edge of the
coutil base with the organza shoulder part between. On the
curved front seam I had to unpick and re-sew at places.
|
|
| I
pressed the seam allowances at stitched them on the coutil
base. Then I pinned the center back pieces on and pressed
the edges to turn under, but still left them open at this
stage. Then I moved on the hem. |
|
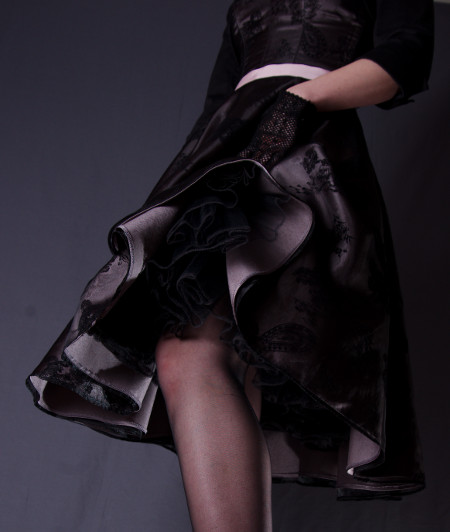
Perhaps
as a some kind of compensation for all the trouble I had
had with the bodice the skirt went together very easy. I
sewed a pleat on the center back on both layers, cut it
open at the top, joined the layers as one and inserted a
zipper there. Even the invisible zipper which can be a bit
tricky sometimes succeeded at the first try, and the waist
circumference I had cut by estimation was just perfect. I
joined the layers at the waist and sewed them on the
bodice edge, and pressed at stitched the seam allowances
upwards.
Now I could finally try the almost finished dress on with
the tulle petticoat. The skirt continued behaving well and
seemed to be pretty much even length, so I, or rather the
poor wretch I would bribe or threaten to assist me was
saved from the tedious operation of hem leveling. Despite
the cosmetic flaws on the bodice the dress was beginning
to look quite pretty, which lifted my motivation level a
bit.
|
|
For a
moment I even considered hemming the organza by hand, but
then came back to my senses, remembering both my
to-do-list for the week and the sad fact that a perfect
hemline would be utterly wasted in the same garment with
crumpled bodice. So instead I stitched a supporting thread
near the edge to help with turning the hem, but it was
hopelessly too tight (as my machine, like most, hate
organza), so I had to unpick most of it and just try to
press a hem without burning my fingers too much. The
hemming didn't end up quite as even and narrow as I would
have hoped, but then again it's dark so it doesn't get
much attention anyway.
|
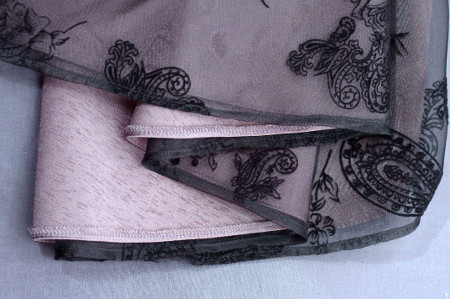 |
Though
the circle cut organza had looked even when I tried the
dress on I did not trust the heavier satin to stay so for
long, so I put the dress on a hanger to wait for a few
hours. Then I pinned the tulle petticoat inside the dress
the throw the hem out and began pinning the satin where it
hit the organza edge. I cut away the extra, put the dress
on the hanger again, and went round and round it clipping
away the longer parts. Finally it seemed even enough, and
I neatened the hem with overlock and a narrow stitching.
For the last thing I pinned the bodice top layer edges on
the coutil base. As the hooks and eyes made machine sewing
too tricky I sewed them on by hand on a small stab stitch.
I have become quite like the look of it though my period
sewing, and imitation of decorative running stitch
finishing features at the moment on modern clothes too. By
practize I have also learned to get it even enough quite
effortlessly, and a stitching in heavier thread that goes
through all the layers makes the edges nicely firm like no
bag lining trick. I extended the edges to cover the hooks,
but as the garment is quite tight they gap a bit anyway,
but I suppose it's hard to avoid.
|
|
Though
the dress is rather pretty I'm not satisfied with it at
all, as the bodice flaws do show annoyingly. On the
afterthought The organza might have settled more neatly
over the satin if I had cut it on bias too, but I wouldn't
probably have had enough fabric for that. Of course I
could also have basted them and generally done that stage
with more care. After having worked with silk organza once
I also have to say that I might have been more successful
with quality materials, as polyester organza is just very
unforgiving. But then again, what I had wanted in the
beginning had been an inexpensive machine washable dress,
and so one is stuck with polyester.
While we have dwelled in detail with the imperfections of
the bodice I also have to state that I am not happy with
the shoulder part either - the unforgiving, shiny organza
again shows all the bagginess and tightness. On the first
wearing the neckline also began to chafe. The famous
moving allowance for the shoulder blades also shows as
bagginess at the back, especially as the velvet pattern
stiffens the organza. One of the lessons learned with this
dress is that bias cut still doesn't mean the same things
as lycra.
|
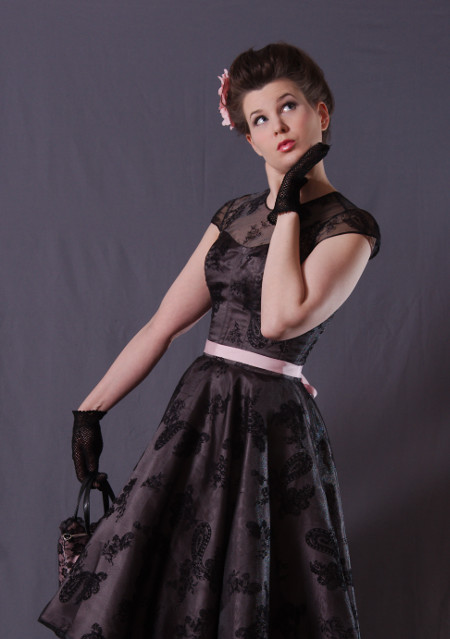 |
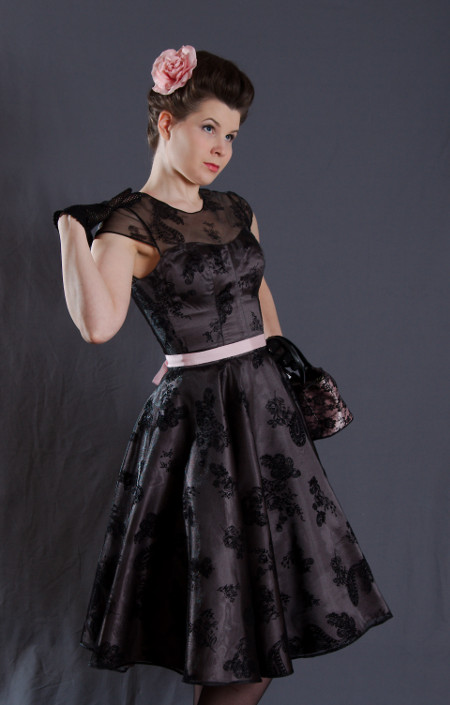
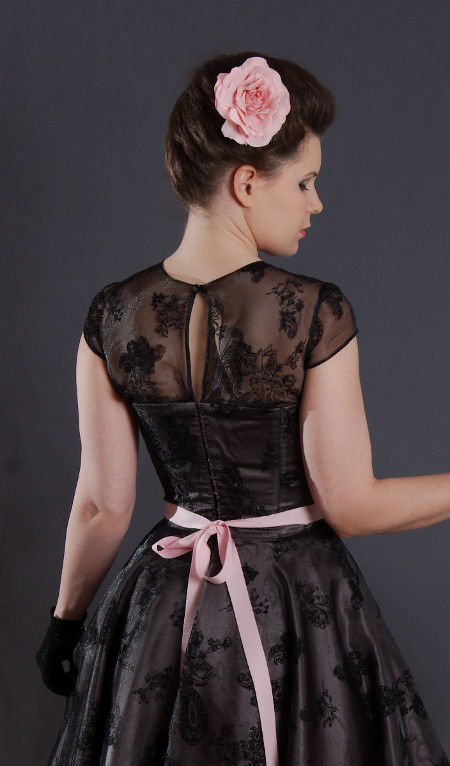
As I am
on this century rather addicted to black I had planned to
accessorize the dress with black, and add a black velvet
ribbon tie at the waist. But the finished dress turned out
darker than I had anticipated while choosing the satin.
Under the black organza it mysteriously lost the lilac hue
almost completely and looked just dark grey.
On the baroque dance group where I had the dress with me I
wondered whether I could wear it in a wedding after all,
but then our dancing master suggested cheering it up with
red accessories. I initially frowned at the idea of red,
as I don't really have any red accessories, and had
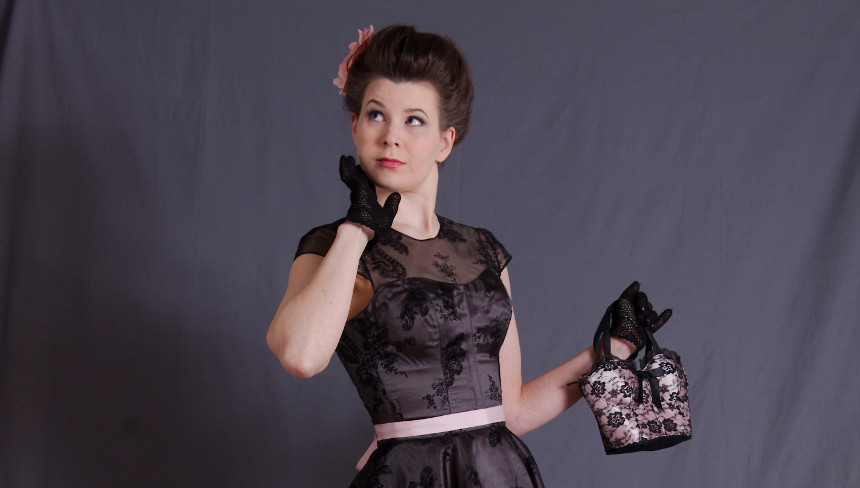
decided to to buy anything new. But then I realized that
pink always works with gray, and moreover I already had a
fabric rose, ribbon and a very cute little handbag I had
never used all in matching light pink. Light pink is
powerful in adding the pastel toned flair even in small
quantities, and the dress began to look a lot more fitting
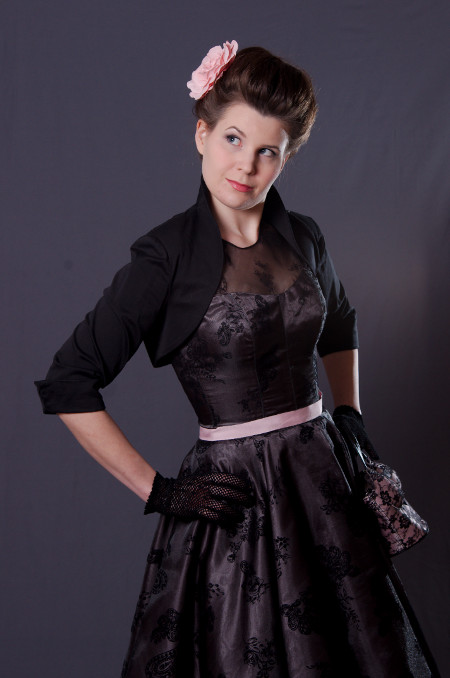
for a wedding, even in spite of my black bolero.
|
|
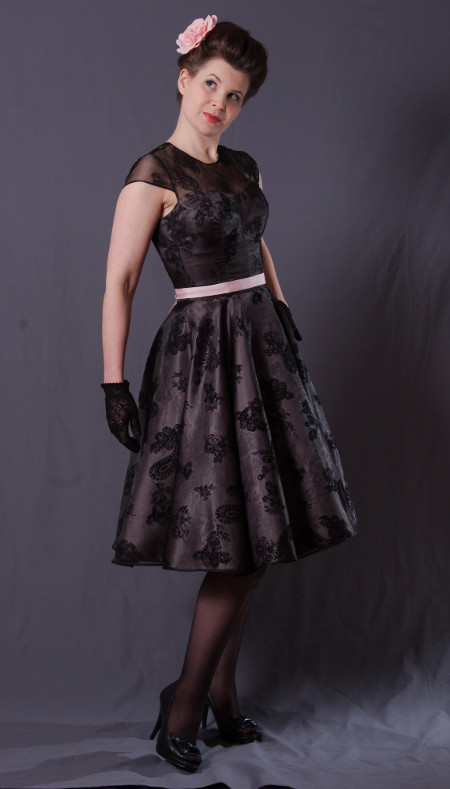
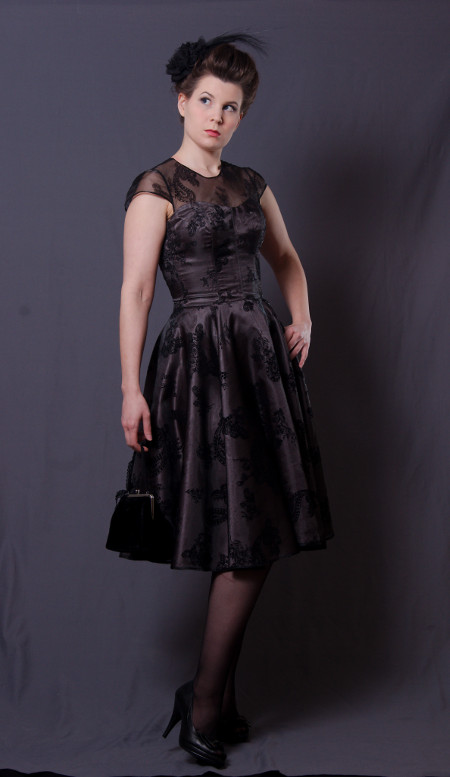
For evening occasions
the dress can be combined with black for a more
sophisticated look. The skirts also look nice even without
the tulle petticoat.
For my hair I did my usual 1770-esque thing without the
side rolls. I know I should try to learn how to do more
things with my hair, but I've just gotten very lazy about
it.
Despite the numerous challenges and the fact that it took
me much longer time than I had thought I'm still basically
happy that I at least finished the dress. I learned many
things and the result is wearable after all. In the world
filled with cheap badly made dresses shipped from the far
east it doesn't stick out, though of course as a
dressmaker I guess I should be ashamed of showing up on a
flawed creation of mine.
<< Back to the Project Page
|
|