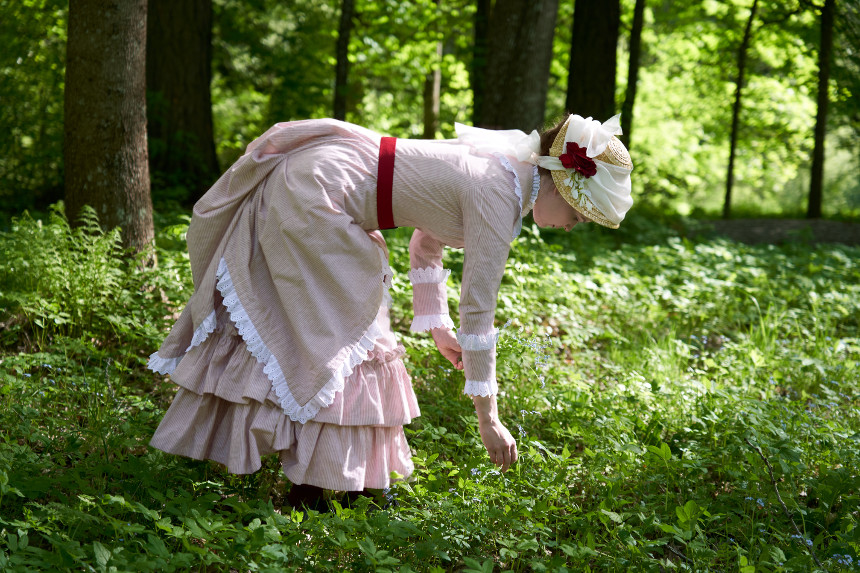
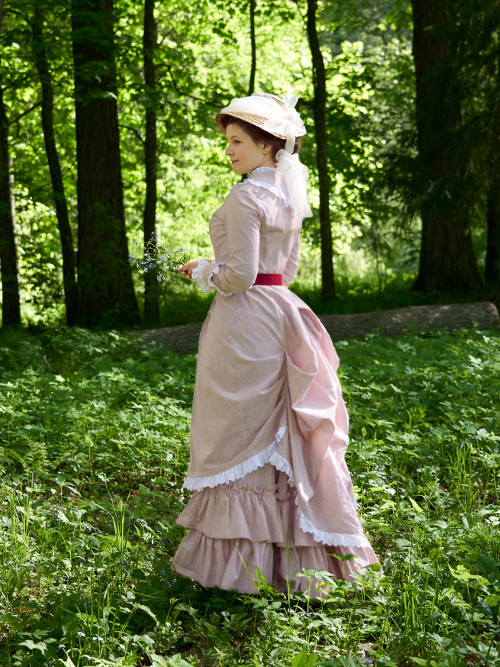
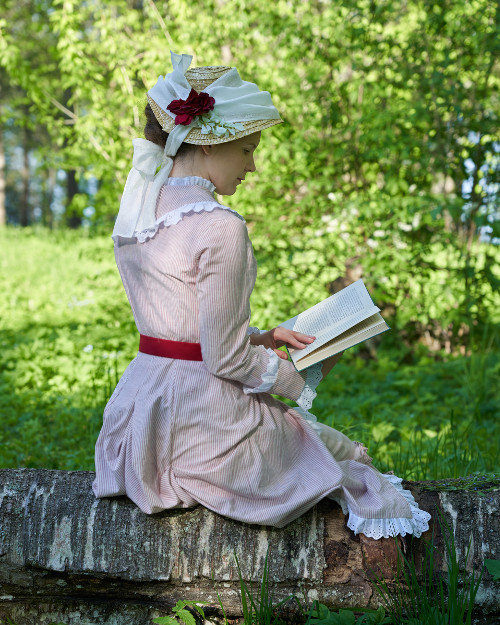
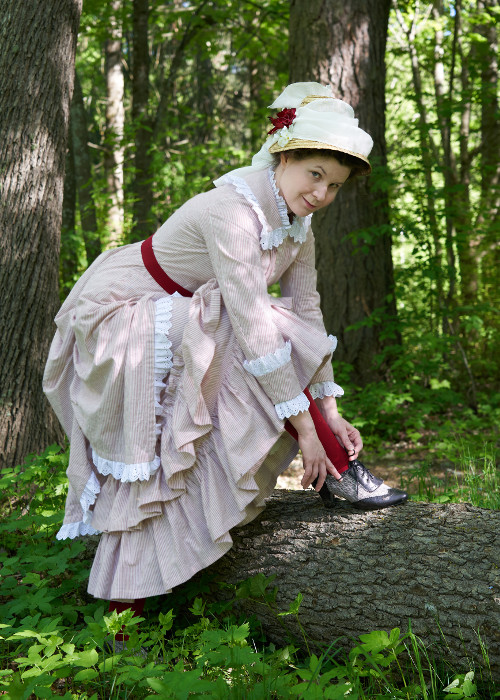
Walking dress for
summer, 2021
While I started my journey into the Natural Form fashion era with the plan to focus on the glamour stuff, some realism inevitably sneaked in at some point. I think it began by looking at some pretty model titled "a walking dress for country"ť, and I began to think that maybe a short, durable, easily washable dress would be a good one to have in my closet. At this time there were also plans for a Victorian / Edwardian outdoor activities day, including things like picnics and a croquet match if the pandemic would only loosen its grip by the summer.
Materials
I decided that a durable but relatively lightweight cotton would be the obvious fabric choice. Ikea’s Bergpalm duvet & pillowcase set seemed ideal, though in the webstore picture the red and white stripes seemed a bit garish to me, though they would no doubt appeal to Victorian taste. But when the fabric arrived the red was darker and a lot more muted than I had thought, even a bit dull, and from any distance the stripes blended into a faded light pink. It worked well for the dress in general: Not too densely woven so it breathes in hot weather, but yet had enough body not to look limp. It seems also to be surprisingly resistant against wrinkling in use.
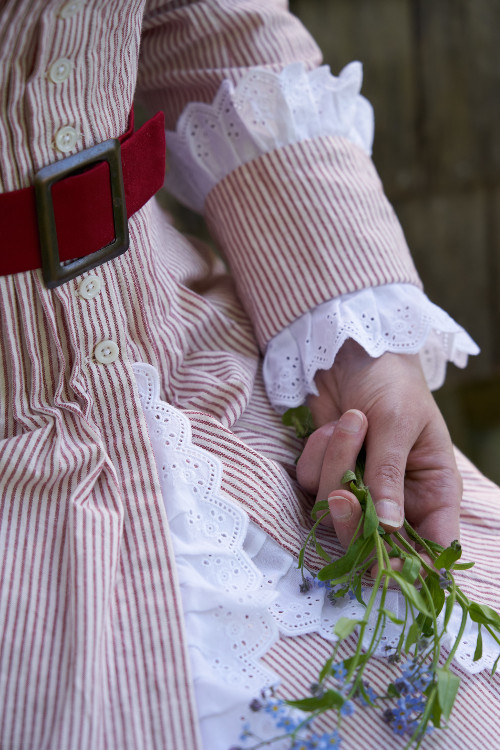
Trimming would be in the most durable kind of lace, cotton eyelet, and fortunately I had lots of it on stash. I had originally bought this pretty lace for underwear, but had never yet used it after all as I thought that it might be a bit wasted in petticoat hems. I did have some doubts whether the combination of pink and white eyelet lace would look way too girly for me, but in the end decided to go with it anyway. Maybe one should not be too conscious of one's age after all.
Choosing the style
I looked at a lot of different fashion plates and museum costumes for inspiration. I found several tennis dresses, though mainly from later 1880s in a similar looking striped cotton in light colors and trimmed with some durable lace. I thought something from the first years of 1880s would be ideal, as they usually had short hems. Then there was this extant printed cotton dress in Manchester City Galleries from the early 1880s that I really liked and had even a fabric for in the stash, and finally I decided that with some minor changes I could use it as a base for this project and then redo it later in the flower print.
Drafting the pattern
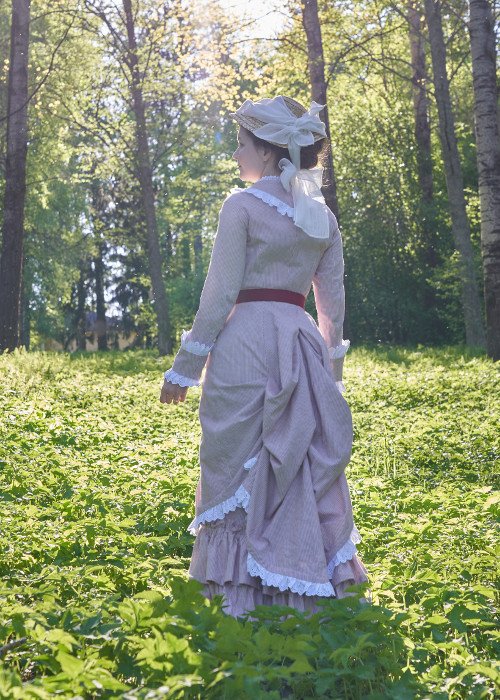
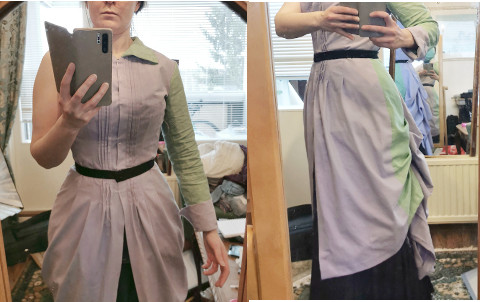
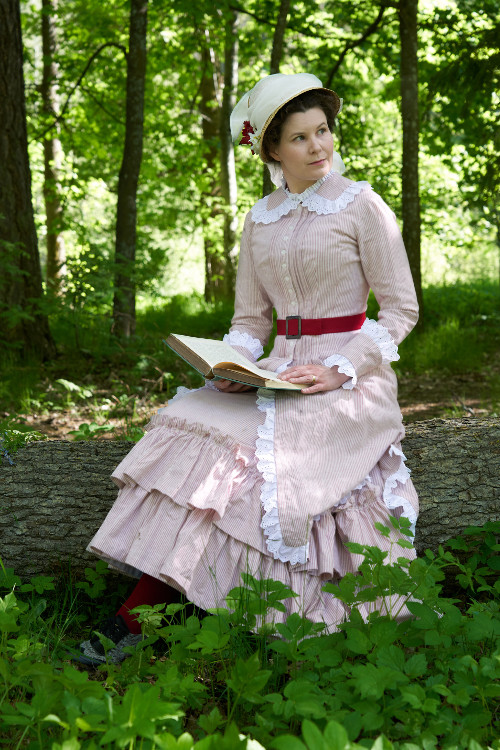
I set out to make a mock up of the polonaise based on my previous patterns. I added some extra allowance on the bodice as I thought that this dress should have a relaxed width with loosely laced corset beneath. I made small horizontal darts at the waistline to get a nice fit.
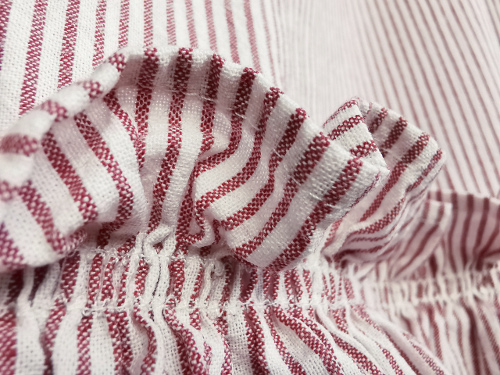
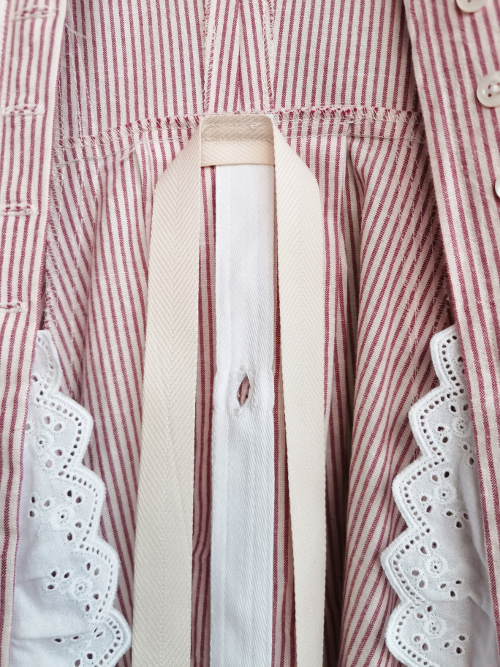
I could not really make out from the pictures quite what was going on at the back hem of the Manchester Galleries polonaise, but thought the back puff looked so ample that it must have pleats in all three back seams. When I tried that out I just couldn't make it look right, so I went back to my trusted method of adding a deep pleat in the back seam, pleating the second side pieces in the back width and looping up the back width with a button and tape - arrangement.
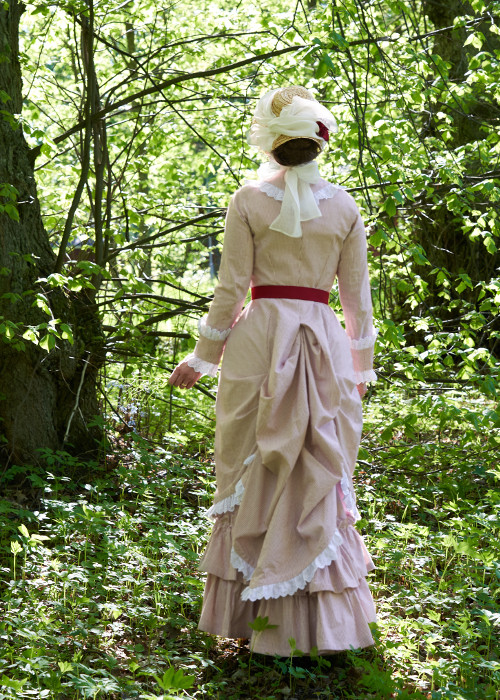
I tried on different options for the draping with tape and safety pins until I was happy with it, and then marked the places for buttons and buttonholes on the pattern. One more thing about the back pleat: it goes all the way to the waistline, because I had already decided to make the bodice without the supporting interlining that the pleats are usually sewn into. I thought it would be the best way to keep it in shape and support it. I also cut the back piece with a seam at the waistline so I could easily sew the pleat into it. The seam is neatly disguised under the belt I had planned.
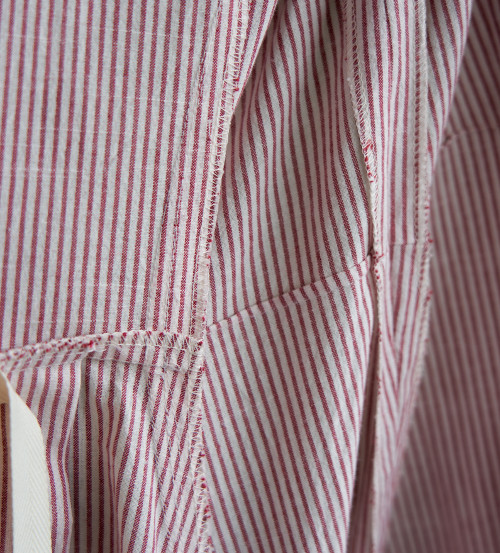
I have always had problems with the shoulder seam, and yet again I had to adjust them. On the fronts I loosely followed the Manchester City Galleries dress and drafted four 8mm tucks on both sides of the center front buttoning. In the original dress they turn towards the center front, but I felt it would in many ways be more practical to turn them outwards, so I did just that. A bit below the waist the pleats open to give a tiny bit of extra width to the hem.
They also came in handy with the eternal problem of the bust dart I never seem to get totally rid off - usually I try to turn it towards the center front as a hidden dart in the lining combined with the extra length in the top fabric smoothed on top of it, but it only works in some materials. Now I just turned the bust dart to follow the edge of the pleating to the neckline and hid it under the pleats. I have no idea whether this would have been done in the period but it worked beautifully for me. I also left the waist darts to open as pleats.
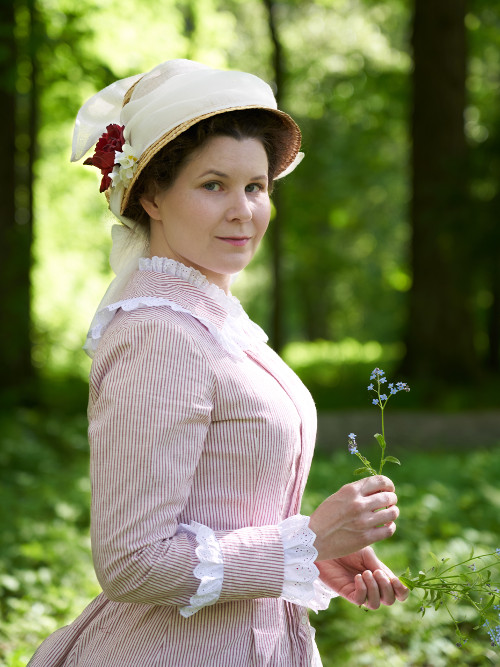
I originally tried to open the side seam to the hem as a wide pleat as well but I never got it to look nice, so I gave up on it and made it as a normal seam in the end. The sleeve came from another pattern with a basic long sleeve, I just added a bit of extra width and drafted the armhole a bit larger for more free arm movement. I added simple cuffs based on period examples. The wide falling collar with pointed back follows early 1880s fashion illustrations as well. With these details the dress began to look a bit different from my original inspiration, the printed dress, but I felt that it worked.
The skirt pattern came quite simply from the early 1880s short skirt pattern I had made for my white and navy walking dress, I only shortened it a bit more.
Sewing
As for the construction, I decided that the dress should be as light as possible, so I would leave the bodice unlined. It would work better with a bodice with some extra allowance anyway. This would also make putting the dress together a lot more straightforward.
And this time I was going to do things as straightforward as possible indeed: My plan was to machine sew the whole bloody thing. With so much else going on I thought this could well be the sort of quick and dirty sewing job we all need sometimes in the middle of more challenging and long term projects. Well, at least I do, but they usually tend to be modern clothing.
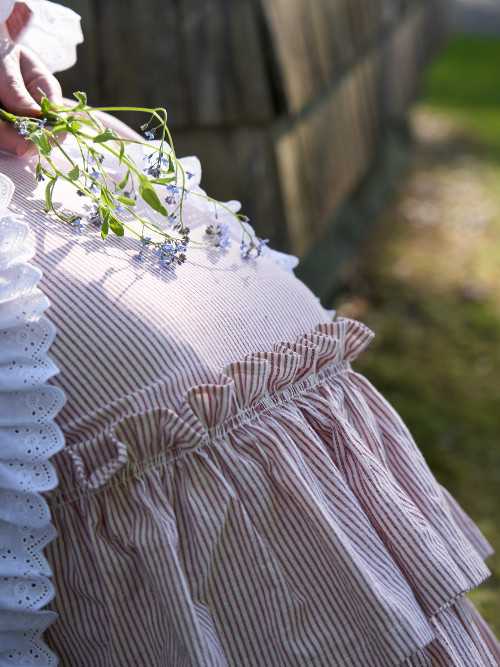
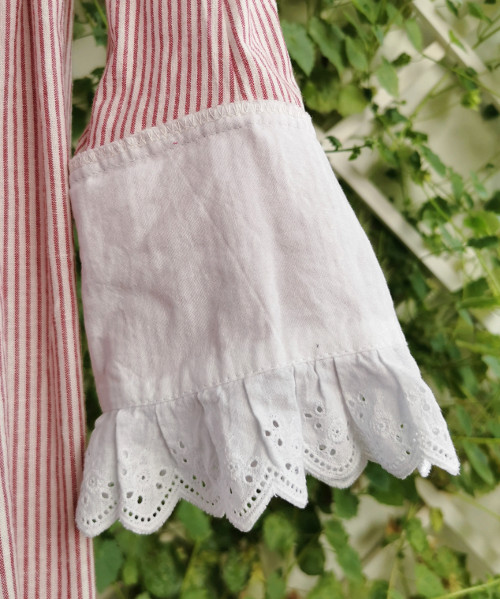
The skirt follows the aforementioned walking dress skirt: buttoned waist opening placket, seams joined with machine stitch and allowances finished with overlock. The hem got a white cotton lining under the ruffles, supporting the hem where they are sewn on. The hem is turned up with a cotton band.

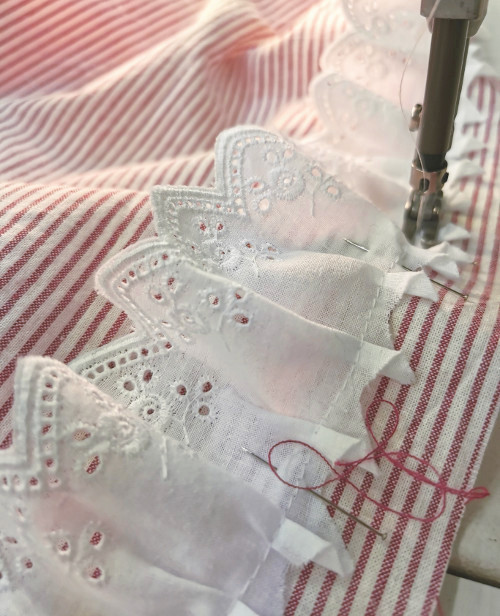
For gathering the ruffled I used another dirty trick originally introduced to me by Noora (@noranoreen003) from The Shadow on my Hand: I sewed a zig zag over a crochet cotton thread, which could then be pulled to the desired length, giving a neat and even gathering. Then I stitched it on the hem. The lower ruffle edge is finished with bias tape, while the top one has a heading of 3cm. The unorthodox gathering method that I have previously used on petticoats etc actually doesn’t look all that bad from some distance.

The polonaise is also put together with rather modern methods of machining the seams and finishing them with overlock. Technically this is not crucially different from period construction, however, they would have just used whip stitches instead of overlock for the seam allowances. I also unashamedly used modern iron-on interfacing for the front edges, collar, waistband and buttoning placket. Let’s just call it permanent starch, shall we?
I had to try it on a few times and adjust the fit slightly as I went along, so the seam allowances are not always of equal width and there are definite signs of unpicking stitches and sewing them again. Nevertheless, the sewing went quite smoothly - it was an easy material to work with, and once I had gotten past the front pleats that needed more careful attention and stripe matching everything went quite fast. Pleating the cotton lace was a bit messy around the corners, though.
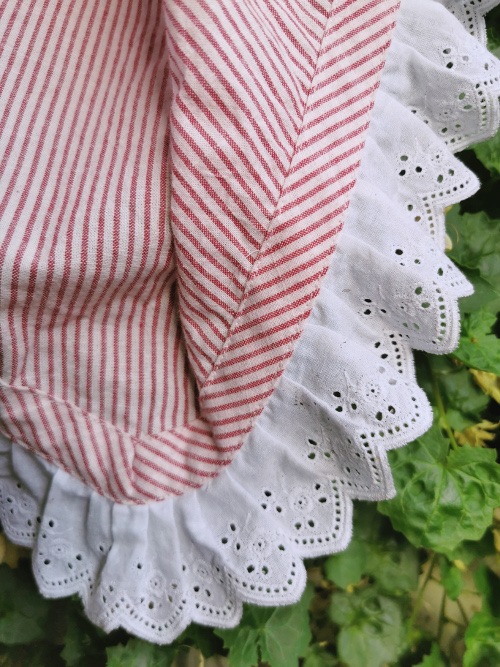
I finished the lace edging with bias tape. It actually looked so nice that I could as well have put it on the right side, but then that would have needed a bit more work. The cuffs were lined with white cotton and sewed on the sleeve ends so that the allowances were hidden under the cuff, which is really handy and actually a period method.
The collar is lined with the same cotton as the cuffs. I sewed it to the neckline and covered the seam allowances with the ever so convenient bias tape. I also added a narrower pleated lace in the seam. I guess the neck frill should be either part of the corset cover or removable for washing, but as the whole dress is washable I considered this little cheat very practical.

The polonaise skirt got the usual arrangement of buttons and one buttonhole in the back width and corresponding tape attached to the waistline furnished with buttonholes. I also added a waistband at the back seam so that the skirts would not drag it down, and also to support the tape that looped up the skirts.
I also was surprisingly sane enough to make the buttonholes with a machine for once - it goes against the grain for me, but on a striped material with small buttons they are not so obvious after all. I actually like making buttonholes, but was not prepared to give this outfit so much of my time. So, in the end the only things I sewed by hand for this one were the buttons and the skirt waistband hooks.
Accessorizing
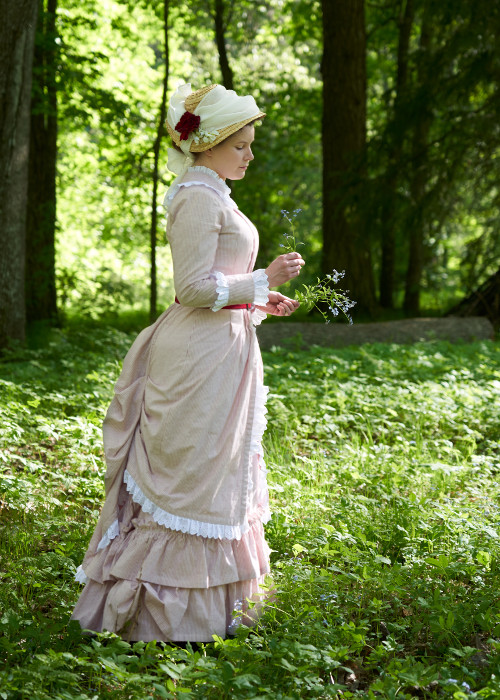
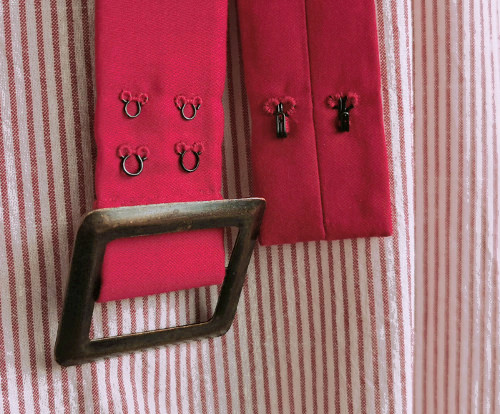
Then there was the always important accessorizing. Many fashion illustrations showed jaunty belts with this type of dress, and I thought this would add some character and an eyecatcher for a light toned and sweetly girlish dress. I was lucky enough to find a small piece of red cotton satin that matched the stripe rather well, and a thrifted buckle for a 4cm wide belt. As the buckle is only decorative the belt actually closes with hooks and eyes hidden underneath the end.
I also wanted a new hat. I decided to try to salvage an old hat base that hadn't turned out very well and had thus been abandoned. Maybe if I just put on enough decoration it might do.
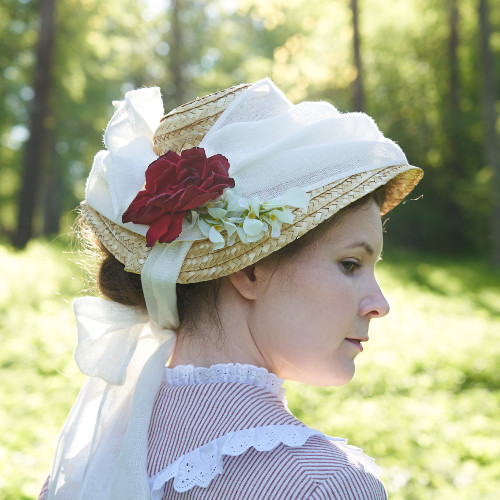
My idea was to make something rather simple with a carefree look, and while I began with a slightly different plan (more on that in another post) this is how it turned out. The sheer linen and fake flowers came from the stash - that rose was an especially lucky find as it matched the belt.
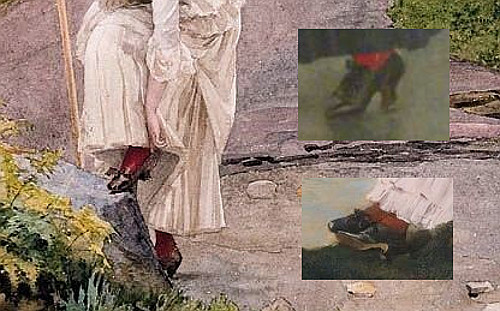
The final touch for the outfit came with hosiery in the accent color. I had seen several early 1880s paintings with women in shorts skirts flashing ankles clad in bold red socks, so those could be even appropriate detail. I had old 60 denier pantyhose in the same dark red, and those would work perfectly with some adjustment. Pantyhose just does not work with a corset and drawers or combinations, but some of the odd things that I store “for possible future use” came in handy for once.
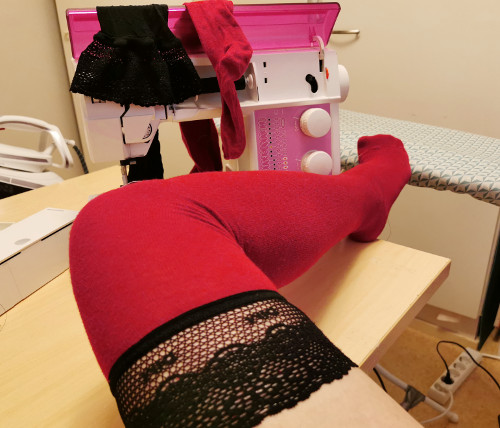
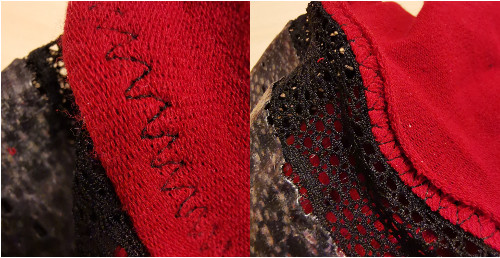
This time it was old stay up hosiery with torn feet but still perfectly working elastic lace with silicone strips. I cut the top away from the red pantyhose and sewed the lace tops on the legs with 3-stitch zig zag.
Period correct? Hell, no! But a nice no cost addition to my outfit none the less.
Conclusion
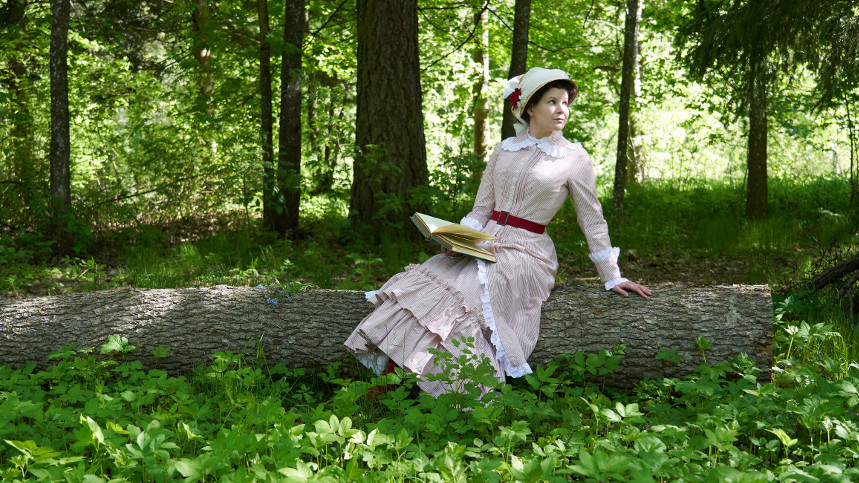
The finished dress turned out quite cute. It’s very comfortable and carefree to wear, just perfect for picnicks, strolls in the country or beach, or light sports like croquet. While I did have to buy the fabric, I had the satisfaction of turning some other odd things lying around in my stash to good use. I also got a very cute modern romper out of the remains of the fabric. I’m very glad I got distracted to make it, even though it postponed my other scheduled sewing a bit!