Now, a month is a long time for one already impatient from the previous delays. What's more, I had planned to concentrate all my energies on this one project and thus didn't have absolutely anything else to sew. There was not much I could do for the suit (save sewing on interlinings) before getting things like pocket flaps done, and I was also craving to get something to do in bus and coffee breaks. Then I happily realized that there were after all the breeches which would not have the fancy shiny buttonholes. I had originally planned to begin with the waistcoat and coat mainly because I was too lazy to try to remember how the pockets in the breeches were put together, but now I was forced to face them.
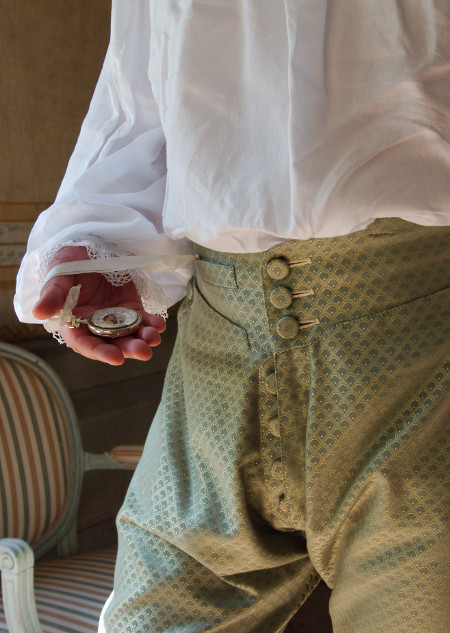
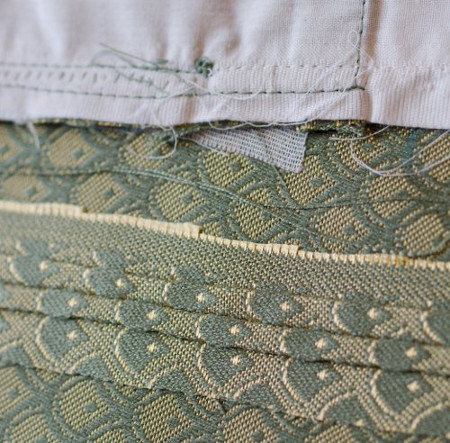
I attached interlining on the waistband, the buttoning piece on the fly, the top corners of the pockets and the knee openings at the top side where the buttonholes would come. I sewed the seam allowances on the waistband on the interlining and made a watch pocket on the right side waistband. I thought it must be something like a modern breast pocket of a coat, so I made it as such finished with hand-stitching. On the inside I put a loop of ribbon for securing the watch.
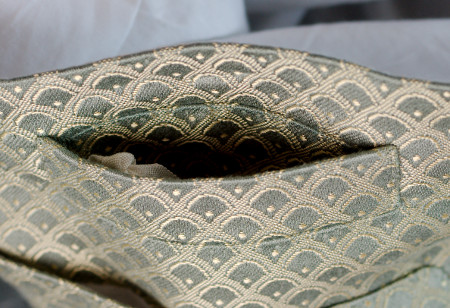
The front pocket construction came back to me when I just began on them, so it was really not that hard. I did have some problems with the side opening ending in a tiny dart, which had been easy on felted wool but on this material the narrow allowances began to fray. After the pocket tearing already on the making stage I gave up and resorted to a piece of modern iron-on interfacing. Of course I also added a lot of hand stitching to strengthen the slit.
This time I tried the trick of folding the inseams on the breeches and sewing them through the two layers as demonstrated on Costume Close Up. I thought it a simply brilliant way of strengthening the seams which take a lot of strain in tightly fitting breeches. After closing the seams I added an extra piece on the back piece knee for the buttons. Then I sewed on the waistband, gathering the back on it. On afterthought I should really have taken the time to do the gathering by hand, it would have been much neater. I sewed the seam allowances on the waistband interlining by hand and added a row of hand stitching on the top.
For the lining I used cotton batiste like in the first suit, but this time I did not try to dye it, having finally gotten rid of my modern obsession of the lining matching the fashion fabric. Following the Costume Close Up I made up the lining separate and sewed it by hand on the top edge of the waistband, back opening and fly opening. On the leg I left the bottom edge still open at this point but sewed the lining on the buttoning slits at the side seams. Then I began working on the buttonholes.

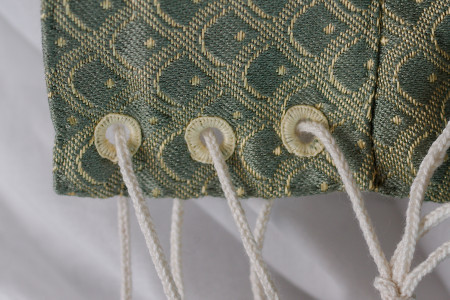
Actually I had already began the buttonholes from the separately made buttoning piece that would go on the fly opening, having made up that little piece early on. Unfortunately I had not hack much luck in finding a silk buttonhole thread that would match the fashion fabric, so I had to settle for a polyester one. It's not as nice and shiny, but will do for the breeches where the buttonholes are not as conspicious. On the back edges of the waistband I made lacing holes.
I had made fabric covered buttons before, but small ones were more tricky to get neat. In many of them the pattern is not symmetrically placed, but I used them anyway, promising myself to be more precise when making the more visible buttons for the coat and waistcoat.
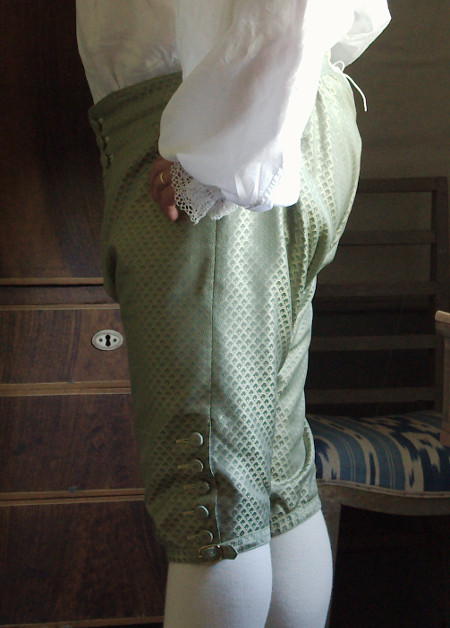
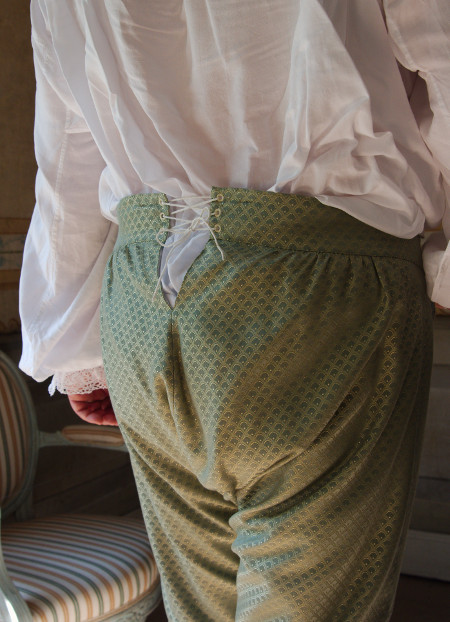
When I had made the buttonholes and sewed on the buttons on the fly and knee openings, and of course the back lacing too, it was the time to try the breeches on Jarno. The back vent opened quite much, and this made the gathering at the back to settle more towards the side than I had intended, but then again I have never made nor bought pants that would not give in a bit at waist with some wear. The top part of the breeches seemed okay, and I mainly wanted to see the legs.
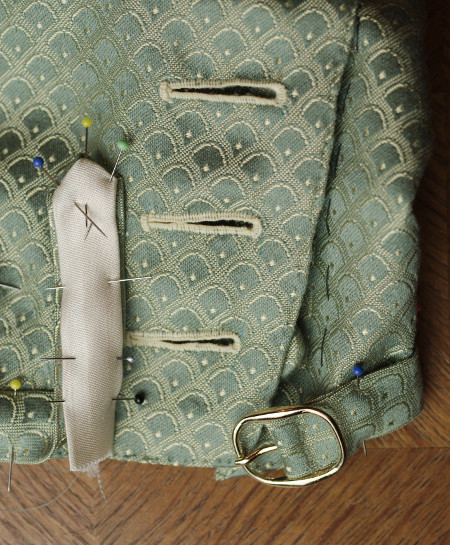
On the previous pair of breeches I had finished the knees with a separate cuff, gathering the front to get some room for the knee while keeping the edge tight. This time I wanted to make a proper period correct knee band sewn on the top of the leg and closed with a buckle. I'm not sure whether you are supposed to have gathering at the knee at all, especially on stiffer silks it might not work, but I decided to try to sew gathering threads on the legs and see how it would work. On the fitting my slightly gathered knee looked okay, so I turned the edges under and sewed the lining on.
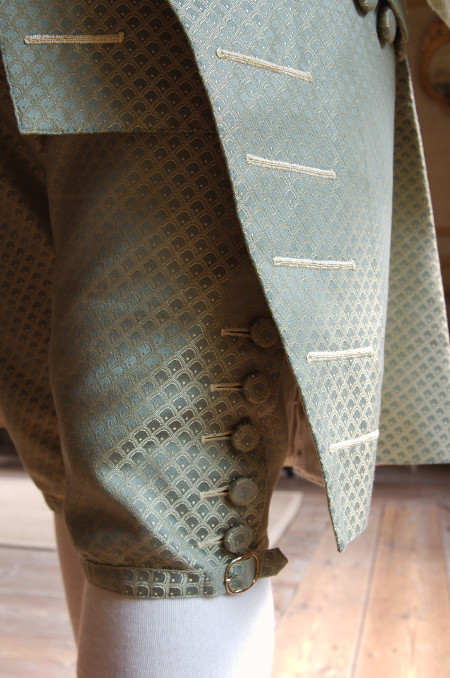
Costume Close Up shows a knee band cut in bias to mold better on the curved leg, which was very welcome news. I cut a piece of generous length, pressed the seam allowances and pinned and stitched it on the knee. In place of period correct knee buckles I cheated a bit and inserted a regular buckle on the other end of the band. I lined the another end and worked an eyelet for the buckle tongue. I'm still a bit confused whether I got the knee band construction quite right, but at least it looks pretty much right from the outside.
The Saga of the Green Suit continues on page 3 >>