My first light blue kirtle was
beginning to show signs of wear, so I began to fancy a new
finer one to wear with fancy overdresses such as the
sideless surcote. I also found a beautiful burgundy melton,
but as usual got distracted by other stuff for a long time.
(I once estimated the average time that fabrics mature in
the stash to be about two years). My next purchase were
fancy tin buttons with red glass center. I wanted the same
long fitted sleeves with mitten cuffs as in my first kirtle,
with a few extra buttons added at the top.
Then at some point I got round to planning the kirtle for
real, and it became an unexpectedly long journey...
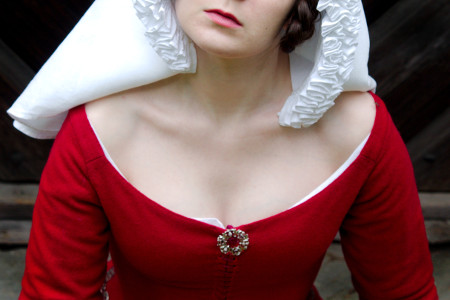
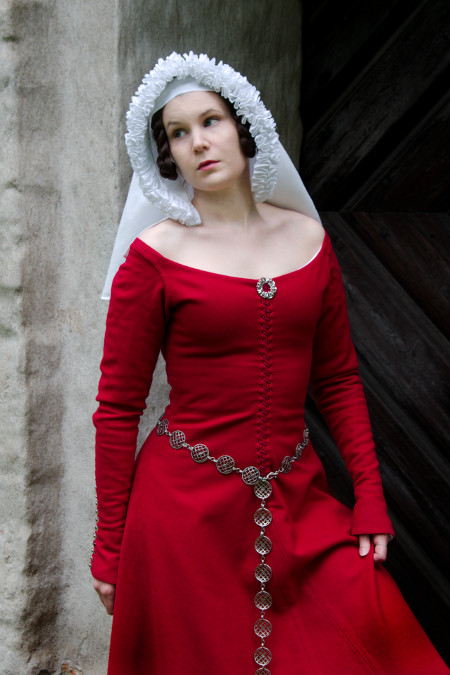
I had made several gowns with the same trusted pattern, but now I wanted to try something new and try to achieve the ultra-tight fit of the late 14th century. At least on the idealised illuminations of the period the gowns have a quite revealing neckline combined with a very high bust, in modern terms a push up-fit. I was also planning to make a houppelande sometime in the future, and in the pictures they also have a raised, full bust, very likely created with a fitted kirtle worn underneath. Of course one should be wary of making assumptions entirely from illuminations, as they are always to some extent idealized, but on the other hand ladies have always sought to achieve the fashionable ideal look, with variable success. Also my general goal with my medieval garb is not to be as historically accurate as possible, but rather create something that evokes the look of period images with a lot of compromises to budget and practicality.
La Cotte Simple's articles under "”Fitted dresses in 14th century western Europe” were very useful in figuring out the cut for the kirtle. On the tutorials the example dresses are made by draping the material on the body, but as I am a very paper pattern obsessed person and I had a fairly good pattern to begin with I decided to just try and alter it. I chose the straight-front type of cut as it seemed to really create the push-up effect I was after, working like a pair of stays.
I began by some modest changes in my basic 4-panel kirtle pattern, such as taking in at the seams a bit for a tighter fit and raising the underarm with 1cm to get more support for the raised bust. Then I made a mock up with plenty of allowance on the front closing and tried it on, pinning the front.

I usually wear a modern bra under my medieval garb, both for comfort and vanity. This kirtle would have a wide neckline, and bra straps might peek out, and moreover I wanted to try to get the supportive lift with just the kirtle fit without the effect of bra straps. I tried the mock up with sligthtlypadded bra with the straps removed. The bra gave a nice tiny addition to my modest bust and made the silhouette look a bit like the probably unrealistic but pretty illumination figures. Without the straps the lift came mostly from the kirtle, so I feel that this was closer to a period solution for the bust lift.
I had pinned the front closing checking the fit with mirror, and when I took it off I drew the pinned lines on the fabric. Compared to the old basic pattern the front was clearly straighter, curving out a bit at the top rather like my 18th century patterns. It also came higher. Next I made a mock up of the sleeve, following the old pattern but cutting the wrist a bit tighter and widening the gore in the mitten cuff. When I sewed the sleeve on, I noticed that it pulled the bodice at the front. I realized that the raised bust needed more space, and changed the armhole curve accordingly. That did the trick.
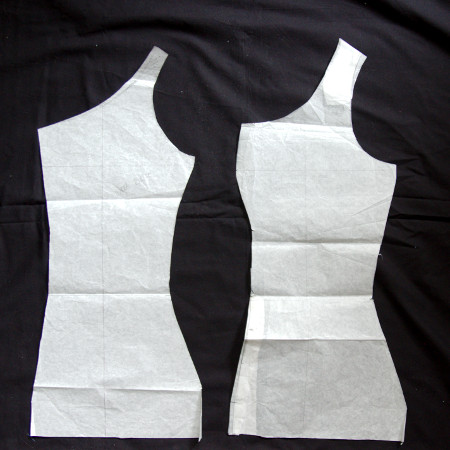
The
old kirtle pattern on the right, the new one on the left
Just to be extra neurotic I made the other mock up sleeve too
to check if the pulled on the tight bodice and to ensure arm
movement. I still had to take in a bit at the side seams under
the bust and the back seam at the waist to get an ultra-tight
fit. As the bodice became even tighter a horizontal wrinkle
appeared on the back waistline, as often happens. I shortened
the back seam at the waist, making a tuck in the pattern and
changing its angle slightly. My mock up was made of heavier
stuff than the usual old bedsheets, and I fitted it without a
shift to get a really tight fit, as the final wool dress would
inevitably stretch a bit in use.
When I was happy with the bodice fit I shaped the neckline. As
the bust line had become higher the neckline was fairly deep
enough, but needed widening instead. cut away about 2,5cm at
the shoulder, leaving a tiny shoulder strap. The thought of a
raglan sleeve did cross my mind, but as I didn't immediately
remember any period evidence of this and the narrow shoulder
seemed to work I decided to go with it. The neckline was,
after all, planned to be just
wide, not totally off-the shoulder.
Sewing
As I began to
cut I realized that I had been a bit optimistic about the
fabric length. I resorted to cutting the narrow shoulder as a
separate strip in the 18th century style, which shortened the
pattern length just enough to fit the fabric. Of course I
can't name any source to support this, but then again
everything that reduces cutting waste is always period correct
in spirit.
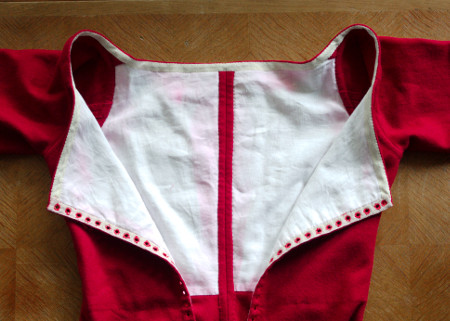
I decided to line the bodice from the waistline upwards to
make it stiffer. Waistline seemed like the natural place to
end the lining, and also in the period images the dress seems
super-tight from the waist up and then much more voluminous at
the belly and hip area. I'm not saying that they reinforced
the top bodice for this effect, but it might certainly help to
get the right look. A wool layer alone will stretch in wear.
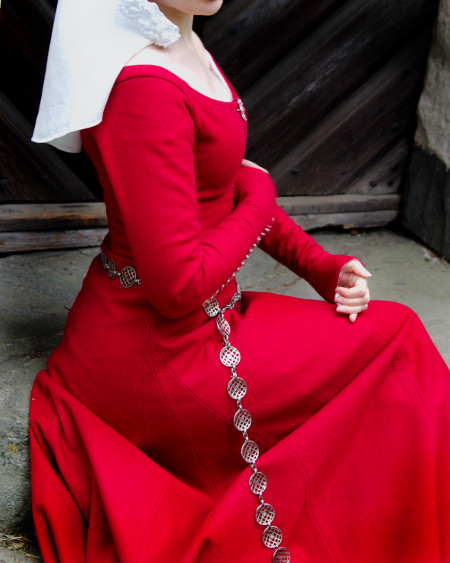
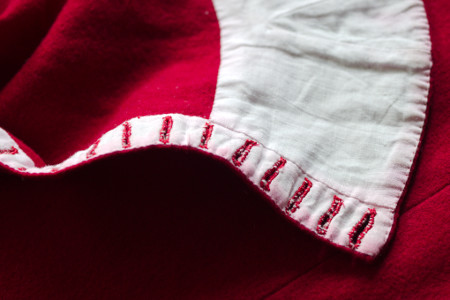
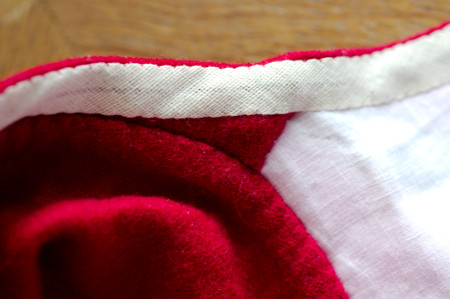
For the lining I chose a lightweight but very densely woven linen, it would help a little to keep the bodice in shape but would not make it too hot and stiff. I basted the linen on the bodice pieces and sewed the bottom edge on the melton at the waistline. On the narrow shoulder strip I would just bag line the seams, but elsewhere I would treat the linen and melton as one layer to get more durable seams. I reinforced the front edges with a sturdy linen band and began to work on the lacing eyelets.
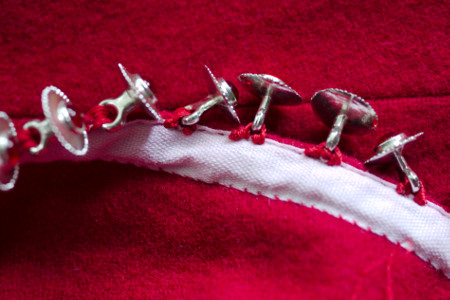
For the extra tight kirtle
I spaced the eyelets closer to each other that usually, with
1,5cm distance. Yes, at some point making them began to feel
rather tedious, and I did wonder if I had been
over-enthusiastic about their number.
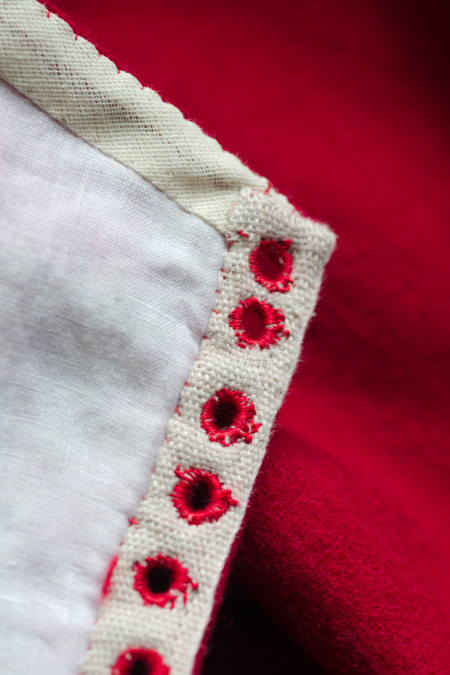
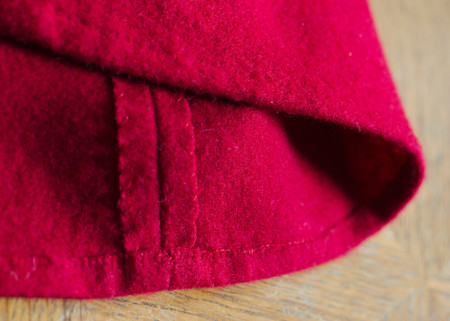
In my first kirtle I
had reinforced the sleeve buttonholes with a linen tape,
but as that had been a rather loosely woven one the narrow
buttonholes didn't catch all the threads. Now I realized
that under buttonholes the dense thread count might be
more important that the heaviness of the supportive
material, so I faced the buttonhole edge with the same
linen I had used for the bodice. On the button edge a
narrow strip of cotton tape was enough. I also lined the
mitten cuff to the wrist, as it was a neat way to finish
the sleeve end and cover the gore seam allowances. As
usual, I marked the buttonholes with the same 1,5cm
spacing as in my first kirtle, machine sewed around them
to get a stitch line and then began slowly to make the
buttonholes.
Most of the time with this dress went into
the lacing eyelets and the buttonholes, but then again
they were a nice carry-with-you-sewing. Having finished
them at last I sewed the dress pieces together. On the
lined bodice I first pressed the seam allowances open and
then hemmed them down on the lining, on the unlined skirts
and sleeves I just sewed the raw edges down as the melton
does not really fray. At this point I still left the side
seam allowances unfinished, though, for further shaping if
needed after checking the fit. The shoulder straps were
bag lined and the armholes flat felled by hand. On the
neckline I turned both layers on the inside of the dress
and covered them with a tape that would reinforce the
neckline edge.
Then I tried the kirtle on. It was tight, almost too tight.
I had great trouble getting the lacing close at the bust.
After wearing it for an half an hour it did give in a bit,
so that I even had to take in a bit more at the side seams.
The front lacing also nearly closed now, though forcing it
close made the shoulder area so tight that my neck and upper
back cramped very soon. I ripped off the neckline tape and
let the neckline stretch to a more comfortable fit. Usually
you put the tape on the neckline to prevent it from
stretching, now the neckline could obviously even stretch a
bit to work. The mock up, of course, had stretched freely at
the neckline.
Finally I pinned and sewed down the neckline tape anew, and
this time it actually stretched the fabric rather that
otherways. I also noticed that the shoulder strap tended to
move inwards and upwards as the shoulder area was too tight,
so the neckline didn't become as wide as I had intended.
At this point, however, I thought that the bodice fit would
do, and turned to finishing the one thing remaining, the hem.
It was pretty much the right length already, as I had had so
little fabric I hadn't cut the 5cm extra length as I often
tend to do "just in case". I turned the raw edge narrowly with
small blanket stitch.
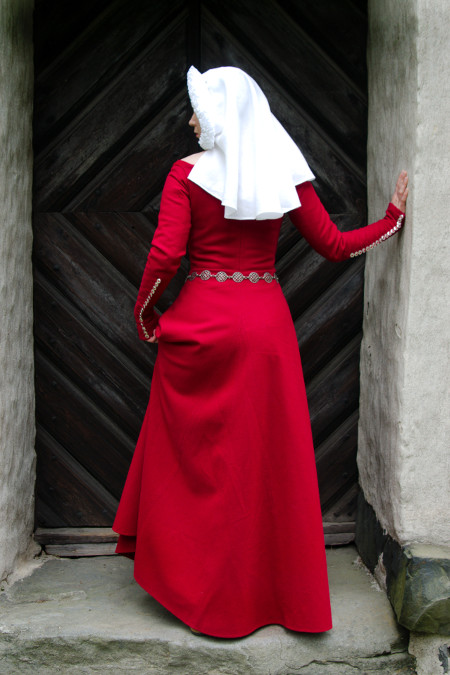
And of course having just finished the kirtle I ran into the second extended edition of Thursfield's "The Medieval Tailor's Assistant", which included a new garment called "Tight Cotehardie". It had a raglan-type sleeve with a separate shoulder strap that settled lower on the shoulder, and gave a beautiful wide neckline. It also had a back lacing. I had followed the theory that a mundane practical detail such as a laced front closure was not depicted on the tiny illuminations tough it might still be there. On the 15th century the hidden lacing with tiny metal rings sewed on the inside of the front edges were in use, but obviously there is no record of this closure type from the 14th century as far as I know. The back lacing is of course a tempting solution to the mysteries of dress closure.
I wore the finished kirtle a few times, and on the second occasion the feast hall happened to be a very draughty one. What followed was an epic shoulder cramp that made me decide that something had to be done to the too tight shoulder area of the kirtle. I knew I had to act before the cramp would fade and I would happily forget it, so when I got home I at once attacked the dress armed with a seam ripper. I removed the shoulder straps entirely (now it was handy that they were cut separately) and tried the kirtle on without them, letting the sleeves take their shape. The sleevecap settled much lower, almost off-the-shoulder now that the shoulder strap was not there to pull it up.
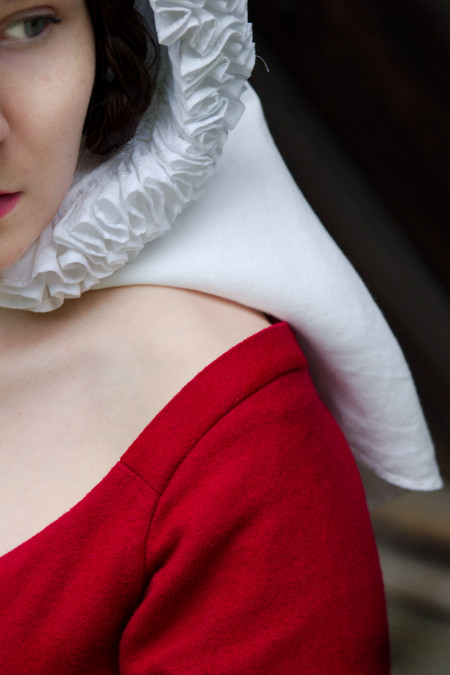
The resulting neckline fit was much closer to both my original vision and the mock up. I found the cutting waste and managed to get new, longer shoulder straps out of them. I pinned them on and compared to the original shoulder they became both longer and slightly differently shaped. I sewed them on and tried the kirtle on once more before sewing the sleeves back on. It's good that I did, now the straps were slightly too long, and the shoulder dropped too low. I shortened them by 1cm, and they become just perfect. This time I added no reinforcing tapes, as the sleeve cap seam would keep them in shape and I had learned the hard way that a bit of stretch on a lowered shoulder line is not a bad thing at all.
I realized only afterwards that the problems with the shoulder area could partly be traced back to cutting the shoulder strap as a separate piece. The mock up shoulder that was cut with the bodice was actually nearly in bias, while the separate strap was cut in the straight. Add a stiff lining and the final shoulder worked very different on wear. The new shoulder construction is more simple, which also means it will be easier to adjust again should the shoulder strap stretch too much on wear. The downside of the new shoulder fit is that as it settles lower on the shoulder it creates a wrinkle in the bodice, but I can live with that. Overall I'm really happy I tackled the problem after all, as the kirtle is now much more comfortable and also looks nicer.

There is, however, another
imperfection on the dress, related to timing. I had planned
the kirtle to be worn both alone and mainly with fancy
overgarments. The extra long, buttoned sleeves were a detail I
never really questioned. Later, looking more carefully at
images of houppelande's and other fancy overgarments I
realized that by the early 15th century the buttoned sleeves
were hopelessly outdated. That meant that the kirtle would not
be as convenient as all-purpose underlayer, if one was to
stick to at least some resemblance of historical accuracy. But
I really like the blingy sleeves, and at least they will be
spot on with my sideless surcote.
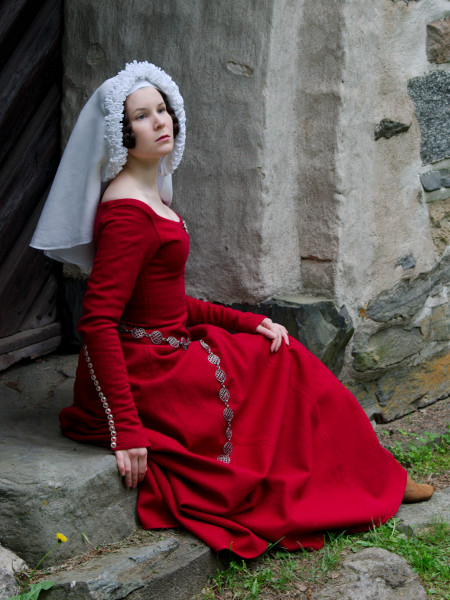
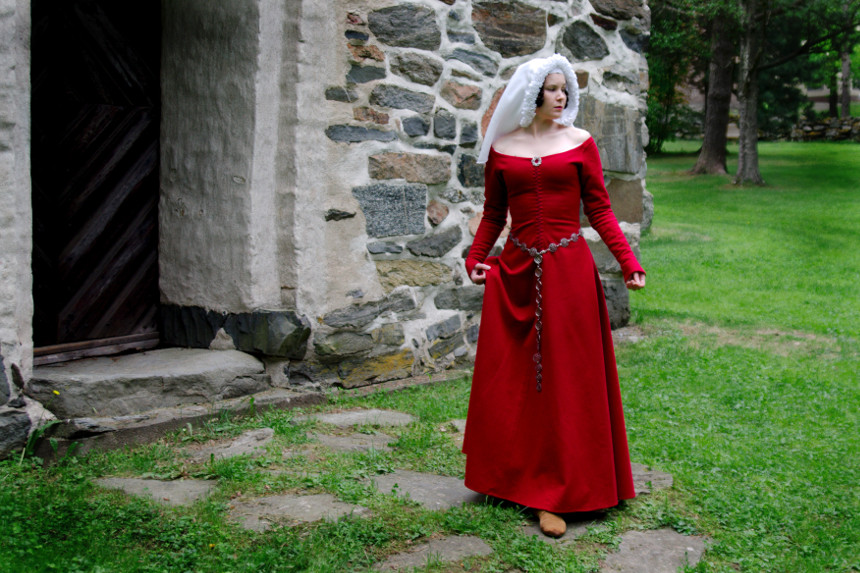
The kirtle is also pretty worn alone, and I can tell I will be
using it a lot. It's a fairly simple but well made garment,
and of course the color is just lovely.