Shoes, 2014
It's been a while since my last re-fashioned shoes. As my dress for the Sveaborg Christmas ball was almost finished long before the event this year I had time to turn my attention to accessorizing. Black shoes would of course have been perfectly suitable with a grey dress trimmed with pink bows, but I sort of got it into my head that I absolutely needed pink 18th century shoes.
I went through my stash, and my first option for the covering material was the leftover pink taffeta from my ancient pink Pet en l'air. Happily I remembered very soon that even clean water left it stained, so it would be hopelessly impractical material for shoes, let alone tricky to get smooth.
Luckily I came up with a plan b, which was to use the leftovers from the cream cotton damask I had used for my Mothers corset, and use the pink dye kit I has had forever on it. The color printed on the box looked more magenta pink than the soft rose pink of my dress trimmings, but I hoped the cream base might soften the hue.
The dyed material was still a different pink, but at least it was even, and they would not be right next to each other so I thought it would do. Otherways the fabric seemed great, durable but not too thick.
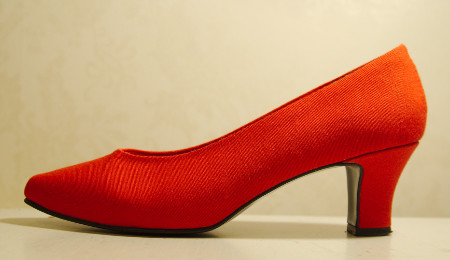
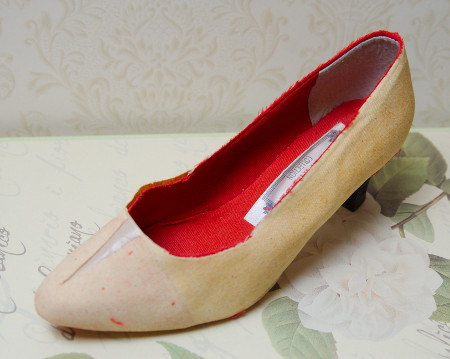
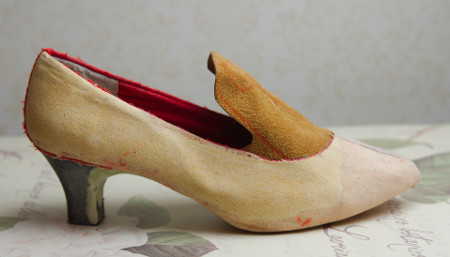
I had found these pumps from a second hand store some years ago, and now decided that the time had come to sacrifice them for upcycling. Their shape is not perfect, the toe is okay but the heel should of course be more curved. It's not hopelessly too narrow, though, or too boxy. A bit of epoxy putty plastering might improve it, however, as I had experimented with my mule project. I have not really worn the hopelessly impractical mules apart from the photoshoot, so this would be a nice opportunity to test how epoxy additions take wear.
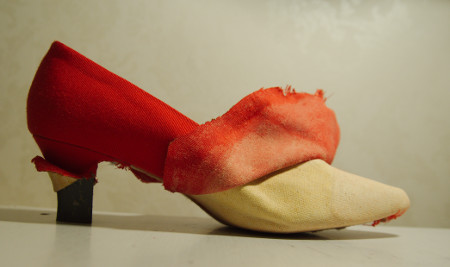
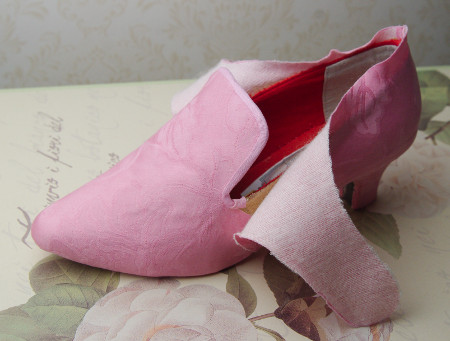
So, I began to rip the pumps apart. Some steaming and brutal force rid them of the outer sole, and this time the heel tip gave in very easily too. With steaming the red fabric cover also began to peel off, so I removed it too to reveal the base fabric. On the edges and seams I trimmed the remains of the red fabric very carefully.
I had already learned with the mules that cutting a bit of the original front edge away will prevent the thick seam showing through covering. This also gives the material an opportunity to stretch a little, which is a good thing if your feet need more space (mine usually do).
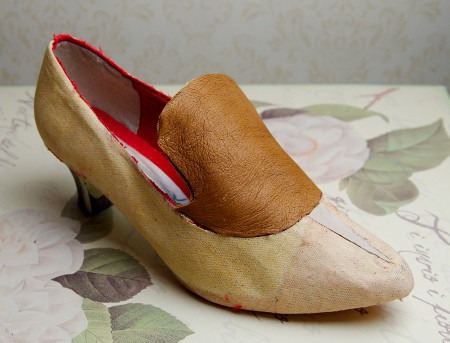
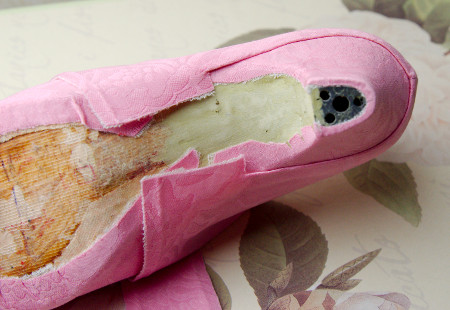
As I have wide feet, I tried to get some more space for my poor toes by slashing the top of the toe part. I glued a piece of thin leather between the shoe fabric and the lining to create a wedge that measured about 1cm at the top edge. Later I glued a tiny leather wedge on the top to create an even surface.

It seems to me, by the way, that the period shoes have a higher profile at the top of the feet and only narrowed sharp towards the toe, while modern pumps tend to be very flat at the toe area. I guess it's because a open-cut pump has to be tight at the toe to stay on, while buckled shoes stay on better anyway. The profile of the shoe is also of course shaped by the shape of the sole, which is also different from what you get today. Anyway, a bit extra space at the ball of the foot rather more helps to achieve the period look than the opposite.
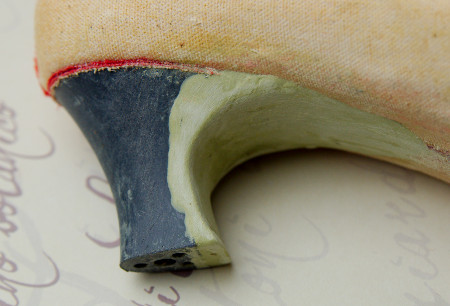
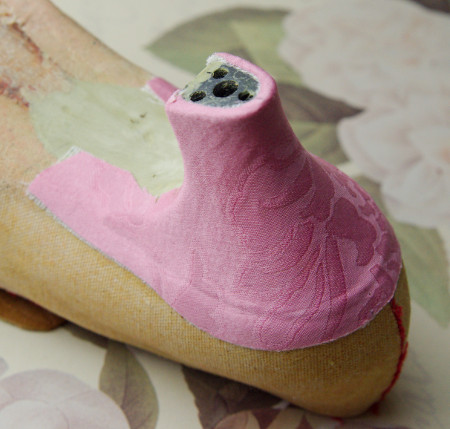
Next came the heel. I still had just enough epoxy putty from the mule project for both heels. First I added the putty under the heel to create a smoother curve, and then I tried also to add some on the front edge of the heel. This would make the heel look placed slightly frontwards, more under the arch of the foot, which is a distinctive feature of period shoes, aimed to make feet look shorter and more delicate. When the putty had hardened I smoothed the surface with sandpaper.
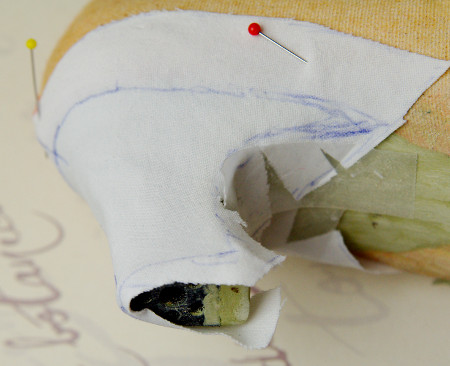
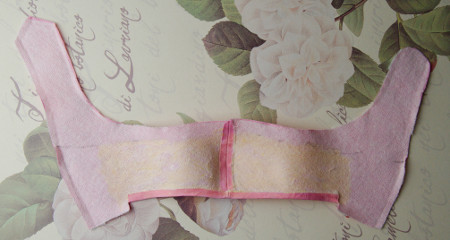
Then I was able to begin on the pattern for the fabric covering. I pinned and taped fabric over the shoe and marked the pattern edges. The mock up fabric was cut on bias as the final covering material would be too. This is essential at least for the heel, but in my experience the toe should also be cut in the bias for smooth fit, if possible.
I also draped the toe part with tongue and the back/side pieces continuing into buckle flaps. I shaped them with the shoe on, and marked the shoe opening line on my foot for further fitting.
I would use my "Dauphine" buckles from American Duchess, so I measured the buckle flaps to fit them. Unlike in period shoes I left the underside flap shorter to fit smoother in the shoe.
After trying on the shoes for the pattern drafting and taking a few steps on them I noticed to my great annoyance that the epoxy addition was breaking off at one of the heels. This was rather dissappointing, as I has like the shape created by them. Perhaps I had not shaped the heel bottom edge even enough, which caused uneven pressure on the heel. Perhaps the heels might have lasted if I could have kept them intact until putting on the protective heel tips, but as it was I thought it safer to file away the extra putty on the front side of the heels, leaving only the upper part which would not be as vulnerable in wear.
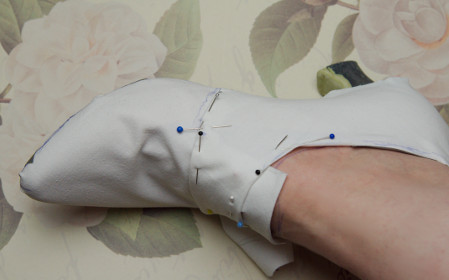
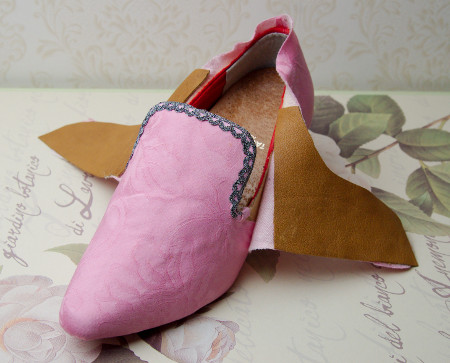
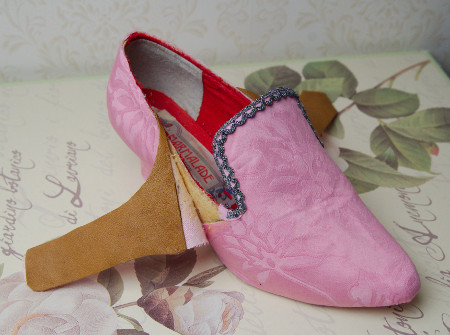
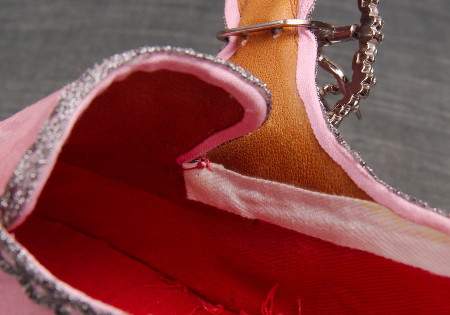
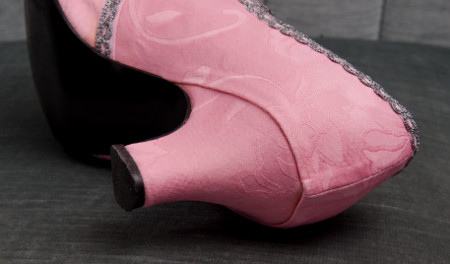
Next I began to shape the tongue based on my drafted pattern. First I glued leather additions on the inside edge of the toe part and shaped them to the final shape. Then I added another layer of leather on the top, carefully shaped to match the edge of the cut opening, to make the tongue more sturdy and even the surface. On the picture you can also see se top wedge insertion at the toe.
These patchwork additions with the new heel alone already gave the shoe a more historical look, changing the balance so that it looked less elongated.
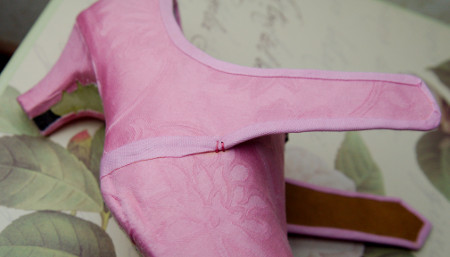
And then it was time to whip out the pink fabric. As mentioned above, I cut all the pieces in bias. As the fabric pattern was forgivingly large and obscure it did not need any consideration in the cutting. For the gluing I used again Tixo contact adhensive.
I did manage to blow up my first attempt. When applying the glue I noticed that it showed through on the right side, at some parts there were visible stains and at others the pretty fresh pink just got an ugly yellowish tone. So, my material had been too thin after all.
I tried to add a heavy, slightly napped iron-on interfacing on one piece and test glue it on a scrap of leather. The glue stayed on the interfacing, and the extra layer might also smooth out the various material edges on the toe.
Happily I had not cut all the pieces yet, so I decided to iron the interlining on the whole fabric piece and cut new ones from that. While trying keep in mind I weould be cutting them on bias I somehow managed to iron the bias cut interlining on the straight of the material, thus eliminating the stretch that bias gives. I steamed the material furiously and ripped the interfacing away, and then cut the pieces individually and only added the interlining afterwards on each one.
I steamed and smoothed the heel covering into shape before applying glue. After adding the interfacing my material behaved very well and was nice to work with.

I sewed two rows of gathering stitches on the edge of the toe part, which helped a lot to turn it neatly under the sole.
I tried the toe part on, fastening it lightly with some pins at the sides and with paper clips on the tongue. Then I steamed it lightly and carefully pulled it to shape. Due to some mistake in the drafting stage the toe piece was a bit small, and did not reach the top edge of the tongue. In the end I had to shorted the tongue a bit.
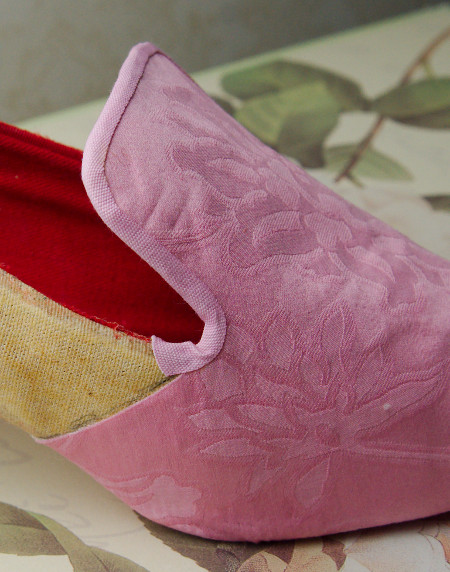
After evening out the tongue edges I finished them with cotton tape I had dyed with the fabric. It fit over the curved parts much more smoothly than the taffeta ribbon I had used in my previous shoes, and the glue did not show through as badly either. Glueing the binding needs care, and at some places there are tiny glue stains visible next to the binding.
I sewed the center back seams and glued the seam allowances. I tried the pieces carefully on the shoe, marking the point where the heel ended underneath the shoe. Then I cut open the seam allowance at the marked point and glued the seam allowance to turn upwards at the heel area.
I applied the glue at first only at the back of the shoe, leaving the buckle flaps and their base at the sides free from glue at this point. Then I applied glue on the corresponding area on the shoe.
I had given some thought on how to finish the heel seam, as I did not want to cover it with a ribbon. As you can see, I ended up leaving the heel piece allowance continue over the seam and turn the allowance on back piece of the shoe instead, as the heel covering is tricky to get smooth without any extra matching.
The heel edge was a tricky part, as the glue should not go over the seam line on the shoe but the heavy folded edge still had to be fastened securely. I had to add some more glue at some parts.
It smoothed the back part of the covering on, beginning at the center back and going down the sides. The buckle flaps still hang free as you can see.
Before continuing with the buckle flaps I had to make a design choice I had been putting off: Whether to keep the shoes nice and simple or go over the top by adding some blingy braid? At the planning stage I had briefly entertained an idea of a cloth-of-silver-esque panel at the top of the toe/tongue with some additional braid edging, but then I realized that this decoration would be too old fashioned for both the shoe shape and most of my wardrobe.
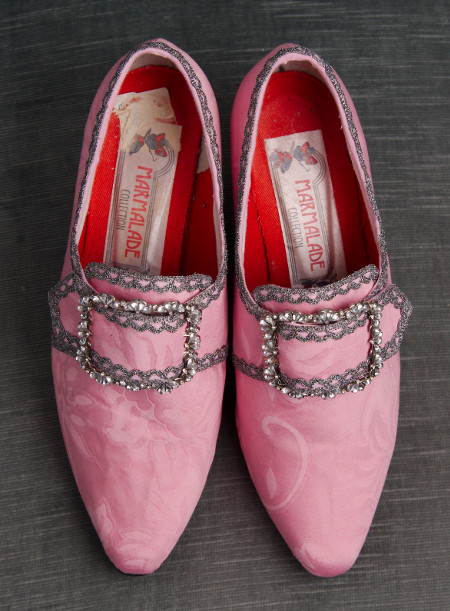
I didn't totally abandon the braid idea, though. The cotton tape binding had turned out quite neat, and the buckles alone would add some bling, but then I happened to find a very nice narrow silver braid and decided to go for the bling. So, I glued the braid on the top of the cotton tape binding on the tongue and then moved on to the buckle flaps.
I marked the original shoe edge on the side/flap pieces and glued leather pieces up from this line to line and reinforce the buckle flaps. As pieces never match quite perfectly in this world of ours I left the top of the leather pieces unshaped, and cut them to the final shape when the glue had dried. I tried the shoes on to check that the edge was the right shape and the buckle flaps folded neatly over each other. I also marked the line where the bottom edge of the back/side pieces would go, and the point where the buckle flaps start at the sides of the tongue.
I glued on the rest of the edge binding tape. At the back of the shoe I had stitched another piece of tape on the edge of the binding tape down to the point where the buckle flaps begin to curve upwards from the original shoe edge. The narrow binding tape alone would not have been wide enough to cover the thick reinforced back edge of the shoe, and it might have began to peel off very easily in wear.
The additional tape reached far enough inside the shoe to be hopefully more durable, and on the sides it continues to cover the seam of the original shoe edge and the buckle flaps, another part prone to fray in use.
At last I could also glue the ends of the back/side pieces down. I covered the seam with the end of the binding tape. 18th century shoes usually had an angled seam at the base of the buckle flaps, but I had resorted to the easier straight seam once again. It begins to appear later on the century too, though.
The braid coming on the top of the binding allowed me to reinforce the buckle flap base corner with a couple of heavy stitches. They also caught the end of the tape covering the seam inside the shoe.
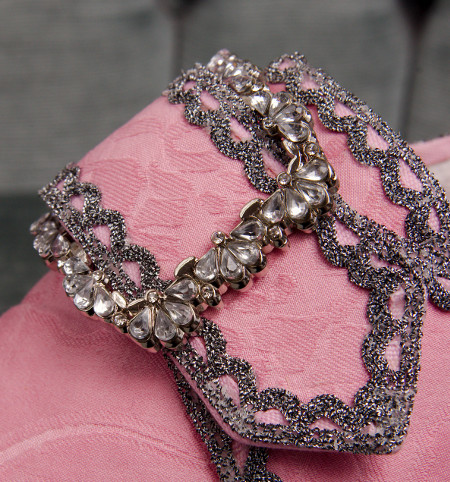
And then was the time to add some bling! I used hot glue for putting on the braid, working on tiny bits at a time to avoid the glue cooling. As you can see on the picture, the glue leaked through the lacy braid. I removed larger glue blobs with pins and sharp scissors. The shoes have the advantage of not being observed too close (usually), so I was not overly anxious by the remaining extra glue.
Otherways the braid was very nice to work with, as the looped edge followed the curves smoothly, and only had to be folded slightly on the ends of the buckle flaps.
The original black plastic outer soles did not look very convincing period-wise, and at some point I fancied replacing them with leather soles. On the other hand I did want to use the materials I already had (though I had already succumbed to buying the braid), and at least the plastic soles would be durable and save me the trouble of cutting them to shape, not counting the few tiny snips needed at the heel area. So, I glued the original soles back on, from the toe towards the back, consoling myself with the thought that they whould not show that much in use.
As the re-shaping the heel at the bottom had not worked out I was also able to bang the original heel tips back on. They were, like the soles too, in very good condition, almost not worn at all, so in a way it was kinda sensible not to replace them after all.
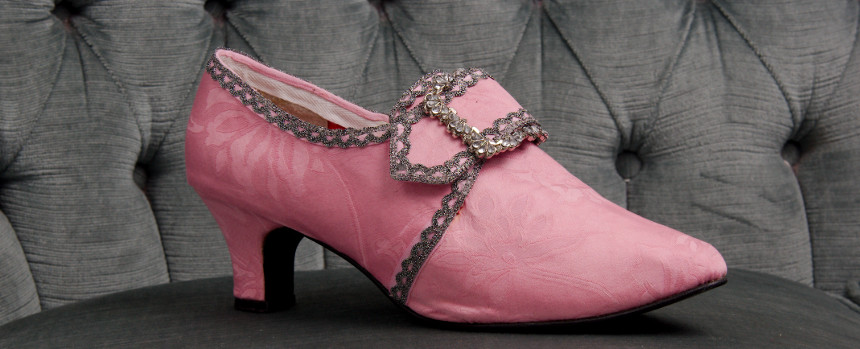
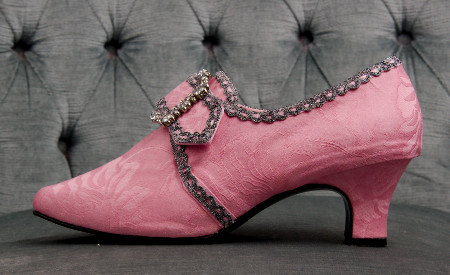
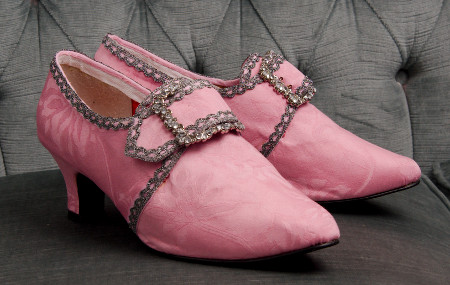
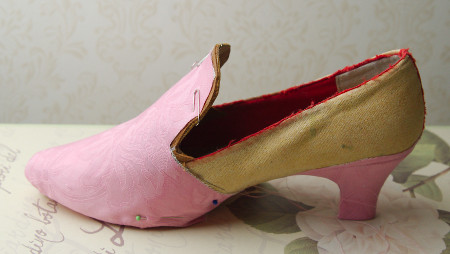
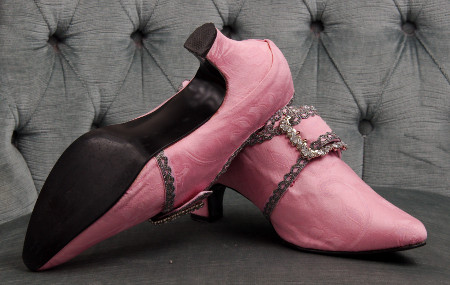
I'm fairly pleased with how the shoe project turned out. They are not perfect 18th century shoes, but nevertheless a very pretty pair of shoes at a very low cost. As you can see in the pictures, they have some imperfections: Some of the wrinkles at the sides were already there in the original shoes, but some others appeared at the top of the toe area after adding the new covering. Both the center back seam and the heel seam also stick out rather too much, and especially the latter breaks the smooth back curve of the shoe quite irritantingly. Let me still add, that the tongue should have originally been a bit longer.
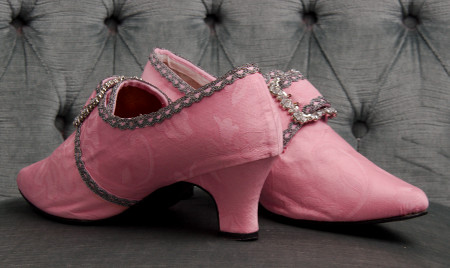
The metal braid may make the shoes a bit harder to match with many different garments, and they might have turned very pretty even without it. On the other hand the extra decoration catches the eye and diverts attention from the few tiny glue stains and the other stains that the shoes will probably get sooner or later.
To my great delight the shoes survived the first ball I wore them to, including a lot of dancing and also some quantity of wine, without any damage to the heel and all the braid still securely on.