Mules, 2012
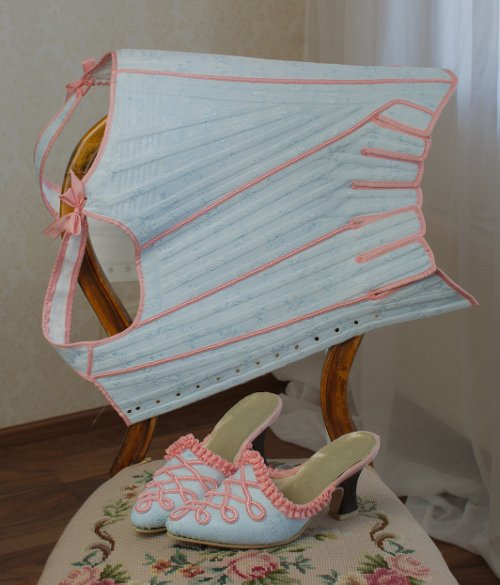
It is a truth universally acknowledged that when one makes or buys some new piece of apparel, several other purchases or handicraft projects "to wear with it" soon follow. Once I had finally finished a new, sorely needed pair of stays and began planning the photoshoot, it occurred to me that I absolutely needed a pair of pretty little mules. Of course they would have very little other use, but on the other hand a good opportunity to gain experience on shoe styling must not be wasted.
The methods I used are largely based on the excellent tutorial on Your Wardrobe Unlock'd by Loren Dearborn, which I also used on my first 18th century shoe project.

Details of La toilette (Boucher) (1742) and The Declaration of Love (Jean François de Troy) (1731). Wikimedia Commons
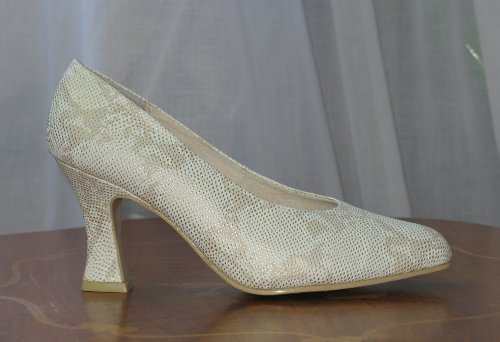
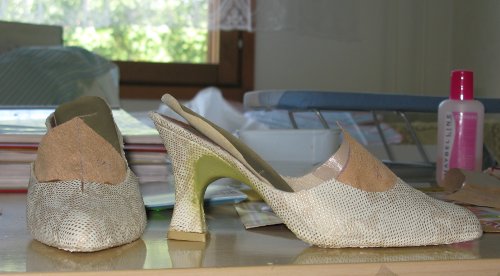
After some search I found a perfect base for the shoes: An almost unused pair of pumps with a narrow toe and a high Louis heel. They were an internet auction find, and even though I was a bit worried that they might be too small for me the shape was so great and the price dirt cheap that I decided to take the risk. I had been right, once they arrived I couldn't even get them on my feet. But I did not despair, as I reasoned that cutting the back off would fix that, as mules have to be a bit small anyway to stay on one's feet. I probably wouldn't use them much for actual walking anyway.
So, for the first thing I took heavy scissors and cut the back of the shoe off. I also cut a small slit at the front of the opening to get more room. I cut away the sides gradually until I was happy with the shape.
The shoes were assembled like the ones I used for my first re-styled shoes, which was another reason for choosing them. The sole piece continued on the underside of the heel, and was easily pried off with some steam and a screwdriver. This time I managed to rip the hole sole off which made things much easier. The heel tip was fixed much more soundly, but I managed to lift it a few millimeters.
One of the most characteristic elements of 18th century shoes is the louis heel. It's hard to come across on modern footwear. Heels that curve on the back and sides are around (mostly low and mid-high) but they usually lack the gently sloping lower curve of the true louis heel that continues long under the arch of the foot. I had for a long time toyed with the idea of padding the underside of a modern heel with some sort of paste, and this seemed to be the perfect project for experimenting with that.
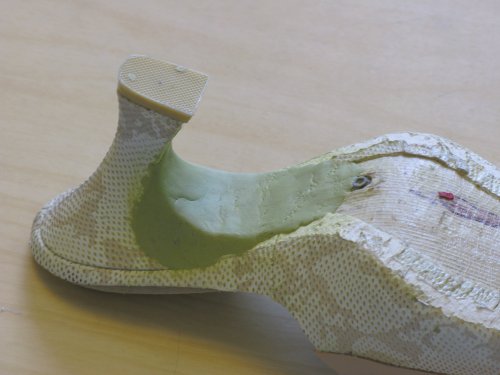
I used Milliput-epoxy putty, which was very easy to work with - even nostalgic, as I felt like a kid playing with plasticine. I was happy to find that it was a useful skill to acquire back then! I added the putty on small amounts of the underside of the heel and shaped it with my fingers. The left and right heel are not quite identical but as this was an experimental project I'm not going to be bothered by that.
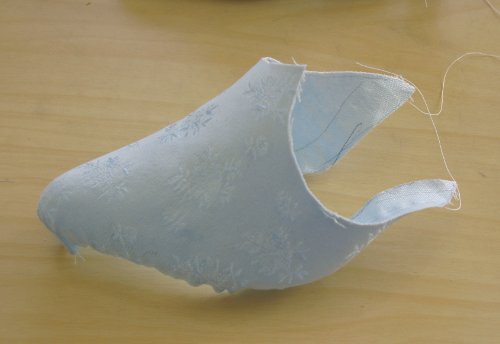
I left the heels to dry overnight and on the next day I attacked the toes. I cut a 1cm wide strip off the front opening to get rid of the stiff edge which might also show through the covering fabric. Now I could already get my feet in quite well. I draped the pattern for the missing center part of the opening with muslin and cut it doubled on thin leather. Then I glued a leather piece on both inside and outside leaving the original lowered opening between them.
I had shaped the leather a bit with steam to fit the curving shape on the top of the foot before gluing. With the altered heel and toe the shoes were beginning to get the period look.
As the shoes were intended to match the stays I naturally chose the same coutil (which I had plenty of left) cor covering material. I found out that apart from corsetry coutil is also an excellent shoe material, as it's sturdy but also molds to shape.
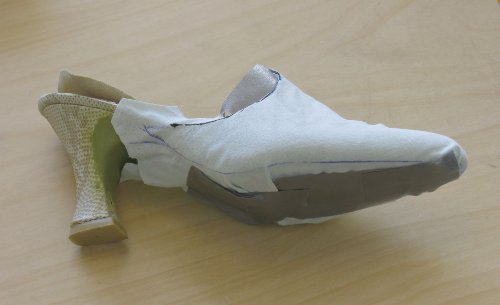
I draped the pattern for the toe with the help of muslin and tape and cut it with generous seam allowances. With my previous shoes I had just glued the fabric straight on the shoe, but this time I tried to shape it before gluing with good results.
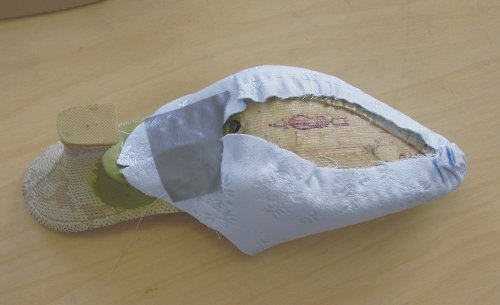
First of all, I cut the toe on bias to get more stretch, ans sewed a gathering thread a few millimeters outside the sole edge. I steamed and stretched the rising front edge to match the shape created with the leather pieces, and then placed the covering on the shoes, gathering the sides. Then I steamed and eased the fabric with my fingers until it molded quite smoothly over the shoe. This time I managed to get even the narrow toe quite smooth, though there remained a thick bunch of seam allowances on the underside. Working with the fabric covering was also made easier this time by the damask pattern of the coutil being to faint that I decided to ignore all matching when cutting.
For all the glueing I used Tixo-contact adhensive to which I had been introduced to on my first shoe project. After gluing the covering I carefully cut of some of the heaviest pleats on the gathered seam allowances, but lacked the courage to trim them more thoroughly in fear of raveling.
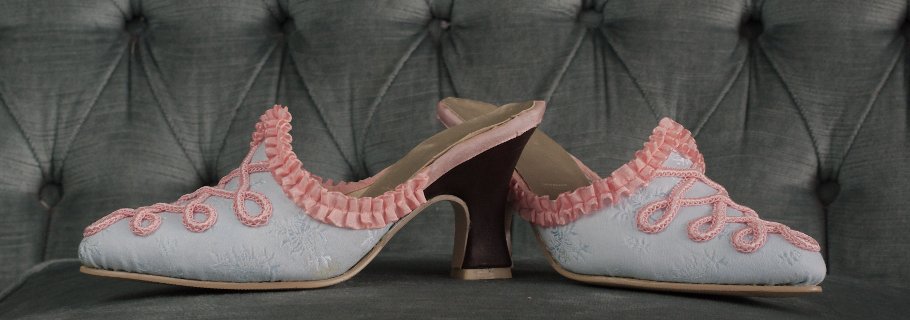
This time I covered the heel after the toe, reasoning that covering the fabric edge with the leather would be much better option than vice versa. I had first planned to make the heel light toned in keeping with the pastel palette, then I set my mind on extravagant red leather. Sadly the scraps of red leather I had planned to use proved to be too small for the altered heel when I began cutting, so I had to make do with what I found at home - it's so annoying to interrupt a good manic holiday handicrafts session to hunt for materials.
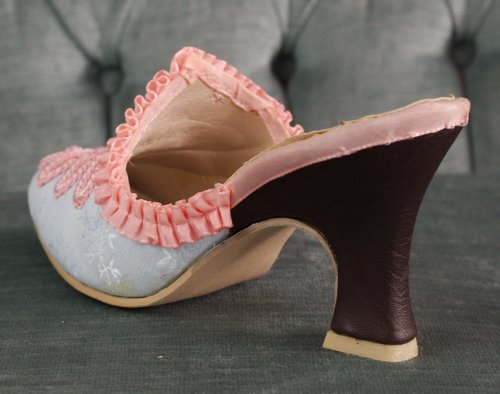
The most suitable thing I found on the stash was a bit heavier dark brown leather, which was, in the end, not bad that all - period mules often seemed to have a dark heel combined with a light fabric covering. Besides, it brings some contrast to the bright pastel shades of the toe and also balanced the overall look.
As the leather was a bit thicker I cut the pieces on the most stretchy parts I found. I also steamed and shaped them thoroughly before glueing. When I had applied the glue the leather became much more elastic, and I was able to ease it over the heel quite neatly. On the top of the heel I turned the edges over the sole edge, and on the bottom I turned them under the raised heel tip with the help of a screwdriver. It was hard work and I managed to scratch both the leather and my hands at places. While I was playing with the glue on the heels I had protected the fabric toes with plastic bags.
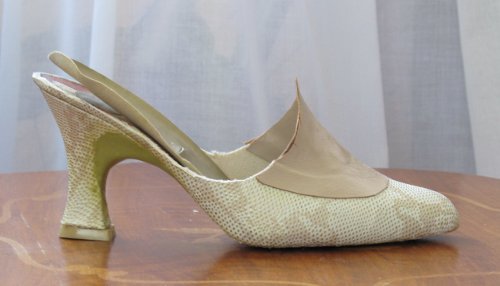
For the binding I used the same rose pink satin ribbon I had used in the stays. I had also used similar in my first shoes. Like then, the ribbon could not be neatly eased on curved edges now either. The front edge needed a binding, but on the afterthought I realized that the binding around the heel edge is both completely unnecessary and bland ugly. Compared to needle and thread glue is pleasantly fast but also impractically final.
Now was the time to finally glue the sole back on. First I tried it on, secured it with tape and pencilled the altered line of the heel. The excess would have been removed more neatly with a sharp knife, but I was too impatient to find one and used the scissors already close at hand. I glued the sole in several stages, first the toe, then the arch, last the heel. The re-shaped sole does not quite match at the heel, but maybe the next time I'll be better able to anticipate problems brought on by altering the heel shape and also work more carefully.
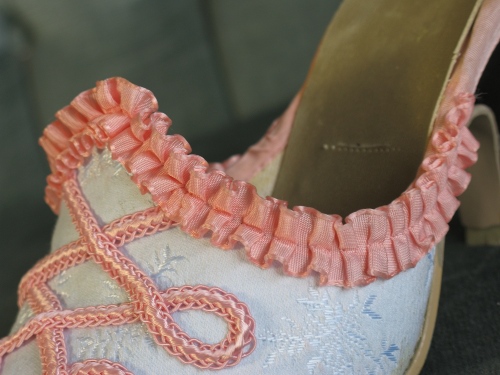
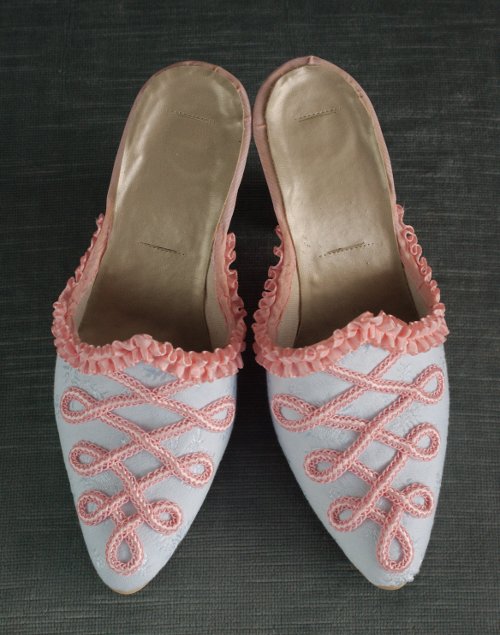
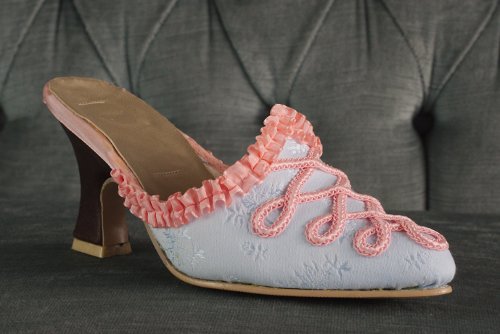
The wrinkled binding on the front edge annoyed me so much that I came up with the idea of covering it with a ribbon ruching. Though not common, I found a few extant examples of this kind of decoration to justify it. Ruching sewn though the edge would also secure the binding. First I tried gathering the ribbon, which looked stuffy, so I ripped it off and began anew, this time pleating it. Pleats looked slightly better.
When I had finished I realized that the pink ruching was kinda loud, and needed some other matching decoration on the toe to balance it. I had already given the decoration some thought before beginning the project. Embroidery would have been the period choice number one, but it should have been worked on the material before the covering, making matching more challenging, and besides I was not prepared to give the needed amount of time and effort for this particular project.

I had some of the braid I has used for covering the seams of the stays left, and I began to pin it over the toe trying on different patterns. It looked even more loud, and I had to face that my shoes had gone from delicate rococo elegance to the realm of burlesque. But I did not want to take off the ruching since it would leave needle holes and was also useful in covering the gaps on the sides, and it would simply not work alone. Thus I decided to make a cute pair of carnevale shoes instead and go with the braid.
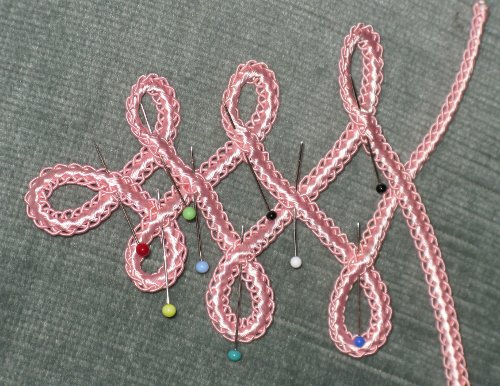
I pinned the braid on the shoe very lightly into a victorianesque looped design. Once it was more or less symmetrical I pinned the crossings and secured them with a few stitches. Then I pinned the rest of the braid on the top of the looped braid motif to create a copy for the other shoe. I finished the braid ends with small machine stitch and glue.
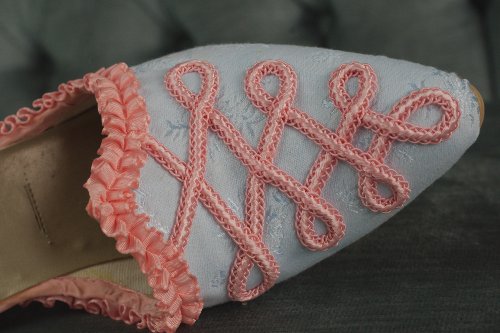
I placed the braid ornaments on top of the shoe and marked the places for crossings very lightly with a pencil. For attaching htem I used fabric glue which dries transparent unlike the yellow-tinted contact adhensive. The decoration hardly needs strong adhensive, and it would have been nearly impossible to apply glue on both surfaces and magically get them align perfectly with no stains. Thus I applied glue only on the braid save tiny drops on the crossing marks. I hid the ends under the ruching and secured them with a few stitches.
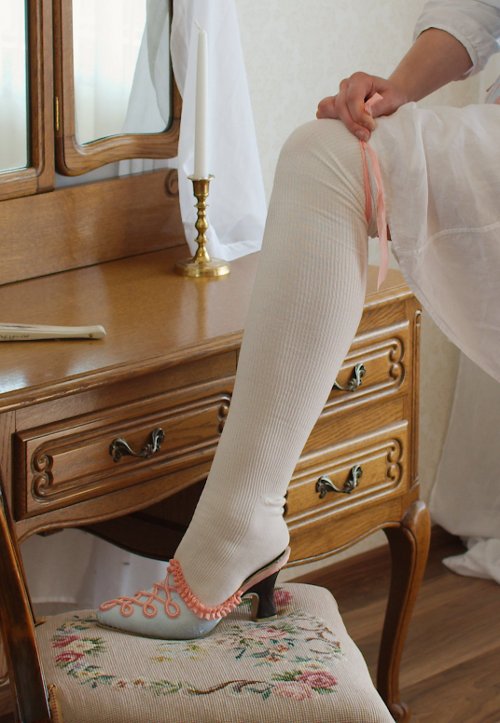
The final outcome of the shoe project is a bit different than I originally had in my mind. Actually I'm not quite sure whether the mules are adorable or horrible. Our dancing master quite fittingly described them as "candy porn". As I'm probably not going to use them in very serious re-enacting anyway they was as well be a little bit silly - and besides, they are far from being the only item of dubious historical accuracy in my 18th century closet. Anyway, I had a lot of fun making them, and learned quite a bit too.