
Robe
á la Anglaise, 2009
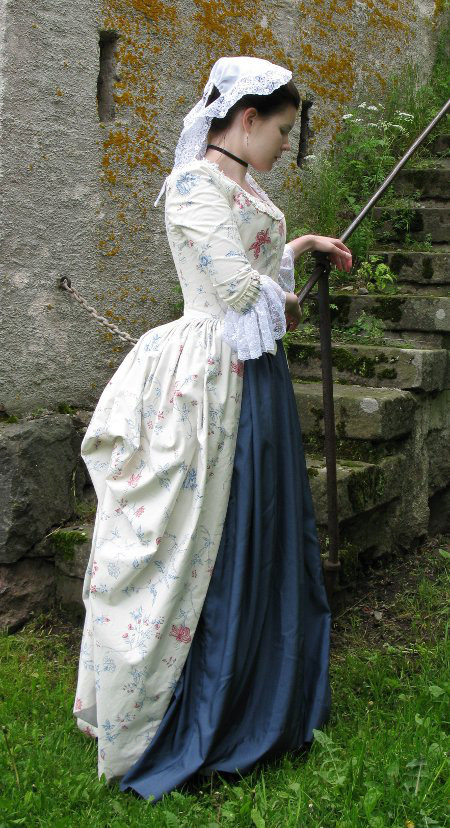
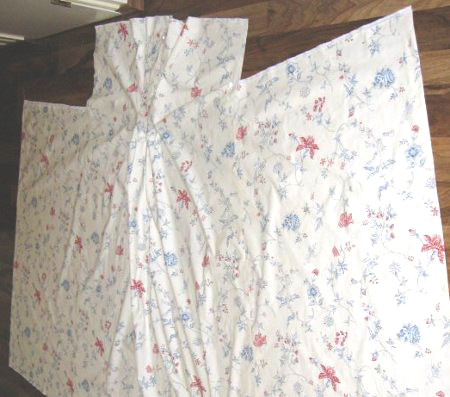
Of course my first historical costume was for a long time to be a Robe a la Francaise. Then I decided to practice with a shorter (and thus less fabric-consuming) Pet-en-l'air with a petticoat of different material. Some day I shall probably make one or the other or both, but when I found this printed cotton I knew almost at once that it was destined to become an Anglaise (even though it is probably designed for curtains). I happened to have some old blue fabric that matched the pattern color so well that I wanted to use it for the petticoat, even though a lighter colored petticoat might have been more authentic, not to mention the blatantly plastic material. On the other hand, inexpensive, not very light colored and machine-washable petticoats are quite sensible.
Before beginning the dress there was was the project of making all the necessary underwear. More about them can be found here (the stays) and here (the rest). The blue petticoat is constructed in the same simple fashion as the cotton under petticoat.
Drafting
the pattern
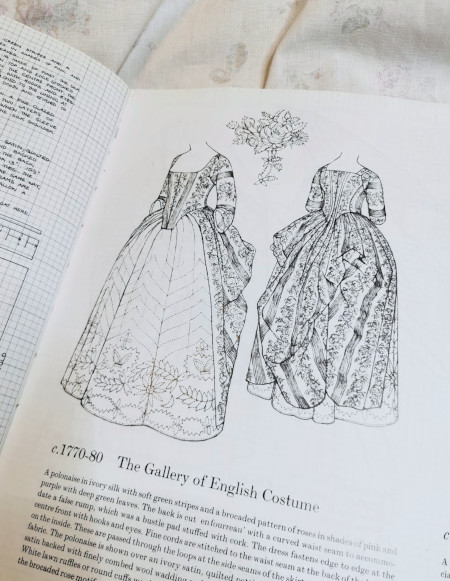
The pattern for the dress is for the largest part based on a polonaise in Janet Arnold's Pattern's of Fashion I, and of course my stays. The sleeve pattern fit almost without alteration.
The "en fourreau" back is pleated wider than in the book, following an earlier style, purely out of my whim because I thought it looked nicer. I also considered cutting the bodice separate all around in a later style, but there was something so fascinating in the "en fourreau"-cut that I just had to try it out. The term means, by the way, that the front of the bodice is cut separate, but the back from neck to skirt hem is cut in one piece. The material is pleated at the back to follow the figure closely, but nothing is cut off, and the pleats are stitched down to the lining.
After some planning I set to work with the pattern, equipped with my stays, dummy, bum-roll, petticoats, pattern books, mock up-fabric, pencil and paper. Eventually the pattern for the bodice lining emerged. In it I had marked the places for the back pleats (their placing I had tested on the dummy), lacking the courage to just pin the top fabric on it and somehow get all the pleats symmetrical... or not.
Sewing the dress
As the material was quite
thin, I decided to back it with bed sheet cotton at the
skirt/back piece. I joined the front skirt pieces with the
center back one, then I sewed the pleats in the places I had
marked from the wrong side - not quite the right way to do it,
but a safe one. I almost went mad trying to figure out how to
get the pattern look symmetrical when pleated, but I ended up
believing that would be impossible - which might even be the
case, as it's a draping material after all, not a clothing
one. Anyway, there is nothing more period than careful fabric
economy, and according to that I was quite right to cut so
that I could use the whole width of the fabric and not be too
choosy - never mind the pattern. The result is that the right
side of the center back has a lot of flowers and the left
almost none. With smaller pieces I made some more effort to
choose where I cut, as the red flowers are quite dominating,
but then the pleated pieces are very unevenly patterned again.
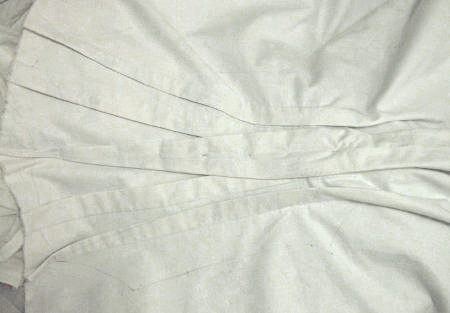
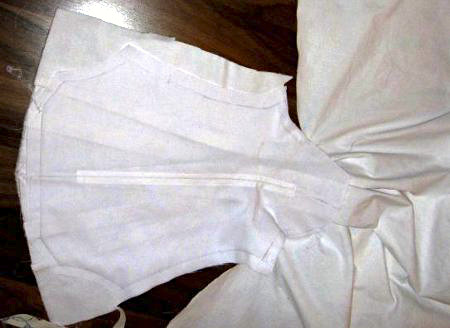
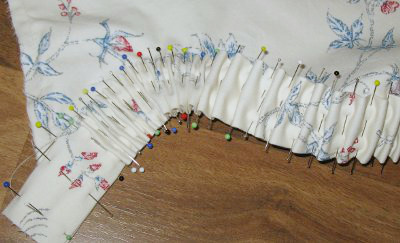
Anyway, back to the back pleats. In the picture you may be able to make out pencil lines marking the back piece edges. The pleats are ironed (and the large center one pinned down). The outermost pleat is not sewn all the way down, however, since the end of the side seam will be hidden under it - once again, originally all this was worked from the outside. Now I attached the back lining piece over the pleating, leaving the bottom of it open. In the photo you can see a boning channel, which I ended up not even using as the dress seemed fit well without the bones. Then I cut the extra material off, leaving a narrow seam allowance between the skirt part and the back bodice. It was rather scary, and I was worried about how it would work, but as the bodice edge goes up towards the side seam on a much sharper angle than the pleated skirt part, you can cut between them almost to where they join and still have enough seam allowance left.
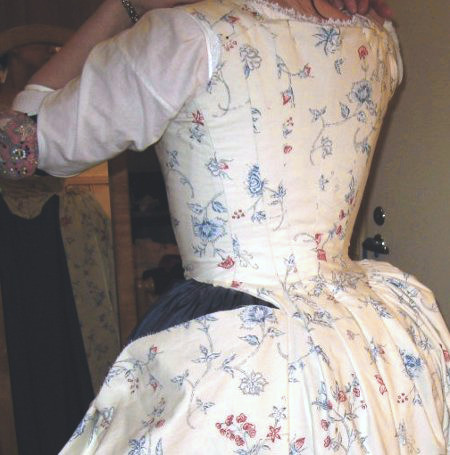
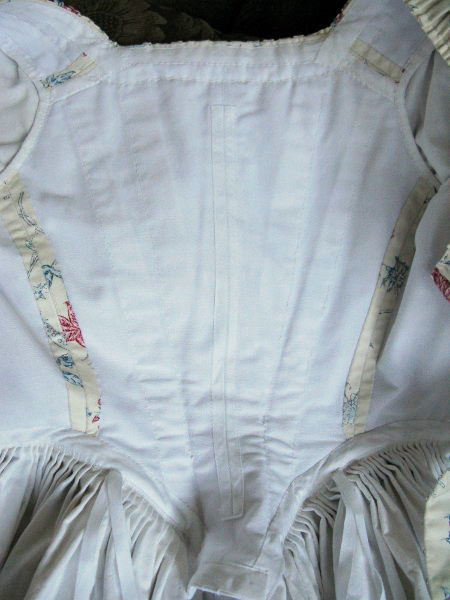
I put together the front piece lining and top fabric, and sewed a row of hooks and eyes at the front opening. Then I sewed the side seams and pleated the skirt to the bodice. In the picture the other side is finished, and to my relief it turned out very well. I tidied up the seam with bias tape, turning the lower edge of the bodice front with it too. Then I finished the back pleating by handstitching, in this case mostly decorative, disguising my modern shortcut in making them.
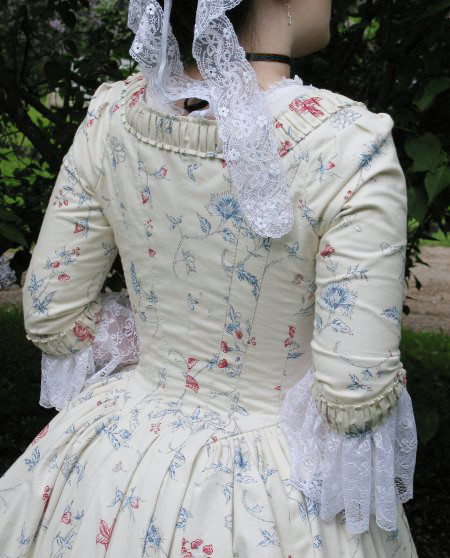
After careful fitting I attached the shoulder piece, and then finished the neckline with bias tape (not necessarily authentic but neat). As I didn't want the neckline to be too revealing (and being afraid the edge of stays might accidentally show), I left it somewhat higher than the stays. That of course meant that the neckline would not quite fit, the front piece being straight without any hint of a breast dart. Obviously a ribbon tunnel was the period solution, but as I was going to decorate the neckline with the pleated strips that might not work very well, so I gathered the bias-tape finished edge with tiny stitches on a strong thread - it helds at least so far. Perhaps the neckline ended up being even a bit too high, but at least I don't have to fear the stays (or anything else inappropriate) showing now.

Now it was the time to tackle the sleeve, which I had so far pushed entirely for the time I would have managed to put the bodice together. Between finishing the bodice and beginning the sleeve several months elapsed, as I was stricken with that mixture of getting fed up and/or lacking courage which often hits at some part of a large project. And as it often is, when you at last get back to the project, it's not that difficult after all. Well, I had had my doubts about the sleeve, since modern sleeves are sometimes tricky enough, so I thought that an 18th century one, which is slightly different, might be even harder. I began by enlarging the Arnold's book sleeve pattern, altering it very slightly to match my measurements and the bodice armhole, and to my happy surprise the mock up of this pattern worked almost perfectly at once, the only thing to do was to remove the few centimeters extra length I had added just in case.

Thus I proceeded to cut the sleeve. I lined it with cotton batiste, the same I had used in the chemise. To diminish bulk I made the elbow darts separate on the top fabric and lining before joining them. After the facing at the elbow the two layers are worked as one.
The patterned dress would have been pretty and appropriate even without trimmings, but still I wanted the characteristic pleated ruffles on the same material on the neckline and sleeves. The fabric, which I had thought thin before, felt stiff and heavy now, as I could not just cut scalloped edges on the strips but had to turn the edges to prevent fraying.
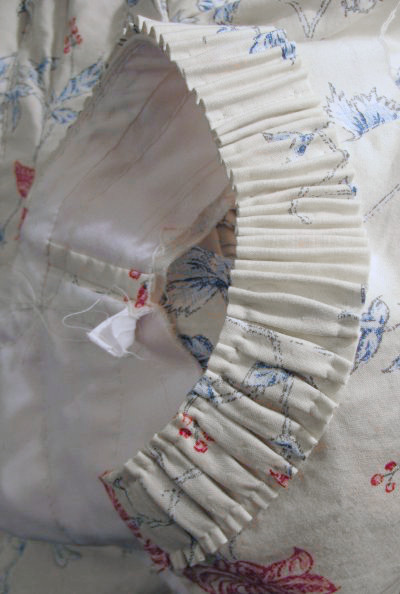
First I pinned the pleats evenly and attached them with one stitch between every pleat, then on the second round I stitched them down to form tiny box pleats. At first I thought the pleating might look too stiff (but was not going to rip it off after all the work nevertheless), but I ended up liking it, as it brings a nice geometrical touch to the fluffy floral dress and lacy accessories. It also makes the neckline look better fitting and balances it's proportions (as it could well be more revealing).
As the picture shows, I made most of the sleeve trimming while the sleeve was still open, as it went much easier at this point. Then I just fervently hoped that nothing drastic and mysterious had happened since the mock up fitting (these things sometimes do happen, as we know), but luckily the sleeve settled in it's place very nicely. The only problem was that the pleated strip made the elbow a bit tight and stiff, and on the first wearing I had problems in tucking the chemise sleeves under the dress sleeves. Luckily it gave away a little when worn, and now it's actually just tight enough to help preventing the chemise sleeves (which are quite long) from slipping down.
I am aware that many dresses at this period were not too fastidiously neat on the inside, but my occasionally emerging perfectionism got the better of me (as I was not in any hurry with finishing the dress yet either) and I thought that massive use of bias tape can't be such a sin when there is also half-polyester lining and machine seams involved. I had cut some of the bias tape myself, after all!
The final, massive lack of motivation often interrupts a project at pretty much the same phase. There is usually some comparatively small and easy thing left to finish, very often the hem. The hem was the case this time too. In my defense I must state that marking this particular hem demanded putting on several different undergarments, sweeping the floor and employing Jarno for help. At last I was impelled to get done with this great chore at the Wednesday of the week of the 18th century weekend at Suomenlinna. Despite my own faltering courage and overwhelming laziness a good luck had favored this project all along, and it didn't desert me now, and it turned out that the few guiding pins I had put on the hem before were actually pretty accurate. The long postponed event of cropping the hem and turning the edges was done amazingly fast in the end, as I managed to make most of the dress fabric and lining facing each other with a machine. Both cotton, when ironed they cling to each other perfectly.
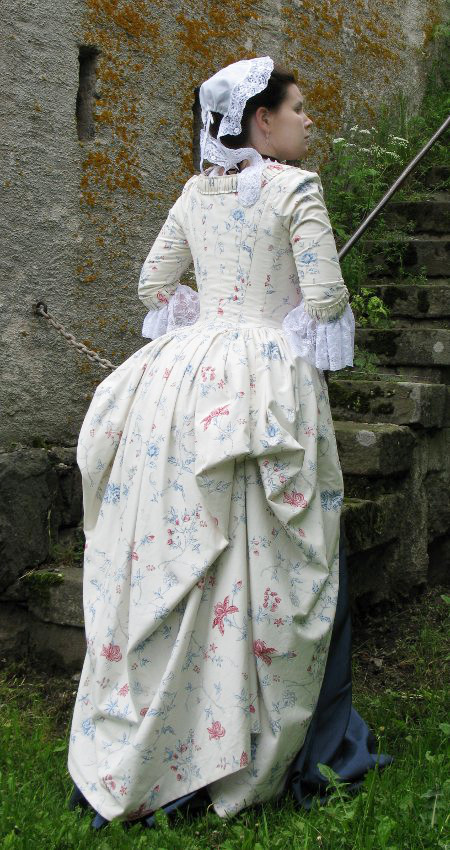
One of the ponderings I had entertained myself with was whether to wear the dress as a l'Anglaise or as a la Polonaise, as both have their charm. As the debut of the dress was to be an outdoor event, the Polonaise seemed a sensible option, as raising the hem even slightly above the ground would help in keeping it clean and intact. So for the last thing I added tapes on the side seams and loops on the waist. The result of this very simple device looked very pretty. Perhaps some day I may wear the skirt plain, too.
From the pictures taken at Suomenlinna I feel the need to mention that on both Saturday and Sunday I had dressed at the place in a hurry, and it shows a bit... The chemise in peeking out way too much both on the neckline and the elbows. Oh well. I also forgot to apply any sun protection, and thus the snow white bosom I had carefully preserved until now was soon rather blushed. I also got a funny tan line on my neck on the place of the ribbon! But then again, forgetting sun protection is a good old trick for getting a great weather, and in the end I'm rather happy that the heavy rain the forecast promised fell on the night.
Final
Thoughts
As I get quite carried away now I shall confess that this project has been very important for me personally. I have always (well, mostly) been rather sceptical about this popular heresy about one being able to accomplish anything if one only believes in his dreams and tries hard enough etc (just watch American Idol to find fine examples of this philosophy). Anyway, a dress something like this has been a dream of mine for a long time, and though I'm sure it's nowhere near a very good historical reproduction, I also know it could have turned out much worse. A few years ago I might not yet have been ready to make this dress, and I hope also to get much better and more experienced in the future. So, the aforementioned philosophy may to some extent be applied to making clothes: It's mostly about practice and experience, and when things go wrong you can always just silently bury the project gone awry with only the loss of material cost and some work.
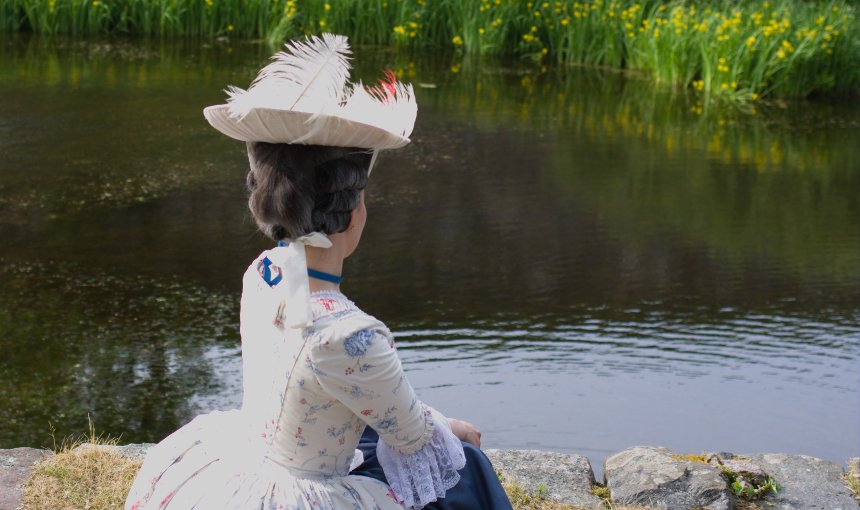
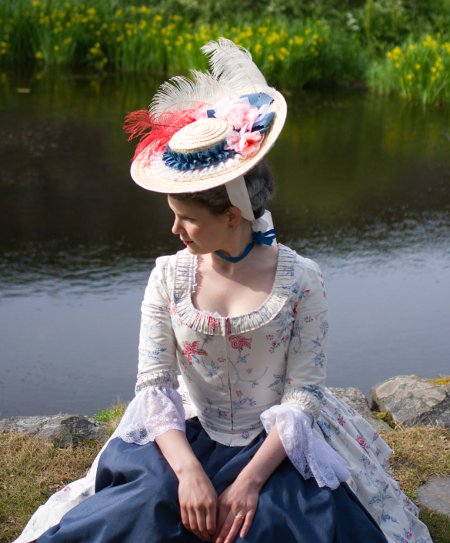
Some of the pictures are taken a ear or two later, when I already had a hat to wear with it.