
Stays, 2012
A pair of stays is the foundation of a lady's toilette, upon which lies much of her elegance. After some time and wear I realized that my first pair of stays was far from perfect when it came to fit. My second attempt at staymaking, the red silk ones turned out better, but both the material and the construction were too weak for tighter lacing. Nevertheless the latter project helped me to recognize some of the problems of my first stays and encouraged me to strive for better fitting stays.
I had decided long ago that I would not make one new dress until I had the new stays, but had kept putting them off and working on other things or 18th century clothes that I could wear with the red stays. Then finally on early 2012 I realized that I would have to get started with the stays if I wanted to have a new dress for the ball in September – a fancy ball dress was another thing that I had planned for such a long time. My goal was a well-fitting, back lacing pair of stays which could be laced quite tight, and which I would wear with my finer evening wear while the lighter red stays would continue to be worn with more relaxed day wear.
Targeting
my past mistakes
So, why exactly did my first pair of stays fit so badly?
First of all, I had based the pattern more on period examples with a tiny waist and wide chest than a realistic view of my figure. Stays are, of course, meant to shape the figure, but when one is almost 30 instead of 6 years old and only wears stays now and then it's hopelessly too late to shape your ribcage. Fat can be compressed more easily, but sadly I don't have much extra of that above my waistline. As a result the stays would not close at the waist but were too large on the top. I had fallen into the trap of inexperience in not wanting to compress my small bosom, but had not realized that no compression also means no cleavage. As the stays were also too large under my bust my bosom just sunk inside the stays which made the stays edge show through the outer garments.
The fitting issues were probably made even worse by my choise of steel boning, which might have worked better on tightly fitted stays, preferably also on a larger figure. I also lost a bit of weight, which also contributed to the problems. My corseted silhouette began to look less delicate than I would have wished, and ill fitting stays are not very comfortable either.
On my red stays, which I originally intended for more relaxed fancy dress use, I had added more room on the waist which made the back lacing close evenly, this alone causing a major difference in fit. On the front I made a wide front lacing over a separate stomacher, which gave much more room for adjustment. I also noticed that when I laced the stays more tightly under the bust, which was now possible, my bosom stopped from shrinking inside the stays. The period correct cone shape is hard to accomplish on a modern body with a naturally developed ribcage, though this of course varied from person to person. It might be easier for larger ladies with more soft tissue to replace, and a larger bosom to fill the top of the stays. In figuring out all this and finding solutions for my fitting issues I was immensely aided by the La Couturiere Parisienne article “fitting stays”.
So, I had managed to create a pleasing and also comfortable shape with the wide front lacing and a stomacher, now the question was how to get the desired fit on back lacing stays. Leafing through different pattern sources I noticed that at least by 1770's the stays developed a more curved shape, which can also be seen on fashion prints and paintings of the period. While the center front seam was usually straight, the side front seams could be very curved. As my next project would be a 1770's polonaise this kind of cut seemed appropriate.
Drafting
the pattern
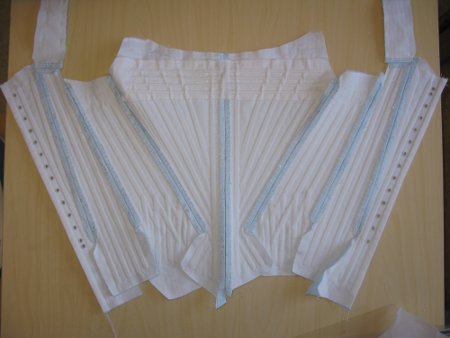
My main pattern sources were Norah Waugh's "The Cut of Women's Clothes 1600-1900" and they pair of stays in Kyoto Costume Institute's book "Fashion - A History from the 18th to the 20th Century". I was also inspired by this pair (Item T.909-1913) in Victoria & Albert Museum, and used it as a model for shaping and seam placement.
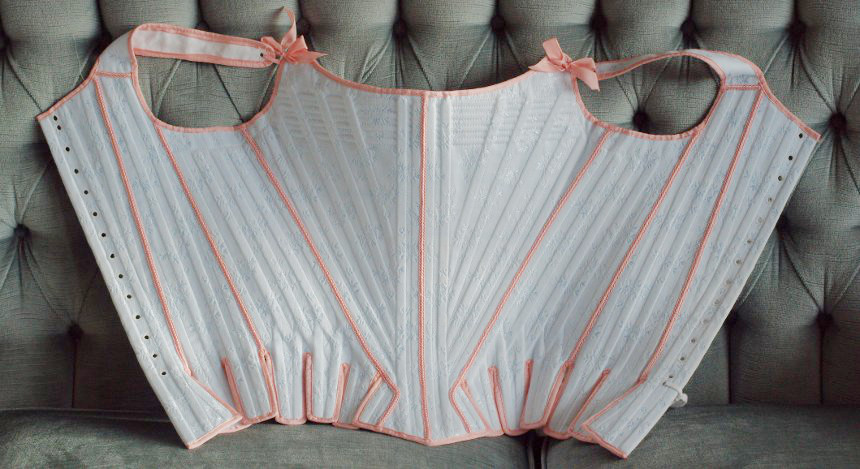
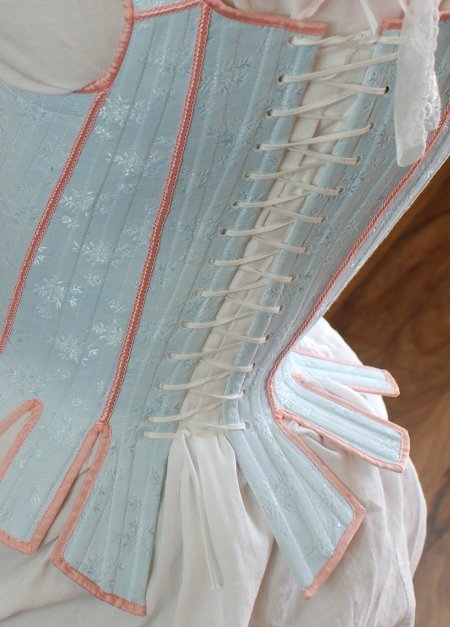
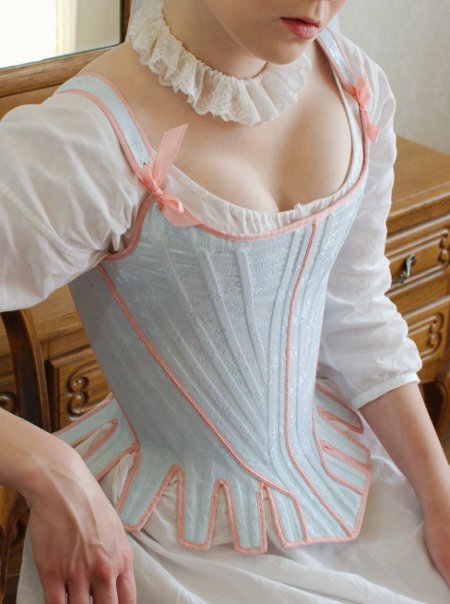
I began drafting the pattern based on a copy of the pattern for the red stays. First I measured the distance between front edges at every eyelet when the stays were laced to the desired shape. Then I drafted the new center front seam based on these measurements. This of course created quite a curved seam. I straightened it, leaving it curve out just 1cm at the top edge (Which is sometimes seen on period patterns, it's rare but not unheard of, “The Cut of Womens Clothes 1600-1900” has one pair with a curved front seam). The rest of the under bust shaping I moved to the side-front seam on the front piece according to period patterns.
To add further support for the bust I drafted the underarm higher. I carefully tested that it was not too high to cut into my arm, and left the boning channels end 3cm lower.
On the back I cut my former center back piece to two different pattern pieces like in the V&A stays. This made it possible to shape the seam between them slightly and add 0,5cm at the waist on both pieces. My former stays had sometimes pressed my lower back uncomfortably when laced very tight, and this helped a bit, along with making the stays close better at the bottom.
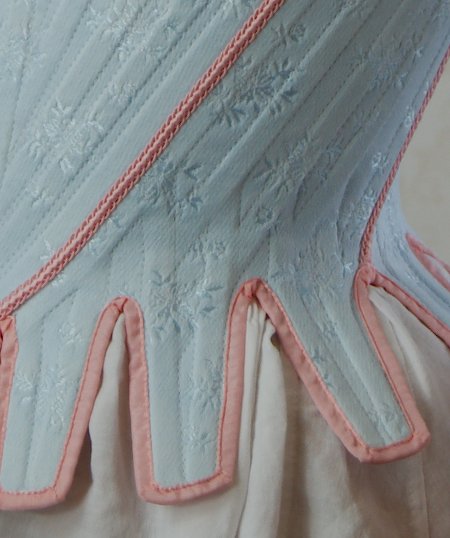
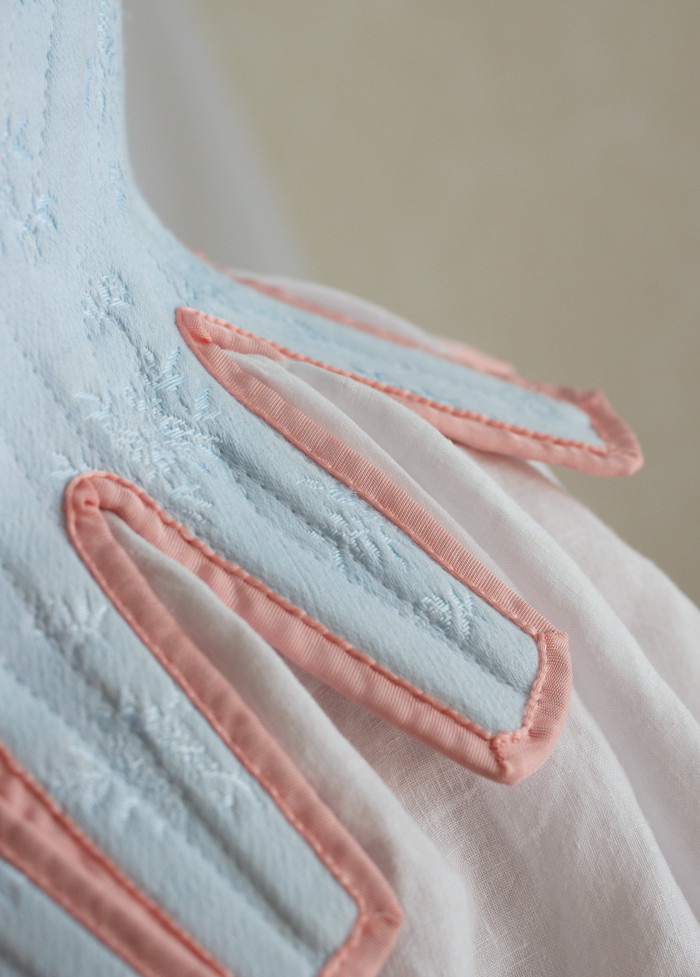
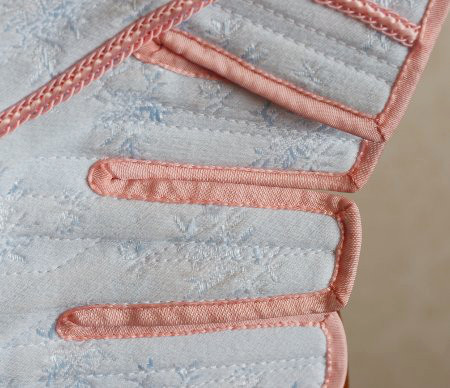
My well developed bottom tends to make the tabs open rather too much at the back, so this time I drew the last tab curve out at the bottom, which was again made possible by the extra side-back seam. I also split one tab of the side piece and added it to the new side back piece, again following the V&A stays, from which I also copied the shape of the lower edge at the front.'
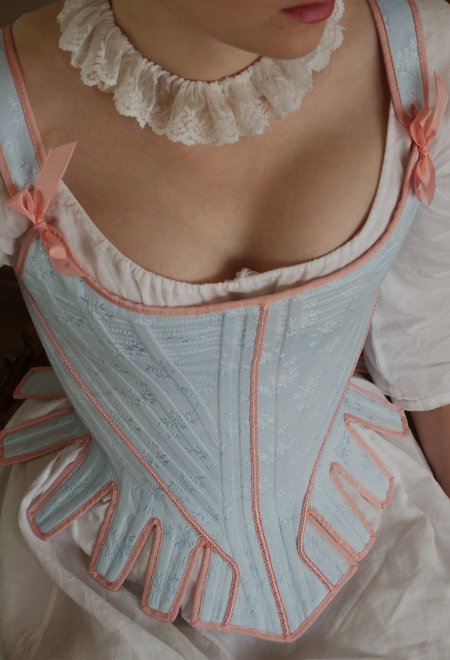
For the last thing I shortened the shoulder straps and made them 1cm narrower at the neckline to hide better under gowns with a wide neckline.
Planning
the boning channels
I had decided to try visible boning channels for change, so I had to plan their placement carefully already on the pattern drafting stage. For the boning I had chosen 8mm wide cable tie. It's more elastic than steel, and it's said that real whalebone was actually quite elastic and molded to shape in time. Actually I don't doubt this at all, since at least the tight curve at the waist where the stays hit the pelvis bones needs quite elastic boning, if the bones don't give in your stays just won't close as tight as they are supposed to. Anyway, this is my theory, people with more experience on different kinds of corsetry and boning probably have more insight on the subject.
Another good thing about cable tie is the low cost, which also plays a role with the amount of boning needed for even half-boned stays. It would have been more suitable for a period look in 5mm width, which I have also heard people use with success, but I somehow suspected it would be too elastic.
While I aimed for strong stays I did not feel I needed them to be fully boned. I tried to place the boning channels evenly whenever it was possible with a distance of one channel between them, though occasionally they were placed closer.
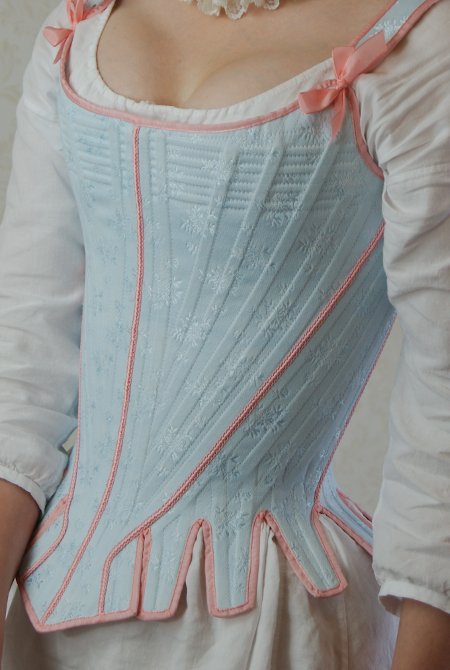
On both sides of the center front seam I placed two boning channels parallel to the seam. The side-front seam also got a boning channel next to it, and the rest began at the center front bones and opened fan-like towards the top edge like in my previous stays. On the sides of the spade-shaped lower edge I put a few short bones following the V&A stays. I the mock up version of my first stays I had included the horizontal bones at the bust area that were in the Butterick pattern I had used, but discarded them as they felt awkward and too much extra trouble at the time. Now I gave them another chance, and once again I had to admit that the 18th century staymakers knew what they were doing: Those horizontal bones support the bust and give the top of the stays a nice rounded shape. For these bones I used 5mm wide cable tie as they didn't have to be that strong but rather elastic.
The boning channels in the side pieces have always caused me some headaches. The short bones in the tabs have either made the tabs stick out too much or, even worse, digged in to my waist, so on my two previous stays I have left them out and just extended the main bones as far on the tabs as possible. La Couturiere Parisienne gives this method for half boned stays, and it's also used in the V&A stays. It is, however, not always possible to get the bones reach long enough into the tabs, and if the boning channels are set close to each other some of them will inevitably stop at the waist and may begin to chafe. In stays fully bones with thin, narrow boning it might work better. This time I first placed the boning like in fully boned stays, short bones on the tabs stopping where they cross the long bones, but the result looked awful and the breaks in the boning showed through visibly instead of creating a smooth waistline.
I wondered what to do, and was beginning to despair, when, just in time, my friend Sanna from Rococo Atelier published a blog entry of her new stays. She has extended the tab bones far into the side pieces so that they crossed with the long bones. After consulting her and googling for extant period pieces using this same boning layout I decided to try it on my mock up. I was super happy to find that it worked miraculously well.
On the back pieces I placed boning channels more or less evenly with the gap of about one channel width between them. The center back piece also has a few diagonal bones.
The
Materials
This time I decided to use coutil as the
base material. While it's not the most period correct option
I've come to prefer it in corsetry so much that I didn't really
even consider other options. I had actually bought a pretty pale
blue silk for the top material, but then I began to worry that
it might not be durable enough. Making a good pair of stays
takes so much time that I simply won't be able to make a new
pair every year. Thus I decided to save the silk for something
else and go for something more long-lasting. Belle Modeste
(where my base coutil also came from) also had a pretty
cotton-viscose mix coutil with a jaquard woven pattern of small
sprigs. As I was going to make visible boning channels using
coutil as the top layer would save me the trouble of one extra
layer too.
The jaquard coutil was only available in white, black and beige, the two last mentioned being naturally out of question (black might show through light colored garments and as for beige, I simply don't wear anything in beige, save pantyhose). White stays would be a bit boring, and they might also show more signs of wear and dirt than colored ones, so I decided to dye the coutil. As we all know, any color goes as long it's a shade of blue, and besides I had had satisfying results before with the Javana shade “arctic blue”. I'm not very experienced in the art of fabric dyeing, and was afraid to put the color pulver in my washing machine, and thus the result of dyeing a thick material on a bucket is not very even. As it's a light shade that doesn't show very badly, though. I was also obviously a bit tired or in a hurry while beginning the dyeing operation, as I realized only later that I had dyed all of the coutil, while I had originally ordered extra to be used later on other corset projects. Well, I do recollect a passing though of “how can there be so much of it?”, but I should have paid more heed to it... Anyway, luckily I like the color.

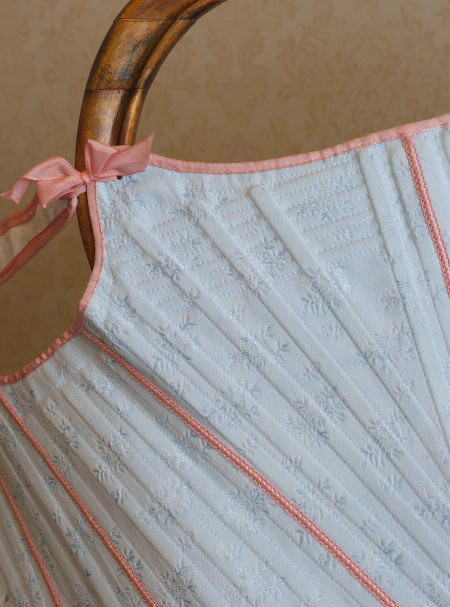
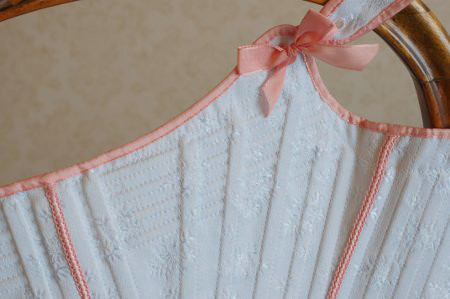
The innermost lining was to be in thin white linen. At first I had thought the binding should also be in white, but while it looks nice on the stays itself when worn with a white shift it somewhat looses the lovely effect of outlining the shape of the stays. While white (or some other neutral, light tone) is common in the period, a colored one would give a nicer visual effect.
After considering several options, even yellow (the extreme rarity in my wardrobe) I finally settled on a viscose taffeta ribbon in warm pink, decision which was cemented by the incredible luck of finding a perfectly matching braid for covering the seams.
Sewing the stays
After all the hassle with the pattern and planning boning channels I finally got to work on the real thing. I began by drawing the pattern outlines and matching points with pencil on the blue coutil. I pinned the base coutil underneath it, stitched the pattern edges and then cut the pieces separate with ample seam allowances. On the center back pieces I finished the back edges before marking the pieces. Then I began working on the boning channels.
Visible boning channels mean a lot more work than hidden ones, as I was soon to find out. The marking alone was quite a different matter. I could, of course, have pencilled the stitching lines on the underside of the base coutil, but as the stitch of my sewing machine is just neater on the top side no matter how much I adjust it I had to sew the channels from the right side. I did, however, use the handy pencil in marking the ends of the boning channels outside the pattern edges, so that they would work as guidelines when marking the lines in between.
First I tried chalk for the marking, but it would smear too easily for exact stitching lines. My next experiment was to draw lines with a pin, which left a faint trace on the satin surface. This technique proved much better, as the thin line was very sharp, and with some adjustment of my table light in different angles it was visible enough to follow. The one downside was that I got a bit too heavy handed at some point, which resulted in the satin threads of the pattern being broken at some places. Well, one learns.
I sincerely admire all of you who have accomplished the enormous task of making hand-sewn stays, I'm simply not up to it. Thus I stitched the boning channels by machine with a strong thread. I began with the easier back pieces and then moved on to the side and front pieces with more complicated boning channel design. As the bones cross on the side piece waist I stitched the boning channels to form a lattice, which meant I had to plan ahead and tie the thread ends on the underside to mimic hand sewn stitching. I also tied the threads on all the edges as well, as I didn't want any backing stitch to show and didn't trust the narrow binding to hold the stitching.
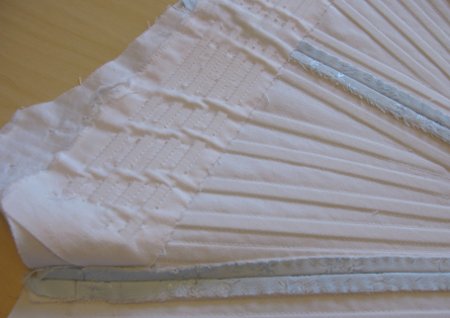
On the front pieces I stitched the vertical boning channels first. The challenging part was to get the top bones placed in a fan shape to match on both sides. I counted stitches on the vertical boning channels on the center front to get the points where they begin on the same level. When I had finished with the vertical boning channels I closed the center front seam and basted an extra layer of coutil on the underside of the top part of the front pieces. Then I stitched the horizontal boning channels on the bust area, stopping at the vertical channels. Thus I got a separate layer with its own boning channels for the horizontal bones.
This of course resulted in an insane amount of thread ends to knot, especially as the heavier thread refused to stay knotted unless you tied it several times. As I tend to get perfectionistic and paranoid every now and then I also threaded the ends between the coutil layers even though I was going to line the damn thing anyway. At this point I began seriously wonder whether machine stitching was so fast after all. For the last thing I sewed down the edges of the extra coutil layer.
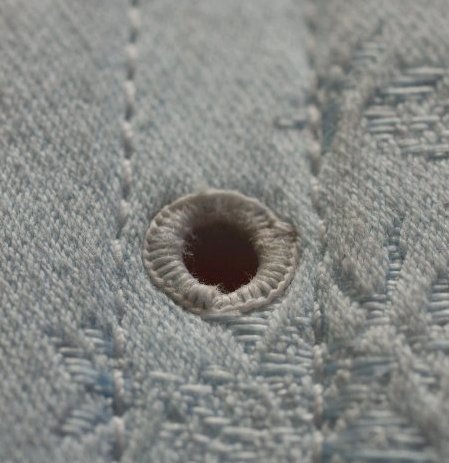
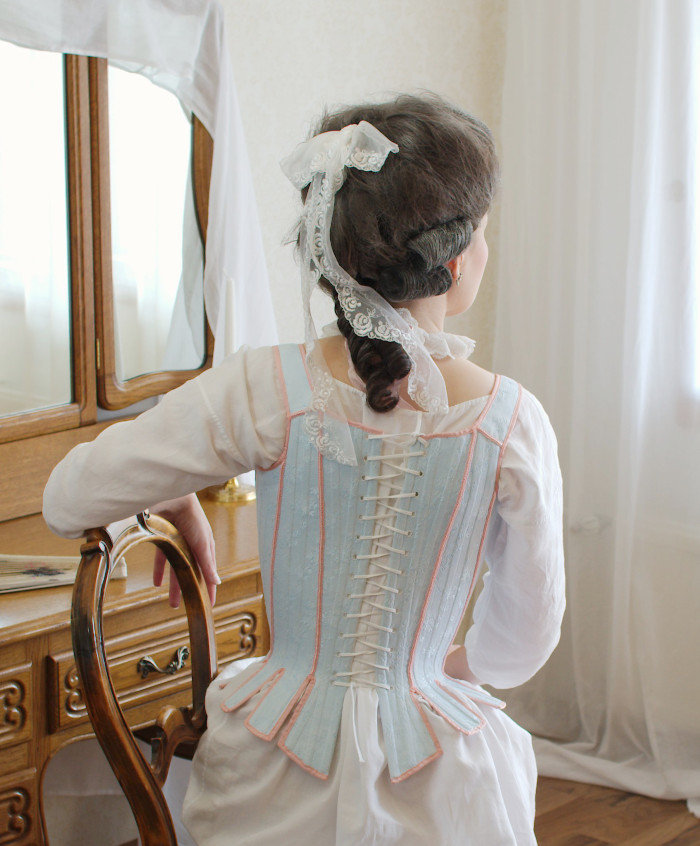
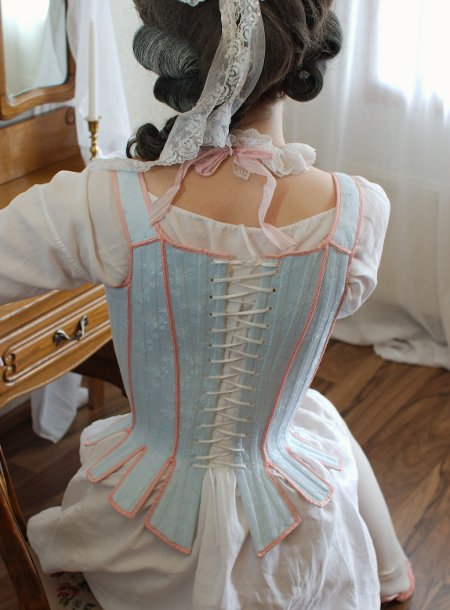
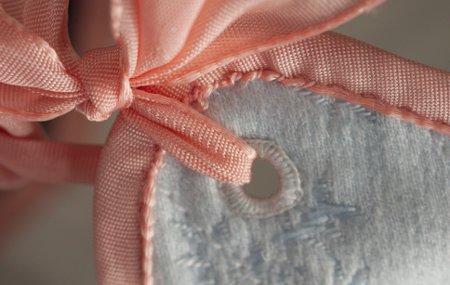
Back to the back pieces. Once they had boning channels I began working on the lacing holes, this time placing them quite correctly off set unlike in my previous stays. Though coutil is sturdy, the weave opened well with an awl and I was able to get neat, round, sturdy lacing holes large enough for easy threading, which is important when you have to thread the lace every single time you put on the stays.
Having now finished the boning channels and lacing I joined the pieces, still leaving ample allowance on top- and bottom edges. I pressed the seam allowances open and sewed them down.

Another trick I learned from Sanna-Mari was to join cable ties on their thin ends, which solves the problem of finding long enough bones for the back pieces. I also used then thin ends on the side piece waist where they cross to avoid bulkiness. I filed all the bone ends rounded. As usual, no matter how careful I had tried to be when sewing the channels some ended up a bit too wide and others too narrow. Happily my practical husband had once, when I was battling with some very stubborn boning revealed to me that there is a thing called silicone stick, which has proved immensely helpful ever since.
As the stays rose high on the underarm I sewed an additional stitching to close the boning channels about 3cm lower to prevent them from chafing. I toyed with the idea of decorative zig zag stitching design between the front piece boning channels, but decided to forget it as it wouldn't probably create the right look with this wide boning channels.
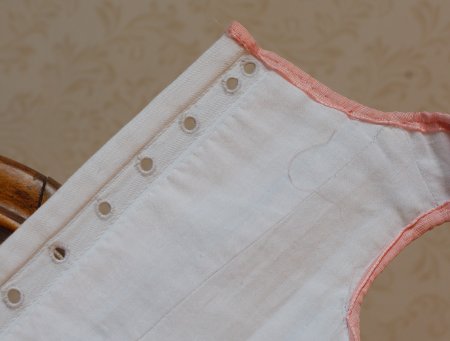
I cut and assembled the linen lining and attached it 3cm from the center back so that the part with previously worked eyelets was left unlined. Then I stitched the lining on the top and bottom edges, and finally cut the tabs separate, reinforcing the end of the slits between them with some additional stitching.
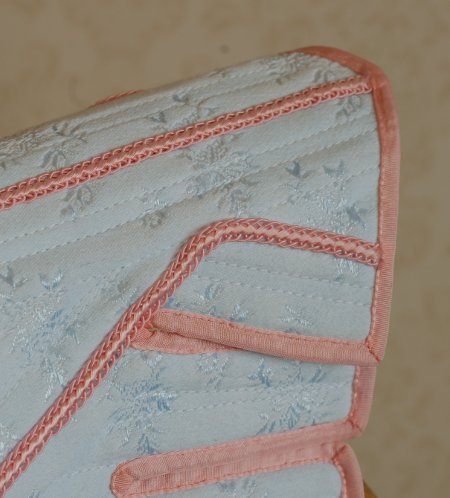
I was surprised at how much time it actually took me to cover the few short seams with the braid, as it was one of the few things I had imagined to be fast and easy on this project. I wasn't too anxious to do it again any time soon so I couldn't take shortcuts about it either. The braid was also very eager to ravel at ends, so I had to secure them with some heavy-duty machine stitching. Another thing I learned with the braid covered seams is that as the braid makes the seams a decorative element (even though their purpose seems to have been originally functional), it's worth the trouble checking at an early stage that the seams are attractively shaped. In this case my side-front seam was far from ideal with the sharp corner at the waist.
And then there was the edging. I began, as usual with the bottom edge, and reinforced it with blanket stitching before binding. As my binding was this time period correct non-bias ribbon it was much harder to work with than I had been used to. Finally, after the colossal effort of finishing the bottom edge and cutting the top edge to shape I was able to try the stays on.
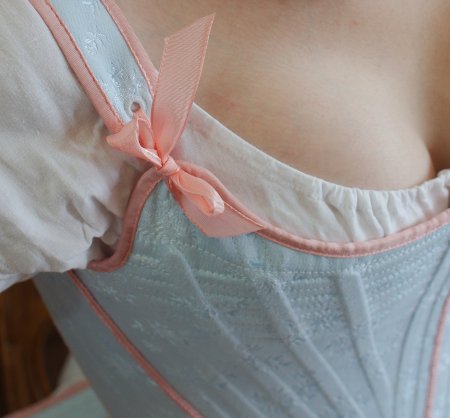
To my relief they looked very promising. The lacing gap at the back was quite wide, but it's always preferable to the vice versa option. The shoulder straps were also still too long, and easy thing to fix though I had unfortunately already made lacing holes in them. Binding the top edge of stays is usually relaxing after the bottom edge, but this time it brought on almost equal number of rude words. The non-elastic ribbon had to be pinned tight to get it neatly, and in spite of all my efforts it still looks wrinkled at places.
Conclusion
The stays required, in the end, considerably more work than I had thought. Especially the extra work caused by the visible boning channels was bit of a surprise. Luckily I didn't have a tight deadline, so I didn't have to panic at any point. I had recently been mostly employed with relatively simple stuff so it was refreshing to make something that forced me to learn new things. The time consuming but relatively easy parts on the other hand were made less tedious by audio books and dvd's. I think, however, that I won't be making another pair with visible boning channels for some time, as it's just so much more time-economical to throw a pretty top material to cover pencilled, machine stitched, possibly not totally matching and even boning channels.
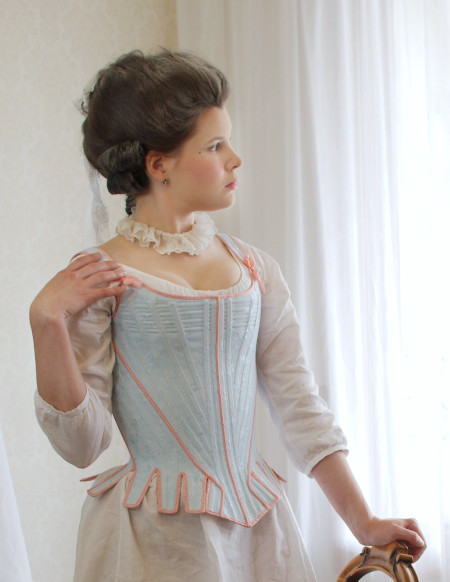
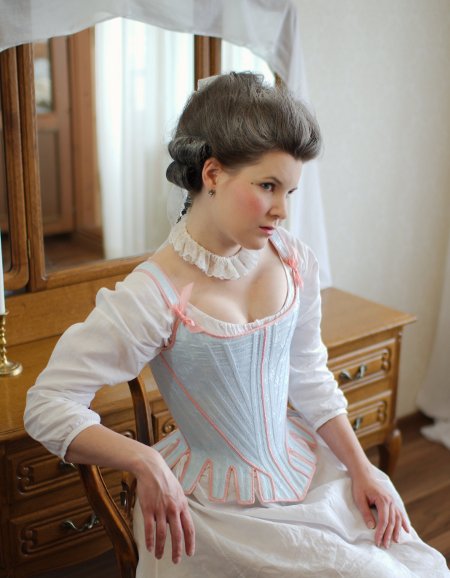
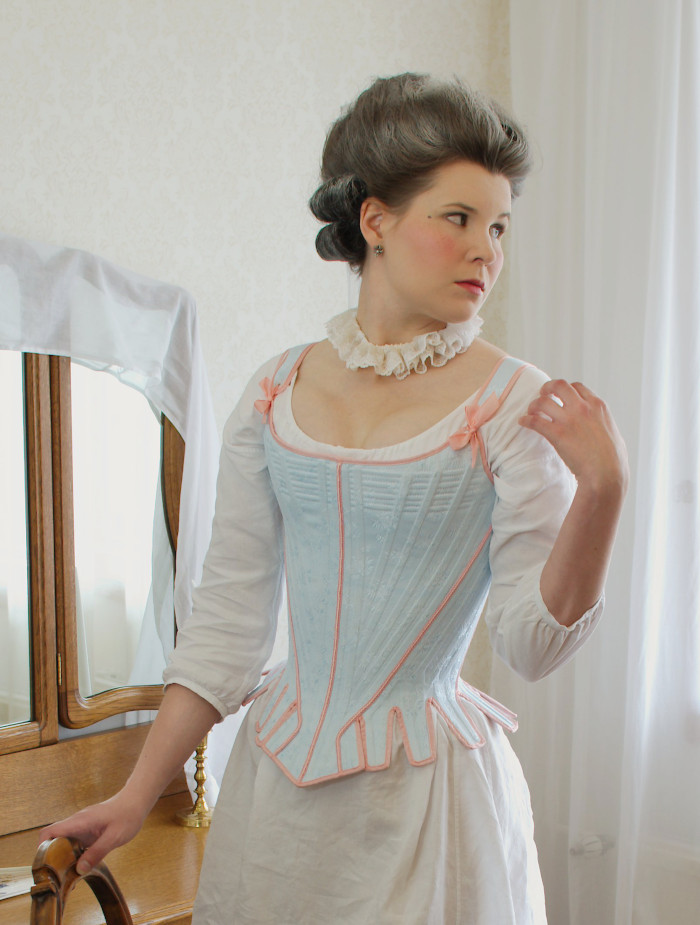
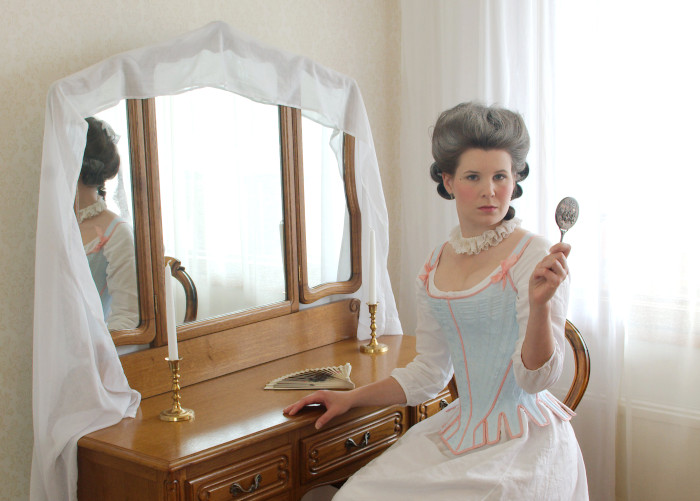
The finished stays have pretty good fit, which was my main aim in making a new pair. Despite the changes I made on the pattern they still don't have a very curved silhouette, but that's mostly due to my slender torso. In the pictures it's laced quite tight, which also adds to the flattening effect, but then again it's quite period. Even while tightly laced the back edges still have a nice gap, so even if the stays stretch a bit in use they are not likely to get too large.
did consider whether I should have added some steel boning in the front, as the bottom edge tends to curve out more than it really should for a period correct silhouette. On the other hand it's much more comfortable to wear now, and one of the problems of the metal boned stays were that I simply couldn't lace them tight enough at waist as the boning didn't give in to accommodate my belly. It would of course be nice some time to make a gorgeous outfit with ultra-tight period fit, but as I only wear stays now and then and also want to eat and dance in them I have to compromise between the look and the comfort. The voluminous skirts usually help to disguise abdomen too.
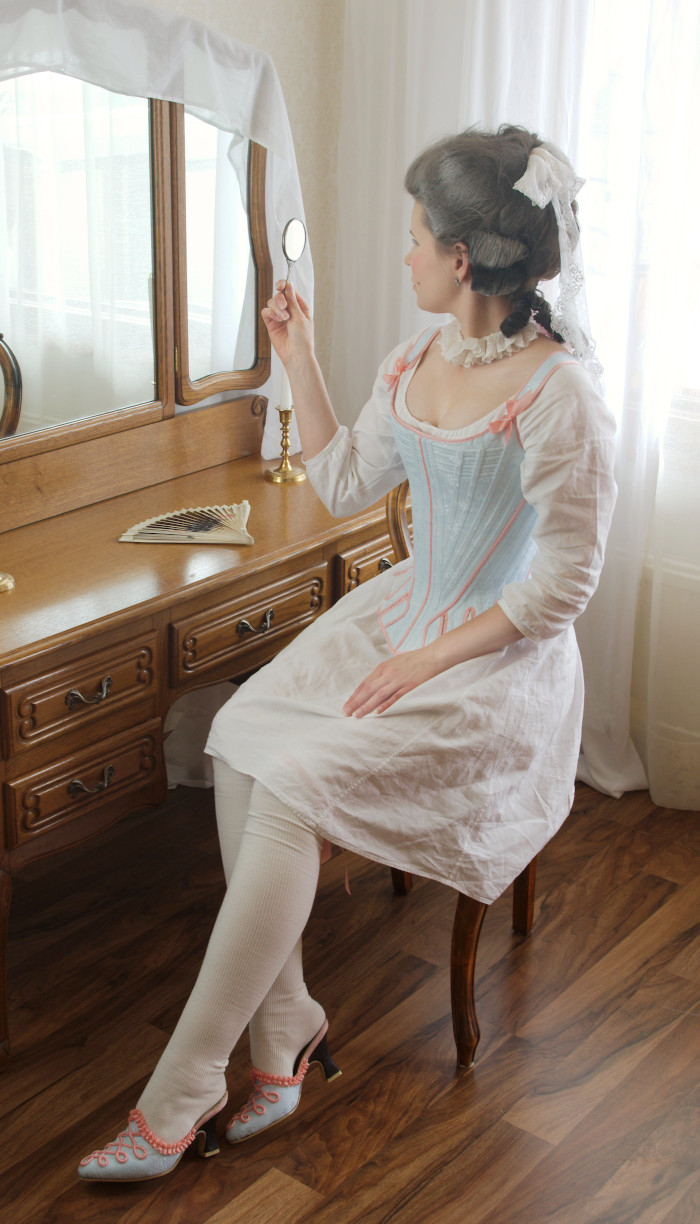
Visually the stays turned out very pretty. The boning channels are, as I have already stated, way too wide for a proper reproduction, but work more as an modern interpretation of the real thing. The color combo creates a delightful, candy toned, slightly theatrical rococo effect. Warm, almost peachy pink is not quite my shade but works in small quantities in the edging. I'm quite ready to admit that this is one of the many garments in my closet somewhat inspired by Sofia Coppola's Marie Antoinette, with which I have a guilty pleasure kind of relationship even though every time I see it I become more conscious of the artistic liberties taken in the costuming.
At the moment I am very pleased with the stays, time will tell how they possibly mold in use and take wear.