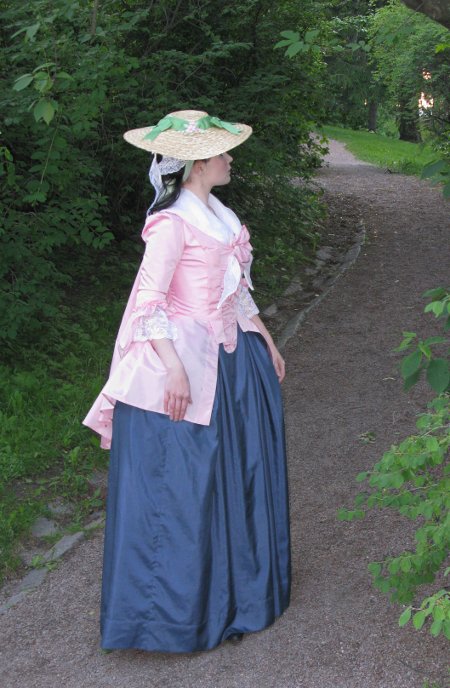
Pet en l'air is cute, practical and economical as it doesn't take very much material. On outdoor events it can be worn with an easily washable skirt. It's also good training for making a full length sack dress. All very good reasons to choose it for my next 18th century dress after the Robe a la Anglaise.
I already had a blue skirt, so I wanted something to go with it, and being one of my favorite colors pink was a strong candidate. I happened to make a short trip to Tallinn on my summer holiday, and as a friend gave me a good list of fabric stores I went through them with this project on my mind among others. I even happened to find an amazingly beautiful pink silk satin, but naturally it was costly too. I might have been able to put that sum into a pet-en-l'air-sized piece, but whether I would ever have the courage to cut it is another matter. The mental strain of cutting Jarno's 18th century coat fresh in my mind at the moment I decided to continue to search for something more affordable and thus less frightening to work with. Dupioni might do, being cheaper but still not very cheap, but as it's not the authentic choise either I began to consider some blatantly plastic alternative.
The last shop of my tour offered a pleasant sight for my fatigued eyes: A delightfully pink taffeta which looked just like something out of Coppola's Marie Antoinette and just screamed "candy". My inner period voice of course hissed that it was a tad too pink and, oh the horror, acetate. But then again, it was irresistibly cute (not to mention cheap), and inspired visions of almost comically pretty pink outfit, partly as a tribute to that not-always-period-correct but enchantingly beautiful movie.
So, I had the material which I was very excited about, but I still had Jarno's coat to make, followed by other stuff and then just laziness almost to the point of hibernation. Every now and then I sneaked to the closet to admire the taffeta, as the color alone cheered me up. At last, on February or so, I began working on it. The first thing was to finish at last the pocket hoops I would need with it.
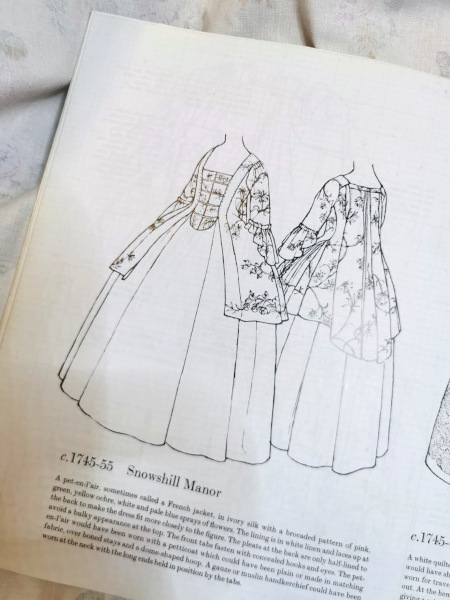
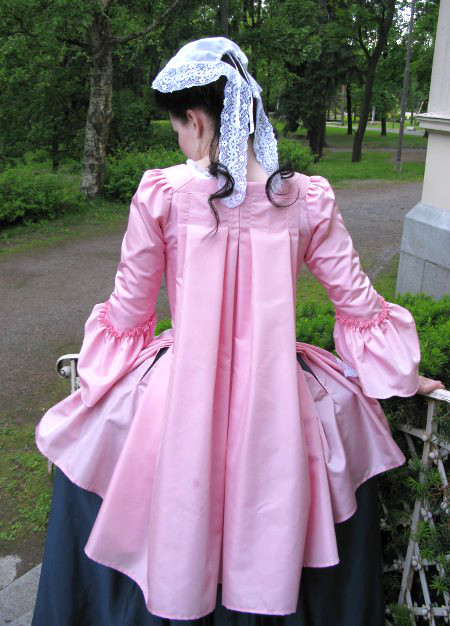
My chief pattern source was Janet Arnold's "Patterns of Fashion I", which feautures a pet en l'air dated c 1745-1755. This pet en l'air has slightly shallower back pleats than usually seen in sack dresses though they looks identical from the outside. My guess would be that a short dress doesn't need as much fullness to fall gracefully. For my pet I copied the the length, the back pleats and side pleats, adding only one extra pleat on the side seam on the front hem piece to get more room for my pocket hoops. The shape of the sleeve flounce is also copied from the book.
The pattern for the back lining (into which the taffeta is pleated) comes from my polonaise, as does the base of the front lining which got it's final shape after fittings. On the front of the pet I took a step out of Arnold's original pattern, as I wanted a waist seam on the front to get a tighter fit. The place and shape of waist seam is also determined by fitting. Instead of the flaps which close with hooks and eyes in the original I also wanted a pinned stomacher, pattern for which was sketched on a piece of muslin I had pinned on my stays. The sleeves are combination of the polonaise sleeve and various patterns from Arnold's book and Waugh's "The cut of women's clothes 1600-1900".
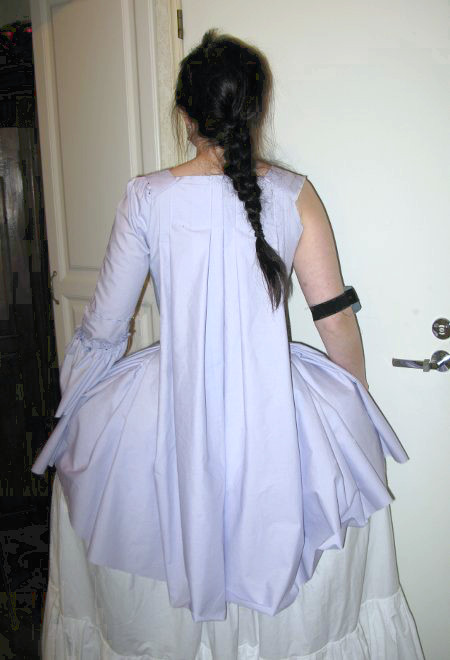
The mock up for the lining was followed by the test run for the whole thing. I was happy to find that everything seemed to work rather well, the sleeve head remained a bit obscure but I happily decided to determine the exact shape later. The front pleats created an awkward curve on the edge of the stays, but after pondering about it I came into the conclusion that it must be to some extent inevitable unless you cut them separately from the front egdes and shape them to curve. What puzzles me, though, is that you seldom see this phenomenom in portraits. Anyway, I deciced to live with them and pin them down.
My other dilemma at this point was what to do with the lower ends of the front pleats. Once again I noticed that even though you imagine having done your research and know what you are doing, odd questions have a habit of emerging as you go. Often the ends of the pleats seem to be sewn down on the front edges of the skirt and covered with trimming, but sometimes you see them just bluntly ending - like in this reproduction. Just like in my pet en l'air, the skirt opens so wide at the front that the pleat ends wouldn't even lie smoothly if sewed down to the edges. Thus I decided to follow this example. It means, though, that when I some day begin my first sack dress I still have some problems to solve.
Some muttered curses followed, and for a moment I considered searching for another material, but then again I was quite excited about the project, still liked the way the taffeta looked and thus finally decided to continue. At least I would learn from this project. So I cut the pet, trying to avoid stained spots, only to notice when I was finished that there had been a large stain on the other side on the front skirt. I put the whole piece in a bucket and lifted it to dry, careful not to crease it. The stains magically dissapeared, but washing the finished garment without ending up with any creases might be another matter. But as I had already cut the thing I might as well continue working on it, though I was beginning to have grave doubts.
I had even originally planned to use some shortcuts in the construction, considering this as a kind of test run for a real sack dress, and my problems with the material made it seem even a better idea. According to this plan I also skipped buying a new white lining material, and used the grey one I happened to have home - it wouldn't even really show, I thought. It was, by they way, the same cotton-polyester blend I had used for my polonaise.
Somewhere at the early stages of the project I also hemmed the sleeve flounces. I'm rather skeptical about the durability of the period correct pinked edges, especially at sleeves which brush against the skirts all the time, so I chose to narrowly hem them instead - also keeping in mind that I might have to be washing this one all the time. Besides, small parts like this aren't too painful to hem because you can easily carry them around with you and work on them a few moments now and then.
Let us return
to the main piece... after finishing the hem and the pocket
slits it was time to pin the back pleats. I had already had good
practise with the mock up and marked the pleats on the pattern,
so it shouldn't have been very hard - only it happened, that I
realised another problem with the taffeta I had not anticipated,
namely that it was so thin that the contrast between white tape
on the boning channels and the grey lining could be seen through
quite clearly. Well, they are covered by the pleats, but how
about the white lining in the sleeves with the grey lining in
the bodice? Or the dark blue petticoat for that matter?

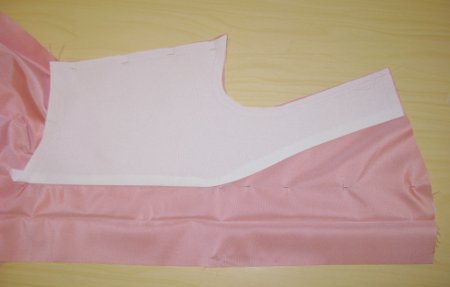
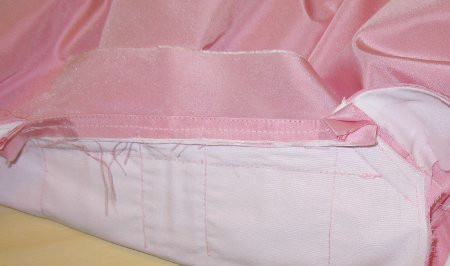
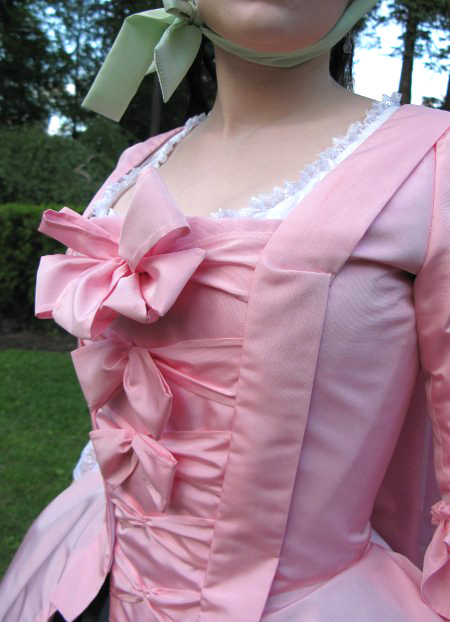
Next I made the front waist seam and began to mount the taffeta on the front bodice lining, following the tutorial on La Couturiere Parisienne. The straight part of the front edge seam is machine sewn, the curved upper part I sewed by hand. When the front edge seam was finished I pinned and basted the taffeta on the lining on the side seam and armhole, which left a fold of extra material on the top part as you can see in the picture. I pinned that into a dart close to the edge, and sewed it by hand - when sewing a lot by hand anyway this is actually quite easy compared to drawing this big shaped dart in the pattern like you would do in a modern garment.
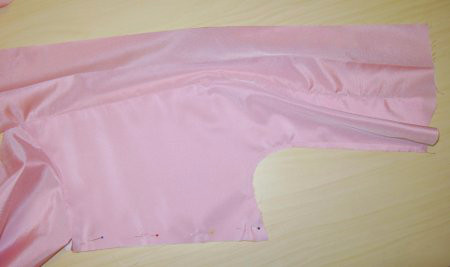
In the picture the fold on the front pleat is already ironed, next thing was to turn the edge and sew it on the the edge. In theory you could, of course, sew the pleat and the front edge on the lining edge with a machine on a single seam, turning the edges inside the bodice (a technique I used in my mock up version), but on the other hand this period method gives you some room for adjusting stuff if all the pieces are not super precicely cut or the material is tricky. And as the seams are short, it doesn't really take that much time. Of course, time consumption is not really that important when you are sewing just for the fun of it (especially with a good audio book) and not for profit...
At this point I tried the Pet en l'air on. I pinned the side pleats on one side and closed the shoulder seams - as my mock up had fitted to well I skipped the precaution to pin them first. Fortunately the shoulder line was still fine, and the whole thing was so very pretty that my slightly dampened enthusiams for it returned. To my pleasant surprise the skirts did not look as transparent over the darker petticoat as I had feared.
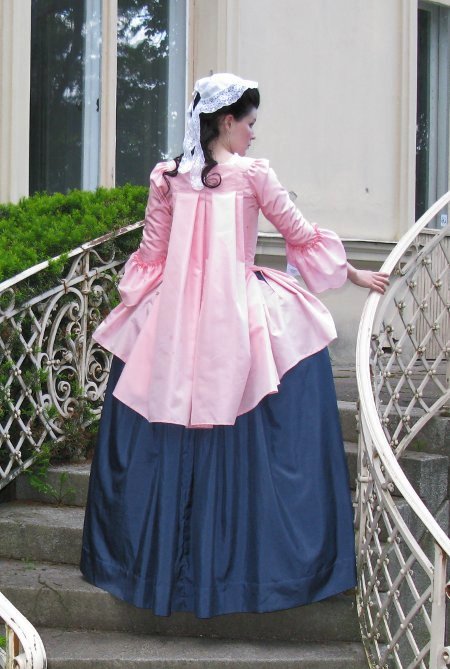
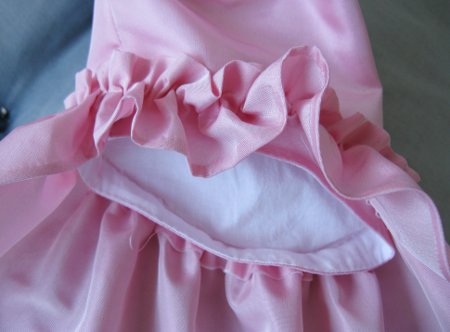
Next I arranged the side pleats slightly overlapping as you can see in the picture, and sewed their upper edge together and to the waist seam. Then I stitched the lining to cover the seam allowances.
Then I finished the back neckline by sewing a strap of taffeta to cover the top of the pleats - the tight corners were a rather interesting piece of work. On the neckline I turned the strap over the edge on the inside - the top edge of the back should have been left raw and finished with this little extra piece, but I had, characteristically, been madly afraid of fraying once again and made that with seam allowance too, so now I turned all the layers on the inside, resulting in a quite thick top edge - the next time I'm going to go the period way in this. To continue with my anti-fraying neatening madness, I bound the shoulder seam allowances on the lining with cotton tape.
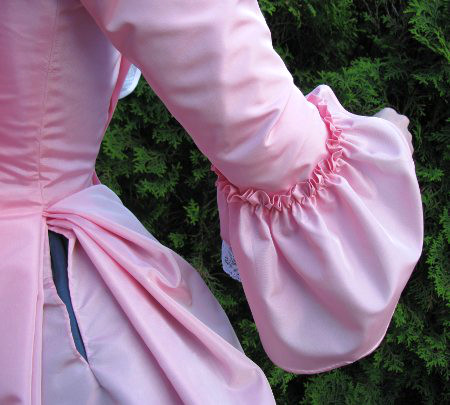
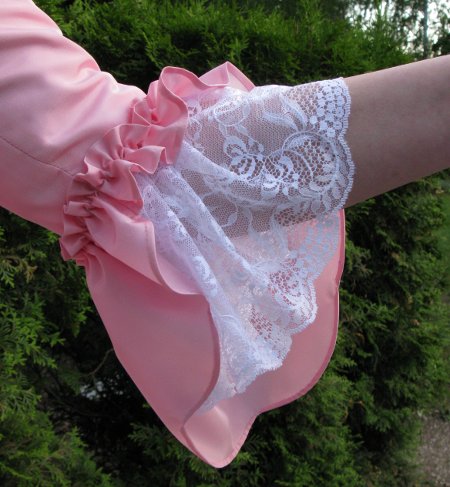
The main part thus being almost finished I attacked the sleeves. I bag lined the taffeta with a thin batiste lining, hand stitching the sleeve end. The way of attaching the ruffles is copied from the Rockin' the Rococo Pet en l'air - again chosen for the durability and the lack of raw edges. Probably this is, once again, common knowledge among costumers, but I like to give credit to where I learned a thing if I happen to remember it! I would be utterly lost without accomplished people willing to share their experience... But to return to the sleeves, the upper edge is turned under, then the flounce is gathered 1,5cm from the top edge and sewn down to the sleeve on a basted line 1,5cm from the edge of the sleeve. This is why I love my mock ups: Knowing already that the sleeve was the right shape and length I could put on the flounces without having to twist and turn the whole dress in my lap.
Once it's the time to set your sleeves in you always wish for either a clone or a higly skilled helper who can also read your mind. Sadly my dress dummy can't help me here as it's armholes are for some reason so bulky that you can't often even get finished clothes on it. Anyway, 18th century sleeve is first sewn on the bodice on the underarm, and then the top of the sleeve is pleated on the shoulder piece, over it actually, with the neckline pleats finally covering the raw edges and stitches. Actually it sounds like a very nice way of being able to adjust the sleeve without having a perfect pattern, but perhaps I'm just too fond of my patterns then because I found pleating the top sleeve awfully frustrating. Strangely, the mock up sleeve had seemed fine to me when I just pleated it hastily, now I spend eternity trying to make my pleats both attractive and identical on both sleeves, and getting the right fit to the sleeve. I was even once stitching them on when I decided that I wasn't happy with them after all and took them out again.

At last I ended up changing my pattern as far as the seam allowances I had cut allowed, making it wider at the front. As they still seemed too tight on the front side of my shoulder I finally moved some of the pleats a bit forward and also left the sleevehead as loose as the taffeta would allow without getting too wrinkly on the front. Actually I think that the main problem is my less than aristrocratic posture, both my sewing and my work make my shoulders bend forward too much for the period fit. Lacing myself tighter might also help, though, but I'm not going to go into tight-lacing training for this hobby (at least yet!)
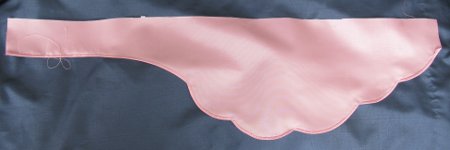
The last piece to
make was the stomacher. Like I mentioned, I had originally
sketched it on a piece of muslin, and on the next fitting
enlarged it a bit as the dress felt tighter. When I was fairly
happy with the shape of the pattern I cut to pieces of the
lining material, making boning channels in them, and a top layer
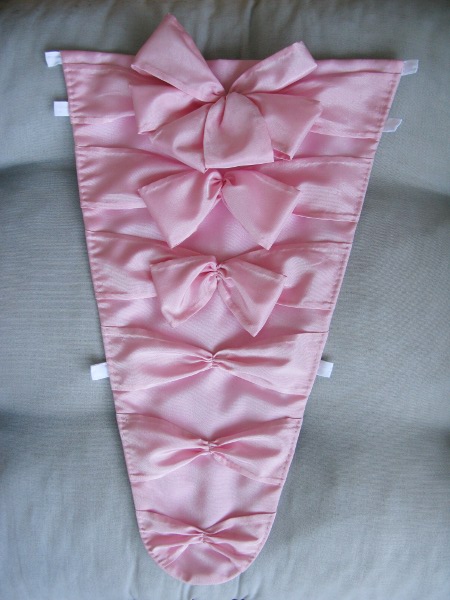
of taffeta. For the boning I used plastic cable ties.
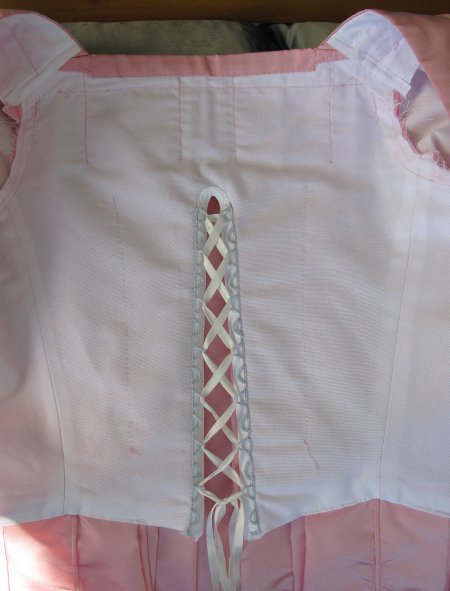
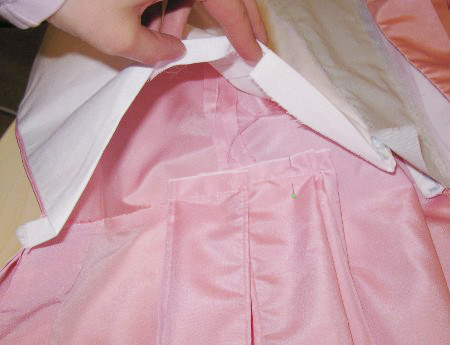
As you can see in the picture, I solved the matter of the ill-fitting front pleats by pinning a little dart to smooth them down.
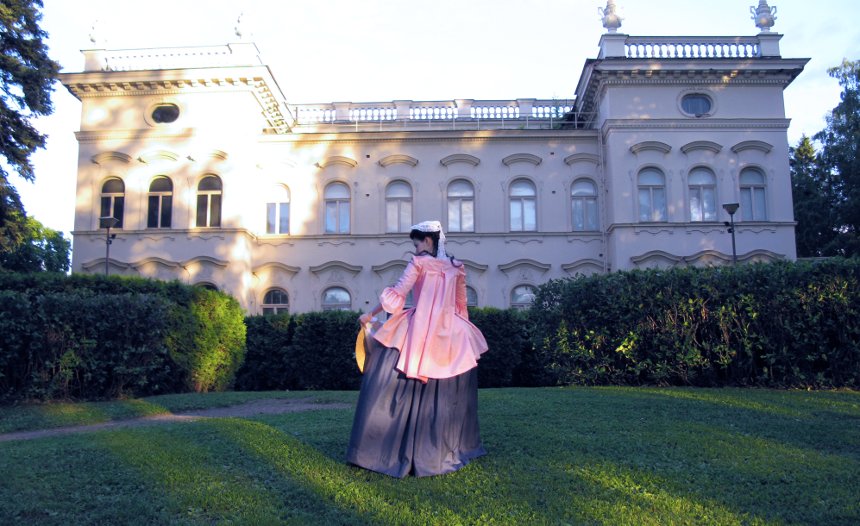
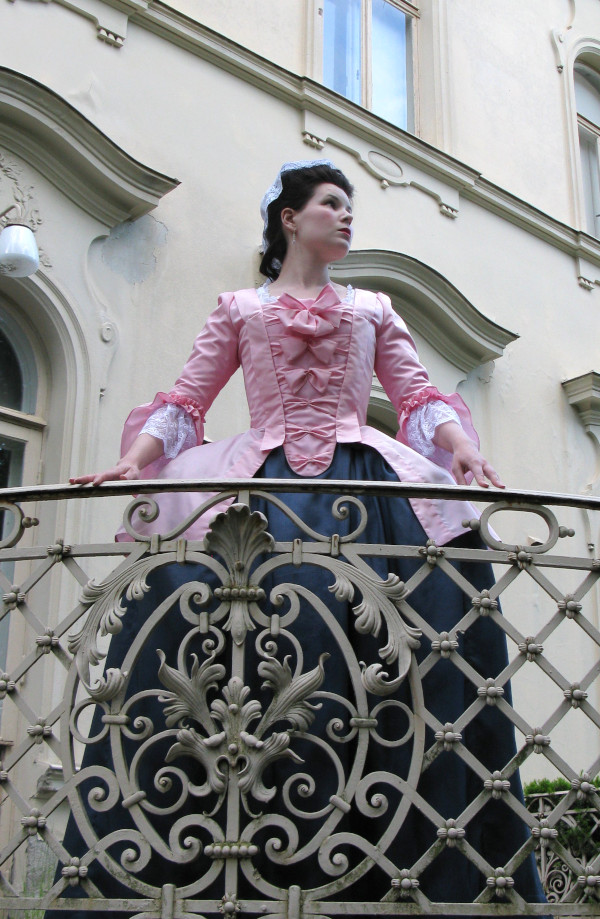
After banging my head on the wall a few times, as usually happens in the course of any more challenging project, in the end I'm quite happy with the result. Pet en l'air both a valuable learning project thinking of my long time dream, a sack dress, and also a very lovely addition to my 18th century wardrobe. The very first event I wore it was a picnic on a rainy day, and it got soaked pretty badly, but happily the stains didn't show as badly as I had thought, so the material choice was also less of disaster that I had feared.
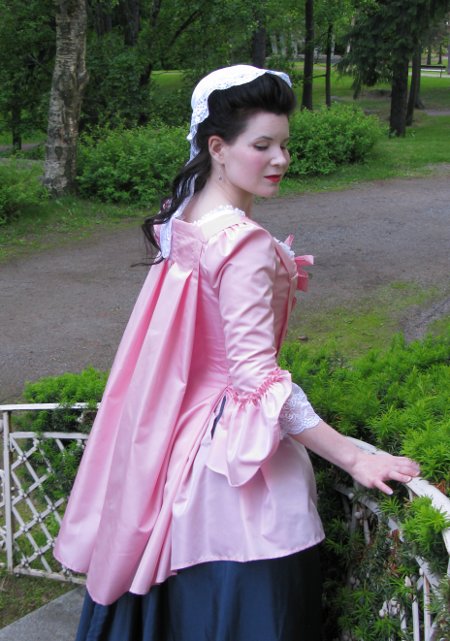
The pictures are taken this time on a June evening on the grounds of a house in Tampere called Näsinlinna. It's built in late 19th century so it's a bit anachronistic but beautiful nevertheless.