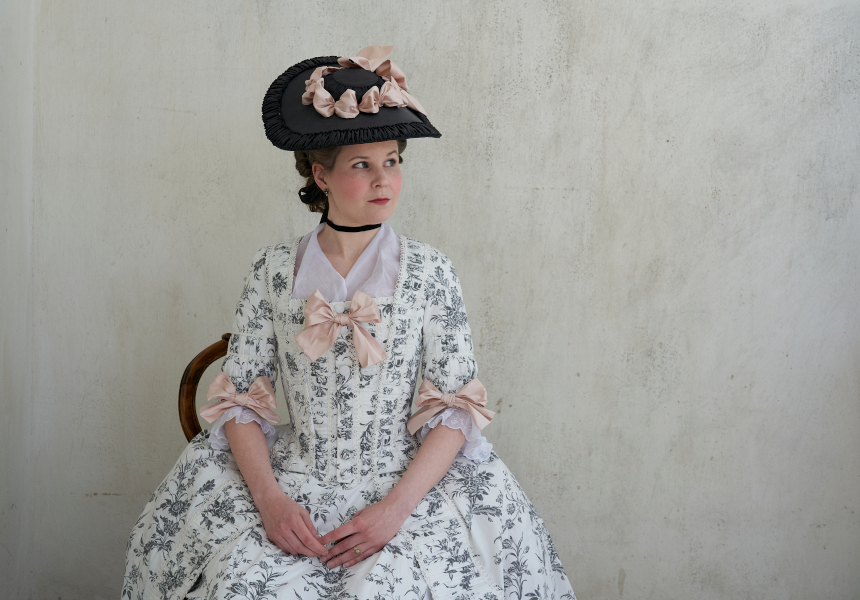
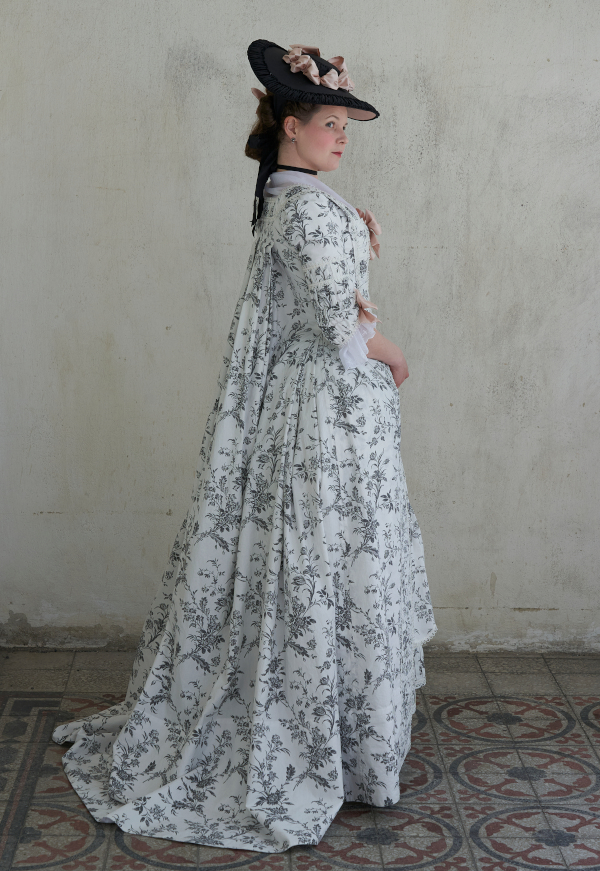
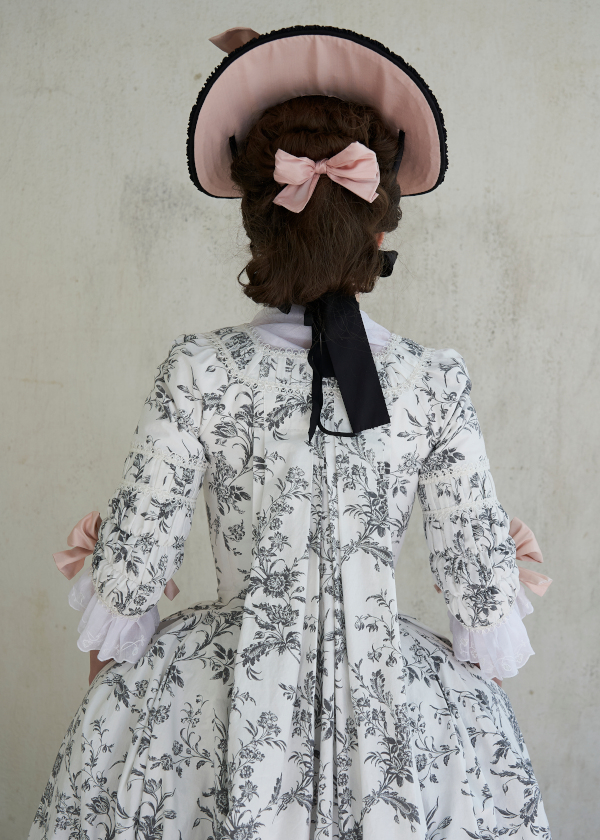
Robe
a la Francaise, 2020-2022
First everyone had an IKEA Dress, then a Pandemic Dress. This is my contribution to both categories!
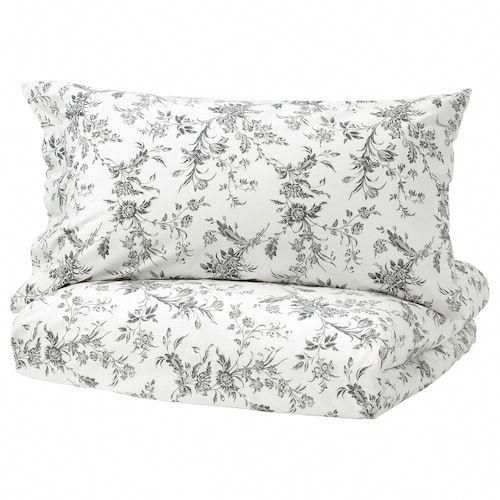
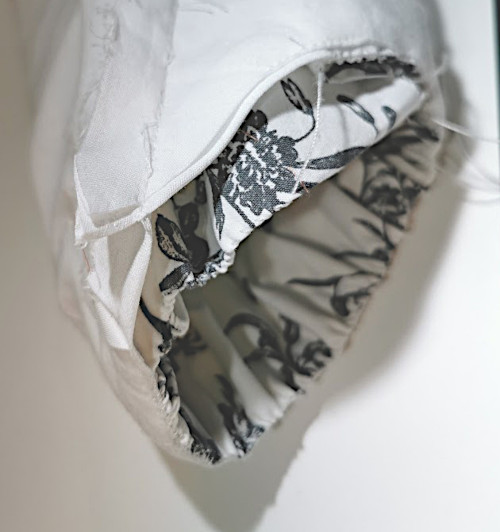
Many 18th century dressmakers have embraced the wonderful selection of repro 18th century prints by IKEA, usefully available in affordable bed linen sets. Many, many years ago I picked my Alvine Kvist double wide duvet and pillowcase set for future use after seeing people making lovely costumes out of it. Initially I wanted a red print but it wasn’t available so I bought the dark grey one instead. While I had plans for it from time to time it mostly lay half forgotten deep in stash for years.
Fast forward to the notorious year of 2020. With everything closing down (though we didn’t have that many restrictions here in Finland as in many other countries) I was temporarily on an unpaid holiday from work and suddenly had time. I decided to make use of the time by excavating some materials from the stash and planning, drafting patterns and cutting a few new projects when I had time to concentrate on them.
The
Material
As mentioned above, this project began with the material and the final style was chosen later. There were, of course, some minor accuracy quibbles with the print. Despite it being a reproduction of a period one, like the Toile de Joy prints it was maybe more of an upholstery print than a costume one, mainly because of the large scale. Also, while in the later 18th century you see a lot of simpler prints in a more muted colour palette on a white ground, totally monochrome ones are rare, though I found a few. Blue or red on white are more common. Nevertheless, I was actually excited about the idea of a slightly stylished, monochrome look.
Choosing
the style
My initial idea for the dress style was an
1780s Robe a la Anglaise, possibly with a cutaway front (or zone
front, as it's often called), also possibly with long sleeves. I
don’t really know what happened, but somewhere along the way I
got kind of bored with it, and suddenly decided to change
course. Then I remembered one of my old dream gowns, the early
1770s Robe a la Francaise from Kyoto Costume Institute. It is,
interestingly, in linen, with a charming, delicate floral print
in blue on white ground.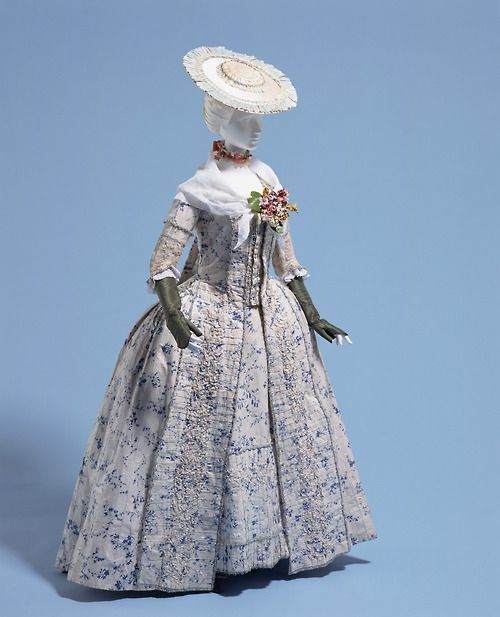
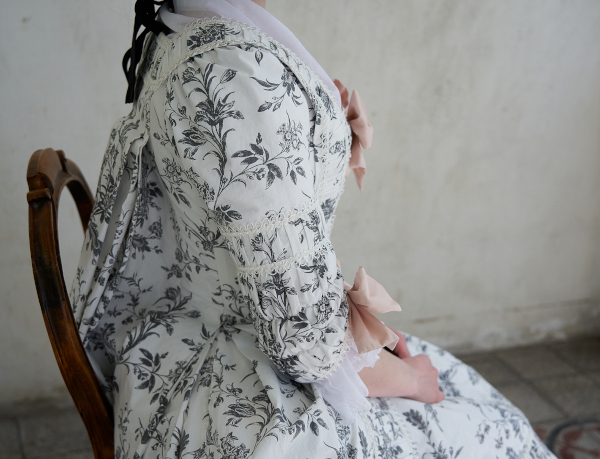
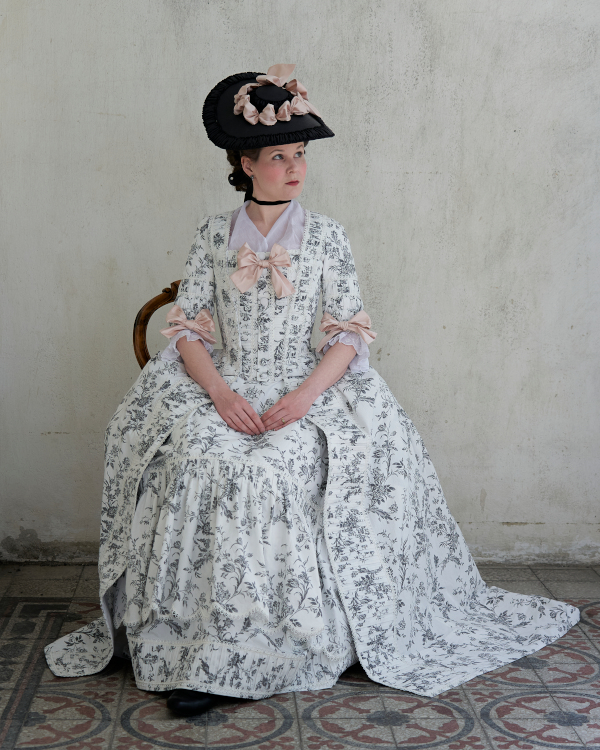
After my grand light blue Francaise project I had been temporarily fed up with even an idea of any more of those, I felt that I given my best effort on that one. But now, some years later I began to feel that it might actually be smart to use the experience I had gained and the patterns I had for another Francaise. The visual idea of a printed instead of more sparkling satin frock was different enough to get me excited again and not feel I was repeating the same old thing. Besides, there would be a few additional tweaks in adapting it to a bit later style.
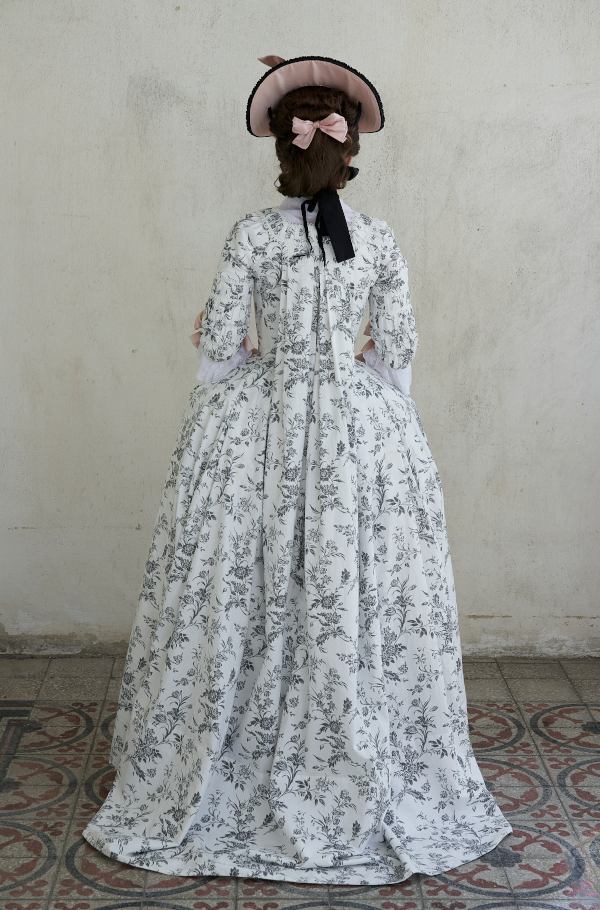
The original dress was a lovely example of a transitional Robe a la Francaise: The distinctive cut with side hoops and back pleats with the new style of sleeve with decoration on the arm instead of the elbow ruffles, yet retaining the open bodice front with a stomacher which would very soon get outdated. In the pictures I found the neckline is partly covered with a kerchief, but from what I can see it’s already curving on the corners and leaving just a narrow glimpse of the stomacher on view.

While I really liked the original, I ended up making some changes, as usual. Some of them were due to a necessity and others stylistic choices.
When changing my plans from an Anglaise to a Francaise I was initially worried that I wouldn’t have enough material. I could have found more, of course, but I sort of wanted to cling to my principle of using stash content as far as possible at the moment. But then I learned that a friend had been able to cut a Francaise out of a bed linen set of the same size, even with sleeve ruffles, and decided that with some fabric saving hacks I could probably do the same. Luckily the print was large and irregular, and thus would require little to no matching and could even be cut upside down in a pinch.
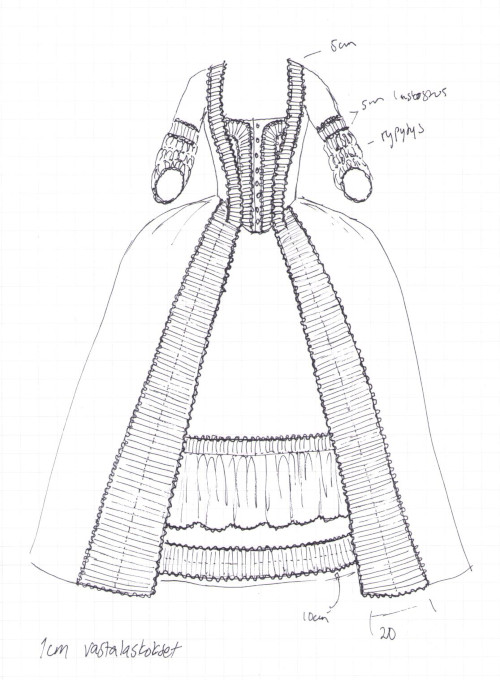
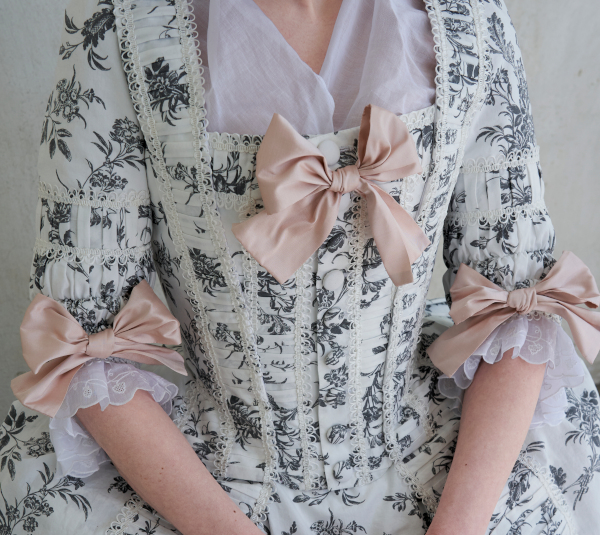
This meant, however, that it would probably be safer to give up the really wide front edge trimming pieces with some very interesting ruching in the center. Happily this coincided with the thought I had already toyed with of simplifying the whole thing. There were several gowns on the period decorated mostly with simple box pleats of varying width, and that option was tempting: Simple to make, doesn’t lose shape in wash. Besides, elaborate ruching arrangements tend to get a bit lost on a non-shiny printed material.
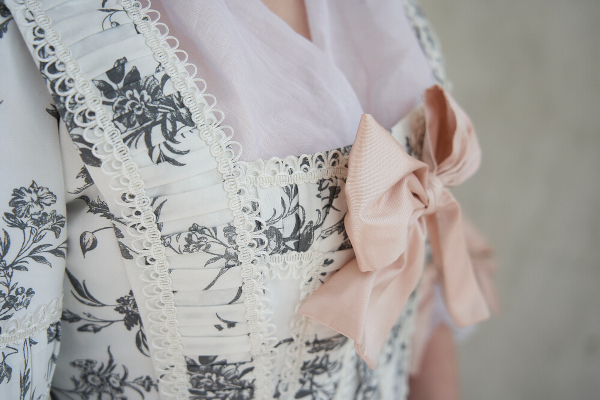
Another change I decided to make was the neckline. My body proportions are such that my bodices tend to be long and my stomachers narrow. If I wanted any of the stomacher to remain visible there wouldn’t be much curve on the neckline sides, so I reasoned that I might just as well go with the good old straight front edges with robings (also, I would be saved from the bother of tweaking my pattern).
The
pattern
As mentioned already, for the pattern I was able to rely heavily on my old Robe a la Francaise pattern with some updates. I cut the back pleats and the back neckline slightly narrower in keeping with the newer style. The stomacher is also a bit shorter. The sleeve pattern is borrowed from my Anglaise pattern.
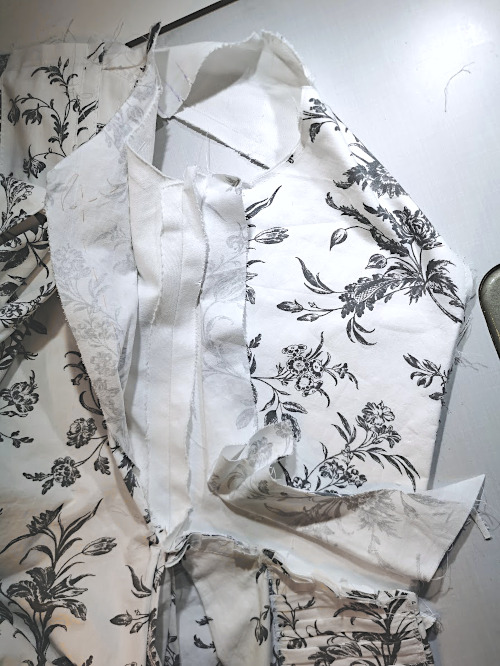
Cutting
and preparation
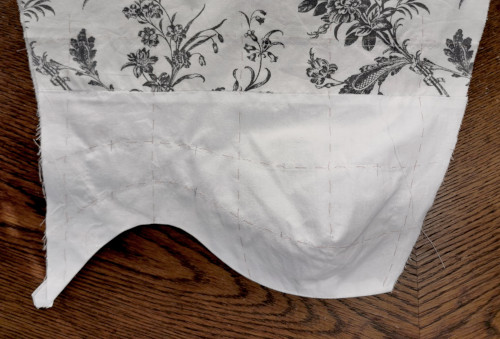
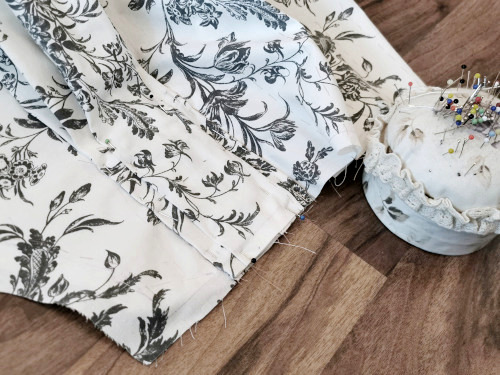
I planned the cutting with some care. Happily in the 18th century fabric piecing regardless of the pattern matching was not considered a problem, so some joining seams would have been quite okay, though in the end I didn’t even have to resort to many. Cutting the invisible top part of the petticoat back piece from plain linen is almost a standard procedure, and I used the same for the lower part of the sleeves under the trimming. I cut the large pieces first and then moved on to smaller trimming pieces. The front edge trimming pieces are cut in different directions and have a join midway down, but it’s really not that visible. The petticoat flounce has a few joins on the sides as well.
After cutting I basted the necessary markings and folded different trimming pieces neatly with paper labels pinned on them. I also began with the stomacher and back piece of the lining before switching to the other dress I had cut and which I decided to tackle first.
And then, of course, I was distracted by a billion other things again. At some point I managed to make the buttonholes on the stomacher and the lacing holes on the lining, but that was it. Finally in the spring of 2022 I decided it was time to seriously continue with this if I ever wanted to get it done.
Sewing
Back when I still thought of making a Robe a la Anglaise gown I had wanted to sew much of it by hand, as I like hand sewing. But later I became more impatient and thought I could just as well take some shortcuts but keep the period look by finishing the visible parts by hand. As with using mostly an old trusted pattern I thought that I could as well make my life easy for once.
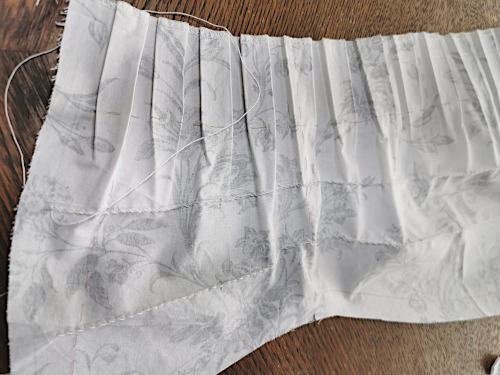
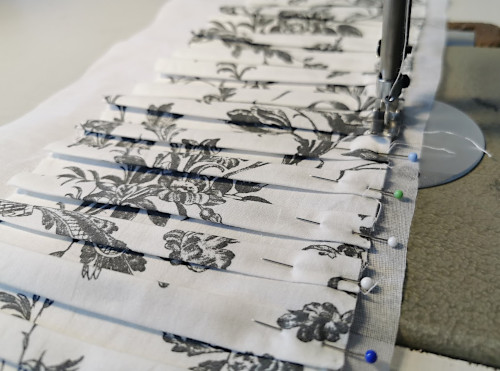
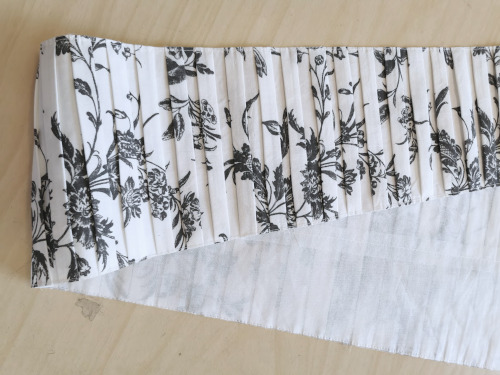
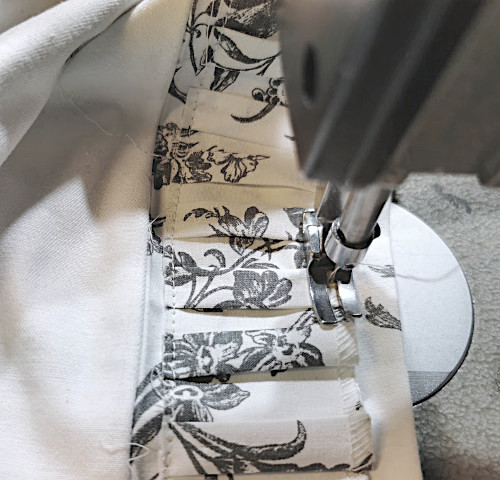
One shortcut that I wanted to try was for the pleated trimming. With my Natural Form era projects I had found pleating boards invaluable in creating all those endless pleated ruffles, and now I wanted to try to make one for 1cm box pleats. While 18th century pleated trimmings look softer than precise pressed ones I thought this would be a nice way to escape the tiresome measuring and pinning as I’m not experienced enough to just fold away even decently regular pleats.
Folding the pleating board from wallpaper took some extra time, of course, but I might always have other use for it later. When I tried it for the first fabric pieces I soon discovered that making box pleats is not as quick as knife pleats and I needed to pin them to keep them in place before ironing, but it was still faster and easier than marking and folding them by hand.
The
petticoat
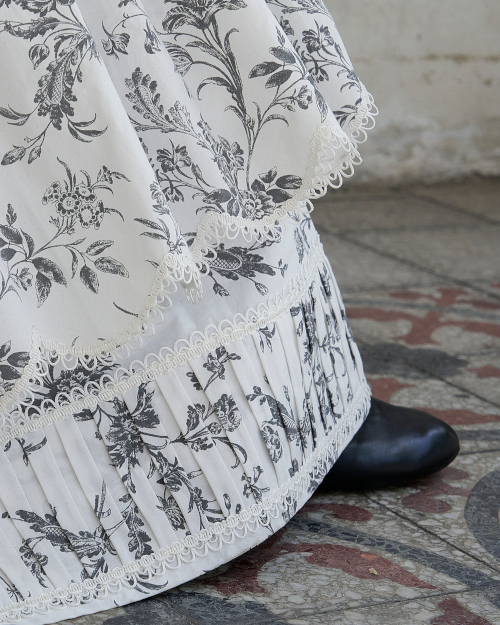
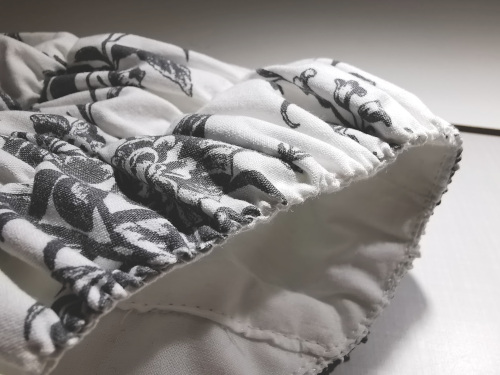
For the petticoat trimming I had chosen a 10cm wide pleated strip at the hem and a wider ruffle with scalloped bottom edge and pleated top edge. I began with the latter.

First I sewed along the scalloped edge line, then I trimmed the seam allowances, pulled the thread a bit tighter and pressed the seam allowance to turn in with the help of a cardboard mold. Then I sewed the braid over the seam allowance by hand.
Oh, that braid is another story.
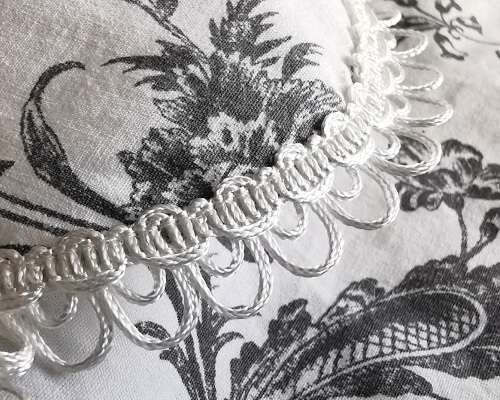
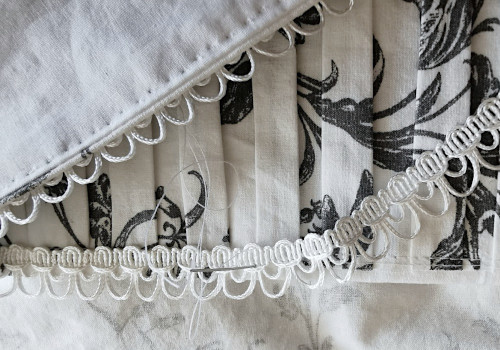
When I had switched my plan to a Francaise I obviously also needed a trimming braid. I could already guess that in the large pattern the fabric trimming would lose its impact from any distance and look just fussy, so I toyed with the idea of edging it with black or dark grey braid for more visual impact. On the other hand I thought the look might be too theatrical, and a light coloured braid would be a safer, if a bit boring choice. I found an affordable white one with a hint of silvery grey so I ordered it. When it arrived I realized that it was maybe a bit too shiny and clunky, but as the project was on hold anyway I decided to think about it later. While it was on hold I happened to find another affordable bolt of a more delicate cream braid, which I decided to grab as I was sure I would have some use for it eventually.
When it was time to finally choose the trim for the printed Francaise I considered both options, and after a while decided on the first one. The hint of grey accentuated the print beautifully and some shine made it more visible. I had already sewn it on the petticoat ruffle and sleeve when I had a better look in bright sunlight and realized the shine actually looked really fake. If I was going to change it it was going to be now or never, so I ripped it off and replaced it with the cream trim. I soon found out that the latter one was also much nicer to sew as it was much less bulky in the seams and corners.
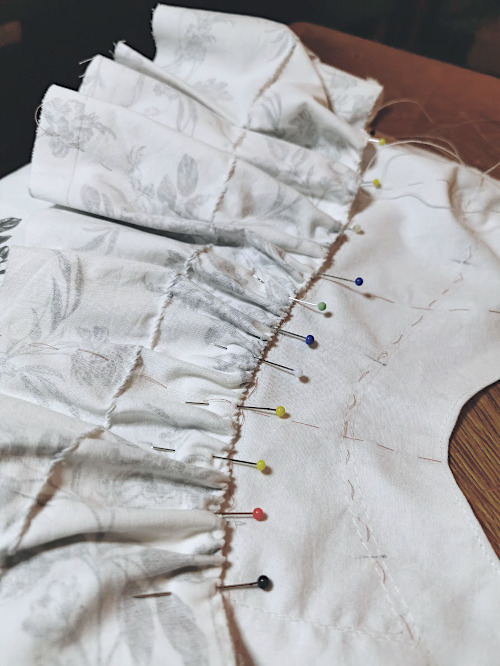
So, after changing the braid I moved forward more smoothly for a while. After finishing the bottom edge of the petticoat ruffle I hemmed the sides and pressed the top 5cm into box pleats. Then I pinned them into the petticoat front piece and sewed the top edge by machine and the lower edge of the pleated top part by hand.
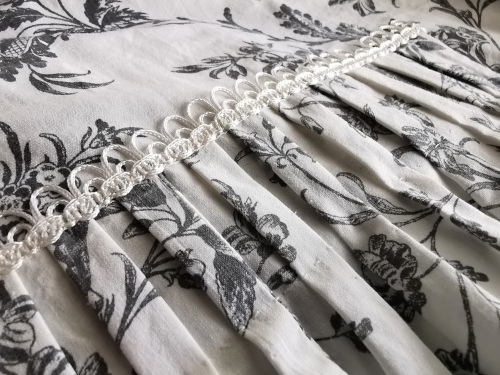
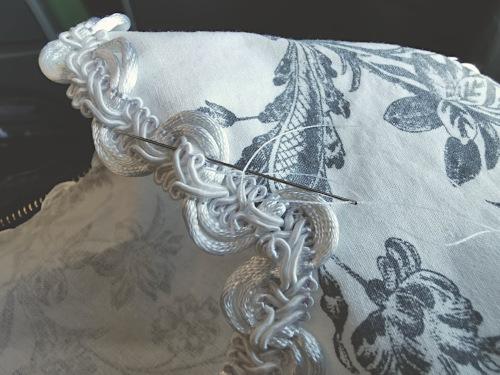
I also pleated the 10cm wide strip on the hem, pinned it in place and stitched the edges. Because the new braid was thinner and softer I was able to sew it on by machine too with a nearly invisible result. In the bodice and sleeves where the details would be more visible I sewed the braid by hand, and in some places it was also easier. Being able to sew these long pieces by machine made things a lot faster, though.
The
Robe
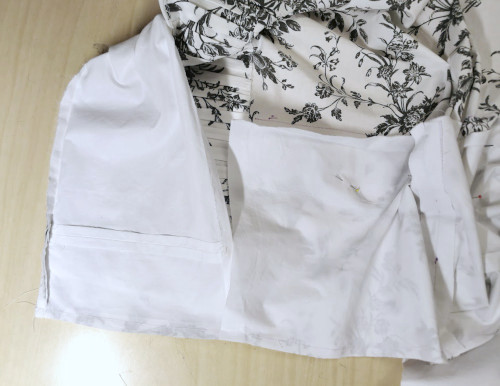
The first thing was to make the back piece of the lining with the adjustment slit down the back and accompanying boning channels and lacing. Despite generally taking a relaxed attitude to accuracy with this project I made the lacing holes by hand: There aren't that many of them and they don’t even have to be very neat or very durable.
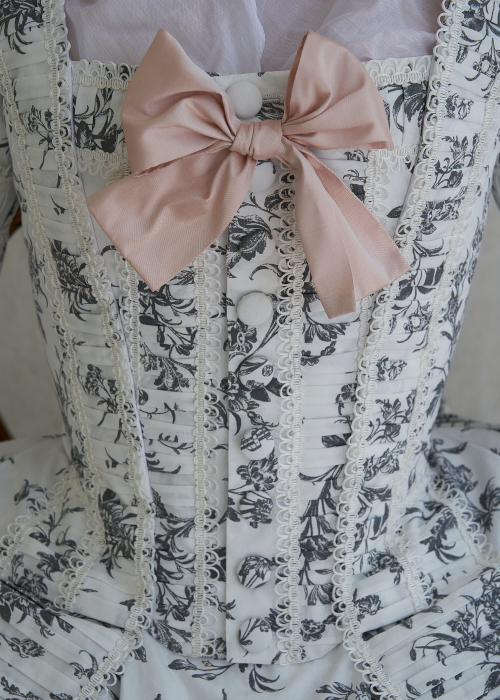
Next was the stomacher. While it is a wholly separate thing and not necessary for making the gown proper I like to have small pieces to work on at hand, and here it would be the buttonholes. Again, despite a moment's hesitation I decided that they would have to be hand sewn.
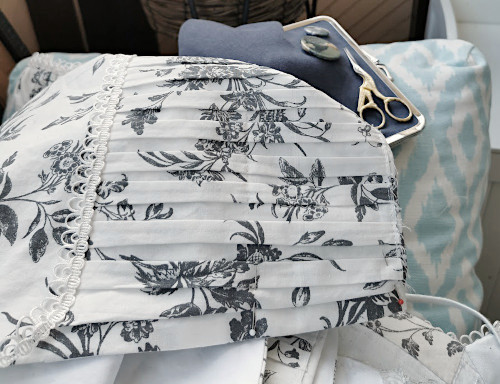
After the buttonholes I sewed on the pleated strips, adjusting the pleats on the curved corners of course, and then covered the edges with braid and sewed the buttons on.
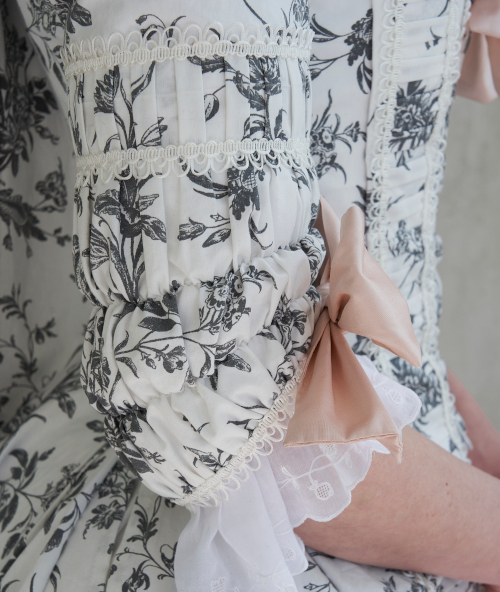
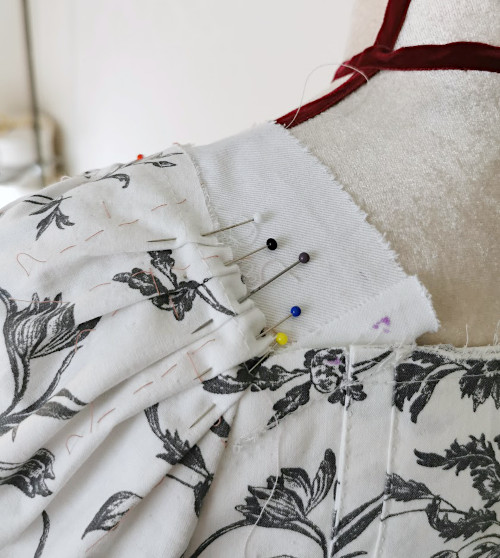
The sleeves were a bigger chunk of work with a lot of hand sewing. I had decided to keep the main look from the KCI gown but make the trimming with just a few gathering lines topped with a 5 cm pleating. For this I had drafted a separate pattern, which followed the sleeve shape but was double wide and a bit longer. After cutting I marked and basted guidelines for the gathering and some vertical lines for matching.
Then I assembled the basic sleeve - joined the upper and lower piece on the top layer, sewed the elbow dart in the top and lining and then sewed them together at the bottom edge, leaving a little bit close to the side seam still open. Then I basted the layers together at the top and sides and marked and basted the corresponding guidelines for the trimming. I had decided that the easiest way to sew on the trimming would be to work with the flat sleeve piece as far as possible, then close the seam and finish the trimming over it.
I whip stitched gathering threads on the sleeve trimming and pressed the pleats on the top. Then I pinned and sewed the top edge in place leaving a short part loose near the edge, and added the braid on top.
Next I gathered the threads and pinned the gathering line in place, and sewed the gathers into the sleeve by hand between the layers, moving from the top row towards bottom. This might have been done from the outside, too, but I prefer the look created by this technique.
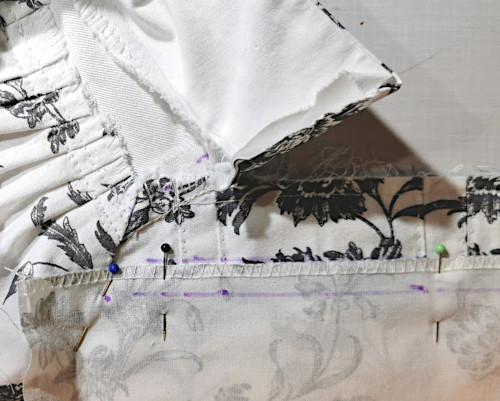
At the sleeve end I had to do some more adjusting because of the curved shape and the elbow dart. After checking that my planned gathering line was more or less right I gathered it too and sewed the gathers down on the edge. Then I closed the side seam and turned one edge of the lining to cover the seam.

Finishing the trimming over the seam was a bit tricky, especially as my gathering lines did not always meet at the seam. This made me wonder if maybe it would have been easier after all to sew the trimming on the finished sleeve, but the final result looks decent which is the main thing.
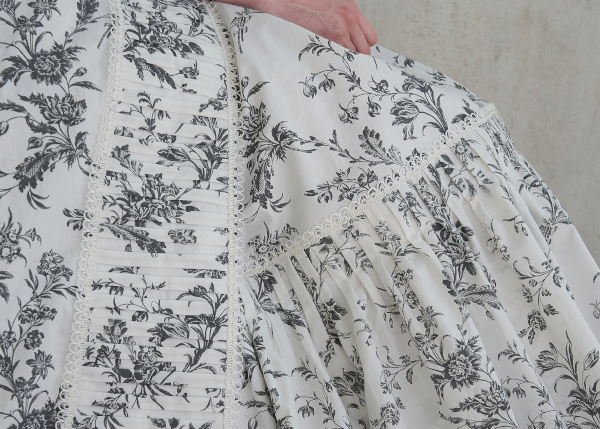
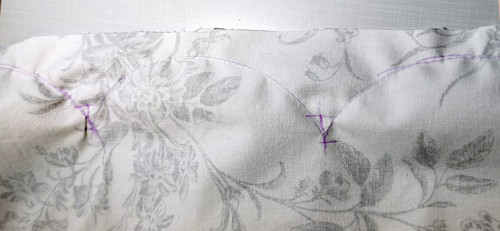
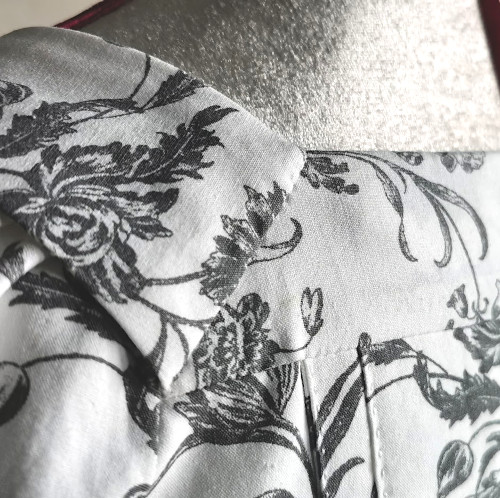
Next I moved on to the front edge trimming. I joined the pieces for the pleated panels shaped to widen towards the hem. After pressing the box pleats I pinned them on strips of cotton organdy (leftovers or cut to wrong measurement from something, that's why they are pieced). Then I sewed along the edges and trimmed them into the finished shape and size. On the bottom edges I left the last pleats still unstitched so I could finish them later to match the hemline. Then I marked a center line and lightly sewed the pleats down by hand along it.
I chose to mount the pleatings of the organdy because while it’s almost certainly not period accurate method it was so much easier to work with smaller pieces rather than the whole front piece, and all that pinning can distort the front edges which are not even cut on straight grain at this time anymore. The extra stiffness created by the organdy layer is not bad at all on the front edges, though I was afraid that it might be bulky elsewhere so I chose to sew the petticoat trimming straight on the fashion fabric.
To get things neat I sewed a facing on the front edges but let the other edge still open at this point. Then I sewed the pleated panels on, leaving about 5cm from the bottom still loose for adjustment. On the top edge I turned the facing in place and stitched it along the waistline.
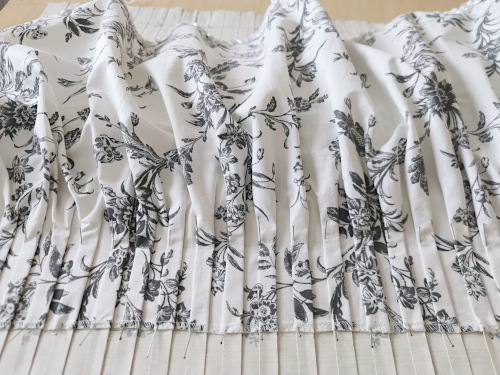
After a few Pet en l’airs and one full length Francaise, folding and pinning the back pleats was almost familiarly pleasant, though of course it helped a lot that I had basted the pleat edges straight after cutting.
Before I could move much forward there was, however, another interesting plot twist.
When beginning the project I had planned using my old pocket hoops with the Francaise even though side hoops sharply diminished in size at this point of fashion evolution. I kind of thought that the hoops under the KCI Francaise seemed quite wide, though of course that could be just how the museum had chosen to dress the mannequin. I was also extremely reluctant to make anything new to take up my limited storage space. But then at some point I came to my senses and realized that not only would the pocket hoops be relatively quick to make, they also folded into a minimal space so it would be insane to use that as an excuse. Besides, I had wide steel boning in the stash.
So, I made new, slightly smaller pocket hoops - they are still not as small as some late period examples, but a much more suitable size for early 1770s. When I think about it a new, slightly smaller pair will be extremely useful with other outfits too, so the effort was not wanted at all.
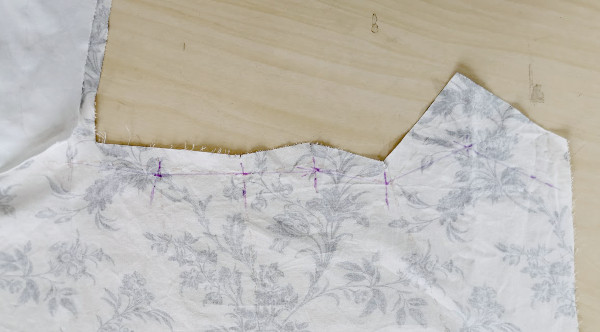
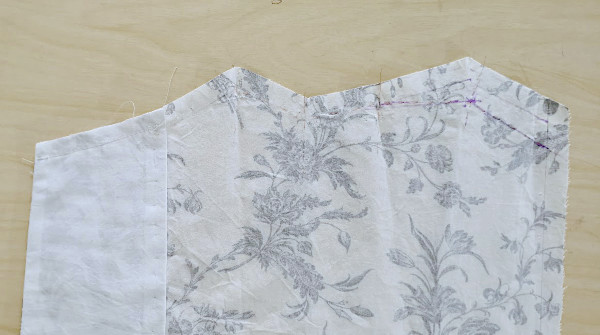
But anyway, the new pocket hoops meant that I would have to alter the side pleats of the robe, which was honestly the main reason for stubbornly refusing to make them. I had had endless trouble with fitting the side pleats in the past, and now I just wanted to cling to my trusted pattern markings. But in the end I had to grab the bull by the horns, baste the side seams and the front waist seam and try to adapt the side pleats to the new shape.
In the end, it went surprisingly easy - I only had to trim a few centimetres off from the top pleats next to the side seam.
For some reason I had to lower the front skirt top edge quite much, which was more of a hassle, but at last I was happy with the fit and could move on to joining the parts for real. Then I folded the edges of the top layer over the seams and stitched it down by hand.
Next I sewed on the underarm part of the sleeves and pleated, pinned and sewed the top part on the shoulder. Then I sewed the robings on the front edges and finished the back neckline with an additional fabric strip. For some reason this part always gives me a strong sense of joy and satisfaction, the finished look is somehow at the same time quirky, charming and neat. It’s almost a shame to always cover it with trimming, but that’s what I did next.

I pinned the pleated strip starting from the center back, trying to get it symmetrical. Then I sewed it on by machine as far as I could and the rest by hand. The braid was added on top to cover the edges. I guess I could have sewn at least parts of it by machine here too, but the cursed perfectionism got the better of me again.
And then back to the skirts. When the shoulder and waist area were finished I could check the final hem length. I sewed the protecting facing on the hem and pinned the top edge in place. At the same time I could also finish the front corners, pin the last pleats and turn the allowance under the pleating.
I sewed the braid over the pleating edges, which also fixed the facing in place. Again, this would have gone so much faster by machine but the underside may well peek out and reveal the horror. I couldn’t really escape sewing the top edge of the hem facing on the top fabric either, though that was a real pain in the densely woven fabric. As for the hem, while the bag lining I now had in there can become, well, baggy, in use, in cotton against cotton it generally settles very neatly. I considered leaving it like that, but then decided after all to add a row of stab stitching close to the edge to fix it more securely. Small things can sometimes make a difference.
After finishing the hem and front edges there were still a few small things in the bodice. One thing with Francaises I’m totally fed up with is the endless pinning. One gets better with practice, but it’s still not all that easy to do yourself. Now, with the advantage of the stomacher with a real functioning buttoning I could just sew it on the front edges under the robings. Then I could sew the end of the robings over the skirt front edge.
Another thing that I hate is flopping robings (unless you pin them very well too), so I made another dirty trick of basting them down on the bodice too. Perfect fit, easy to get in and out of, no fear of pins sticking out after a few hours, what’s not to like?
The
accessories
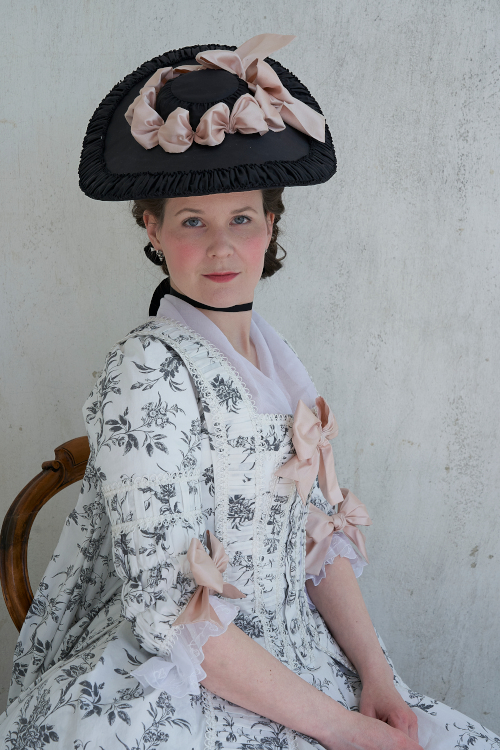
Nevermind what I said about not wanting to make new stuff to fill my storage units, of course I wanted a new hat that I had been dreaming of for some time. Once again, it's something that I can use with other outfits too. A black silk hat added to the monochrome look I had in mind, and I added a little bit of colour with a very muted and light shade of pink repeated on the bows, also removable to be worn with other garments. More about the hat in the hat here.
I also managed to finish the whitework sleeve ruffles I have been embroidering for ages for the photoshoot, but the matching kerchief is still proceeding extremely slowly.
Final
thoughts
I really like the dress and am happy that I finally got it done. While I still feel that the trimming gets a bit lost and the braid almost blends in from any distance on the other hand the delicate look is in keeping with period aesthetics. It’s not the most dramatic dress but a solid, wearable and definitely a charming one. The combination of some shortcuts with a more period accurate finish worked well, and overall the process was rather relaxing but not too boring.
By the way, the reason I call this my Pandemic Dress is not only because I cut it in 2020, but also because I had just begun working on it again in 2022 when the virus finally caught me. It was a rather mild case, happily, but I had to stay at home and felt quite tired so some hand sewing with an occasional effort on a sewing machine was just the thing. I had a lot of work left when I recovered, but somehow I still remember that week on sick leave when I think of the dress because I didn’t do much else then.