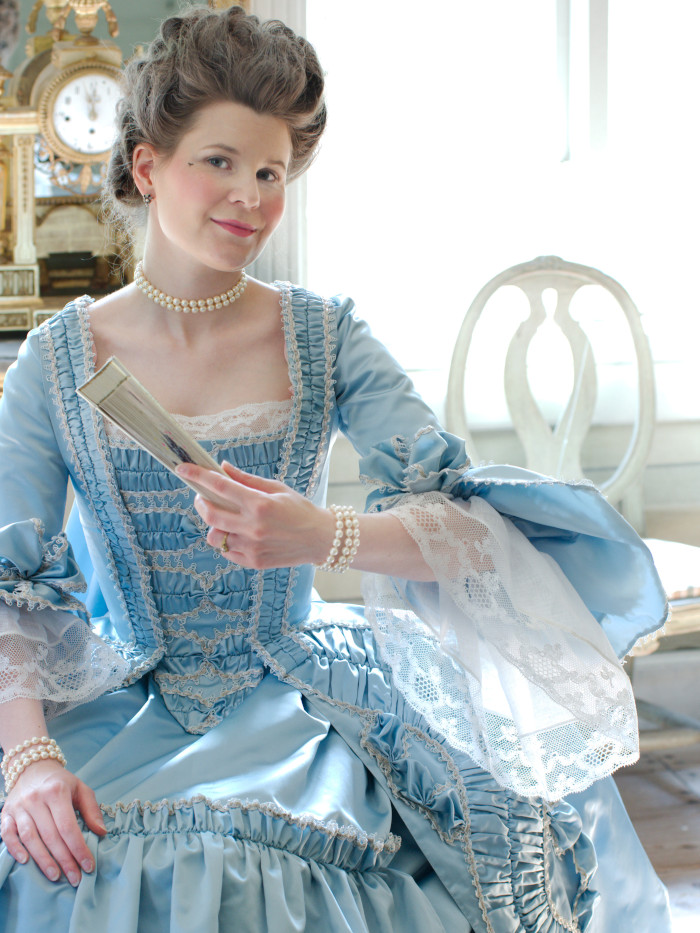
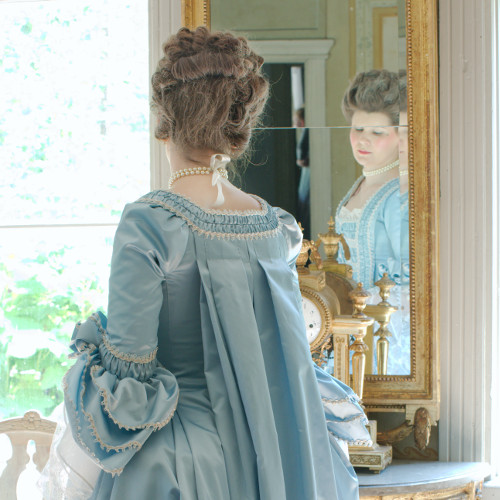
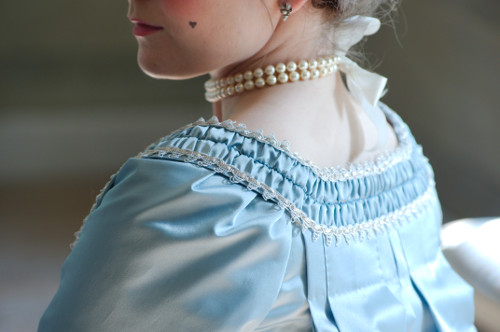
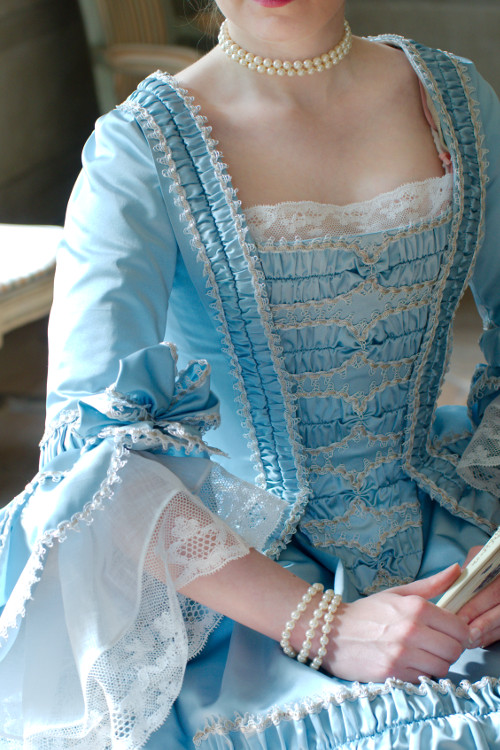
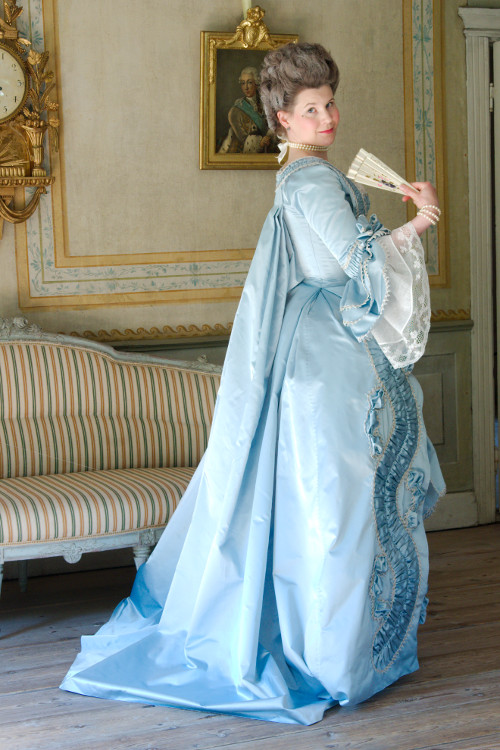
Robe a'la Francaise, 2015-2017
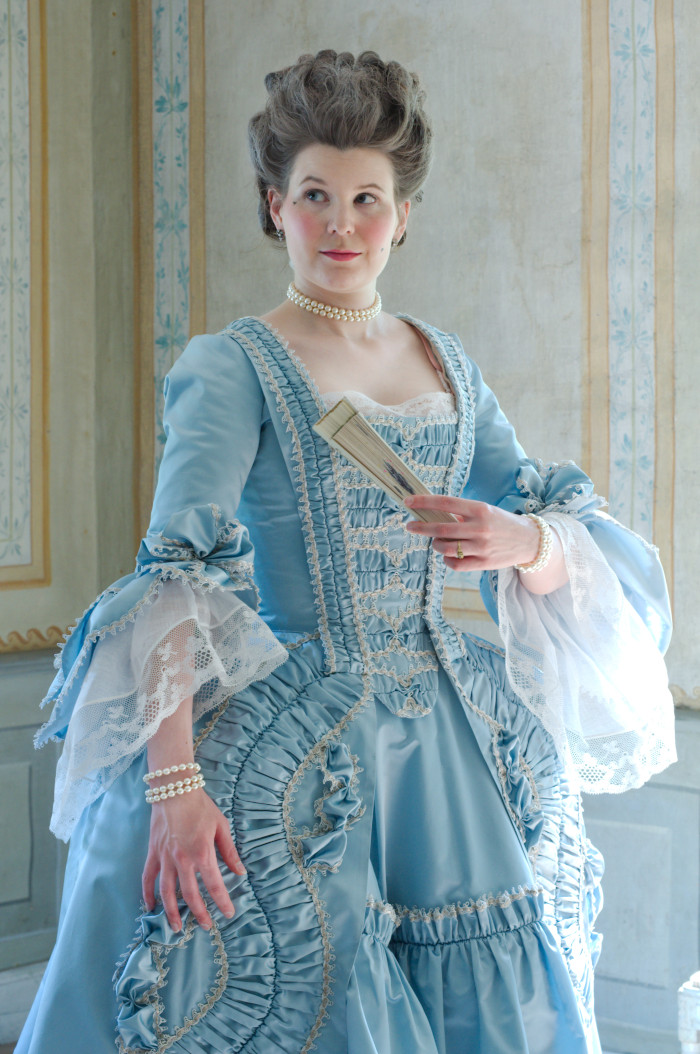
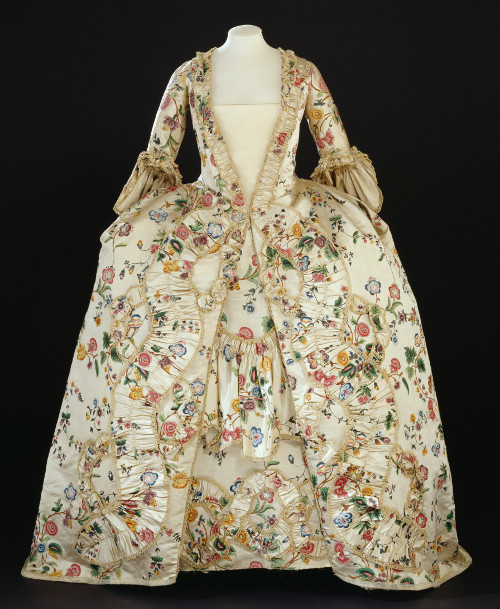
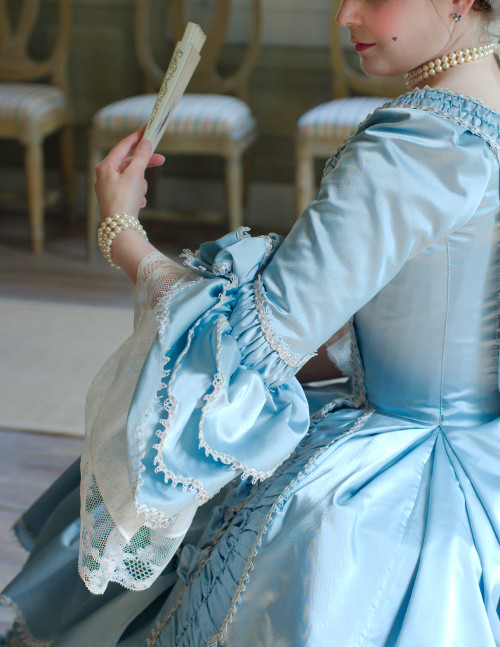
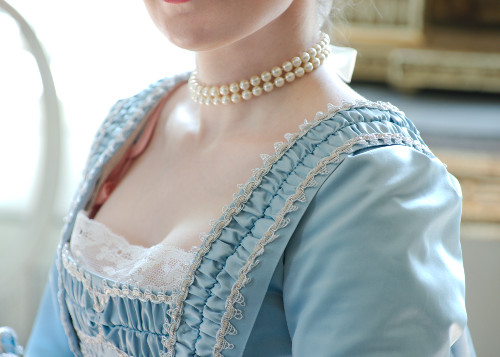
The 18th century fashion classic, the iconic "Rococo dress". The fashionable Lady's must-have wardrobe item that I had put off making for a long, long time, partly because I felt it was a too arduous and challenging task, partly because I was continuously caught up with this at that else. The charming, pastel toned 1760's Robe a la Francaise decked with fabric ruching and trim.
The
materials
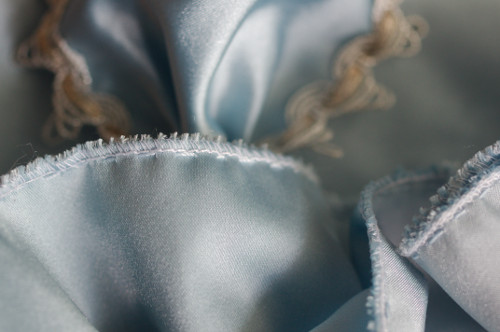
I had found the fabric years ago before actually getting started, and I was still happy with my purchase: a thick pale blue satin, acetate but more or less works for a not too conspicuous cheat for silk gown, and cost about 10€ per meter. The super fashionable Francaise should of course be in floral brocade, but a plain one is a pretty as a smaller budget option too, and the fabric ruching decoration stands out more on it.
I also found a looped braid that looked sort of period, or at least not too painful. The pale gold looked very pretty with the ice blue satin, and would add some nice bling. There was also the practical consideration of finishing all the edges with the trim: for example the lovely orange brocade Francaise in Kyoto Costume Institute (AC5373 86-18-4AC) has looped braid on all the fabric ruchings and sleeve ruffle edges. While it's true that metal braid was mostly used in brocade gowns with metal threads woven into the fabric, at least this satin dress painted multiple times by Copley sports super blingy metal braid or lace too.
Drafting the Pattern
So, I had the materials, then I needed the pattern. The right way to cut a Robe a la Francaise is obviously to drape it on the body, but this method is not preferable for my experience level and my poor nerves! Besides, I wanted to do the pattern myself to get a grip of the whole process, and it's not very easy to fit your own back pleats. I also wanted highly reliable patterns to begin with parts of the decoration before putting it all together - the smaller pieces would also be more practical to store, as I knew I would be working on this project for a long time.
I had, of course, gained some experience of the mysteries of the Francaise with my two Pet en l'Air-projects. Both had taught me several things. The latter one was still not perfect either, so the full length robe needed some more experimenting. I began to work on the pattern based on my second Pet en l'Air trying to fix the problems it still had. I also sacrificed some old bedsheets for a mock up version. Happily one side of the robe was enough for test purposes when it was pinned to the lining, though it did look a bit curious.
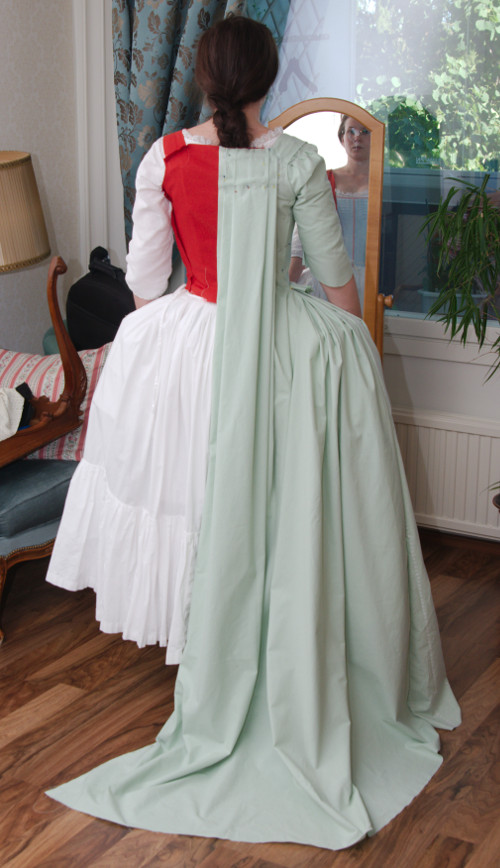
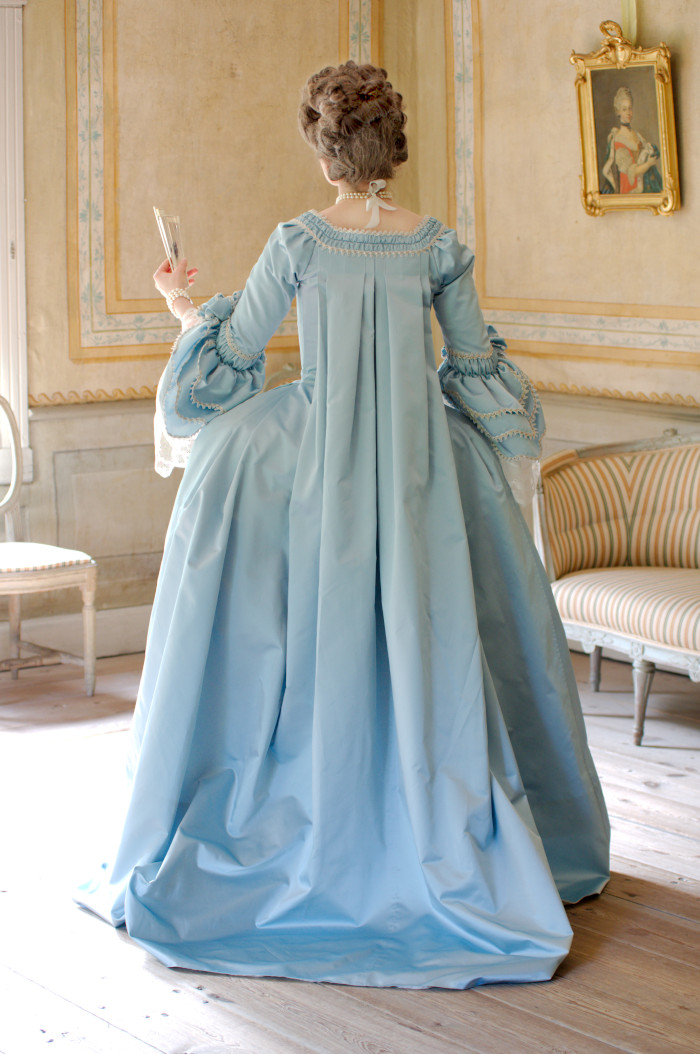
My main reason for an extravagant full length mock up was to make sure the hem width would be adequate for my hoops, as I had come to suspect this was the cause for both my previous Pet en l'Air's fitting awkwardly at the bottom edge. The first pink one opened way too much at the front, while on the second gray one the front was okay but on the back the wide box pleats opened too much towards the hem. On the full length robe the gracefully falling back pleats were such an essential part of the look that this problem had to be solved.
I had used the Snowshill Manor Pet en l'Air-pattern from Janet Arnold's "Patterns of Fashion 1" for both, but on looking at other patterns more carefully I noticed that full length Francaises had more width at the back pleats, while looking the same to outside they would have deeper pleats or an extra very deep pleat under the characteristic double box pleats. Obviously at least that particular short Pet en l'Air was not meant to be worn with hoops, then, which kind of makes sense as it was more informal wear. It does look perfect over a quilted petticoat worn under the taffeta petticoat, though.
So, for the Francaise mock up I added 30cm width at the center back on the half back piece and pinned it into the deep extra pleat underneath.
I have also had massive problems with the side pleats in my previous projects. With the grey Pet en l'Air I learned to place them fan-like. This led to a revelation: For example in the Arnold's pattern of the Snowshill Manor Francaise (1770-1775) the top edges of the side pleats rise over the waistline and the pleats are set slanted. When folded these pleats would likely set in a shape somewhat similar to what I my pleats on the Pet en l'Air had ended up, with the difference that they would actually reach the waist seam and not hang partly loose. The side seam was also cut slanted.
In my mock up I both cut plenty of allowance on the top of the pleats and flaring the side seam by 20cm at the hem. The final total back width at the hem would be 280cm and the front skirts 50cm wide.
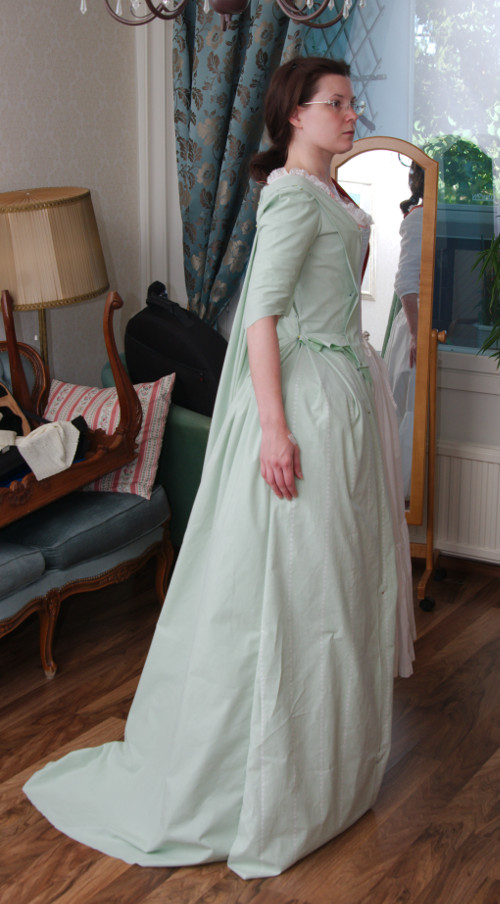
When I had pinned the mock up pieces on the lining and arranged the side pleats for a good while I was almost ready to cry. From happiness, that is. The old cotton sheet looked almost like an elegant Robe a la Francaise. (Well, one half of it). Finally the fabric settled nicely over the hoops and the back pleats fell gracefully all the way down. The small train I had added, estimating the length from museum piece patterns did not look too off either. I folded and pinned the extra length at the front and sides to match the shoes I was planning to re-decorate for the dress. Following the Snowshill Manor Francaise pattern I also shaped the front edge of the skirt slanted in roughly the same angle as the side seam.
I was fairly happy with the sleeve on the grey Pet en l'Air so I just copied the pattern and drafted the third ruffle following the shape of the other ones. The bodice fronts had also looked fairly decent, not counting in the weird robings-pleat thing. I had planned to this time make it for real, as a front pleat instead of an shaped extra piece cop out cheat, but yet again it defeated me. I just couldn't figure out how it was supposed to lie flat and smooth. In the end I just gave up and resorted to the shaped extra piece cheat.
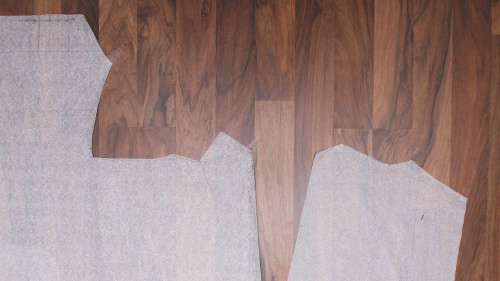
When I was happy with the mock up I carefully unpinned it again and marked the seams, pleats and pretty much everything of interest with pencil. Then I moved on to finish the paper patterns. The big scary Robe a la Francaise-project suddenly began to seem less like a mission impossible.
Trimming
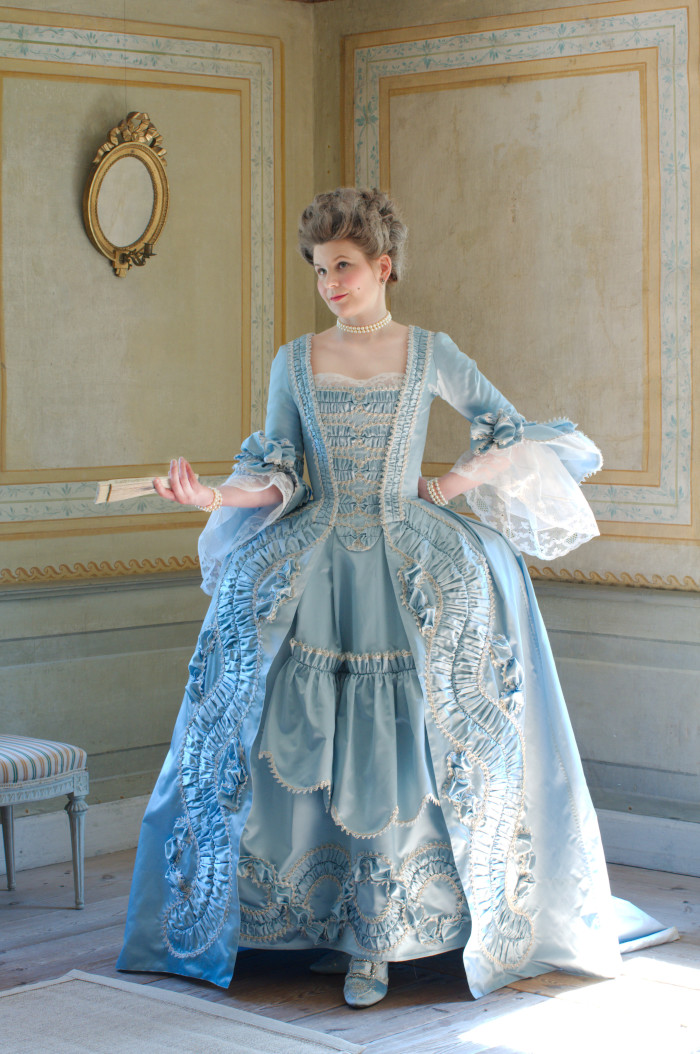
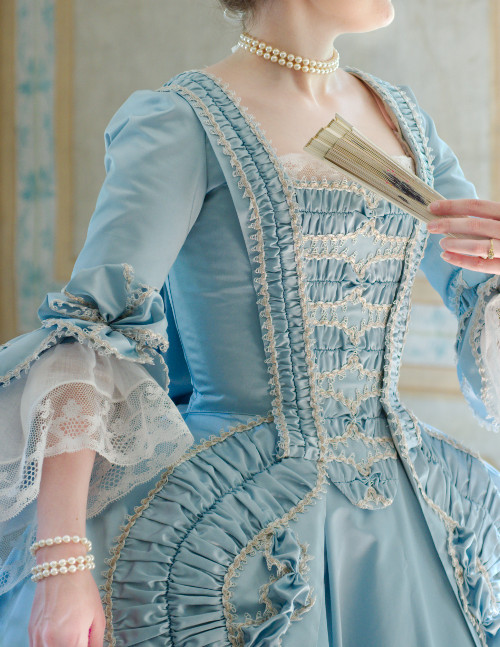
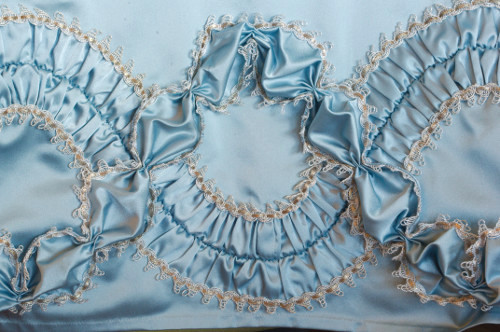
When I was fairly happy with my patterns I began to plan the trimming. The orange Kyoto Costume Institute Francaise mentioned above had a quite nice trimming plan, but then I found one that liked even more, this beauty from Victoria&Albert Museum
(T.115&A-1953). It has the lovely s-curve on the fabric ruchings, so typical to the rococo aesthetic, but it's not overdone, as the straight ruching strips on the robings balance the curvy trimming on the robe skirts and the petticoat. The little puffs combined to the ruched strips are also very pretty. All the ruching and ruffle edges are also finished with braid.
The proportions of the dress also seem to roughly match my body type, unlike some museum pieces made for really short ladies by modern standards, so the trimming design could be copied fairly easily.
My chosen trimming source does, however, very frustratingly lack a matching stomacher. I would just have to make some educated guess about the stomacher trimming, then.
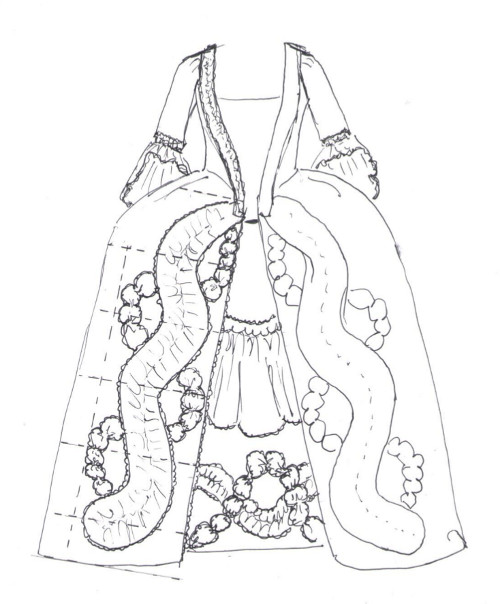
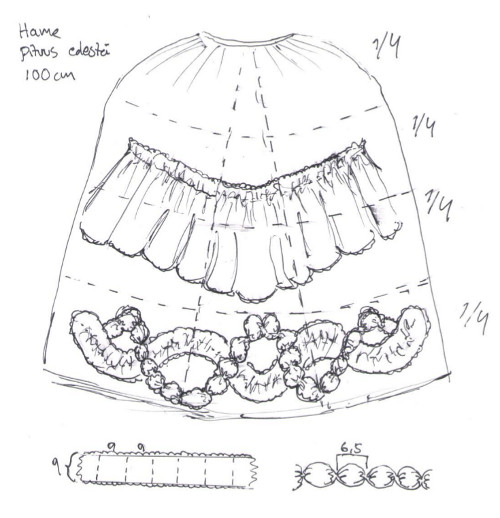
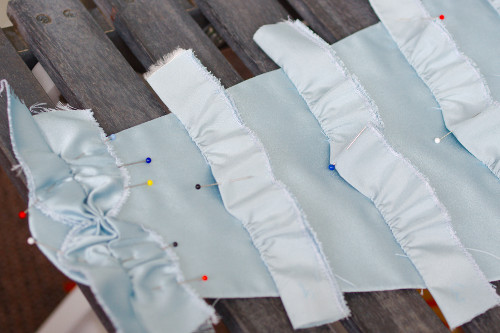
I was excited enough about this project to make some sketches for once, which helped a great deal to plan the trimming design. I estimated the width for the ruching strips and drafted their mounting lines on the patterns. I also made a short sample of the puffed strip and measured the desired length between gathered points. My puffs ended up a bit larger than in the original dress, though.
The petticoat trimming is of course partly another educated guess, as the pictures on the V&A site show only the center part visible underneath the robe. I simply continued the same style of decoration further to the sides.
All the ruching strips on the robe skirts and petticoat were cut twice as long as the finished ruching. The two to one ratio is actually rather dense for the period, many ruchings seem to be only very slightly gathered, which makes sense as fabric was expensive. But then again a more gathered look is lovely on a plain material (again I think of the Copley paintings here), and the two-to-one-ratio is super easy to measure. (I don't think they really counted the ratio on the period, but just gathered as they went along, but I don't trust myself to get an evenly gathered result without some measuring, at least not yet.)
The widest ruching strip on the robe front skirts is cut 14cm wide, the narrower one on the petticoat 8cm wide. The puffed strip used on both is cut 9cm wide and gathered with 9cm intervals to about 6,5cm long puffs. The ruching on the robings is cut about 5cm wide.
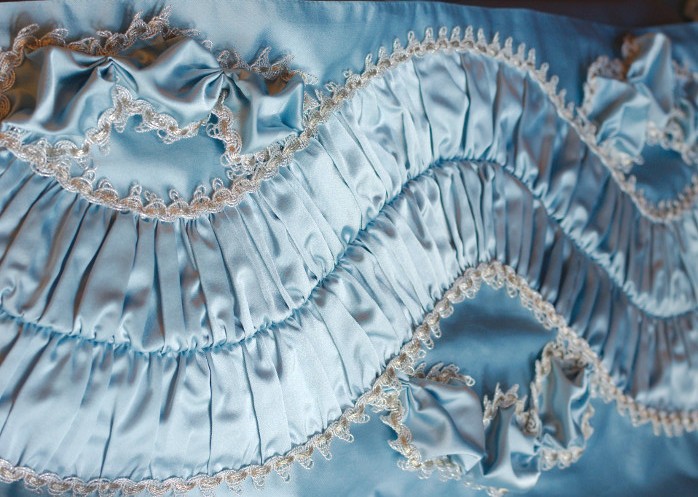
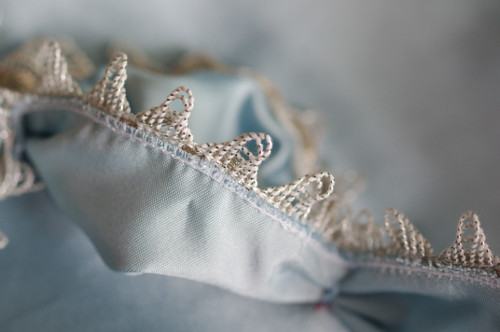
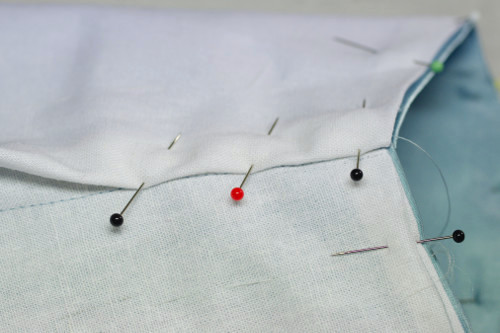
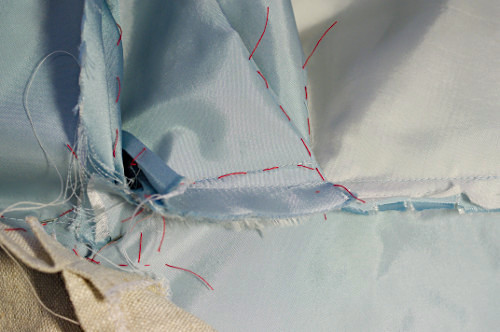
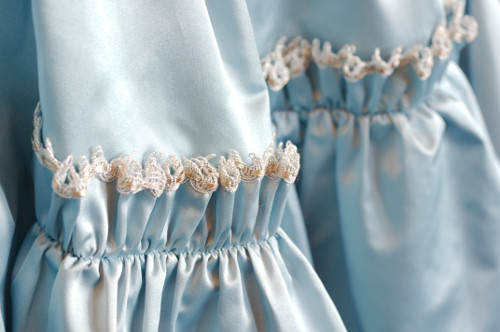
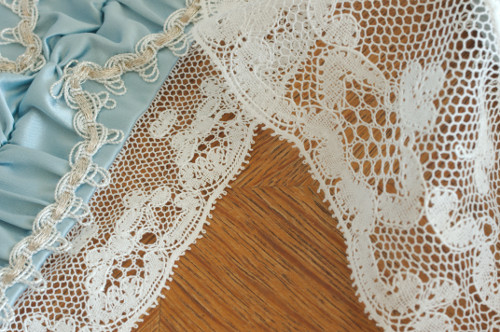
For some reason I had gotten into my head that the ruching strips would be first sewn onto the dress, edges and all, and the braid added afterwards to cover the edges. When I took a closer look at the V&A Francaise I realized that the strips were only gathered at the middle and the edges were flapping loose. This led me to take a closer look at other dress trimmings too. Many had the edges sewn down, but even then the braid was usually sewn on the edges beforehand and then gathered or pleated with the edges.
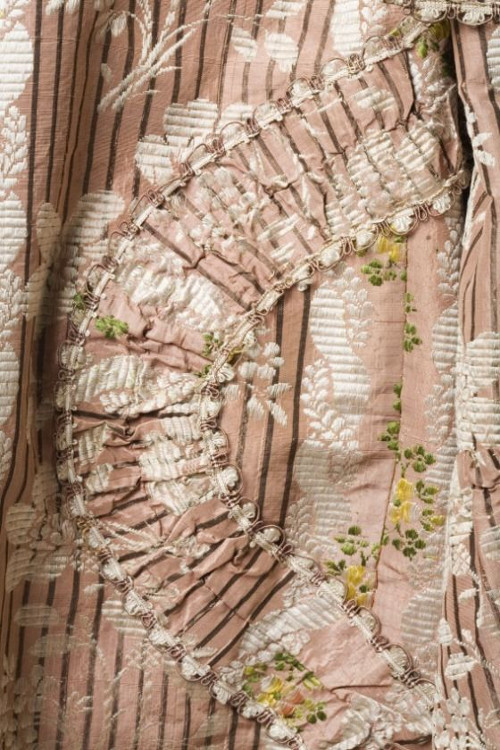
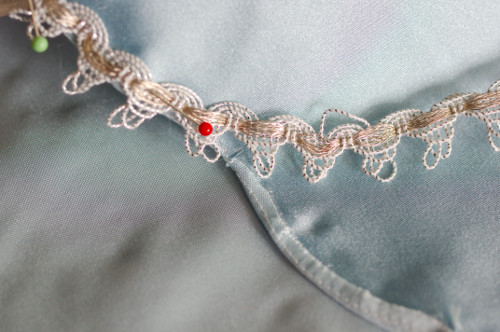
This kind of makes sense, of course, as it would be handy to finish the edges before gathering (especially on brocades). But it also strikes me a bit odd at the same time considering that usually any effort to save materials seemed to be worth the trouble to period mantua-makers, and this takes method so much more braid than adding it afterwards. On a more practical level, my braid stash, all that there was at the shop when I bought it, was not adequate for trimming the strips before gathering. Happily I found at least this example (above) where the looped braid is clearly sewn on after the gathering (just look count the loops on the outer and inner curve), so my ill-advisedly chosen method would not be totally wrong for the period.
Robe
Now that we have mentioned the dreaded term "period correct": My 18th century sewing careers has been a long journey from trying to incorporate blatantly modern methods into period garments to gradually learning some more accurate methods and, whenever I hadn't been too impatient, trying them out in varying degrees with varying results. Robe a la Francaise was such a huge and long-planned project that I originally wanted to use largely period sewing techniques at least in the finishing, as far as I was aware of them and they seemed to work for me. Along the way I of course resorted to many modern cheats after all - I'm not ready to give up machine sewn seams yet!
As my restless mind continually yearns for more different projects that I can reasonably achieve making something as historically accurate as possible has never been my main priority, while it might be an interesting experience in itself. My main focus is usually to make something that looks decently period and is within my budget limits, or sometimes even to just get something easily washable to wear for re-enacting events.
Anyway, as this project was one of the more ambitious ones, one very helpful source for dress construction and sewing techniques was the Rockin' the Rococo Sack Dress tutorial. Not that I followed it completely faithfully, though, but it was very informative.
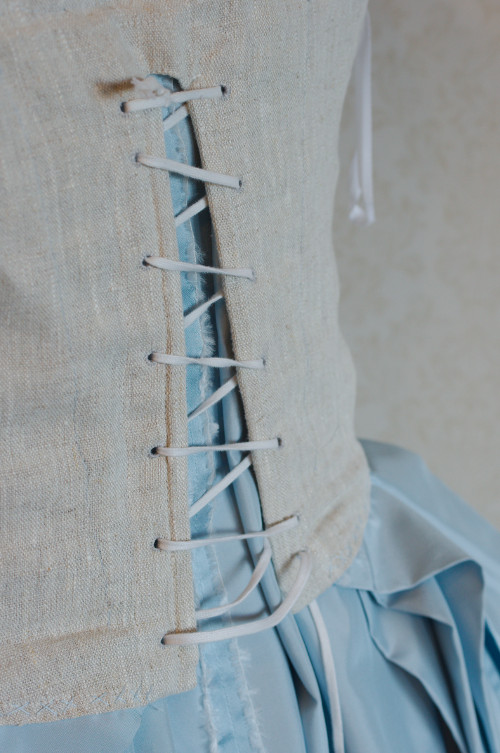
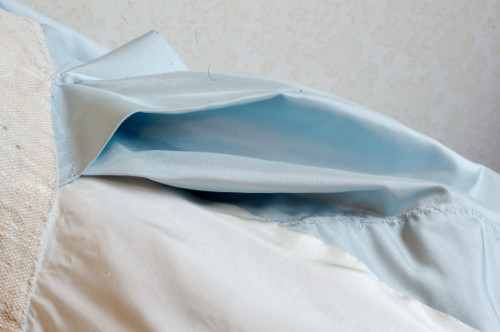
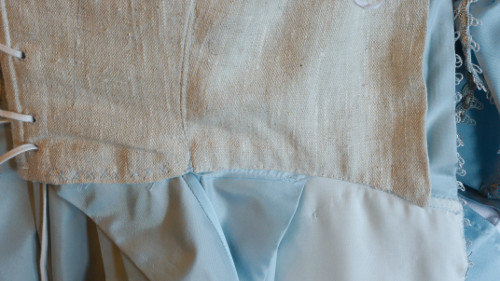
I began the sewing by cutting the bodice lining from a rather rough unbleached linen. I had originally planned to machine sew only the seams, but then I noticed how neatly the machine stitch disappeared on the textured material and machine sewed away the hems and the boning channels on the back opening edges. For the boning I used my usual budget material, cable ties. I made the lacing holes by hand, though, as they are so fast and easy to make on linen and always look so much more nice.
The front edges of the lining stop from a few centimeters form the dress front edge, and there is a 3cm deep fold left loose for pinning the lining into stays. On the neckline the lining goes all they way to the edge again.
I spent one Saturday on our living room floor cutting all the pieces and basting everything from the pleats to the ruching's gathering lines. This obsessive meticulousness proved wise, as pretty soon after this I became so occupied with this and that else that I had to bury the Francaise-to-be in a box under my sewing room guest bed for nearly a year.
I had, however, began the ruching strips. The satin was rather densely woven but still, like with all the satins, the cut edges just breathed out fluffy thread. I decided that my life would be so much easier if I would run them over with narrow overlock stitch at once, as it would eventually be covered by the braid trimming anyway. At this point it of course began to dawn on me why they prefererred to finish the edges with trim before gathering in the period...
In the puffed strips I machine sewed the braid over the overlock stitch, as they would go to the skirts and not be looked at that carefully. The machine stitch was nearly invisible on the top, but of course the edges tended to turn around in the finished puff strip to reveal the overlock disgrace. Oh, well. One learns.

On the ruched strips I first basted a heavier gathering thread at the edges right next to the overlock stitch, then pressed them to fold at the center and whip stitched a gathering thread along the fold.
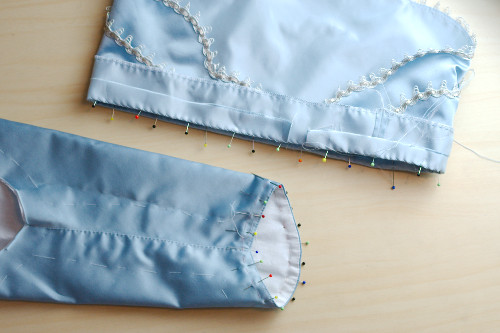
I have read that in the period they would add the dress trimmings last after finishing the dress, which makes sense if they draped the dress on the client. I felt, however, that as I was fairly confident about the cut based on the mock up it would be more practical to sew on most of the elaborate trimmings on separate dress pieces and put them together later. So I began, rather backwardly, with decorating the robe front skirts.
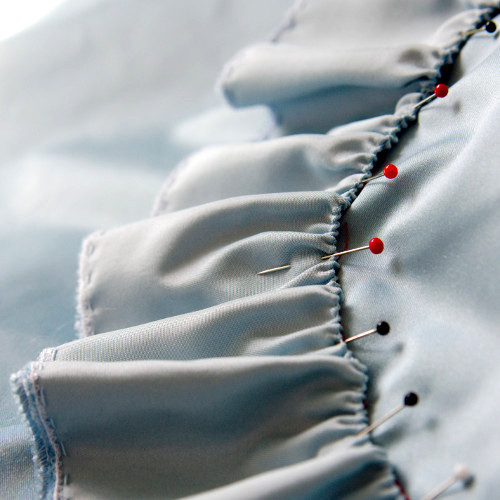
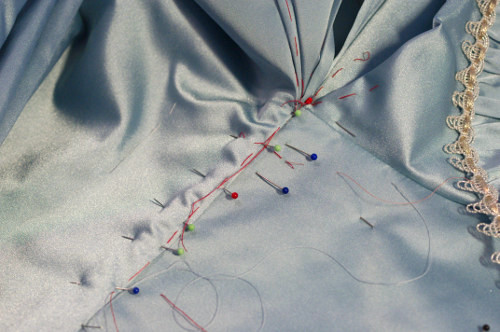
For the first thing I pinned the widest ruching strip on the basted curved line. I had placed pins at evenly measured intervals on both the strip and the basted line so that the strip would be gathered evenly. Only after pinning I tightened the gathering thread as I whip stitched the strip on the skirt piece between every gathered fold. It was a bit tricky to do this along the curvy line and not to pull the base material scrunched. It went slow, but the result is both pretty and durable.
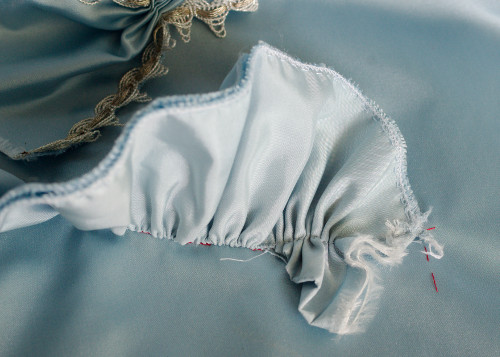
To get the ends rounded I slanted the gathering line towards the edge at the ends and left the last few centimeters ungathered.
After whip stitching the center line I left the edges still loose and added the puffed strips that circle in and out at the sides. They went pretty fast as I had basted the places where the gathered bits would be sewn on. I sewed the ends down under the ruched strip and tried to flatten them as well as I could manage.
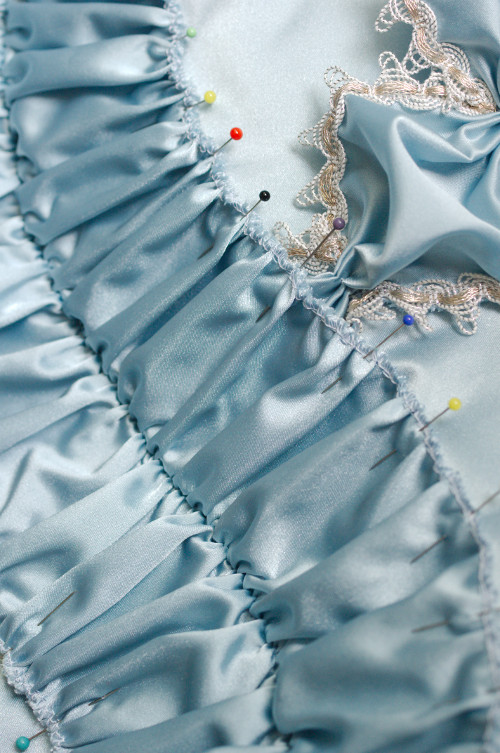
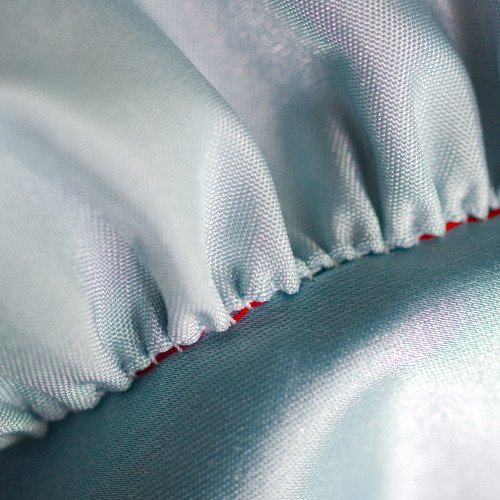
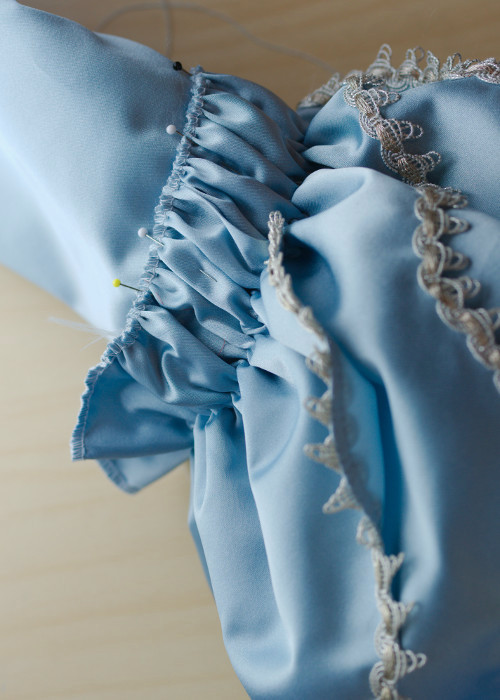
The ruching strip whip stitched on along the fold has to be pulled open, and the center line stays nicely crisp and puffy. After opening the fold I pinned the edges down at some places, carefully tightened the gathering thread little by little and smoothed the gathering evenly at the curves. When the gathering looked fairly even I pinned the edges more carefully. I thought that it would not go amiss to whip stitch the edges down loosely before adding the braid. At this point I also had to be very careful not to pull the base material out of shape.
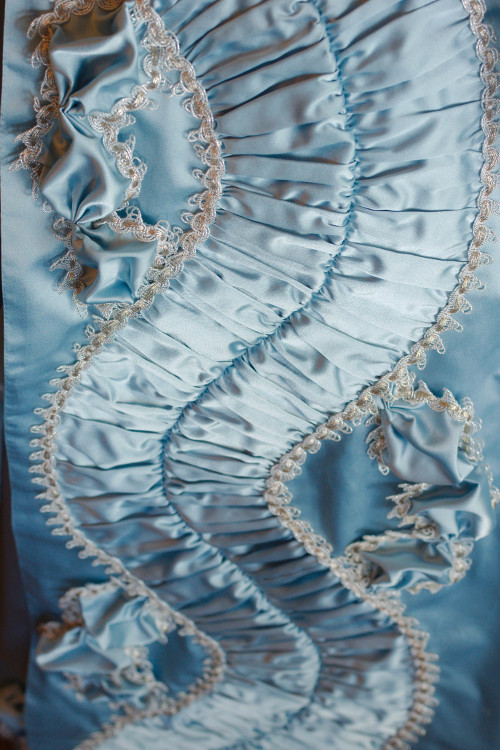
At the top edges I left the ruching strip unfinished to be able to sew that waist seam and front edges. Then I sewed the braid all around the wide ruching, only stopping at the top corner again.
When the front skirts trimming was finished I had to admit that it did pull the skirt pieces after all. The front edges were definitely wavy. I should have kept my stitches looser, as the ruching was not likely to tear off. I did what was still to be done with steam iron, but at last I had to resort to evening the edge with scissors. And yet the finished front edges still don't lie smooth and even, as you can see in the pictures.
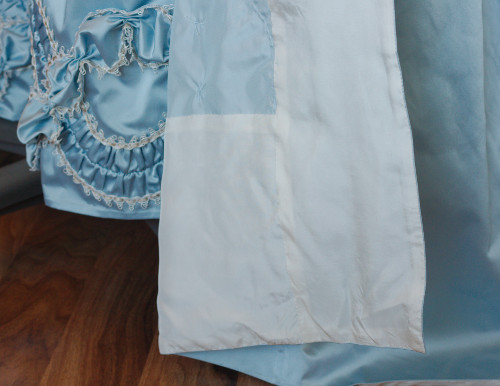
The robe skirts front edges and hem got a facing. I guess linen would have been a sensible option for the material, as it would protect the fashion fabric from dirt and wear at the train. Many museum pieces have silk facings too, which of course look so much nicer especially on the front edges and when the skirts are tucked up. Of course I was not going to put a silk facing to an acetate gown, so in the end I chose more or less wisely a thin acetate lining material, pretending it might pass for a very light silk. It does not offer much protection against wear, but of course it can be replaced if it wears quickly.

The hem facing is about 25 wide at the side seams and continues in a straight line across the back pieces. I basted it on the fronts and back at this point and sewed the top edge on the satin pieces with small herringbone stitches. Near the side seams I only basted it to be able to close the seams later.
The front edges got a 15cm wide facing. I pinned and sewed the facing a bit tight on the edge to pull it back to shape, which helped a bit. The stitch line of the other edge was mostly covered by the trimming.
At this point I stored the front skirt and back pieces away for a while and turned my attention to the sleeves.
I had decided on proper three layer sleeve ruffles, and planned to finish the edges with the braid. Many museum pieces, the V&A Francaise among them, have silk lined sleeve ruffles, and I guess at least brocades need the lining. The wrong side of the satin was so neat that I saw no need for a lining, though, and it would only make the gathering more tricky.
I sewed a line of machine stitch near the scalloped edge, clipped the allowance between the scallops and then pressed the edge to turn on the right side. A machine stitch ends up a bit tight so easily that I didn't even have to really gather it to get the edge turn inwards quite easily. The corners were a bit tricky, of course.
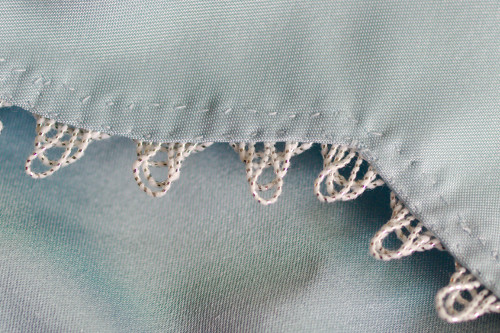
Next I sewed on the braid with two lines of small stab stitch, first very near the edge and then the other side of the braid. The corners between the scallops are reinforced with a few extra stitches.
I lined the sleeves with linen, sewing first the fashion fabric edges and one edge of the linen together, then pinning the other linen edge folded over the seam and stitching through all layers by hand. The sleeve end is also finished by hand. In my former Pet en l'Airs I have just bag lines the sleeves, but now I tried to put on a bit more effort.
When I had finished edging all the ruffle pieces I basted them together at the gathering line and neatened the top edges with overlock, all layers together. Then I basted a heavier gathering thread along the folded line and the top edge right next to the overlock stitch.
I also basted a guideline for the gathering on the sleeve, pinned the ruffle on and whip stitched it on the sleeve from the underside. Costume Close Up has a nice diagram about this on page 15.
When the lower gathering was secured on the sleeve I pulled the top edge gathering thread tight and pinned the top edge on the sleeve, then whip stitched it on place. For the last thing I added the braid on the top. This was, again, doing it unlike they seem to have mostly done in the period, but again I didn't have any extra braid to gather. Besides, the stiff metal braid would also have looked just awful gathered this tight.
Only after finishing the sleeves I also realized that the sleeve ends were a bit too shaped, on a Francaise they might well have been more straight and shorter and the ruffle covers the elbow anyway. The ruffles themselves could have been a bit wider too to flare out prettily. But I guess they'll do.
After playing around with the smaller, separate pieces it was finally the time to begin putting things together. Of course I could have still followed with the stomacher, but I had still not managed to make up my mind about the trimming, and secondly despite careful calculations I was still not 100% sure how much braid I could use for it. I had also found out that the bolt of braid had damaged parts where the metal threads had darkened badly, so I would have to either cut them away or use them for not so visible parts of the trimming. Even rather small bits would be useful on the stomacher, while on the longer pieces I'd rather have not any more bulky joins than necessary.
At this point I also had a vacation, which is the perfect time to work on something that needs your full abilities and concentration - such as putting together a Francaise bodice rather than whip stitching ruching which you can manage half asleep on the couch after a workday. This is why I put off the petticoat at this point too.
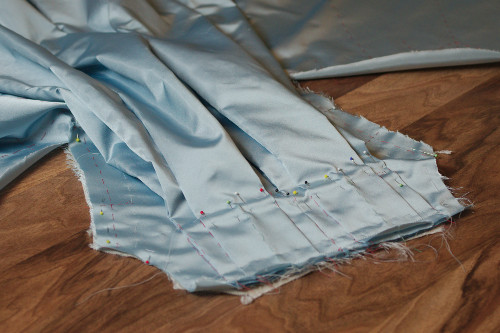
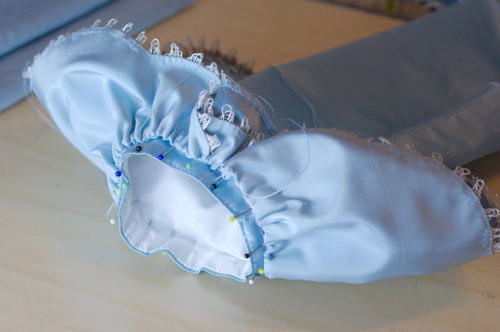
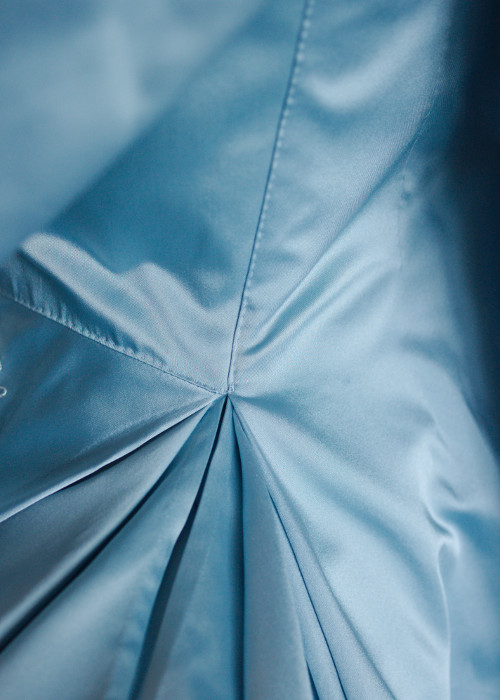
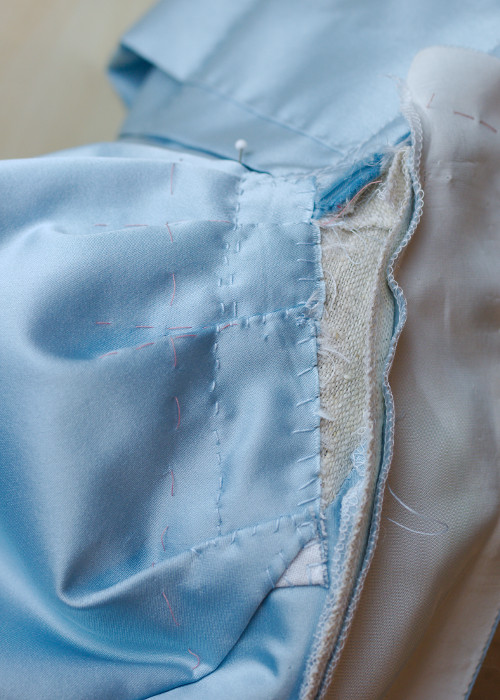
I had basted the back pleating lines on the pieces after cutting, but still I had to dig up my patterns and diagrams again to make sure I'd fold them right. I pinned the pleated back piece on the lining and secured it with a horizontal line of herringbone stitch 10cm down from the neckline. In my previous Pet en l'Air's I have sewed the pleats with vertical stab stitching at the top pleat edges, but since then I have learned that that horizontal stitching seems to have been more common.
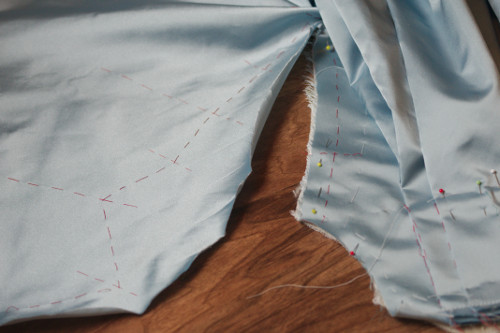
I basted the satin on the lining a few centimeters from the side seam and under the pleats, where the hand stitched line that gives the back of the robe figure a hugging shape would go. Then I moved on to the front pieces.
I sewed the front skirt pieces at the bodice waist, folded the side pleats following the basted lines and sewed their top edges together by machine. Then I basted the front bodice on the lining, sewed the shoulder seam on the back and the side seam on the lining. I pinned the skirt side seams and tried the whole thing on.
I had pinned the side pleats at the waist seam on front and back for the fitting. The back part looked great, but on the front I had to adjust the angle of the pleats a bit still to get them to fan out neatly over my pocket hoops. Also the front waist seam had to be curved a bit more on the skirt piece, but apart from these small adjustments, easy to fix at this point, everything seemed pretty promising.
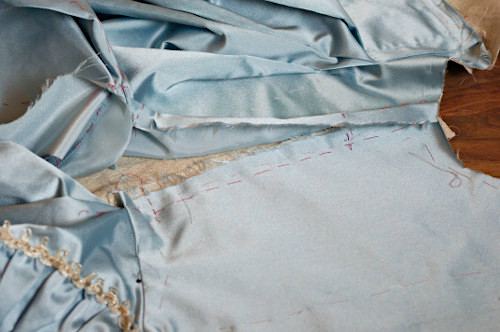
After the fitting I could happily move on to finishing everything only pinned and basted so far. On the side seams I basted the front seam allowance over the lining seam, folded the back seam allowance under and pinned it on the top of the seam, and then hand stitched the layers together. The back side pleats turned under with the seam allowance.
On my grey Pet en l'Air I had had problems with the back fit, the satin tended to pull askew when I stitched it on the lining under the pleats, but then again I had also messed up the side seams and had too narrow back width so maybe it all began from there. Anyway, this time the fabric laid smooth over the lining on the fitting so I could happily stitch it on the lining.
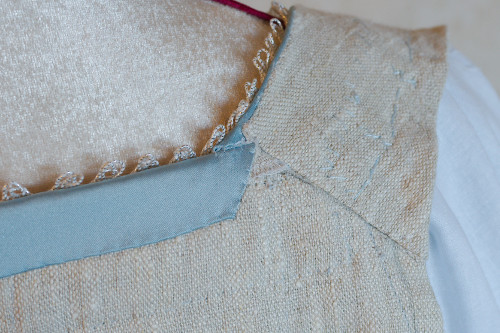
I sewed the back side pleats on the hem of the lining. At the front side I slip stitched the lining on the waist seam and reinforced the side slit top with a few stitches. At the front edges I sewed the lining on the satin 2cm from the lining edge to form a fold for pinning the bodice on stays. This stitching line is technically always covered by the robings, but still I wanted to sew it by hand.
As I have already mentioned, I had ended up making separate robing pieces shaped like the bodice edge. I faced them with the same thin acetate lining I had used on the skirts. I basted matching points for the waist seam and bust point as I had cut the robings a bit extra long at the ends just in case. As the satin and lining both love to fray in seconds I neatened the edge with overlock. The seam allowances end up between the bodice and robings, but they will get brushed when pinning the dress.
I machine sewed the robings on the front edges by machine from the waist seam upwards to a few centimeters to the shoulder seam at the back. I left the ends hang loose to finish them later.
Then I sewed the finished sleeves on front the shoulder seam around the armhole to under the robings at the front. I had already at the cutting stage basted lines for the top pleats and the shoulder line. Now I pinned the pleats, pinned the sleeve top on the shoulder and tried the gown on. The sleeve top only needed some tiny adjustment. I trimmed off extra allowance and sewed the sleeve top on the lining with strong thread.
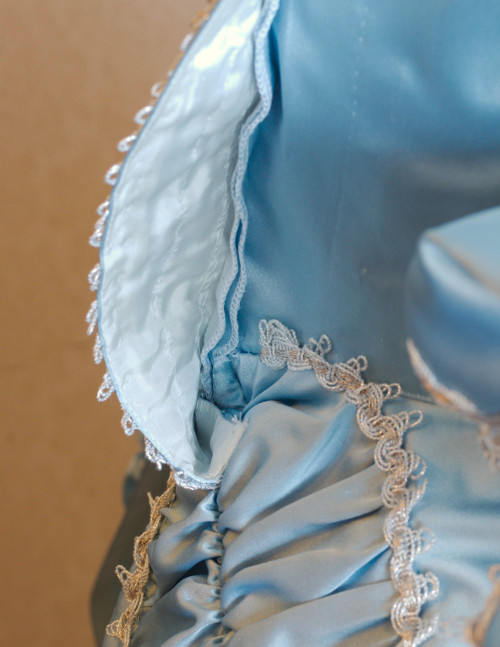
When I had sewn in the sleeves it was time time finish the robing end at the back. Something mysterious had happened at some point, though, either the back neckline had stretched or the shoulder part had stretched (on the Francaise it's rather on bias unlike in the closed front bodices where it's usually cut as a separate piece), as the robings tended to settle inwards from the back neckline corner. A narrow neckline is of course better than a too wide (it's actually still quite wide for a later Robe a la Francaise), so I maneuvered a bit with the seam allowances until I could get the neckline to match the shape of the robings.
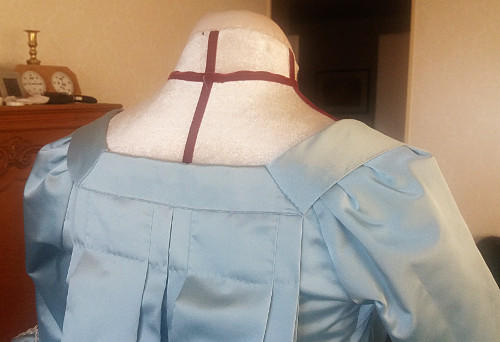
I sewed the ends of the robings down, turning the allowances under. Then I cut a 9cm satin strip, sewed it on the back neckline (just a bit tight to keep the neckline from stretching any more), turned the ends under in the corner and turned the top edge on the wrong side of the bodice. This bit at the back always looks so nice that it's almost a shame to cover it with trimming. It's not perfect, though, as I rather think the sleeve seam should meet the robings corner, which didn't happen here, and I was too lazy to fix it later.
In the period they obviously just left the underarm seam like that, to fray all it pleased, but I'm too pedantic for that. I turned the seam allowances in towards each other and whip stitched the top.
As I had just copied the sleeves from my previous patterns, drafted years ago I had not really stopped to reconsider their fitting the period. I have already mentioned the perhaps too curved elbow. Another thing that I realized only later that the shoulder pleats were usually smaller than mine. Oh, well, I'm not taking them out anymore. Besides, larger pleats work better on a heavier material.
Now the bodice was more or less done save for the trimming, which made me really happy as that was the part I has dreaded the most beforehand. There was still much to do left, of course.
I hemmed the skirt side slits and side seam allowances narrowly and sewed the rest of the facing on over the side seams. Then I checked the hem length (A bit long at the front), trimmed off extra, pressed the narrow allowance to turn under, pinned the lining on the hem and secured it with tiny stitches through the edge.
I had left the bottoms ends of the robings loose as I thought the ruching would be easier to sew on that way. The robings were covered with about 5cm wide straight ruched strip. For some reason I have never really fancied curvy trimming on robings, so this was another thing that had made me fall in love with the V&A Francaise.
As I had by now noticed that the double length strips I had used give very dense ruching I decided to try a 1,5 to 1 ratio for the considerably narrower robings. At first, while gathering I wondered if they would look too sparse after all, but when I had sewed the edges down they began to look just right and in harmony with the rest of the trimming.
When the robings were covered with the ruching I at last finished the front skirts top corners: First the wide ruched strip, matching it to where the robings would end, then the braid on top, going a bit over the waist seam. Then I turned the ends of the robings under and sewed them by hand on the skirt and the little bit of front edge left. On the picture you can see how one can still manage to turn the robings up for pinning.
Petticoat
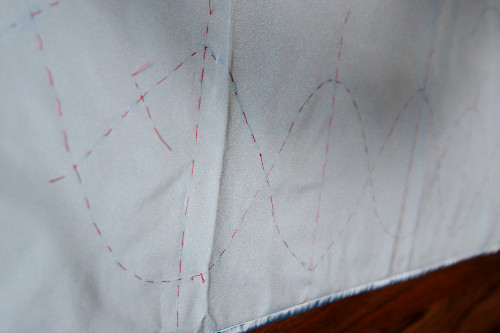
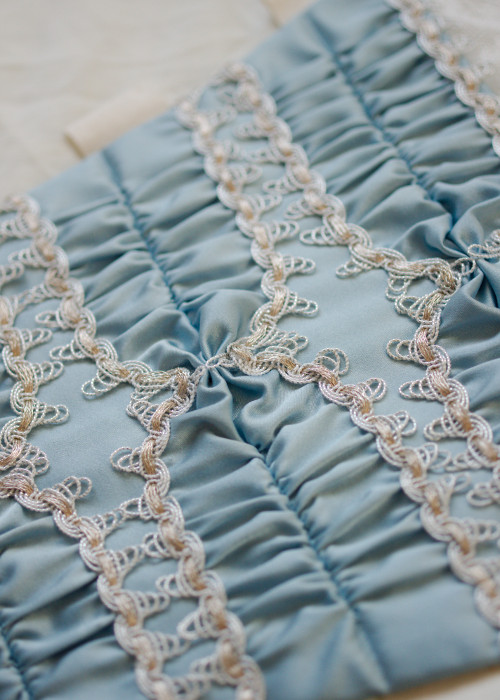
Next I moved on to the petticoat, and it was time for rather relaxing gathering and whip stitching by previously basted lines again. I had already in a very early stage began to hem the petticoat pieces. This may sound like a very curious order of doing things again, but as I would sew on the trimming before assembling the whole petticoat again every adjustment on the length would have to be made on the top edge anyway. So why not hem the individual pieces save for small bits at the sides? (Had I known before that the curved ruchings may pull the main pieces out of shape I might have reasoned differently and done the trimming first).
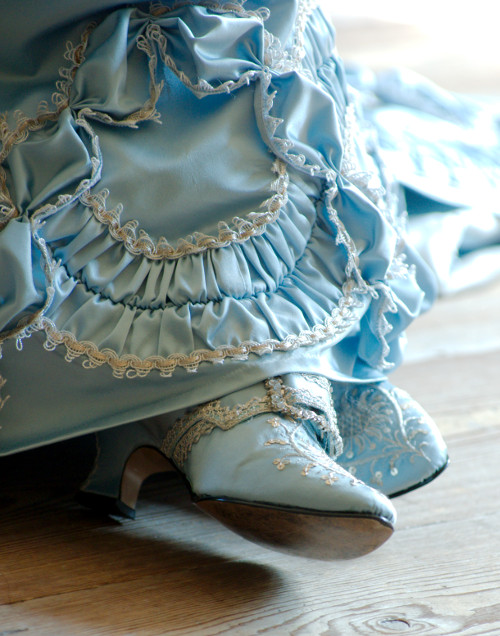
The petticoat trimming followed the same lines as in the robe. I began with the ruched strip, though being a bit wiser now I consciously tried to leave my stitches looser and not get a curvy hemline. Obviously I succeeded better now as I didn't have to take out my hemming. At the last upward curve I left the edges still loose to be able to tuck the ends of the puffed strip underneath. The pictures of the V&A dress don't show how the petticoat trimming continues to the sides, but I thought this looked neat.
My bolt of braid was running low, but happily there were a few separate bits long enough. One join I hid under a puff and another in near the hem on one side. I don't know why I was so neurotic about them, as I don't think a join in the trimming would be anything people would be concerned about in the period as long as there was plenty of it, but I guess it's one of my modern obsessions. Anyway, then I added the puffed strip and finished the remaining bits on the sides.
The large ruffle above was cut twice as long as the gathered line. I finished the top- and bottom edges like the sleeve ruffles, and hemmed the sides. I gathered it 4cm from the top edge and whip stitched on the petticoat. The heavy top edge wouldn't stay up, so I had to baste it lightly on the petticoat.

When the trimming was finished I closed the side seams, hemmed the side slits and the rest of the hem at the sides. I pleated the waist on a dummy, making rather large pleats as they settle more smoothly under the robe. Tiny pleats are a thing of the later, closed front gowns. I had to lower the waistline at the front a bit more than I had estimated, and the petticoat ended up on the border of being too short. But then I had already planned to get fabulous shoes to wear with the Francaise, so they could as well show.
When the pleats were more or less symmetrical on both sides I sewed the waistband on by machine. No hand sewing in a place that doesn't show and needs to hold together securely!
After all the work with the robe the petticoat seemed to get done almost by itself even with the rich trimming. Then there was left only the stomacher that I had put off for such a long time.
Stomacher
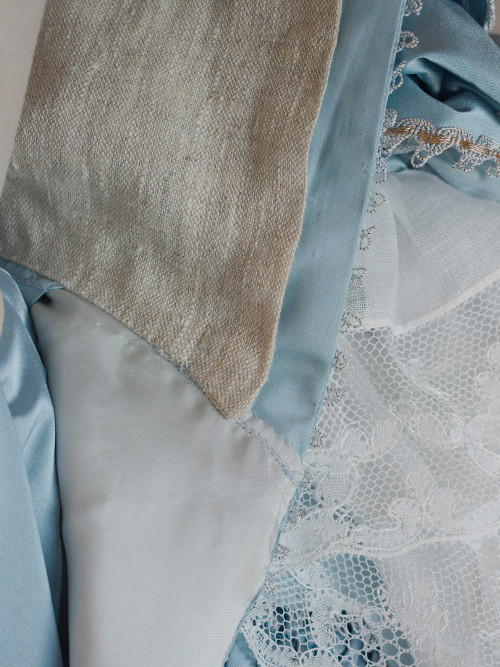
I tried the Francaise on with the stomacher from the grey Pet en l'Air and decided that while the width was still fine it was a bit too long. I drafted a new pattern and made the stomacher base from the same linen as the bodice lining. It was actually more soft than stiff, but I always tend to use too heavy materials I decided to give it a try as the boning would help to keep it in shape.
I simply bag lined two layers and stitched the boning channels and edges. Then I mounted the satin on it, turning the edges on the wrong side and whip stitching them on. The stomacher base was done rather hurriedly and its not even quite symmetrical, but it doesn't really show when it's on.
Then I had to finally make decicions about the trimming. I had originally wanted a spiralling trimming with lots of figure 8ths and s-curves, but then I realised it might be the most practical thing with my chosen technique. First of all, spiralling strips should be very narrow, but then the wide looped braid would swallow up half of them. Secondly on my body a stomacher is rather a long an narrow than a triangular piece, which limits the trimming designs as well. I had also wanted to date my Francaise to late 1760's to early 1770's just because I love tall hair, and by then the simpler comperes-fronts were all the rage.
The most fitting layout for the rest of the gown and the period would probably be a ladder of straight ruched strips, possibly with bows. My other source of inspiration, the orange brocade KCI Francaise has a stomacher of simple ruched rows, which I had at first dismissed as boring, but gradually it grew on me. I would have still liked to add the bows frequently seem on portraits, but was by now running out of braid so I had to abandon them.
So, in the end I cut 6cm wide strips, gathered them save for about 5cm at the center. This straight part I gathered along the center line. This simple thing gives a rather pretty look that sort of combines the ruched and puffed details on the skirts. This decoration also needed very little braid, and that could also come in short pieces.

I left the ruching strips ungathered also for a few centimeters from the edges to get a smoother base for pinning. I turned the ends on the wrong side, added tape loops for pinning and then covered the mess underneath with a linen lining.
I had felt a bit lukewarm about the stomacher, and just sort of wanted to get it done, but in the end I was surprised at how harmoniously it slipped into the whole outfit. The horizontal ruchings create a nice sharp contrast to the vertical ones surrounding them on the robings, the narrow stomacher is not at least made more narrow by them, and in general the more geometrical bodice decoration balances the curves on the skirts.
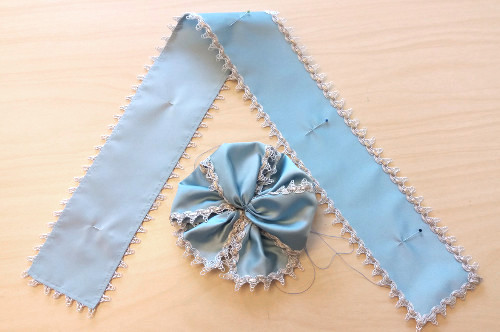
Then there was the one last thing to add on the robe: The elbow bows. The 75cm long and 8cm wide pieces were again finished with the braid like the sleeve ruffles, and I had left them last, working on them while traveling etc. I gathered them into lush two-looped bows and tacked on the sleeves. At first they looked enormous, but on a rococo dress more bows is always a good thing.
Accessorizing
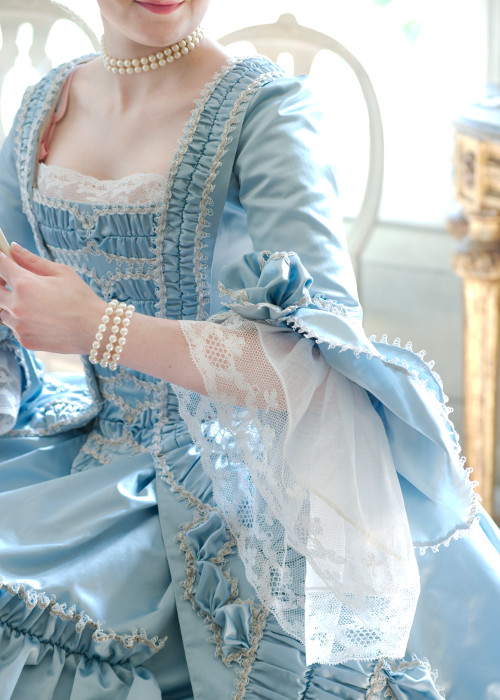
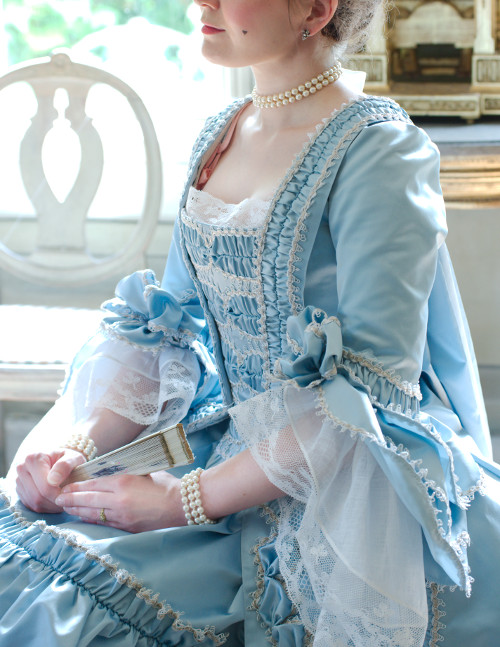
Essential accessories for Robe a la Francaise are the wide, flimsy ruffles on the sleeves, either with lace or embroidery. For the Francaise project I also wanted to indulge my other newly found passion, making bobbin lace. The lace ruffles should have two or three layers, but one layer on each sleeve was all I was able to manage with a bit over year's notice. More detail about making the lace can be found here.
I have always been under the impression that sleeve ruffles were tacked on the shift sleeves and removed for washing. When I had gathered the starched ruffles I realized, however, that there was no way I was going to pull them through the narrow robe sleeves every time I dressed, they would at best get creased and at worst tear. So I decided to be unconventional but practical on my own fashion, and tacked the ruffles on the robe sleeve ends. While I'll still have to take them of if I want to wash the dress or change them to another dress, or if they brush my dinner plate, but it will anyway be likely less often than washing the shift. I think the more informal Pet en l'Airs will do with factory lace and I'm not going to make another Francaise for some time!
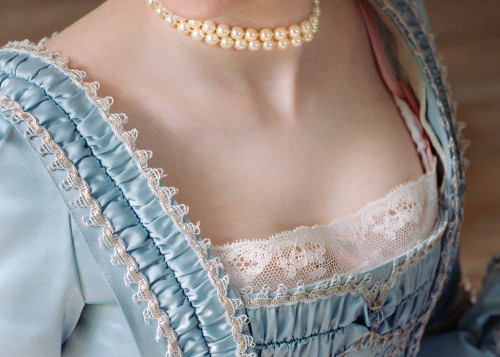
Robe a la Francaise is often, though not always, worn with lace on the neckline too. I have previously thought that to be sewn on the shift neckline too, but have since learned that it's tacked on the robe necklace and the top edge of the stomacher, which makes sense considering the washing, too. On a lot of portraits you see only a bit wider, ungathered bit of lace in the stomacher edge. This seemed to me a nice style for several reasons: first of all, I did not want too much lace to overcrowd the beautiful wide neckline and secondly a 25cm long strip of lace was something I could make in a few month's time.
I sewed the finished lace on a cotton tape which I tacked on the stomacher. When I tried the Francaise on I noticed that I had to twist the ends downwards so that the lace would not stick up but fall on my bosom. It still does not lie all smooth, however.
I had felt ambiguous about the neckline lace too at some point, fearing it might make my already quite high (by 18th century standards) neckline look way too high, yet I still wanted it (more lace!). In the end I rather like the look: The lace is light and airy enough not to look stuffy, and it creates a nice counterpoint for the voluminous sleeve ruffles with a wider lace.
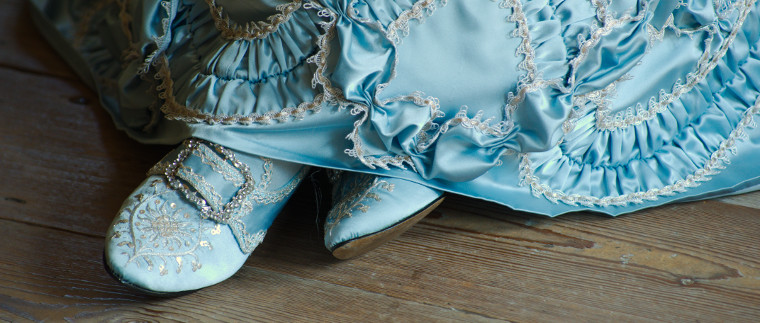
To finish the outfit I took apart a pair of thrifted shoes and re-fashioned them into matching, embroidered satin shoes.
Conclusion
The Francaise-project was a slow one. Not so much because it was that difficult after all, but rather because as I had no clear deadline for it it was all too easy to put on the shelf repeatedly to make time for more urgent matters, both hobby- and work-related. Of course it was also very time consuming with all the hand sewing, not to mention the lace on which I worked at the same time.
After the unhurried beginning I did at some point towards the end to lose my patience with the whole thing, including the accessories, and just wanted to get it done and move on to something new. This is one reason why I don't have as many making-of-pictures as I'd like to have and planned to take beforehand, as I was too much in a hurry and stressed out to try to play around with the DSLR camera I have difficulties handling and just snapped a few quick shots with my phone.
The on and off-way of working was far from ideal also because though I had for once actually made notes and sketches of my plans in the beginning I still managed to forget half of what I had intended to do in the long intervals I was busy with something else. Also the longer you work on something the more you begin to notice your mistakes and things you have since learned that should be done differently, and easily feel too lazy or frustrated to fix them afterwards. And at some point you just lose your interest and want to begin on something new and shiny. At first the pretty half finished Francaise on a dummy in my living room (because my sewing room was a mess at the time) looked adorable and made me smile, but after some times I began to be simply annoyed with it. So fickle is the human mind.
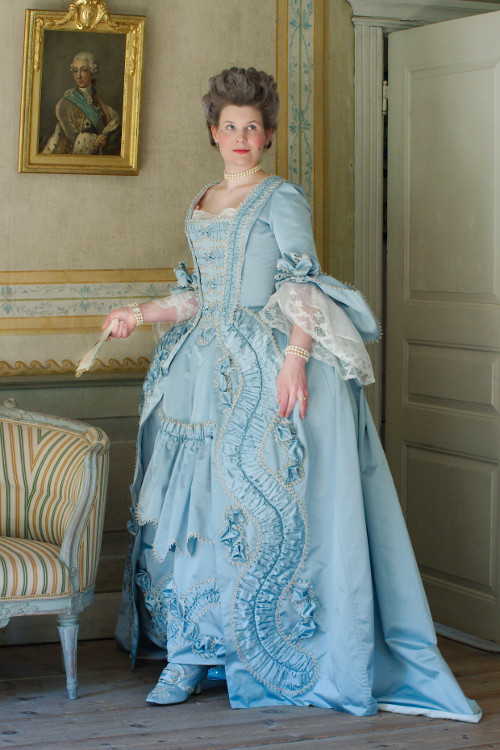
Finally, when it was finished, after a couple of weeks the Francaise with all the pretty accessories began to look lovely to me again. It may not be nearly period accurate, but on an aesthetic level it works very well and is very close to my initial idea of a frilly, pastel toned fountain of prettiness (It has been already nicknamed "The Frozen Francaise" by a friend). I'm also still happy with the fabric, though its heavier and stiffer that silk satin would be it compensates by being washable (already tested as I frequently sew with chocolate and sometimes accidents happen) and does not crease easily. And the color, it's just perfect. And now that I at last have accomplished a Robe a la Francaise I think I sort of qualify as a proper 18th century seamstress.
The pictures of the finished dress on me are taken at the Kahiluoto Manor at Seurasaari Open Air Museum. Many thanks for the friendly staff and Kansallismuseo (The Finnish National Heritage!)