I have been following Kendra Van Cleave's Demode-blog for years, actually it was an important early inspiration to get into costuming in the first place. Some years ago Kendra wrote some posts about an 18th century dress called “Brunswick”, which was the subject of a Costume College workshop at the time. I had never heard of such a thing, and I have to admit that at first the outfit struck me as a bit silly. I saw it as a beautiful robe a'la francaise with some totally weird additions, like the lower sleeves that looked funny to me with the elbow frills. The hood, even though cute, also struck me as not fitting in, perhaps as in modern wear a hood is associated with leisure wear or practical outdoor wear, which pretty much as far as you can get from the opulent elegance of a robe a'la francaise.
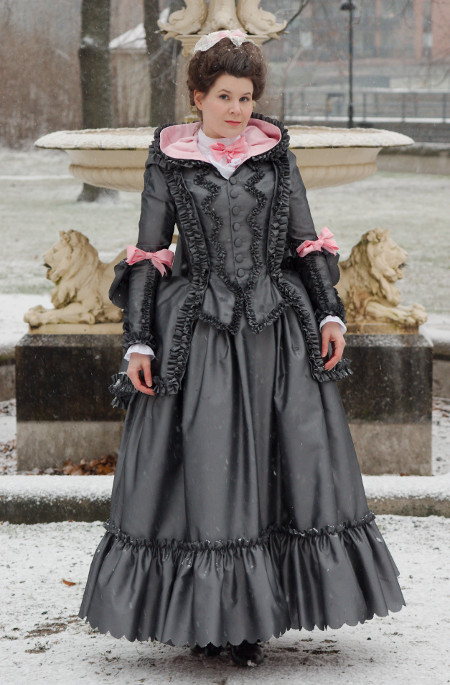
However, when I looked at more pictures and followed Kendra's project I began to get more interested in the brunswick. The details that had at first struck me as silly or weird settled into an 18th century context in my mind and I began to see the charm of the dress. When you keep in mind that the brunswick was a fashionable outfit meant for traveling etc. that made small concessions to practicality and warmth, it begins to make sense. It's got the fashionable cut of a Pet en l'air, the fashionable ruched trimmings and then the added extra coverage to keep you warm. Actually, come to think of it, it would be totally essential for a Scandinavian climate. From this notion there was a perilously small leap to beginning to plan my own one.
I already had a warm riding habit in thick wool, so a brunswick might not get that much use (when did that ever stop me, though), but the plan took another turn. If I would make a separate hooded waistcoat instead of just a dress front I could change it to a stomacher for a lighter version of the dress. This would also get me two dresses for the fabric cost of one, the brunswick that interested me now and a pretty pet en l'air dress, and just think of the convenience of changing a day outfit for a ball gown! Okay, a pet en l'air is really totally not a ball gown, but happily the re-enactor's ball dress codes are quite flexible to say the least.
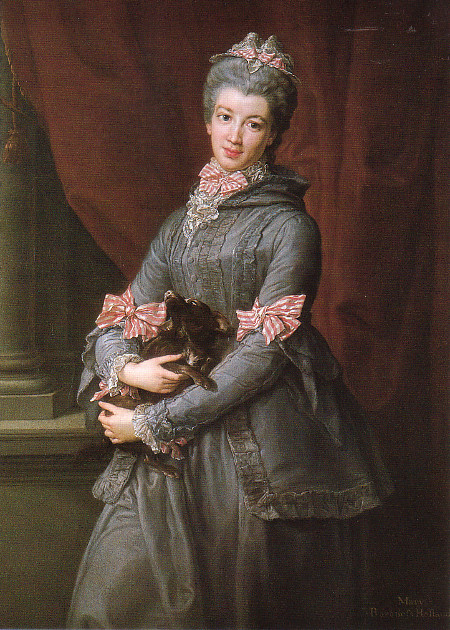
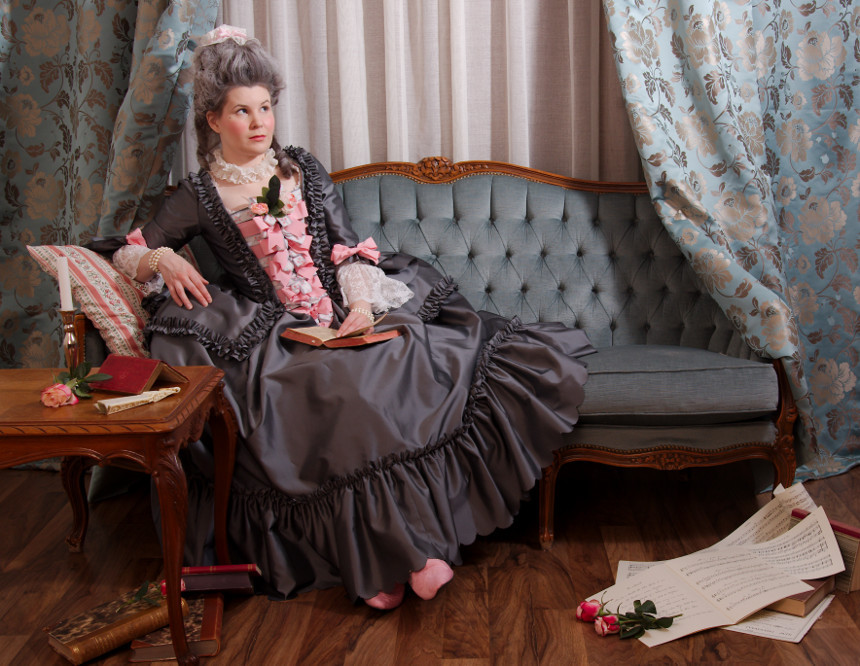
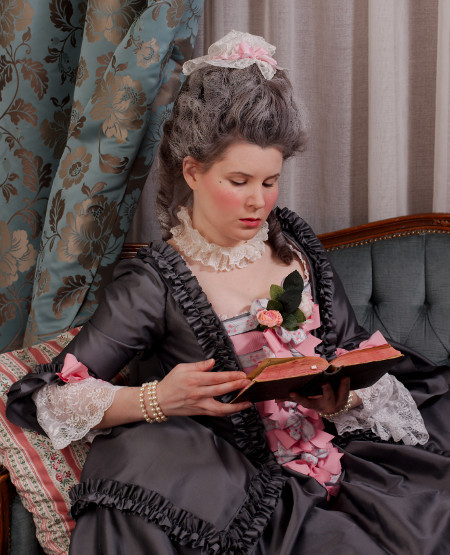
While looking at the period paintings I took a liking to the brunswick in the portrait of Lady Mary Fox, which has a lovely color combination. In time I was also lucky enough to come across a very affordable polyester taffeta in the right shade of gray (no pun intended). The bows in the portrait are red and white striped, but as a striped band is hard to find and fabric substitutes boring to hem I settled for a pink ribbon from the stash. The striped bows look pink from a distance, anyway, so the effect is quite similar. Anyway, it's no secret that I love pink, so it was not a hard decision, and I like how the pink bows bring some playful color to the sombre gray dress.
From Demode I learned that according to the Costume College workshop a brunswick was worn without skirts supports like hoops or bumrolls, though some of the pictures show petticoats of suspicious volume. I began to wonder if a quilted petticoat might be suitable to wear under a brunswick, as it gives some modest volume to the skirts but most of all was worn in the period for warmth, which would fit in with the whole “fashionable but warm outfit”-concept. Happily I already was a proud owner of a quilted petticoat, and also of a long sleeved habit shirt with ruffles. Both the real life wardrobe and re-enacting one work by the same rule: If you already have something to match the shiny new thing you buy, the better.
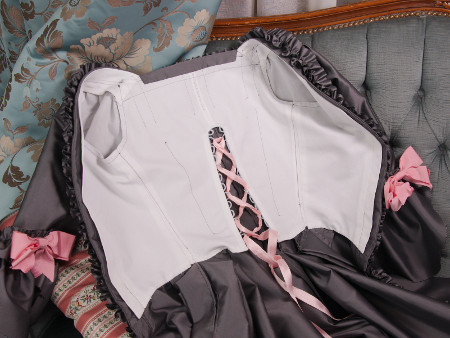
So, my plan was to make a separate waistcoat and a pet en l'air. Diary of a Mantuamaker has also made a beautiful brunswick with a separate waistcoat. It's made like a men's waistcoat of the time with a back lacing which gives nice fitting allowance. Also following a men's waistcoat the back is made of linen. I decided to follow the lead. At first I thought to make removable lower sleeves with buttons and loops, but then I began to wonder if the waistcoat could actually have long sleeves. The men's waistcoats sometimes did, especially on the first half of the century.
Apparently the reason for the curious added lower sleeve in brunswicks is that they were made by seamstresses who did not at the time use the two piece pattern for a long, curved sleeve but rather added an additional lower sleeve tube on the regular elbow length sleeve. The riding habits with the two piece sleeve were made by tailors. In the light of this information a long sleeved waistcoat in a brunswick would be historically unlikely. So, why was I taken with the idea of a sleeved waistcoat? Turning the brunswick into a pet in l'air without extra fuss with buttons was one appealing thought. Another was the warming extra layer of material covering my arms. Of course this extra layer also brought the problem of possible bulkiness on the narrow sleeves. In the end I decided to at least try out in the mock up stage how the long sleeve would work.
Drafting the pattern
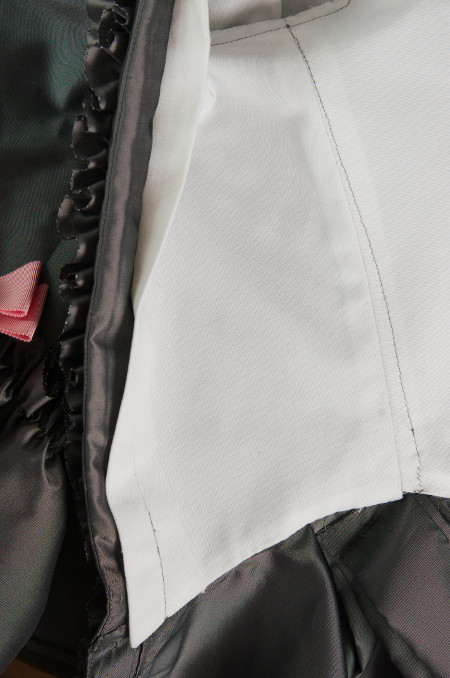
I began with making a pattern for the waistcoat. The riding habit gave a good base for that. As the habit had turned out a bit loose and the material in brunswick would be much lighter I took the pattern in at the sides for 1cm so that the armhole became narrower too. To get the sleeve fit smoothly under the pet en l'air sleeve I also raised the armhole a bit. In many portraits it's hard to tell if the waist has a seam or not as the lady's hands are folded to cover it, but at least some looked like there wouldn't be any waist seam at all. I decided to draft the bodice and waistcoat skirts in one piece like in a jacket and see how it would look like in a mock up. The back pieces ended at the waist.
I drafted the riding habit sleeve narrower – a bit too much, as I couldn't even get the mock up sleeve on. Next version was larger, but I kept the wrist narrow as it would have an opening anyway. I also had to shape the sleevehead a bit. I pinned the sleeve first by following the old balance marks, but for some reason it began to look much better when I moved it about 2cm backwards. The final sleeve is still narrower than in the riding habit, has a smaller armhole and less fullness at the sleevehead.
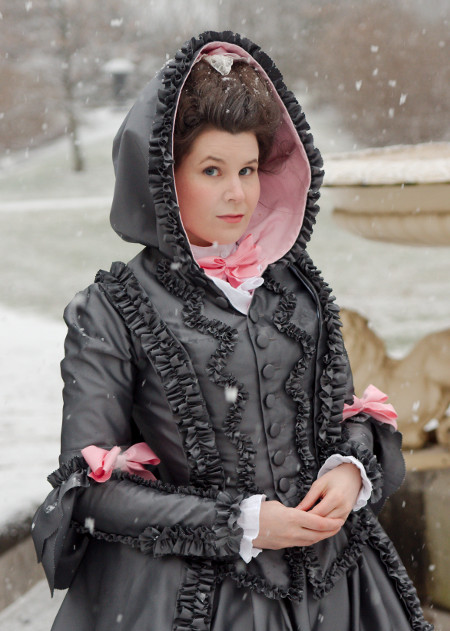
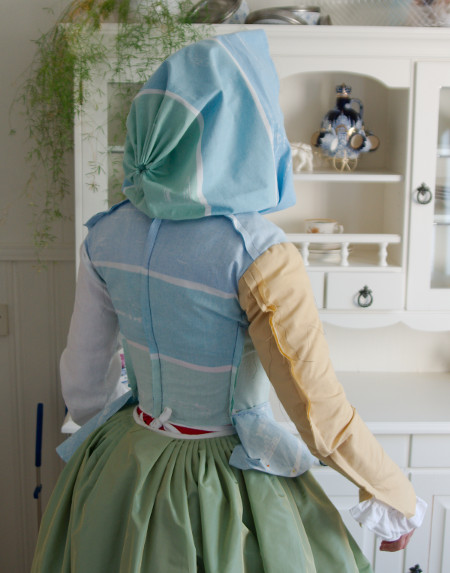
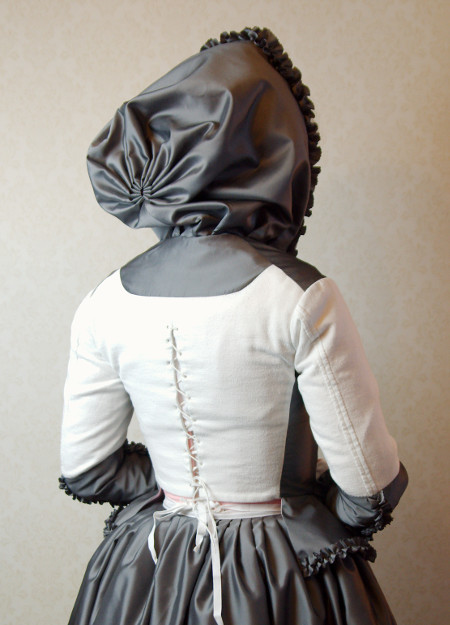
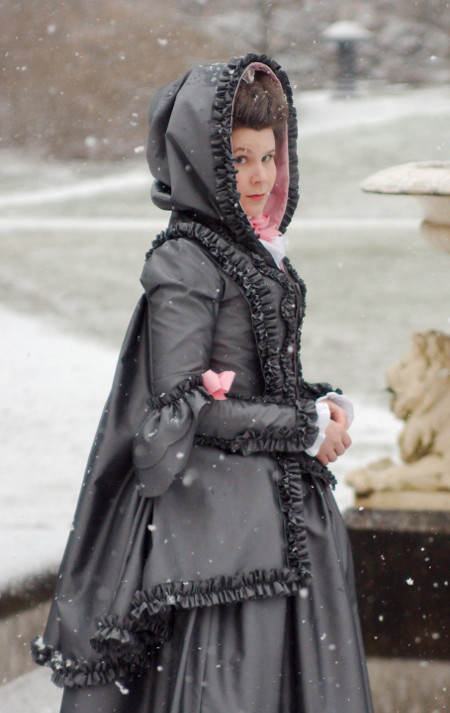
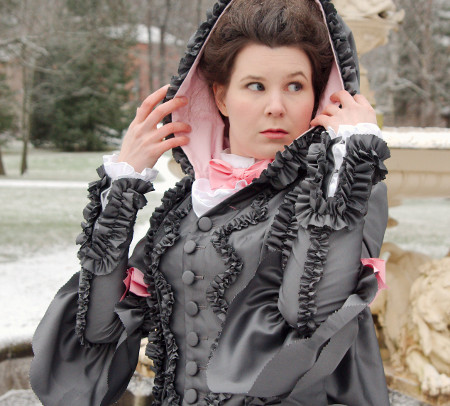
The hood came from my green taffeta cloak, I just cut it a bit less deep as it's not meant to be as large and cover half of my face from rain, but rather look pretty.

I tried the waistcoat mock up on over stays, habit shirt, quilted petticoat and a taffeta petticoat. The bodice was very nice, I just curved the front edge ever so slightly to match the shape of my new stays (The riding habit was made for my first, very straight pair of stays). The waistcoat skirts definitely needed a waist seam, though, as a huge fold formed at the waist. A fake waistcoat that was really just a continuation of the robe edged might work without a waist seam but a separate waistcoat clearly did not. Well, the seam was easy to add just by pinning the offending fold. I also pinned the front corners and skirts to the shape I wanted.
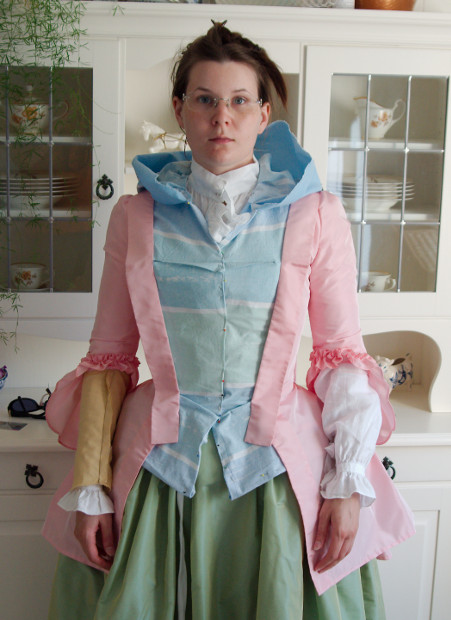
Then I put on my old pet en l'air. The sleeves were too tight as was to be expected but I could get them on, so just a bit extra room would be needed. I had already noticed that most bulk in the sleeve was caused not by the extra waistcoat sleeve but my loose habit shirt sleeves, which can't really be helped. Anyway, the whole outfit, not quite matching in colors at this point, though, looked very promising.
The front edges of the pet en l'air were left more open than with tighter stays and stomacher, but not way too wide, and the back lacing would also allow some adjustment.
The taffeta skirt that was made to be worn with pocket hoops looked surprisingly good ever a quilted petticoat, though the sides fell a bit too low as was to be expected. I would have to try to find a midway petticoat shape that would work with both quilted petticoat and pocket hoops.
I had thought I would have a pet en l'air pattern ready to use, but when I looked though the contents of the folder I noticed that the large back piece was missing. Of course, it can and should be just marked on the fabric or pleated on a person / dummy, but I'm usually at loss without the comforting paper pattern. The sleeve pattern was also very vague, and actually the whole pet en l'air could use some fine-tuning.

I began with the sleeve. I widened it for about 1,5cm and made a mock up. It was comfortably roomy but not baggy. I also realized that my former sleeve had been a bit too long, as it tended to fold, so I shortened it for 1,5cm. I also raised the armhole a bit. It may sound against logic but when the sleeve is tight the higher it goes at the armhole the more movement it actually allows – something I've learned with historical costuming. This particular sleeve still felt too tight at the front side of the armhole, so I opened the seam and let the sleeve settle where it wanted to. Obviously my armhole had been too deep at the front side, and the adjusted curve helped a lot. I pinned the sleevehead on the shoulder and marked the pleats, though they would probably need some adjustment still. The sleeve looked much better (though the mock up sleeve for the pink pet en l'air had looked fine too, while the real thing caused me endless problems), so I fixed the pattern according to the mock up.
I had used the
original pet en l'air lining pattern for the mock up. I fit
quite well over my new stays (it was originally made for my
first stays too), and I had worn the pet en l'air with them
too. As I was updating the pattern, however, I smoothed the
front edge curve a bit. I'm totally fed up with the flapping
front pleats of the pink pet en l'air, however, and had
decided that I would have to find some other way to make them
for smoother fit. I tried to pin a doubled strip of fabric on
the front edges, but there was no way that a straight strip
would settle smoothly.
I browsed through my 18th century file again to try and see how it looked in the period, and the result was everything between the pleats running over the bust with a narrow gap, the pleats running on the side of the bust with a large gap, occasionally there were visibly flapping pleats (especially on the earlier robes) but usually they seemed to follow the bodice very smoothly. My bust is rather small, but still my lining pattern is clearly curved at the bust. At last I decided to cut separate pleats shaped to match the front edge, if I read them correctly some of Norah Waugh's period patterns seem to have something similar. Perhaps the next time I'll devote more time to solve this mystery, but now I just wanted to get to cutting the damn dress.
The next thing in the list “what I'm not happy with the pink pet en l'air” were the skirts, especially the front edges which gapped way too much. The side pleats also started far too back, falling on the back of the dress. I reasoned that if I moved the side seam a bit towards the front the pleats would settle on the top of the hoop and give more volume on the front. When I moved the seam 2cm towards the front in the lining mock up it seemed to settle right in the middle of the hoops. I was a bit worried by the fact that in period patterns and pictures the side seam seems to settle a bit towards to back, but I decided to give it a try, with ample seam allowances of course.

The fabric
ruchings of Lady Mary's brunswick and also several others look
hemmed to me, but pinked ruchings appear too. Hemmed or turned
edges would of course have been sensible, durable and
washable, but I wanted for once frilly pinked rococo ruchings,
especially as the dress would double in finer wear, and they
would be faster to make, too.
This trick was, of course, disgracefully modern. But then again, period silk taffetas were often more densily vowen and didn't fray as fast as cheap modern subtitutes. The downside was that fabric edges get blackend in the process, but happily I was working with gray and black shot taffeta so it doesn't stand out too much.
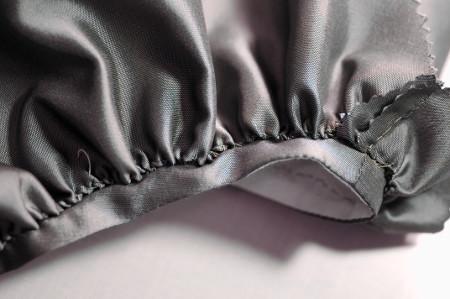
As mentioned above, I had originally intended to melt only hem ruffle edge, but midway the sewing I realised that my sleeve ruffles were fraying when I had just sewn them in. I melted the lower tedge super carefully but didn't dare to touch the top edge anymore. Wiser from this experience I melted all the other ruching strips before gathering and attaching them. I was slow and tedious and I had to be very careful not to burn a larger hole on the edge.

I had originally meant my pink pet en l'air to be a test version for a proper robe a la francaise, but as you can see, I just never got to the francaise. This project became in effect a new try on that: A good chance to refresh my memory about making a robe, which still is a bit of a mystery to me, fine tune the pattern and test new details.
I studied the blue francaise based on Arnold's “Patterns of Fashion”-pattern of the Rockin' the Rococo blog very closely. The amazing high quality photographs of the construction were a priceless source of advice, though for this project I took modern shortcuts now and then. I had already decided to make this dress using sewing machine quite much. Expect on the trimming, of course.
I made the back lacing on the lining by sewing a looped braid at the edges, which also had light plastic bones.
In my first pet en l'air the front edges are pinned to the stomacher under the pleats, which is a bit tedious. As the pleats would be more tightly fitted this time, and also sewn down at the lower ends I decided to try the trick seen in many robes, also the Rocking the Rococo one, of making a separate fold on the lining, ending a few centimeters from the front edge, and using it for pinning instead.
I made a wide fold in the lining and turned the edges under on the curving upper edge. Then I mounted the taffeta over the front linings, leaving the side seams and the waist still open. I sewed the shaped front pleats on the front edges, leaving them open at shoulder and waist.
As I mentioned earlier, I had lost the pattern for the back with pleat marks, so I made a new one. Measuring the pleats and calculating how much fabric they would take in total was actually a good thing to do all over again to learn it the better. I measured the side pleats from the old pet en l'air. Curiously I had found the pattern for the front skirt, but as the skirts had issues I decided to cut it straight and fit it later.
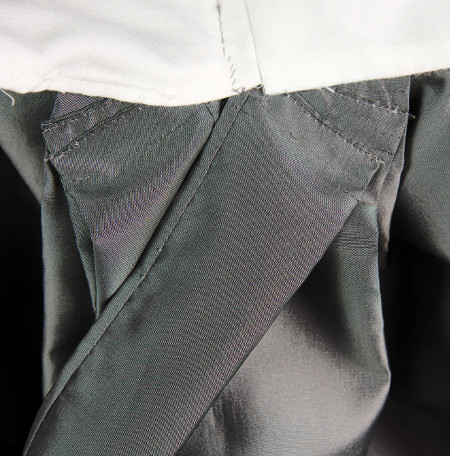
I marked the back pleats and the side slit on the fabric. I cut the pet en l'air from two widths of material with a back seam, so I cut a slit for the side opening. Like in the earlier pet en l'air I left the back 10cm longer, as it falls more gracefully than an even hem. I hemmed it by machine, as the hem would be covered by fabric ruching anyway.
I closed the shoulder seams of the lining at began to mount the taffeta on the back lining. I had the very smart idea (or so it seemed at the time) to sew the line of stitches fixing the underside of the pleating to the lining before making the pleats. Well, it seemed convenient to do at this stage. I also had the idea of putting this line of stitching a bit farther back than in the previous dress.
Then I pinned the pleats and sewed them down by hand. Now that I made the back pleating second time (or third, if the mock up for the pink pet is counted in) it went very smoothly. Then I folded the side pleats and sewed then together at the top.

I had in the first pet en l'air closed both the lining and top fabric side seams separately with the seam allowances ending up between the layers. The Rockin' the Rococo robe was apparently made by sewing most of the top together before mounting it on the lining. I decided to try to close first the lining seam, then baste the front over it and finally turn the allowances of the back piece under and top stitch it over the seam. I basted the front down to about 5cm from the waist.
At this point I put on stays and side hoops and put the gown on with the thought of fitting the front skirt and pinning it to waist seam. The mirror revealed that pretty much everything was somehow wrong.
First, the
back pinned on the side seam was somehow crooked. I pinned it
anew, which made the top part look slightly better, but the
biggest eyesore was still left: There was a large wrinkle at
the waist from the side seam to the stitch line under the
pleats. The back pleats did not fall gracefully down the back
but rather had a baggy, broken line ending up in an almost
straight hem.
I realised that moving the side seam towards the front may have been a mistake, as now there was a sad lack of fabric width in the back side instead. Happily I had at least cut the side seam with ample allowances. I took the dress off and pinned the back on the side seam anew, this time settling about 1cm backwards. I also formed the side pleats anew and pinned them on the new side seam. I also unstitched the stitch line under the pleats.
The pictures, of course are not from this stage but of the finished dress. It would be so useful to take more pictures of the work in progress, but I never do...

When I put the dress back on it looked marginally better. I carefully pinned the taffeta on the lining at the back, this time a few centimetres towards the side seam as the previous stitching had obviously been too far back. The waist wrinkles were reduced but the back pleats still would not fall all the way down.
I remembered
that I had based the pattern on the pet en l'air on Arnold's
“Patterns of Fashion” that had only the visible double pleats
without the additional deep pleat hidden under the top pleats
that long robes seem to commonly have. Now I realized that
this extra pleat is to give more volume to the back so that
the double pleats fall all the way down and don't get pulled
open by the wide hoops. Obviously the original pet en l'air
was just not made for this wide hoops.
This was, of course, a valuable lesson to learn, but a bit of a setback at this point nevertheless. As I had worn the pink pet en l'air with exactly the same side hoops and the back pleats work just fine I had no way of anticipating problems with this one. I wondered for a moment if I had measured the side pleats too narrow, as the front skirts were a bit too wide, but even this did not explain the mystery completely.
Now there was, however, nothing left to do but begin to work on the front skirts. That turned out another epic battle. As before, the front edge stubbornly wanted to go towards the sides, even after I had cut the top edge much lower than on the first pet en l'air. Finally I began to think that the side pleats didn't open enough, so I ripped their top edge open again and let them fall loosely. The skirts did settle better over the hoop and reach further front at once.
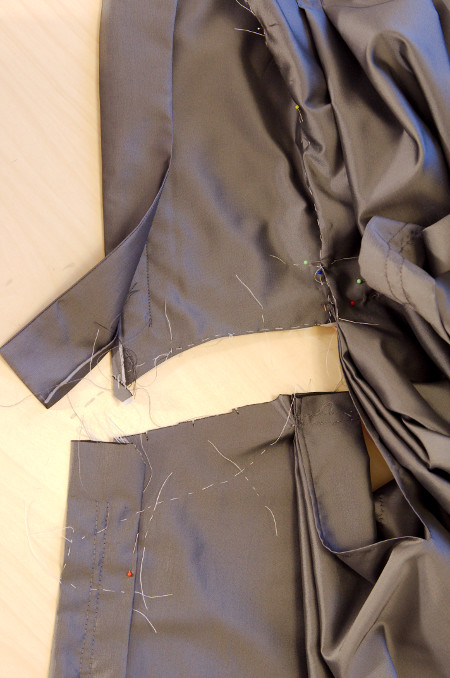
As the last resource I formed a pleat from the extra width on the front edge like one sees in many patterns in case it would alter the skirt shape. I don't know about that, but at least the pleat continues the front edge pleats nicely.
Getting the right angle for joining them smoothly was somewhat tricky, but at last I managed to pin them to my liking and quickly sewed them down. Then I copied the hem shape on the other side, trimmed the seam allowances and closed the waist seam. The extra seam allowances are neatened under the front pleats.
The damn side pleats were still causing me severe headaches, though. In the first pet en l'air I had sewed their top edges together and sewed them all on the lining at waist. Now the front skirts had showed me that the even top edge was not ideal, after all. After finishing the front waist seam I tried the dress on once more, smoothed the skirts over the hoops and pinned the side pleats down where they naturally fell. Instead of a neat little packet they clearly were happier as a fan. I neatened the top edges and sewed the pleats on each other, and the bottom one on the lining at the waist.
This new way of fixing the pleats in a fan-like fashion also meant that they fit over the hoop and did not all fall to the back side. The downside of this was, of course, that thus the back was left too narrow for the back pleats to fall properly, but as a whole the dress looked better than the first pet en l'air.
For the last
thing I sewed the back side down at the side seams and sewed a
new stitching under the pleats, more towards the side as I had
pinned it.
I did wonder for a moment whether fanning out the side pleats was appropriate at all, even though it felt the only logical solution. Rockin' the Rococo's side pleats seem to have an even top edge on the first sight, but on closer inspection I saw that the top edge was slanted. When I compared this to the pattern given by Arnold I noticed that the side pleats really were slanted and the waist seam of the skirts rose higher at the side seam. I could, of course, have studied the pattern more carefully to begin with, but as I was in the faith that I already had a good pattern that only needed some small adjustment I did not bother.
Anyway, as a consolation the pleats fell much better with the quilted petticoat I wore with the brunswick version. It was obviously just not designed to fit nicely over hoops.
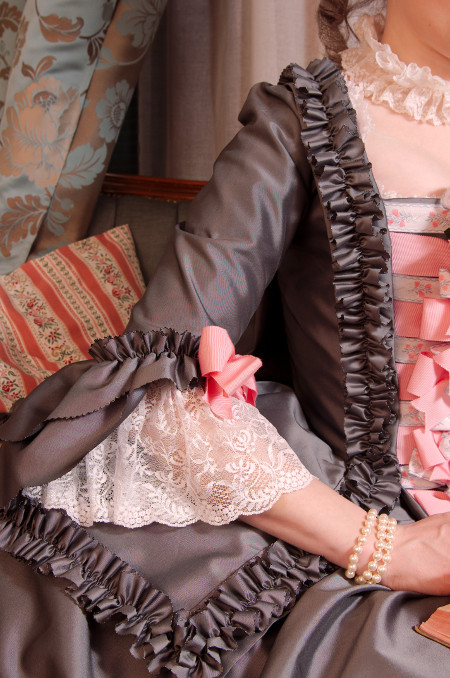
So, when the dress was more or less functioning it was time for the sleeves. I bag lined them quickly and then sewed on the elbow flounces. They come, as did the ones in the previous dress, from the same Arnold pattern used for the Rockin' the Rococo robe. In the first pet en l'air I made only one flounce, the middle one, but this time I added the top one too. I considered the third flounce too but calculated that my material might not allow that.
I cut the edges with pinking scissors and basted the flounces together at the top edge. This time I wanted to try to sew them on with the period correct “whipped gathers”-technique, so I marked them at regular intervals, ironed a fold on the gathering line, basted a gathering thread and then gathered the flounces and pinned them down following my markings to get the gathering distributed evenly. Then I sewed the tucks on the sleeve one by one from the underside, pulled the layers apart and carefully steamed over the gathering. The result was charming and also securely fastened.
Setting the sleeve was surprisingly easy, the pleats followed the pattern marks pretty well, which makes me very pleased with my new sleeve pattern. The slightly looser sleeve does not look too baggy without the waistcoat underneath either. After sewing the sleeves on I sewed down the rest of the front edge pleat on the shoulder, and finished the back neckline with the strip of taffeta sewn on top of it. The pet en l'air was now happily waiting only the trimming (More on that later).

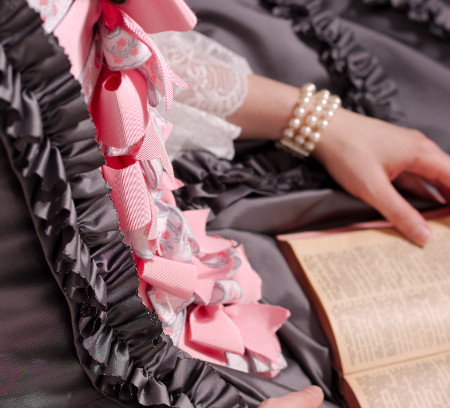
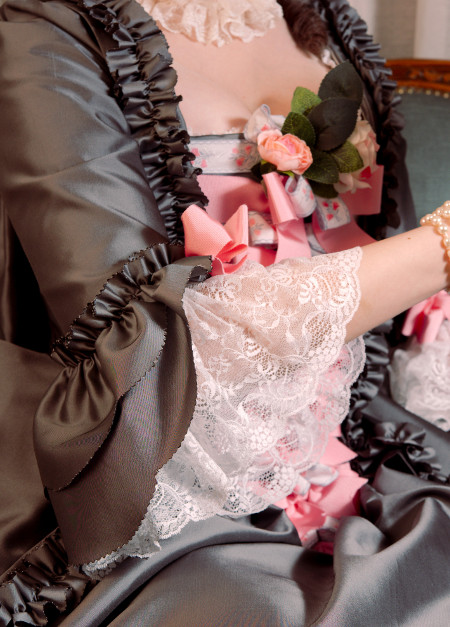
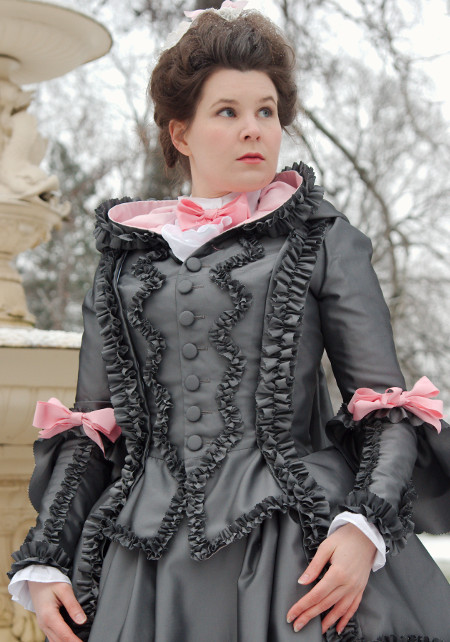
For the
stomacher I wanted to try the cascade of bows in the style of
Madame de Pompadour. Aside the pink ribbon I happened to have
some very pretty white ribbon embroidered with pink and grey,
and the combination of the two was so charming that I wanted
to use both. Measuring the remaining pink ribbon revealed that
I would actually have to if I wanted the bow-front.
When I gave
this some more thought I remembered that the only stomacher
with two different ribbons I actually remembered seeing was on
a Kyoto Costume Institute dress, and may well be a modern
addition made for the exhibition and not part of the original
dress. At last I decided that I allowed myself to take some
liberties with this project (I often do, anyway) and use both
ribbons even though lacking a documentation. I really liked
the visual idea of the refreshing bit of white among the pink
and the embroidery bringing the colors of the outfit together.
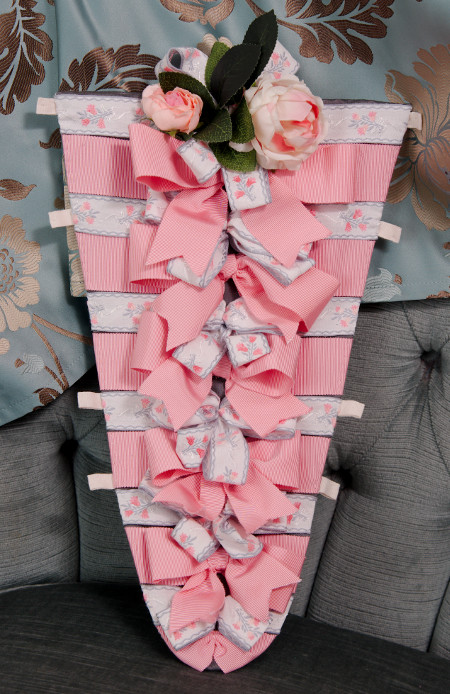
Then I began
to plan the ribbon placement. To save the pink ribbon, which I
had left less I decided to begin from the top with the
embroidered one. Then I sewed down the horizontal pink ribbons
first, gathering them at the center. I made up the bows
separate and added them at the gathered points later, as the
ribbon was so thick that actually tying the bows would have
made them way too heavy.
In most on the
pictures the stomacher bows seem to be all of the same size,
but when I tried them on the top looked empty and the bottom
too full packed. As the stomacher trimming was already
somewhat dubious I decided to continue in the purely
aesthetically pleasing line and scale the bows down towards
the lower edge.
Next I added
the embroidered ribbon between the pink ones. As it's ends
would need hemming and the underside was not very neat either,
I twisted it on double loops instead of bows.
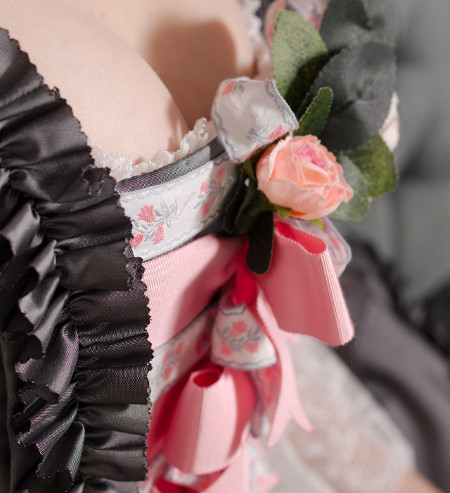
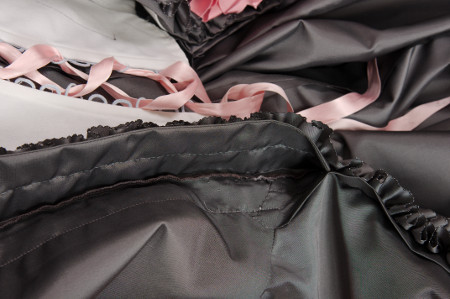
When I had all the ribbons sewn on and took a look on the stomacher I noticed, however, that my decision to place the embroidered ribbon on the top was not a very good one, it left the top looking a bit bare. Happily it struck me that in a proper rococo dress more is definitely more, and I could always add a fabric flower of two to fill up the stomacher top. I also happened to find a matching fabric rose from the stash (it's good to have a continuous color scheme, aka everything in pink). For the last thing I added small loops of cotton tape on the sides of the stomacher for pinning it on the stays and added a white linen lining to cover the ribbon ends on the underside. The finished stomacher was so silly and frilly it made me smile.
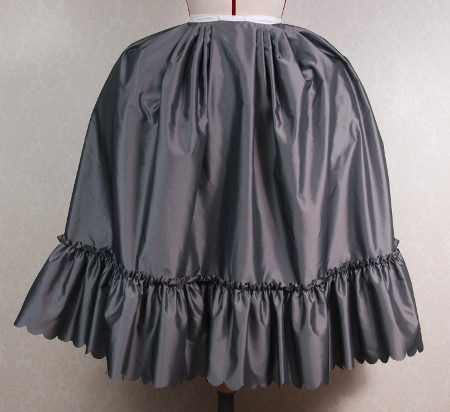
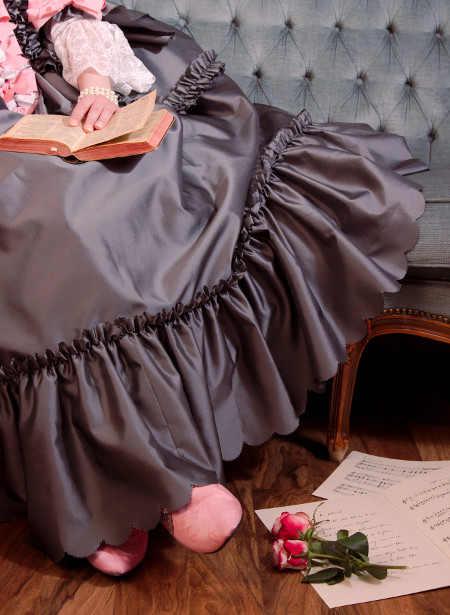
As the old taffeta petticoat I had tried on with the quilted petticoat drooped at the sides, I tried the quilted petticoat over the side hoops instead. It looked surprisingly good, so I decided to shape the petticoat to match the quilted one. I decided to make it practical walking length even though that meant I might have to shorten the quilted petticoat too to keep it from peeking under the hem ruffle.
I had begun to think the hem ruffle of my green taffeta petticoat a bit too wide, so I cut the ruffle only 30cm wide this time. By the standards of the period it's still quite wide. The ruffle took four fabric widths so the width was also determined by how much taffeta I had left.
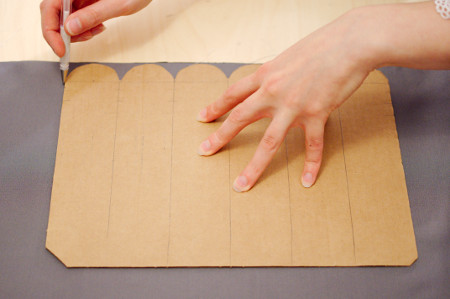
The scalloped edge on the green petticoat was also too large in scale. I made a cardboard sample with more delicate scalloping, traced the line on the taffeta following the edge and cut it with pinking scissors. Then I melted the edge very carefully.
I closed one side seam and hemmed the petticoat by machine as it would get hidden under the ruffle. I marked the line for attaching the ruffle and placed pins at regular intervals. Then I ironed the fold in the ruffle and measured the matching pins. Then I began gathering the ruffle with one thread and sewing it on with another section by section. This took a while but the result was very pretty. I left the ruffle ungathered for a few centimetres at both ends, closed the side seam, then joined the ruffle ends and gathered and sewed the rest over the seam.
I lowered the waist at the front by 5cm following the measurements of the quilted petticoat, but left the back top edge straight. At the center front I left 12cm straight and pleated the sides, but at the back I pleated the whole top edge regularly to match the shape of the quilted petticoat which was more volume at back and sides. When I tried it on with hoops the back seemed okay but the pleats on the front side had to be re-adjusted and moved further to the side to settle over the hoop. The petticoat also, somewhat disappointingly, dipped in the center front and back lower than the stiffer quilted petticoat had. Well, I suppose that can't really be helped if you want to wear the same petticoat both with hoops and without. It looked just fine with the quilted petticoat however, so if one version out of two was successful I guess I should be happy with that.

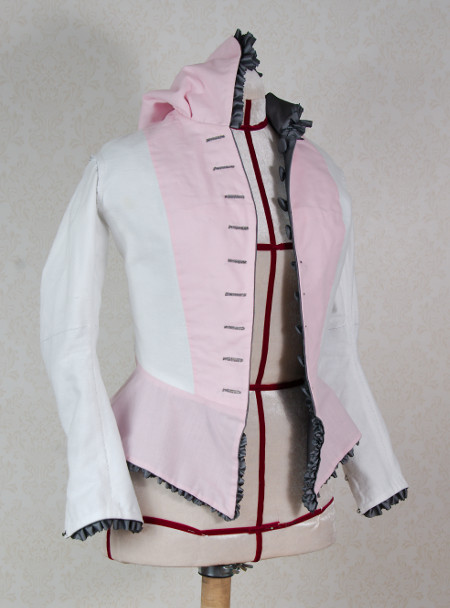
I made the back of two layers of flannel, bag lined at the lacing edges and lower edge. I covered the neck are visible from the pet en l'air with the gray taffeta. Then I left the back to wait for the lacing eyelets.
On the front I first joined the bodice and skirts at both taffeta and lining and then baglined the fronts at the front edges and hem. At other edges I basted the layers together. Then I marked the buttonholes on the lining and sewed a guiding stitch around them.
On the flannel sleeves I left the seam allowances on the right side. On the upper arm I turned them under and sewed them down by hand, on the lower arm they would be covered by the taffeta. This looks a bit curious but makes sense in a way. Then I made up the taffeta part and bag lined the the lower portion of the sleeve with it. The more stretchy flannel stubbornly wanted to peek out in the corners, but happily the fabric ruchings would disguise it. I sewed the top edge of the taffeta on the flannel by hand.
Next I began to work on the previously prepared front and back pieces. The back got eyelets, which I decided this time to make the easiest (period correct) way possible: Instead of my regular round of stitches around the eyelet and dense buttonhole stitch to cover it I just opened the eyelets with an awl and whip stitched loosely around them. I would not, after all, have to lace the back all the time from the start like stays, and the eyelets wouldn't have to take very much strain either, so why be overly meticulous? The dense buttonhole stitch also looks great if the thread shade is even slightly different from the material, but white on white disguises the not so neat whipping stitch quite well. The eyelets were fast to make and still period accurate.
The buttonholes on the front side are done with great care instead. Happily I had, for once, found a perfectly matching silk thread. It was a bit tricky to estimate the right tenseness for the supporting threads on the sides, as I have made most of my hand-made buttonholes on wool which is much more elastic. Some of the buttonholes ended up crumpling the material a bit, but mostly they are quite neat.
On the hood I first sewed the ruffle on the taffeta, leaving both ends open. This way the stitches wouldn't show on the lining. Then I bag lined the hood and gathered the back. After finishing the front buttonholes and back lacing I closed the shoulders seams of the taffeta layer and sewed the hood on. Then I pinned the lining on the neck and shoulder seams and sewed it down by hand.
Now that the front top edge was finished I could make the last buttonhole close to neck. I also sewed the fabric covered buttons on the other side. While trying on the buttoning I found out that the buttonholes were a bit too tight – I had been super smart to measure the length with an uncovered button without taking into account how much thickness the extra allowances tucked under the button would add. Happily I still managed to just push them through the buttonholes with a little twisting and tweaking.
At this point I basted the side seams and
tried the waistcoat on with the pet en l'air. The waistcoat
was a bit tight, but happily the side seams had ample
allowances. It looked very cute with the pet en l'air,
however. I pinned the line of the pet en l'air edge, opened
the side seams again and basted the line. Then I put the
waistcoat on my dummy and began to plan the trimming.
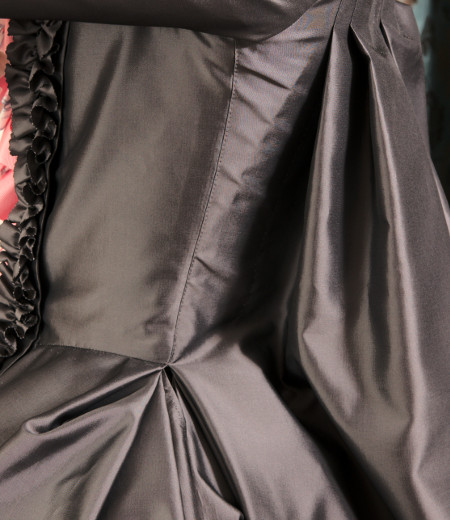
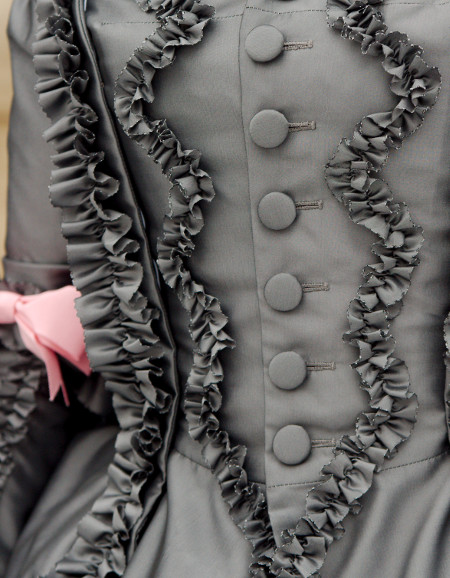
Lady Mary's waistcoat front is trimmed with a single vertical pleated strip on each side. First I had thought to follow this, but after looking at some seriously charming zig zag shaped ruchings, which seemed to be very common on brunswick fronts, I wanted to go for the frilly look too. The waistcoat front and sleeve seams would get a narrow ruching and the pet en l'air edges, hem and waistcoat sleeve ends and hood edge a wider one. I pinned taffeta strips on the waistcoat front and decided on a zig zag line that followed the shape revealed under the pet en l'air, wider at the bust, narrowing down and continuing on the waistcoat hem.
After some experimenting I decided on a 3cm wide ruched strip cut two times the finished length for the fronts. The wider ruching for the rest would be 5,5cm wide cut 2,5 times the finished length. I had noticed that the narrower strip need less gathering for the same effect. The wider ruching could have been gathered even more densely, but as the ruchings took more material than I had originally estimated I now calculated that the remaining material would be just enough for this gathering.
I gathered the
ruchings like I had done on the hem ruffle on measured
intervals, except catching only every second or every third
tuck. This may be a bit over-meticulous technique compared to
just gathering a strip and sewing it on from the top side with
running stitch, but at least it gave an evenly gathered
result.
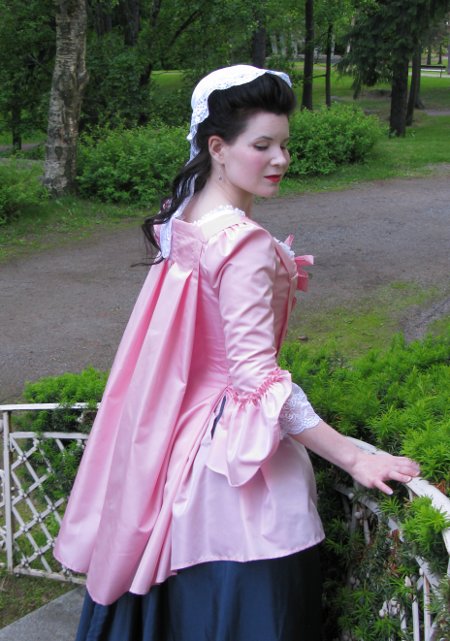
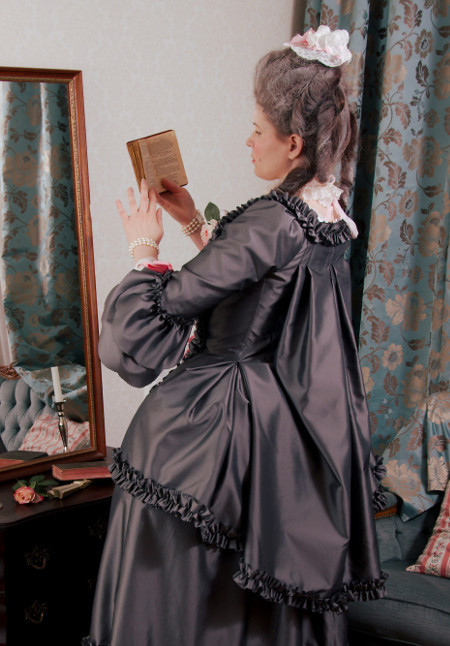
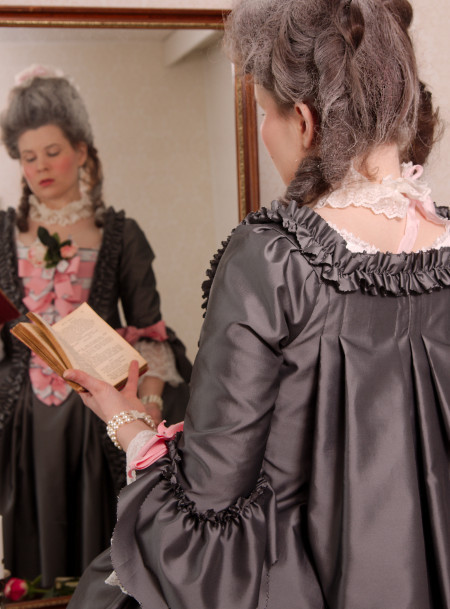
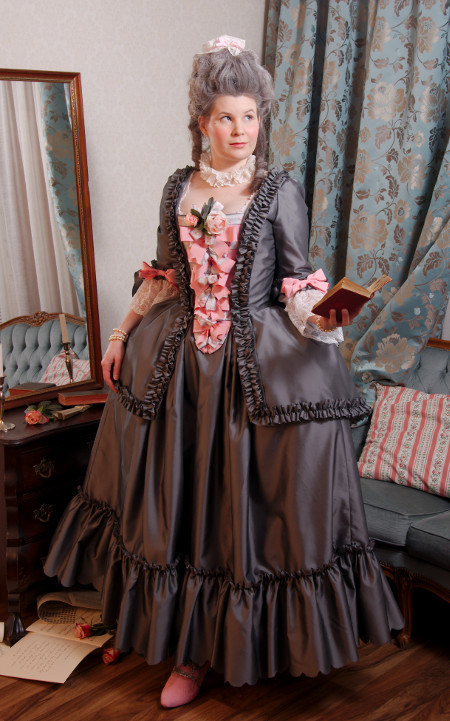
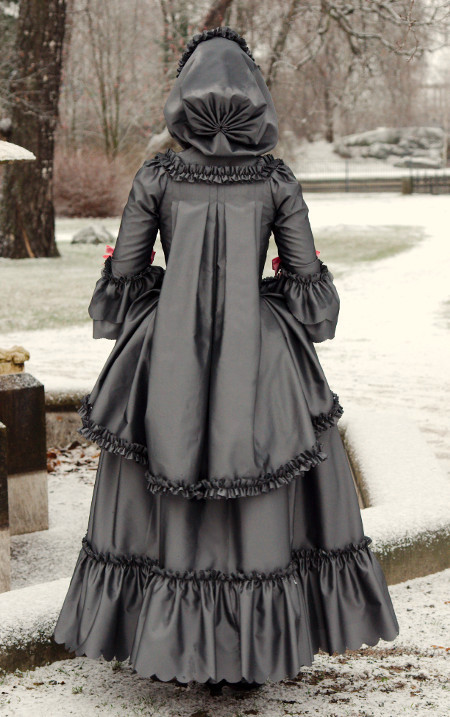
In the end I have to say that both versions of the outfit turned out quite nice, though the brunswick may just be my favorite of the two. Although the romantic snowfall happened to accompany the photo shoot it is not really outerwear for winter (for autumn, maybe), but add a cloak and it becomes a lot warmer for a chilly weather.
The lighter version is very pretty too, and the combination of them is very practical for traveling: you get both the day and evening outfit with less luggage (though you have to drag the quilted petticoat along of course) and the polyester taffeta doesn't even get wrinkles in a tightly packed suitcase.