
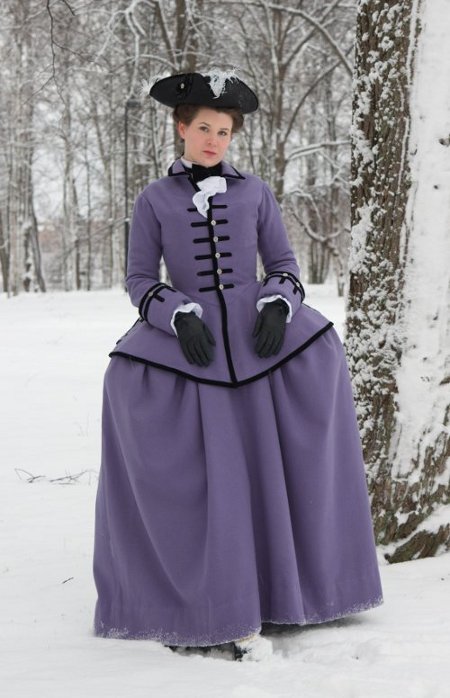
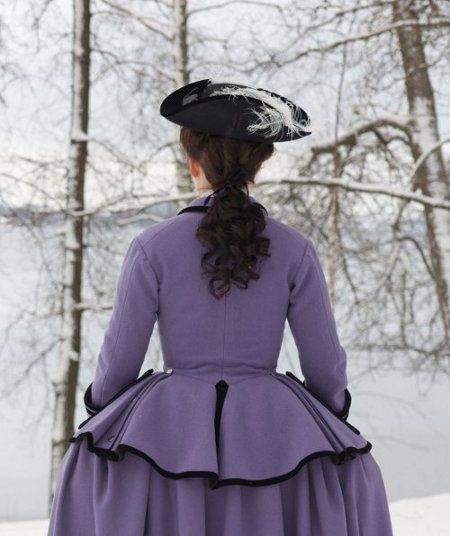
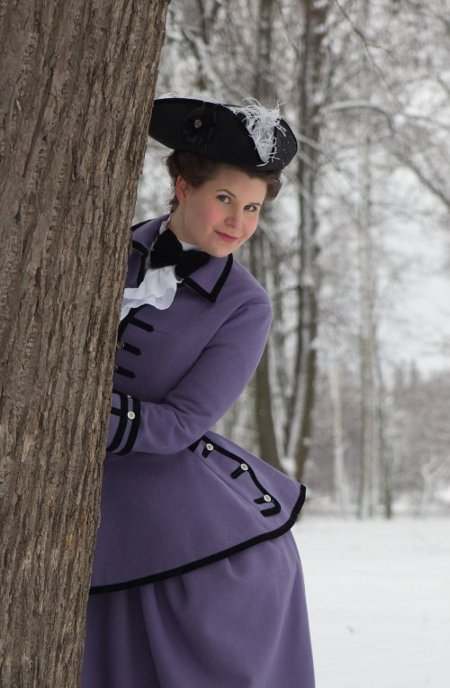
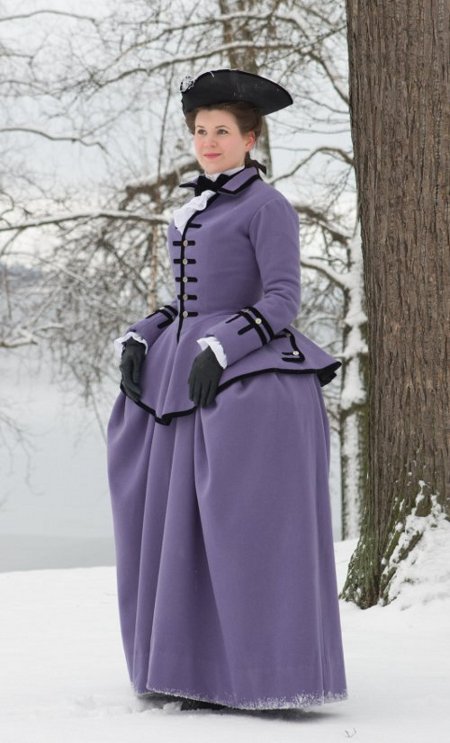
Riding habit, 2010
Riding habit was a fine lady's equivalent for modern outdoor sportswear. Being warm and relatively practical it was used for riding, walking and also for traveling. Riding habits were strongly influenced by men's fashion and were also often made by tailors. The finest habits were elaborately trimmed and worn over fashionable hoops.
I had two reasons for wanting a riding habit: First, they look great, and second because occasionally weather may be chilly on re-enactment events.
Choosing
the style
One of the paintings that inspired me was Desmarees' portrait of the Electress of Bavaria (1740's). It's a perfect example of the masculine, almost military details combined with feminine gracefulness.
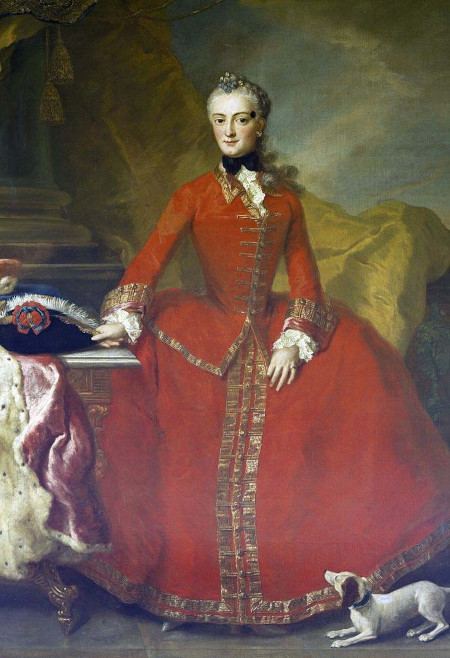
Maria Anna Sophia of Saxony,
attributed to Georg Desmareés
For a long time I planned to make a red riding habit, as it was popular at the time, but perhaps I googled too many red habits and finally got bored with the idea. I also already have a red winter coat with black trimming so in a way I had already done that. I began to fancy some shade of blue instead, until I ran into a material that I just could not leave in the shop.
When the fist thing you do on a holiday trip is to take the tube to a fabric store you seldom leave without a plastic bag (or several). Holiday shopping has an impulsive nature as we all know. Anyway, my great find was a lovely wool, thick enough, all wool and still quite affordable. I instantly fell in love with the color, lavender blue or lilac depending on the light. I was not sure about the color being quite period correct, but I had to have it anyway. It can't be that far off.
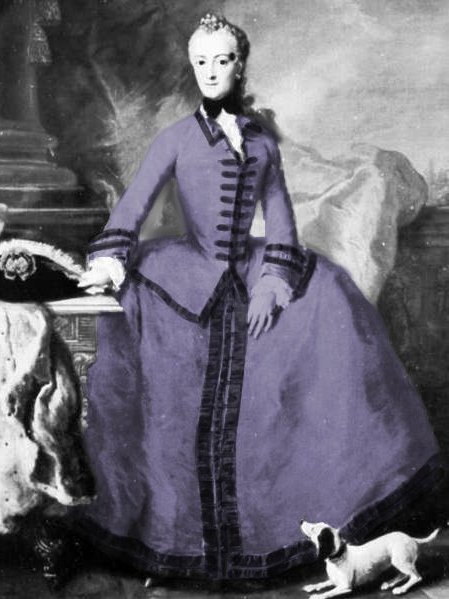
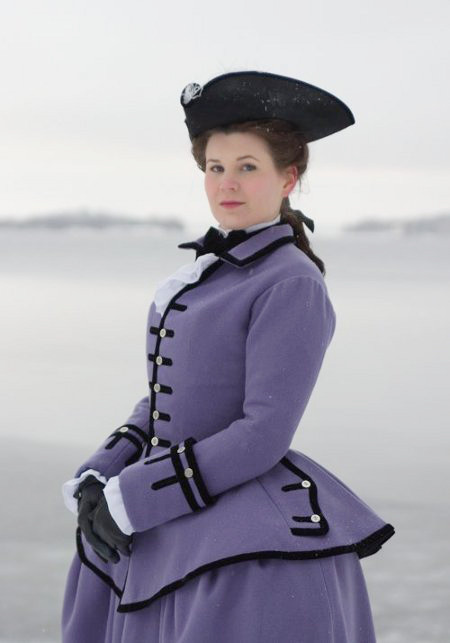
The Electress' habit is a classic red one trimmed with elaborate gold braid. Trimmings in gold (or silver which would have gone better with the lilac) would have turned the habit too over the top for my pretty yet relatively practical vision, and I couldn't get rid of the idea of the black trimming. I tried out this idea with a quick photoshopping with the original painting, and the result looked very cute. Black gave some geometrical sharpness to the fluffy lilac, and even though the feeling of the combo was probably closer to victorian aesthetics than 18th century ones I fell in love with it.
After some thought I decided to leave off the trimming on the skirt. On the other hand it looked interesting, a bit reminiscent of 16th/17th century, but I was afraid that in black it would look way too heavy. Besides, that would take an awful lot of braid, so leaving it off would also serve my budget. And of course it could always be added later.
The next step was choosing the trimming. A thick silk ribbon or some kind of braid might have been the most suitable option, but hard to come by here and expensive. Anything in cotton might look too faded. The best option I found was velvet ribbon: it's affordable, looks fancy (yet not too polyester-shiny), and it comes in many different widths, as the trimming combines several. The downside is that it obviously only came to use late on the century while my habit is dated to the 1740's. Thus my visual idea began to look even more victorian.

I have often thought about what kind of garments I really want to create. I have to confess that historical accuracy is not my top priority, I just can't seem to bother to do enough research nor limit myself to following it very strictly. I'm inspired by both authentic garments and paintings and also movies and other such sources. The amount of time, money and effort spent on each project also plays a great role in the outcome. In short, while I was aware that my riding habit to be was in many ways far from period accurate, I just couldn't abandon a favorite idea but decided to go on with lilac and velvet braid.
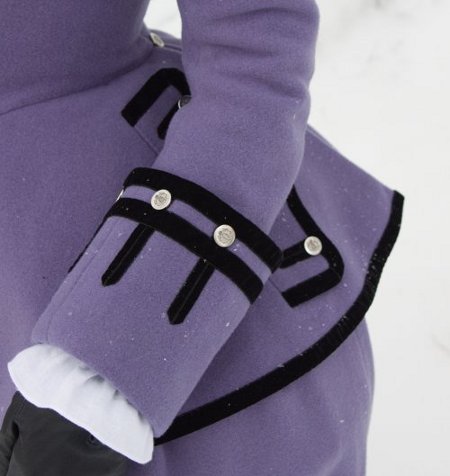
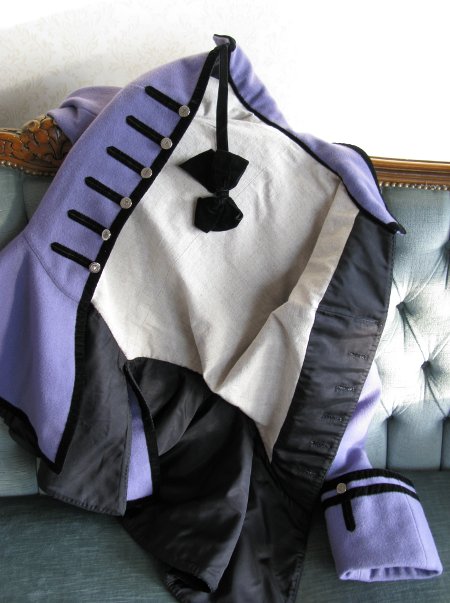
Choosing the buttons was another problem. Black velvet buttons would be the secure, but boring choise. I had several options for metal buttons and at last settled on ones that looked too shiny at first but in the end added the right touch of lightness to the dark trimming.
Drafting the pattern
While my design choises may be a bit controversial my patterning sources were quite orthodox. The jacket is based mostly on the riding habit in Janet Arnold's "Patterns of Fashion". The jacket bodice is based on my polonaise lining combined with my modern jacket pattern for the higher neck part. The breast dart is turned horizontally towards the front edges. The skirts of the jacket, as well as the pocket and collar are copied from Arnold's book, only slightly widening the waist to fit me. The collar seemed a bit odd to me on paper but worked quite well on the mock up.
I copied the sleeve from the book, only lengthening it a bit. I made the cuffs larger that in Arnold's pattern, however, to match those in the painting. This project seemed to be lucky, since the only thing I had to alter in the first mock up were the skirts, which were too narrow to fit over my pocket hoops. A bit of flaring easily fixed that.
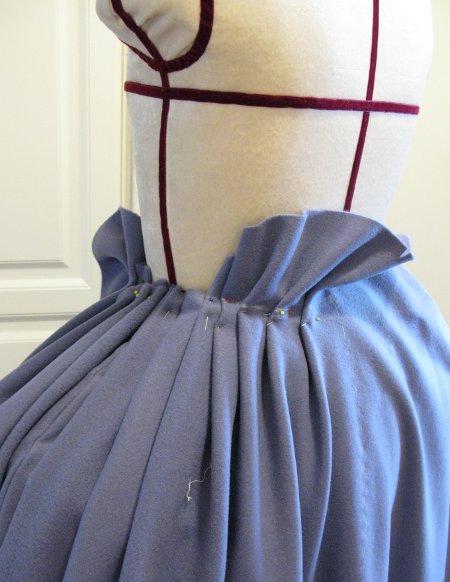
Petticoat
I began with the skirt so that I could fit the jacket over that. The hemline is cut straight and the variation in length caused by the hoops is evened at the waist. Due to the heaviness of the material pleating the waist was a lot more work than usually. I basted the pleats before sewing them on the waistband, and once again remembered just why I love my strong industrial sewing machine. As the skirt was so heavy I decided not to trust only the tied waistband ends (which are always hard to get tight enough without assistance), but added sturdy hooks and eyes on the waist openings. Closing them is a bit challenging too, but when closed they stay securely so.
Jacket
For the interlining I used heavy line. Sewing it on the thick wool was delightfully fast and easy compared to most other materials. I put interlining on the front edges, neck, the pocket's place, pocket flaps, cuffs, back and side vent edges and the sleeve where the buttons would sit.
I lined the jacket with two different materials like the one in Arnold's book: The bocide with sturdy cotton-linen mix and the skirts, sleeves, cuffs and pocket flaps with black triacetate satin. Let's just pretend it's silk, okay?
I began the jacket as usual with pocket flaps. As the wool doesn't fray I worked only some not very close blanket stitching on the buttonholes to fix the lining before sewing the velvet ribbon on top of them. Sewing the velvet ribbon went quite fast, as the stitches dissapperared on the narrow edge so well that they didn't have to be very small and neat. The curved edge of the flap with a wider ribbon was of course a bit slower. I also realised that the usual way of making the top material turn turn slightly over the edge didn't look as good when both the lining and edging were blackm it would be much easier to just make the lining reach the edges, as I then did on other parts of the jacket.
As the mock up had seemed very promising and my deadline was approaching fast I decided to make the jacket without more fittings, save setting the sleeve. This made working faster as I didn't have to leave extra seam allowances or leave room for alterations on the construction. There was, of course, the question of how much the thickness of the finished jacket would alter the fit compared to my flimsy mock up - I added some allowance and hoped for the best.
First I made up the bodice (of course trying it on hurriedly) and lined it with the cotton-linen mix. Like the jacket in Janet Arnold's book the front edges of the lining are covered with black "silk", as the jacket might also be worn open over a waistcoat. I bag lined the front edges and sewed the wool and lining together at armholes. The top buttonhole is made on the breast dart seam.
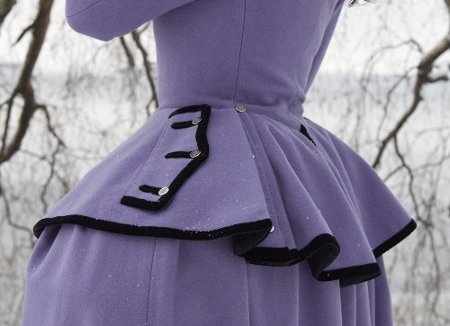
Next I made up the skirt pieces: Inserted the pockets, pocket flaps and buttons and bag lined the pieces. I added a handstitching on the edges to make sure they would keep their shape. Then I pressed the pleats on the side vents and worked buttonholes for the buttons closing the vents. Then I sewed the finished skirts on the bodice and added a hand stitching to keep the seam allowances where I had pressed them. For the last thing I sewed the skirt lining to cover the seam on the inside.
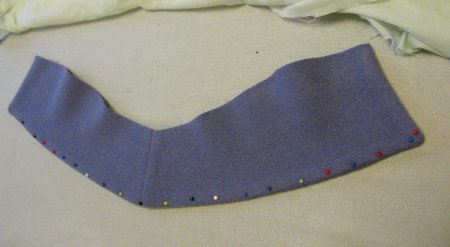
The collar followed. As the material was so sturdy I decided to skip interlining altogether, which would also enable me to shape the collar with steam. After sewing the top and underside together I steamed it quite wet and pinned it to dry, strething the outer edge to make it fit better. When it was dry I handstitched the edge and sewed on the velvet ribbon.
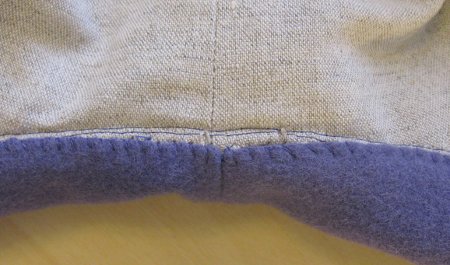
Then I sewed the underside to the neckline and began turning under the edge of the top side to cover the seam only to realise that even though I had cut it wider it was still too narrow to reach the seam. I had to sew the raw edge on the seam and cover it with a ribbon. Having finished it I realised that it actually looks very nice and turning the seam allowance would have probably made the inside of the collar very bulky, so my miscalculation proved to be for the good in the end.
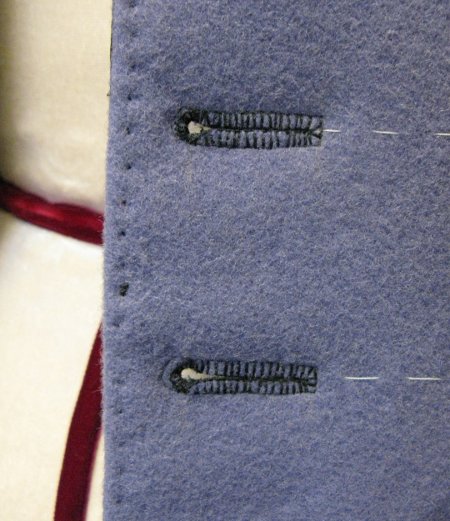
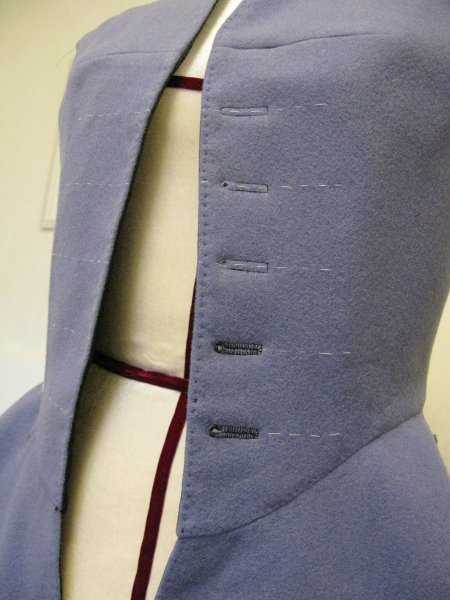
I still put off the sleeves, which would only be on the way, and took the opportunity to work the hand stitching and buttonholes on the front edges. I marked their palces with machine stitch, reinforced them with loose blanket stitch and then added velvet ribbons. In the other side I sewed corresponding velvet ribbons to imitate the same effect. As riding habits were largely made by tailors they also had the buttoning on the men's side, so I made mine according to the same tradition.
I had made the cuffs at an early stage, as small pieces are convenient to carry around in my handbag and work on them when I have time. As the deadline was approaching fast I spent one night in a summer cottage party sewing with a headlamp while others were drinking (clearly this hobby is good for my health) and on the last days before the event I was even temporarily cured of my internet addiction.

As the mock up had looked so good I decided to make up the sleeves without further fitting. This time, unlike in Jarno's 18th century suit where I made a modern sleeve end, I lined the sleeves down to the edge and sewed the cuff on the inside separately. The end of the cuff is finished by turning the lining over the wool.
Setting sleeves on an otherways finished garment which one should be wearing very soon is always an exciting, if not terrifying moment. Perhaps I got some kind of compensation for all the hardships with the Pet en l'air as the riding habit behaved bewilderingly well until the end. The only alteration I had to make was to set the sleeves a bit higher than my marked seamline, which was probably caused by the finished collar being wider than in the mock up. On a closer look the sleevehead has a bit too much fullness, but at this stage of the project I was overjoyed that the sleeve fit relatively well and sewed it on. All that was left was sewing the rest of the buttons and the ribbon on front edges and skirts.
Accessories
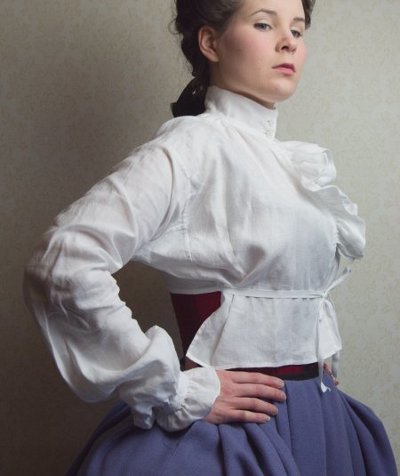
I had made a so called "habit shirt" following the original piece in "The History of Underclothes" (C. Willet & Phillis Cunnington). Later I have learned that some consider this to be misdated and actually belonging to Regency period. Be that as it may, it works and the only things that show from under the jacket are collar and ruffles. More on the shirt on 18th century underwear.
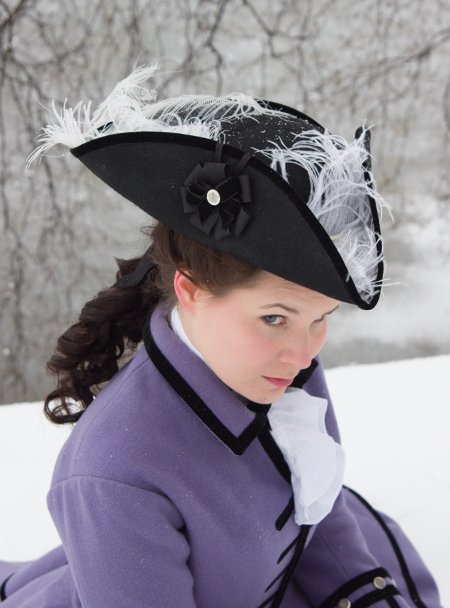
I also needed a jaunty tricorn. Due to schedule panic I just bought a cheap fancy dress tricorn, tore out the gold braid and re-trimmed it with the remains of the velvet tape. More on that at 18th century hats - page. For the last thing I quickly put together a neck bow in wider velvet ribbon.
Conclusion
The riding habit was a very nice and relaxing project, as everything went so smoothly from start to finish. I am also very happy that despite the hurry towards the end I didn't fall for the temptation to cut corners, telling myself I'd finish it later. I'm also very pleased with the finished outfit, though of course there are some minor issues, like the jacket which could well have fitted a bit tighter at the waist. Better this way, though, as I had planned the jacket for more relaxed use I don't have to lace very tight now.
The other problem is that the heavy skirt pulls my pocket hoops downwards so that the hemline looks a bit heavy. I should have left the waist more even in spite of the hoops (actually the skirt in the portrait rises at the sides too), but there is no way I'm ripping the waist open any time soon.
And of course the habit doesn't have quite as slender silhouette on me as on the Electress, but that's mostly due to the fact that I haven't been introduced to tightlacing at the tender age of five and it's a bit late to shape ribcage at this age without massive surgery.