Stays,
2013
Having made four pairs of stays for myself I finally had the courage to begin a pair for a friend. Well, actually I still felt kinda unsure about my skills for fitting stays but as my friend Ida's old, much worn pair was almost falling apart I had to try. The last pair I had made for myself had been so easy that it was actually good to get to work with something more challenging.
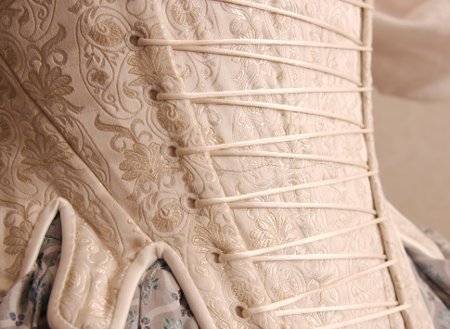
Ida's old stays were originally made as a court dress bodice for another person, and ended up to her in somewhat altered form which laced over a stomacher. Ida wanted the new stays also be fully boned like it, but happily she was okay with a fancy top material disguising the channels, which would save a lot of work in sewing them. She also wanted to keep the wide front lacing, which was quite welcome to the still rather inexperienced staymaker as it gives ample fitting allowance. Ida did not want a back lacing, as she wanted the stays to look more bodice-like so that she could use it in pastoral inspired dancing costumes. The lazy staymaker also agreed on this as it would save the trouble of second set of lacing eyelets.
Drafting the pattern
The project began by trying on Ida's old stays and deciding what to alter. As previously mentioned, it had originally been made for another person, and as Ida had laced it tighter the back was now too wide and the side front pieces came too far forward so that the bust was not supported enough at the sides. The front in general could well come higher too. The waist could also be a bit narrower.
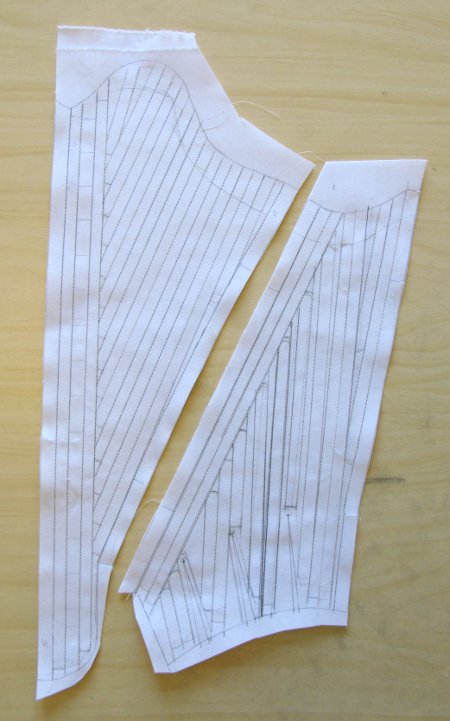
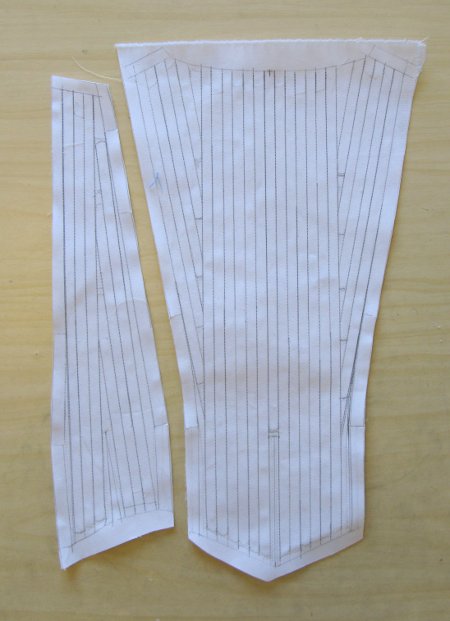
The stays had an even center back piece which narrowed towards waist and a wide side / side front piece with a hidden side seam with some shaping in the boned layer. I ended up drafting a new pattern based on the stays with three pieces and a stomacher, like the one I have used for my front laced stays. I've had good results with it and understand how it works.
I drafted the center front piece based on the old stays, only making it a few centimeters narrower at the center back line. On the side piece I drafted a slanted seam from the side of the lacing on the waist to underarm, thus creating a separate side-front piece. Then I curved the side piece in between so that the waist was reduced by 3 cm, and drafted new tabs.
The old stays were boned on 5mm steel boning all over, and Ida wished similar boning on the new pair. I had boned my first pair of stays on steel, and had much trouble finishing the bone ends so that they would not break through the fabric, so at first I was very reluctant to begin a fully boned pair with steel boning. Happily our resourceful friend Riikka had in her stash both lots of inexpensive steel boning and metal caps for the ends. She also taught me how to fasten the metal caps fast and securely using two pliers.
Planning boning layout for fully boned stays required some effort. As they would not show on the finished stays I could cheat a little of course, but it still took me some time and many drafts before I had final patterns for them.
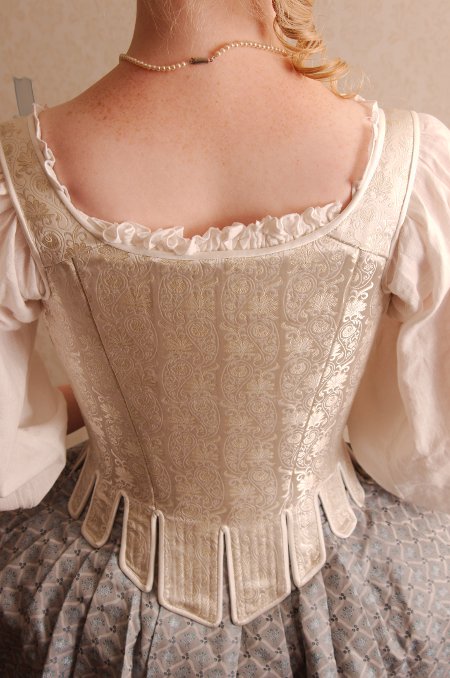
I followed the old stays in the center back piece and the side-front pieces. The side front piece has bones on each side of the front lacing and the rest of the bones are parallel to the side seam. On the back the bones are parallel to the center back until they hit the edge of the tab in the waist, the rest of the bones follow the side-back seam. The center back piece is split into two wide tabs at the waist. The bone at the center ends at the top of the tab so that there is some unboned allowance left for binding.
I also shaped the side-back seam a bit, adding 5mm at the waist on both pieces. It both gives the binding allowance for tabs and at least in my stays a bit more comfortable fit.
The front and back usually go easy, but the side piece has proved tricky before, and this time was no exception. The wide side piece I was dealing with now seemed to require quite a complicated boning layout, so I decided to simplify matters a bit by separating an extra side-back piece like in my light blue stays. I placed the boning channels parallel to the seams, meeting at the middle, leaving binding allowances at the tab edges. As the seam was straight I decided later to cut the top layer as a single piece, however.
In the first mock version on the light blue stays I had tried boned tabs with the bones ending at waist like in period stays. It did not work at all, but I reasoned back then that in fully boned stays with narrow, dense boning it might work better. Thus I decided to give it another try on Ida's mock up, because that's what mock ups are for, really. My personal favorite was the technique introduced to me by Sanna K. from Rococo Atelier, where the tab bones are extented far beyond waistline where they cross the long bones - that way they support each other and there is no sharp angles at the waistline. But of course, it does not work in fully boned stays.
Anyway, I was still somewhat sceptical about the short tab boning, so I decided to try something else on the other side of the mock up. After browsing through my sources I picked the mid-century stays in Norah Waughs "The Cut of Women's Clothes 1600-1900". It has a side-front piece very similar to mine, and the side piece has two bones parallel to the side-front seam, and the rest are vertical continuing down to the tabs. Some of the vertical boning might be a bit tricky to insert as the bones next to the seam close it, but otherways it seemed sensible so I decided to choose it for my second boning option. On the most angled tabs I added a few small bones. As usual with period stays, the boning is much narrower that what you can get nowadays, so that alters the boning layout a bit.
The first mock up version included almost all the vertical bones but no horizontal ones yet. Jarno was great help in cutting the boning while I put the end caps on. The first mock up version had a back lacing for adjustment, and we tried it on with the old stomacher.
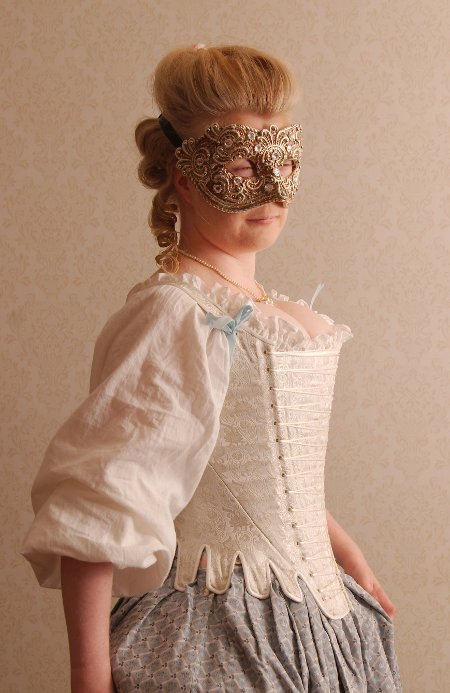
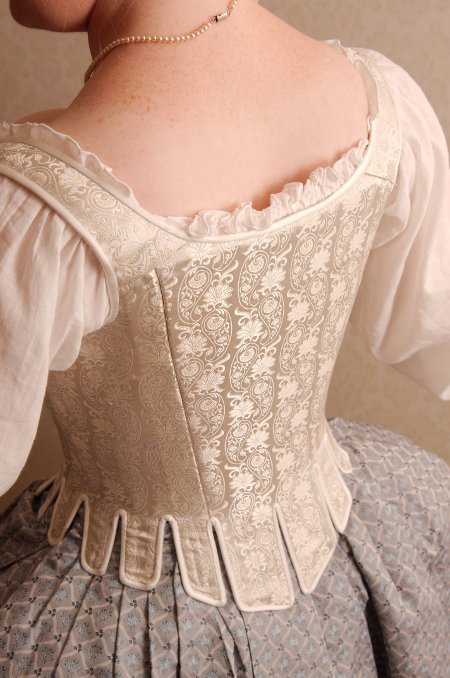
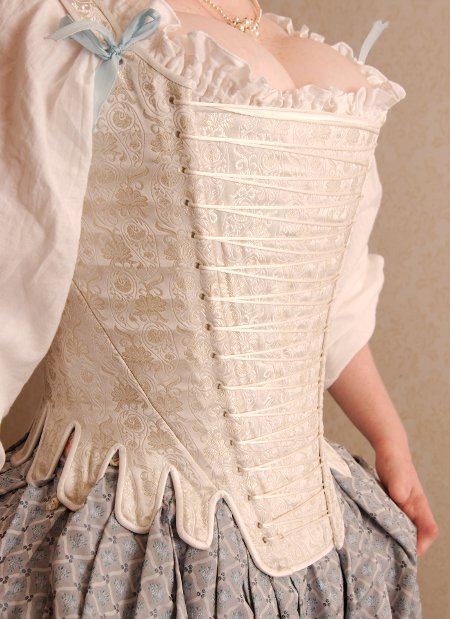
The mock up was rather good, with a few alterations of course. The higher front edge gave more support to the bust and the stays created a nice cone-shaped silhouette. According to Ida it also felt comfortable enough.
As I had anticipated, the side piece with the tab bones ending at waist was the one uncomfortable part, it looked like the bones might stab the waist soon and also created an uneven, sharp line at the waist. I'm not sure where the problem lies exactly, whether it's the bone width, steel versus baleen or just something in the boning layout, but it just didn't work. The other side with vertical boning was much more comfortable, but as the steel did not bend much there was not much curve at the waist. Anyway, it seemed the better option of the two so we decided to go with it.
The narrower back piece supported the back better and gave more moving allowance for the arms, but on the waist there was a 3cm lacing gap. Thus I ended up widening the pattern at the waist and drawing the boning channels anew. With the narrower back the original shoulder strap had to be reshaped a bit too. On the front it looked like the side front top with the shoulder strap eyelet could be just a bit higher still, and this time it seemed go too far on the side and chafe the arm, and not quite cover the stomacher at the top. As the waist was okay I decided to add a very moderate 1,5cm curve on the top of the side front seam like on the stays from the last quarter of the century to give more room for the bust.
And no, unfortunately I don't have any pictures of this mock up on Ida. While I realise it would have been much more informative than just my rambling I didn't come to think of it at the time.
On the next mock up I added the extra bits on the side front piece, made a new complete back piece without lacing and the second side piece with vertical boning.
The vertical boning in the sides was clearly better, but even in this option some bones ended midway the tab and stabbed poor Ida on the hip. On the other hand random bones ending above the waistline didn't give any trouble as long as there were other full length bones around to support them. So I decided to make yet another plan for the side piece boning. This time I placed them a little apart so that each bone either ended just over the tab slit or reached the bottom of the tab. Needless to say, this cheat would be out of the question with visible boning channels more typical for the fully boned stays, but as I did not have all the time in the world at the moment to dedicate myself to searching the mysteries of 18th century staymaking I decided with Ida's blessing that this solution was good enough for now.
While trying out different boning options I realized that in the original stays the tabs were cut to continue straight on the boning direction, meeting at the hidden side seam, which enabled the boning to continue all the way down. I had reshaped the tabs which forced me to go for other boning options, but as Ida liked the new style of tabs so I decided to keep them and cheat with the boning instead.
Sewing the stays
Beginning the real stays was postponed further because I had managed to break my last feed dog when assembling the mock up in hurry (never sew over a steel bone!), and I had to wait for a new one to arrive. The good thing in that was that for once I made all the preparations with care instead of rushing to begin and then get annoyed when I'd have to clear the table for cutting something while I wanted to get on with the thing.
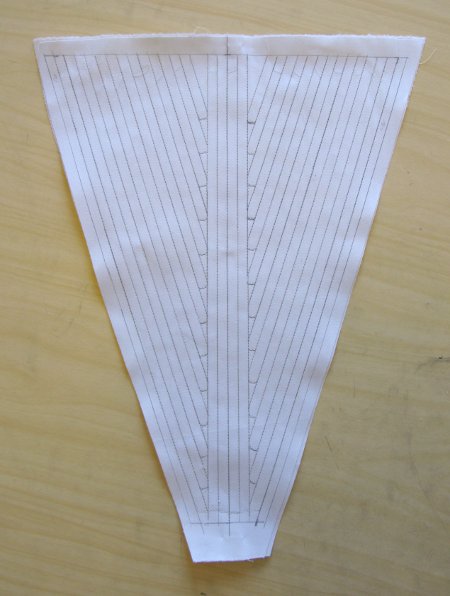
This time I cut the lining, traced the patterns and boning channels on coutil, cut and pressed the bias tape for the binding and other necessary stuff beforehand. When I finally got the feed dog I could just sit down and start stitching. Stitching the boning channels went surprisingly fast as they didn't have to look hand sewn.
I joined the side piece and the side-back piece to a single one, pressed the seam allowances open and stitched them down. Then I began to insert the boning on those and other pieces.
Like mentioned earlier, the mock ups had already had most of the vertical boning cut by Jarno, but with the fitting alterations some boning channels and bone lengths had changed a bit. I had also left the side piece bones uncapped yet anticipating changes. As we had tried the mock ups on with the old stomacher I did not have the stomacher bones yet either. And what's more, even though I had tried to be very precise in tracing the boning channels some of the diagonal ones had somehow mysteriously ended up different length on each side.

I began removing the bones from the mock up in pairs, inserting those that still fit. Pretty soon I ended up with a heap on homeless bones, and began to try where they would fit if not the channel originally intended for them. After some considerable time I had managed to cap and insert almost all of the already cut bones, at times trimming them a bit or cutting them into several shorter ones. For the last thing I took out the rest of the boning and cut the ones I still needed, mostly for the stomacher, and the horizontal ones to be added later.
All this fuss with the boning took quite much time, and once again I was reminded of the old truth of the first piece being almost the hardest: If I had worked with a ready pattern without preparing for any alterations I could have measured, cut, cap and insert the boning effectively at the same time, which would have gone much faster. Well, maybe next time.
The finished stays have in total 141 bones and about 27,6 metres of steel boning.

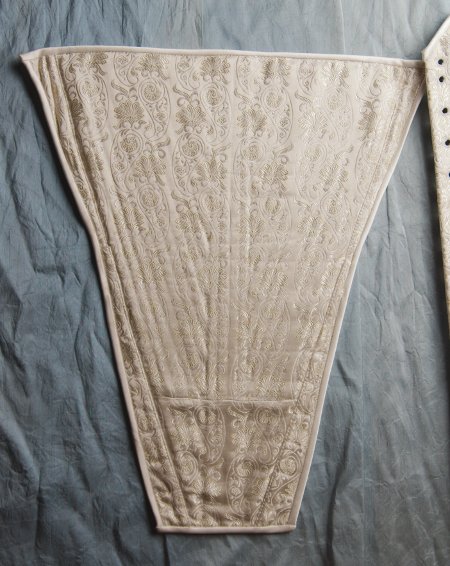
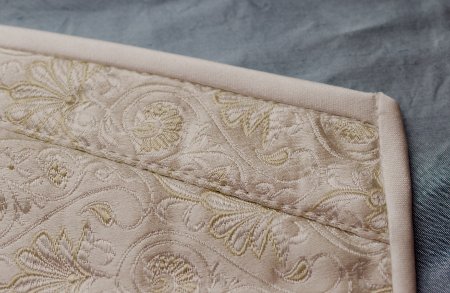
I closed the boning channels with a stitching at the edges and a few centimetres lower at the underarm. Then I placed the boned coutil pieces on the top fabric. The top fabric Ida had chosen was a bargain piece of a beautiful cream-gold brokade, probably polyester. As it seemed very eager to fray I had tried to put an iron-on interfacing on it, but it simply refused to stay on the satin underside so I gave up.
The brocade piece was so short that I had to resort to piecing. At first I thought of back piece waist, but then realised that on stomacher it would hide quite well under the lacing.
I joined the base and the top material on the front lacing edge and on other edges just stitched pieces of the top material with ample allowances on the top of the boned base. On the seams I trimmed the allowances to 1cm and neatened them with zig zag, again to keep the material from fraying.
Next came the lacing eyelets. Usually I tend to make eyelets on bus or coffee breaks during a longer period of time, but due to the impending ball I now made them during a few days.
Then it was time to move on to the back. I joined the center back piece to the side pieces, sewed the shoulder straps on and bound the seam allowances down by hand.
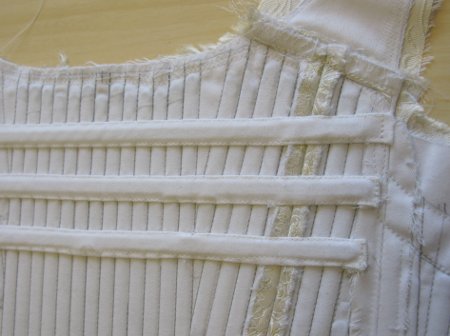
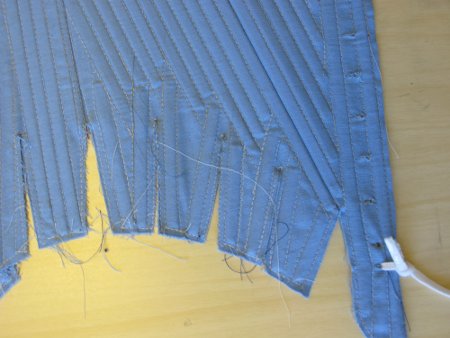
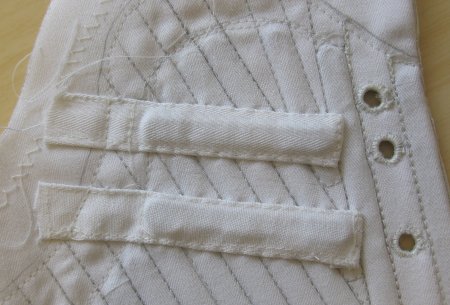
I had cut separate coutil tubes for the horizontal boning and stitched the edges and ends. I pinned them on and sewed them on the boned base. It was quite heavy work, but made a bit easier when I finally came to think of a curved needle.
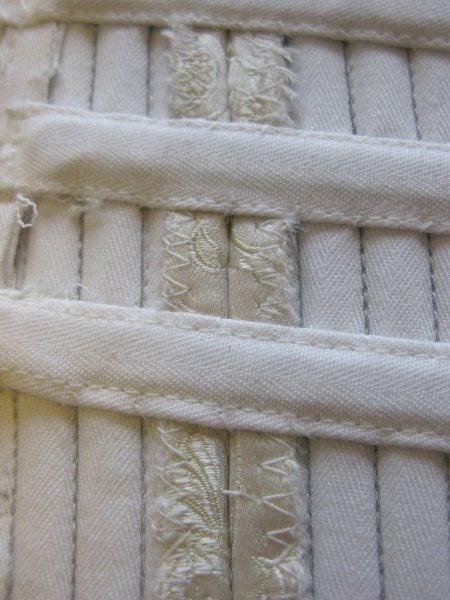
On the stomacher I added three horizontal bones at the top and two lower. For them I used wider boning left over from my pocket hoops. I also added a few short bones on the side-front piece top to further support the bust.
When there was nothing more to do for the individual pieces I joined the side-front piece on too. On the joining seams I used heavier thread and sewed them with two rows of stitching. I used zipper foot but nevertheless I couldn't get the stitching right next to the boning channels, but a few millimeters extra room would not hurt.
I had in past clipped the seam allowances on the tabs even where the tab slit originates from a joining seam, but already in my last pair I had experimented with extending the allowances down the tab slit and just turning them under. I did so now too, reasoning that it would make the construction more durable.

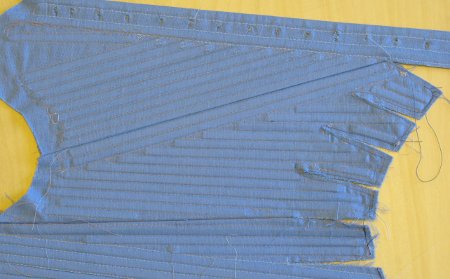
Now the stays were a single piece (save the stomacher of course), and with all the boning it began to be quite stiff and heavy to handle. Next I made the linen lining and pinned it on. I stitched the edges through all layers, which began to be a challenge even for my industrial machine because of the thickness. The bottom layer was easily caught on the feed dog ridges on the sharp turnings on the tab slits and wrinkled. Finally I was able to trim the edges and open the tab slits, just leaving some fitting allowance still on the side front top.
I have usually reinforced the edges with blanket stitch under the binding, but due to the schedule I now decided to try and zig zag them too. The top edge was easy, and I got around the bottom edge too though I had to turn the heavy and stiff stays a lot. While handworked blanket stitch goes quite fast machine is of course always faster so I may use this trick again. Of course I still did some extra reinforcing by hand on the tab slit ends.
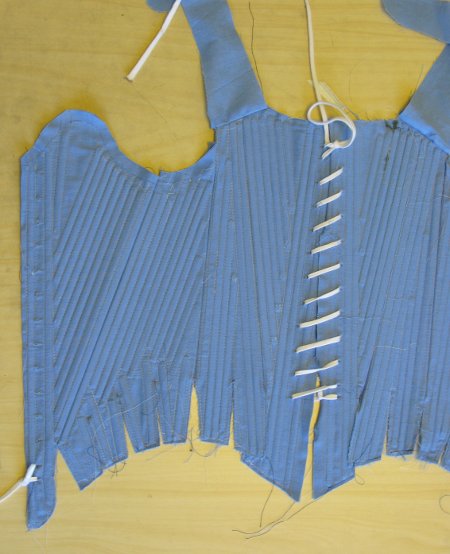
Now it was time to try the stays on for the first time. At this point there wouldn't be much possibility for alterations, though. Unfortunately, as I maybe should have been able to anticipate, the stays had ended up just a bit smaller than the mock up as the material was thicker and did not give in under strain. This caused the side-front top edge digging into arm again. I reshaped it narrower as much as I could without touching the boning. The stomacher was also a bit narrow at the top edge, so I decided to add small extra pieces at the sides, which would pretty much be hidden under the lacing edges. Otherways the stays seemed to fit nicely.

For the binding I used thick off-white satin, leftovers from a wedding dress I had made for a friend. I cut and joined the bias strips in a hurry and only when pressing them I realized that I had joined them without paying any attention to the weave direction. I reshaped the ends on many of them and joined most anew, so that in the end I had a long piece of bias tape with almost invisible piecing. Well, at least I learned well how to make satin bias tape!
I bound the bottom edge by hand but tried to make the top edge on machine this time. As the edges were so thick my stitching line missed the underside edge of the tape at some places, but I finished those by hand. For the last thing I made lacing eyelets on the shoulder straps and the neckline sides.

Up to this point I had made the stays with great care and precision, especially as it was made for someone else, but as often happens, towards the deadline the hurry and also exhaustion tempt one to cut corners. This is especially true when you have to begin fixing your mistakes. Thus the extra pieces on the stomacher top are not very neat, especially on the underside. The re-made binding is not that great either, happily it doesn't show when the stays are on.
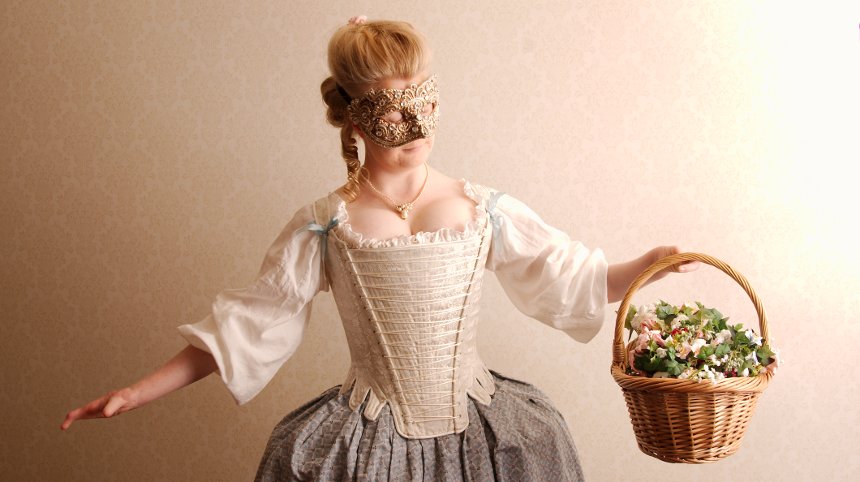
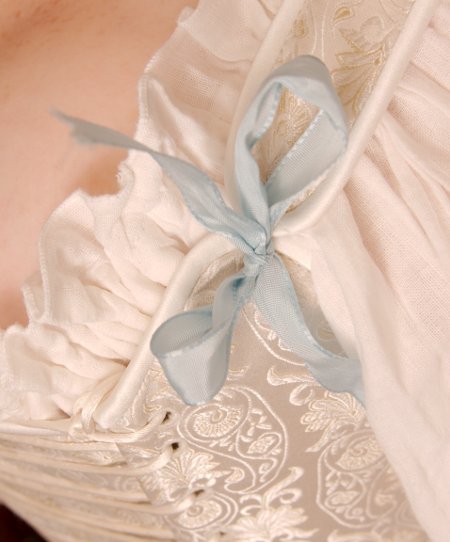
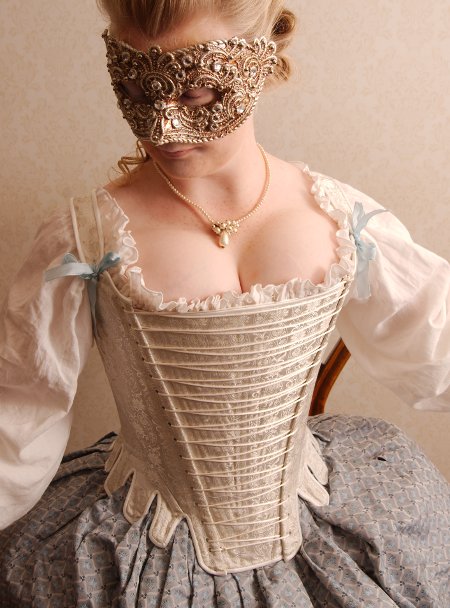
Ida tried the stays on quickly on Tuesday on the of the ball. She felt they were a bit tight at the waist but thought it was just about her skirt waist being crumbled underneath or stomach swelling, and promised to try them on with more time at home. The next day she was convinced that they really were too tight. As it would be a masked ball, Ida would wear the stays visible in a pastoral fashion, and obviously the petticoat and under-petticoat waist took just a bit too much room under the already tight stays. So, the one thing left to do was to rip off the stomacher binding again, find the last scraps of the material and widen the bottom edge too.
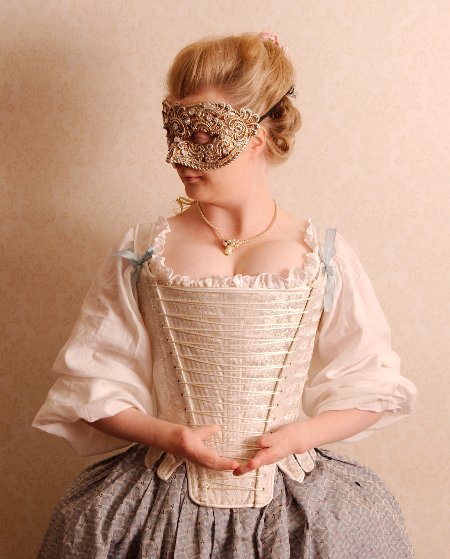
I was rather unenthusiastic about touching the formerly neat stomacher, but happily the few extra centimetres were enough for a more comfortable lacing. When I arrived on the event site on Saturday I met a happy laced Ida who assured me she wouldn't be likely to faint. Unlike at the top, the extra pieces on on the bottom edge show when the stays are on, but happily the lacing disguises them somewhat. Normally the stays are hidden under other clothing, of course, and then the comfort is the main thing.
On the afterthought I realized that we had tried on the mock up stays with the stomacher from the old stays, which had seemed convenient at the time. Then I had just cut the new stomacher to match the size of the finished old one, not considering that the boning would shrink it considerably. I was also generally not prepared for the space the boning, even in slim steel would take in fully boned stays. Another thing I'm beginning to learn is that when using coutil you can't count on the stays stretching after wearing them a few times, as they do with some inferior materials.
I'm still annoyed about making the stomacher too small in the beginning, as it would have been so easy to make wider in the first place. I think I was trying to avoid the opposite problem I've had in the past, especially with my red silk stays, that is the too wide stomacher peeking out between the front tabs. Anyway, I learned some valuable lessons here.
Conclusion
Apart from the size issues and the stomacher fiasco I'm quite happy with the stays. It's always a bit exciting to sew for another person, especially stays which are hard to fit and often only show their true nature when worn. Estimating the right amount of tightness and support is also difficult when you can't feel it yourself. The ideal way would of course have been to make a mock up pair on a sturdier material and have Ida wear it for a few times, but now the schedule forced to get on the sewing stage quickly. On the other hand, the first stays are seldom perfect.
Fully boned stays were and interesting project. For an 18th century costumer they are in a way a thing that has to be done at least once, and honestly I have to admit that I wouldn't have been in a hurry to make them for myself, so it's a good thing I was talked into it. Okay, in a way a fabric covered fully boned stays are bit of a cheat, but apart from the side piece the boning patterns are quite neat and could be left visible if they were only stitched more carefully. The side piece boning still remains a mystery to me, though, but I may be crazy enough to return to it some day.
Personally I'm still not a fan of steel boning on 18th century, though the steel caps and learning the technique of inserting them made working with them a great deal easier. Time will show if they wear the edges or not. I still think steel is too stiff and doesn't bend enough at the waist, though I must admit that it supports a fuller bust very well. Steel boning also keeps the front profile straight unlike the plastic which curves outwards with your belly, but then again the period solution for this was a wide wooden or steel busk at the front.
With this project I actually grew very interested about the mysteries of fully boned stays, and even though I don't feel that I need a maximum amount of support or tightlacing myself I may experiment more with it them the future, perhaps with my distant dream of a French court dress...